1lumen selects and reviews products personally. We may earn affiliate commissions through our links, which help support our testing.
FireflyLite X1S Pharos review
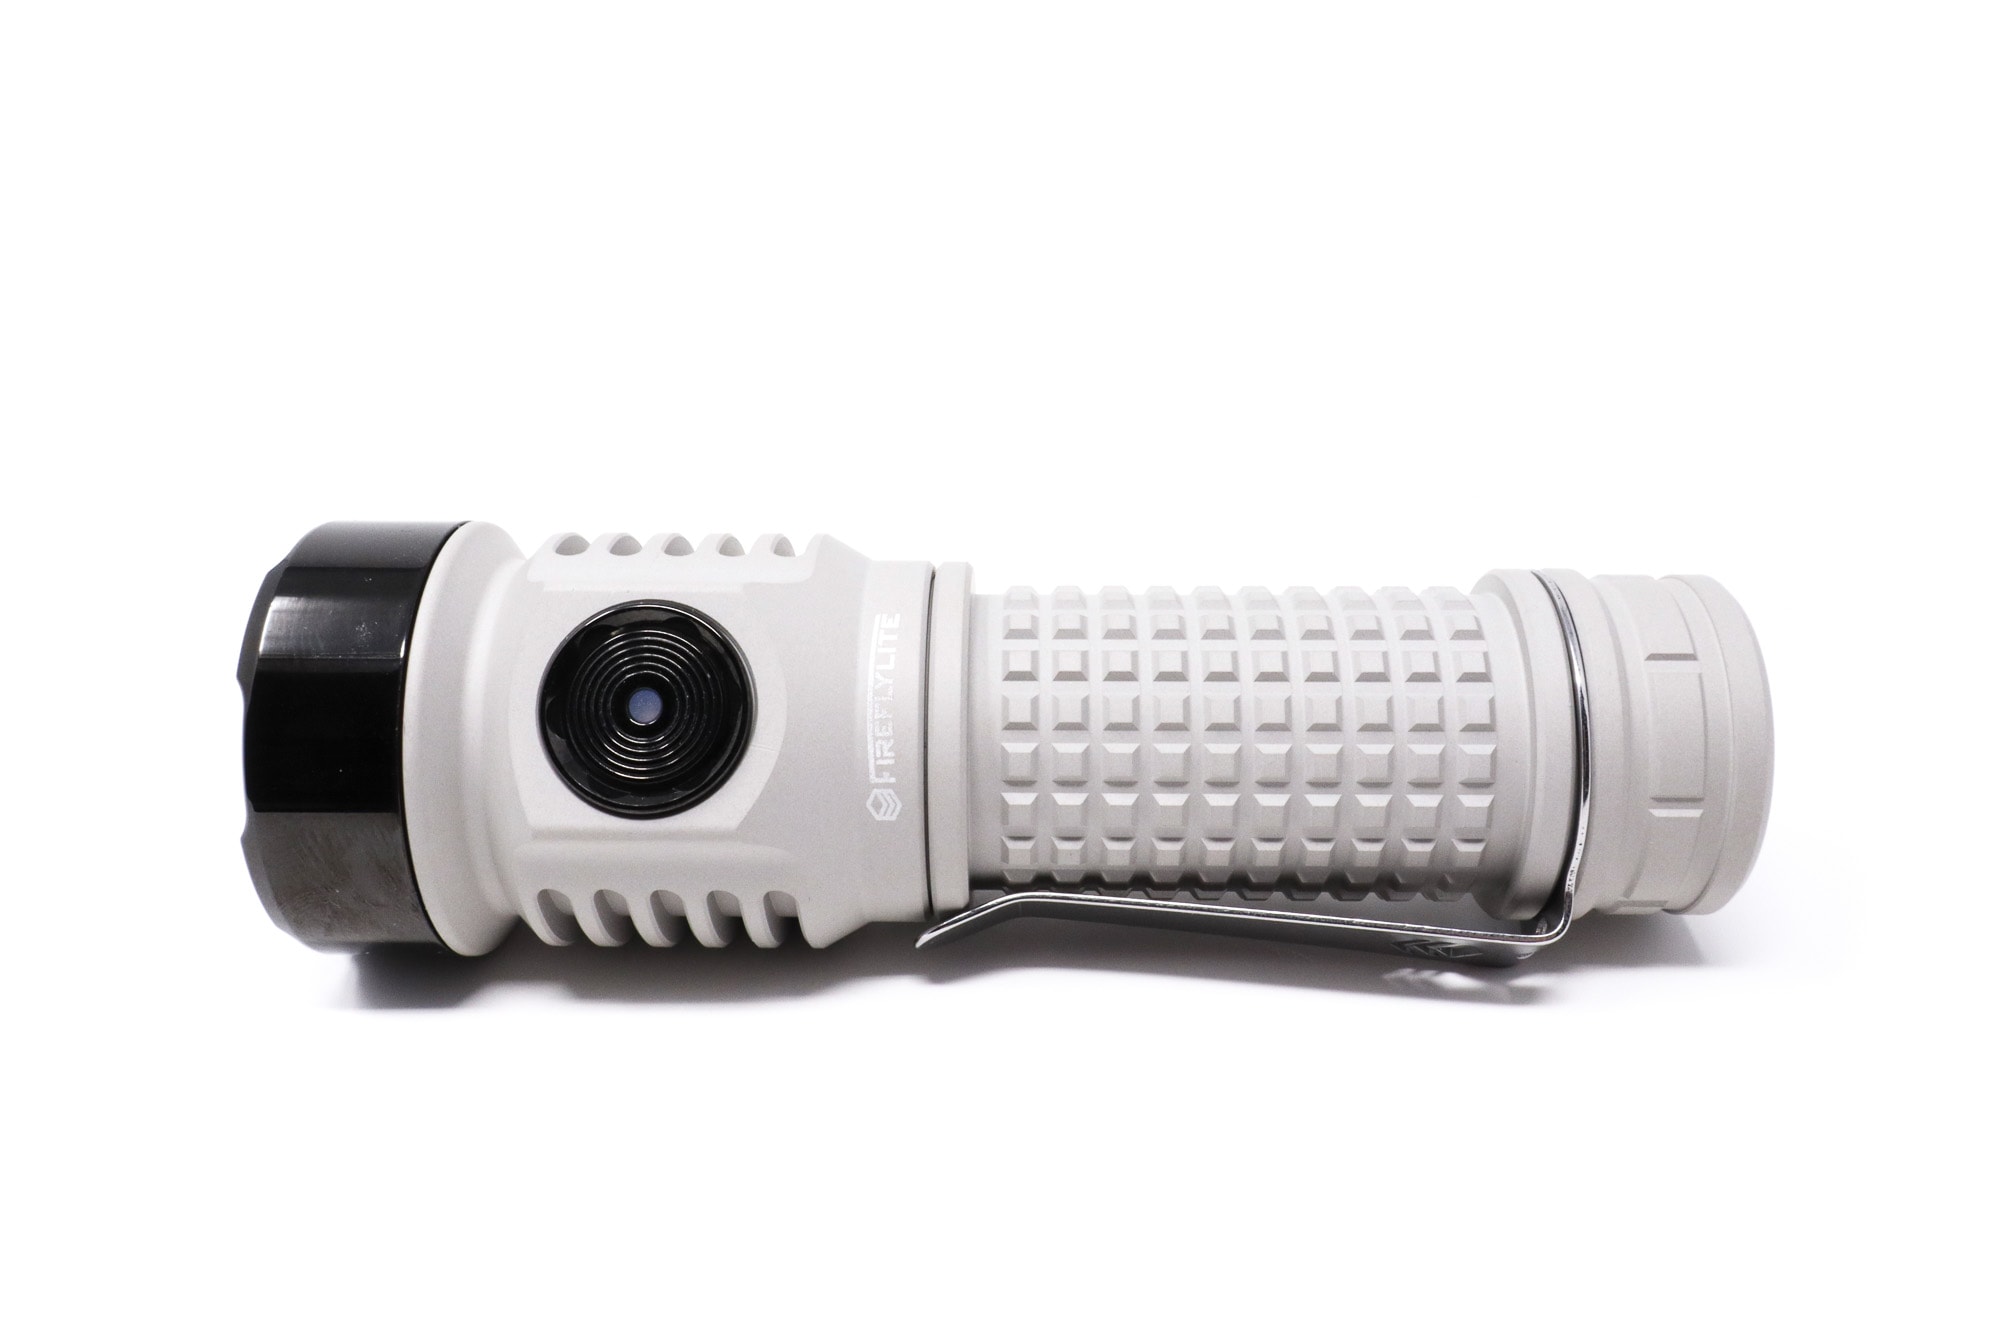
FireflyLite X1S Pharos specifications
| Brand & Model | FireflyLite X1S Pharos |
|---|---|
| Flashlight category | General Purpose |
| LED | 1*Cree XHP50.3 HI 5000K |
| Max. output | 3000 lumens |
| Max. beam distance | 420 meters |
| Max. beam intensity | ? |
| Battery config. | 21700 |
| Onboard charging | USB C |
| Main modes | Many, Anduril 2 |
| Blinkies | Many |
| Waterproof | IPX8 |
| Review publication date | February 2024 |
Review intro:
Round two of the new FireflyLites! Fresh off the freaking awesome E07X Canon review, another new light is on my desk for review, and this one’s going to be good. First, a bit of history: In late 2021, FireflyLite released a EDC-size TIR-based light called the T1R. It was a 22430/21700 size light, came with the Lume1 driver, onboard charging, and a really throwy optic with Anduril 2. As nice as it was, FireflyLite couldn’t leave it alone, and as part of their renaissance, the T1R’s gone under the knife. This new one’s called the X1S ‘Pharos’ and joins the X1L ‘Elite’ (larger, higher output) counterpart. Besides a cool name, it’s supposedly all-new with a premium name-brand optic, new LED choices, and a 40 watt Lume1 boost driver to add 6 volt LED capability. Let’s see how it gets along! Note that some of this content from the E07X review is recycled here since there are some similarities!
What’s in the package
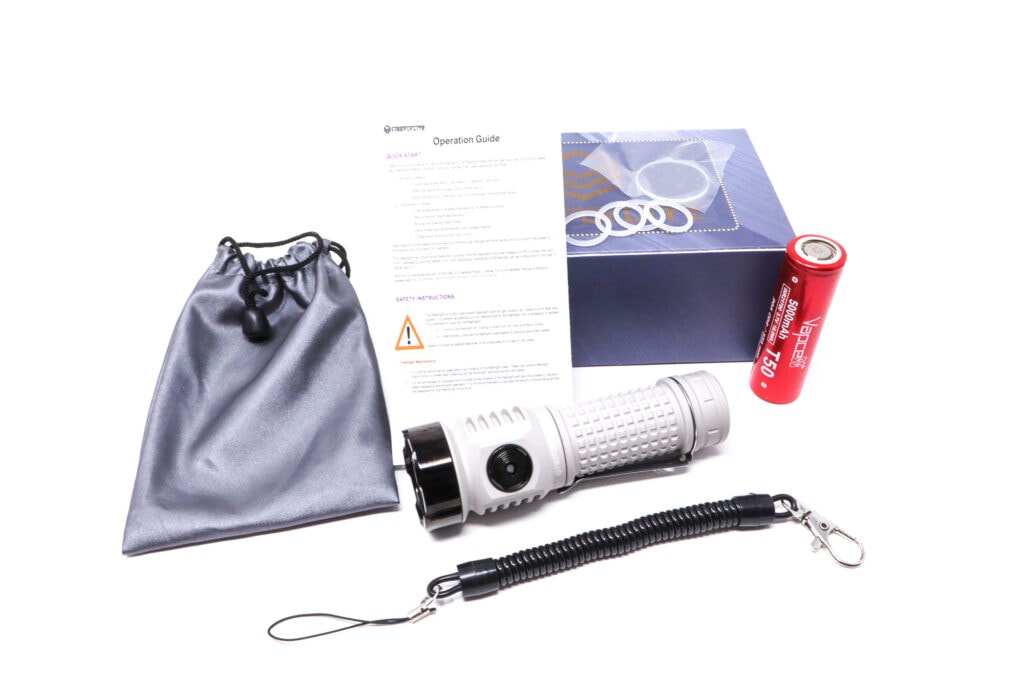
The X1S, like the E07X, came in an identical, somewhat boring box, nothing like the E07X Pro came in. The packaging isn’t indicative of a premium flashlight.
- FireflyLite X1S Pharos
- Vapcell T50 5000 mAh 21700 battery
- 4 o-rings
- Instruction manual
- Carry bag
- Spare lens
- Lanyard
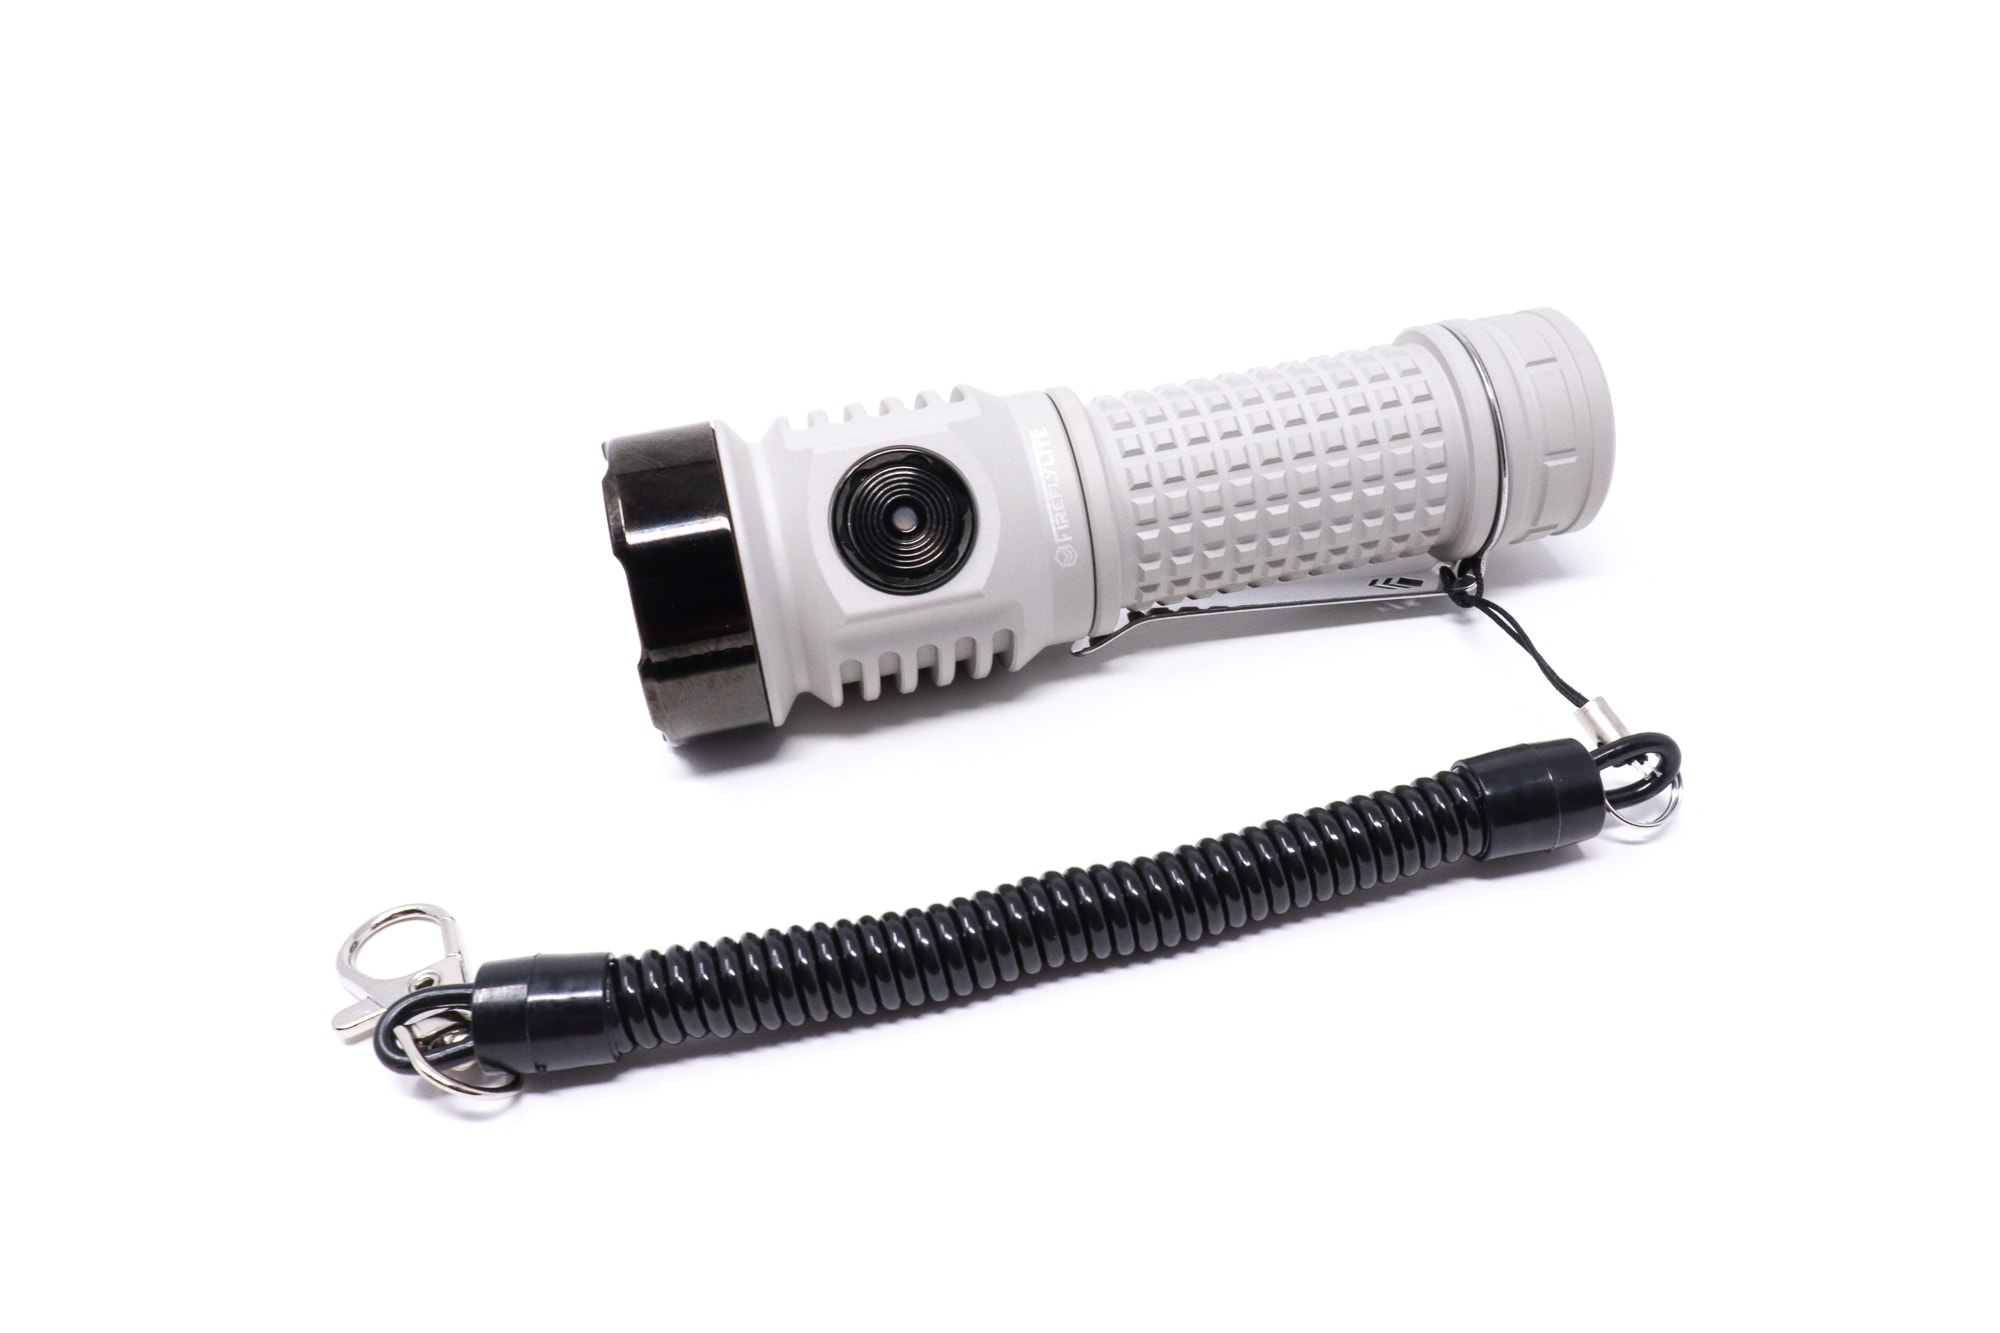
By default, this isn’t a ready to run kit. The test light came with the (optional) VapCell T50 (it’s a good cell-I recommend ordering it), but it doesn’t come with one, so if you need a ready to go kit, make sure to add the battery. This light also included a spare lens, which is nice. The lanyard is an unconventional one, a rubberized, coiled up Slinky type with a quick release on one end. It works, but seems too springy and less lanyard-like.
Flashlight in use, Build Quality, and Warranty
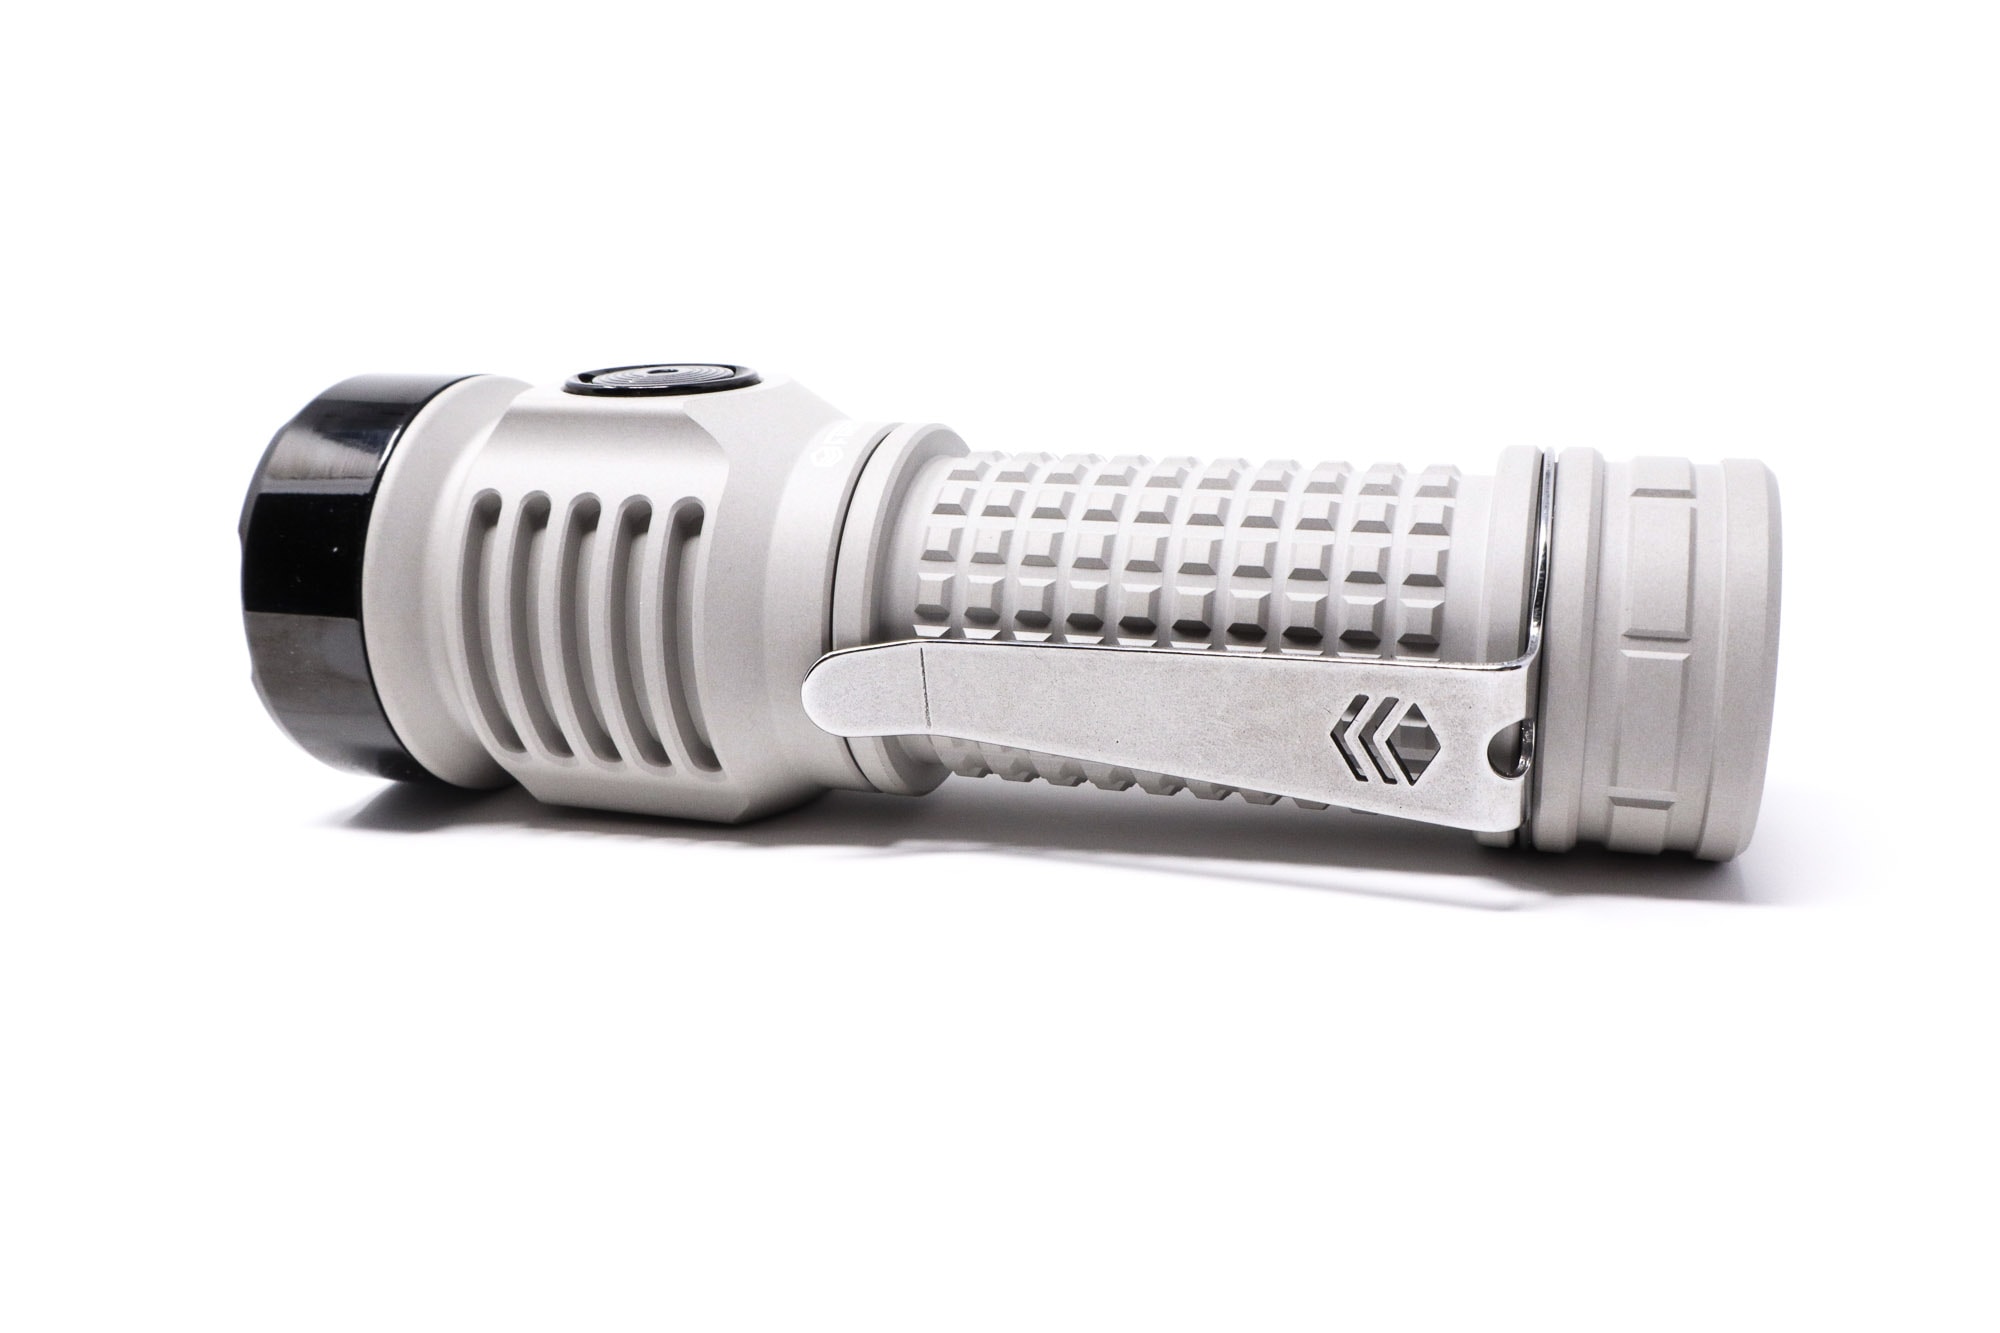
The X1S is a general purpose light first, but can also moonlight as a pretty capable thrower. The design is very thoughtful and utilitarian, with nice flashlight-y form factor. It’s naturally easy to grip and handle. The tube is furnished with nice grippy nobbles and I really like these since they afford great grip when your hands are wet or you’ve got gloves on. You can pocket this like an EDC, and after riding in my pants, I feel it’s on the cusp of what I consider a practical EDC light since it’s a bit portly and bulky, but if you like bulging pockets, go for it.
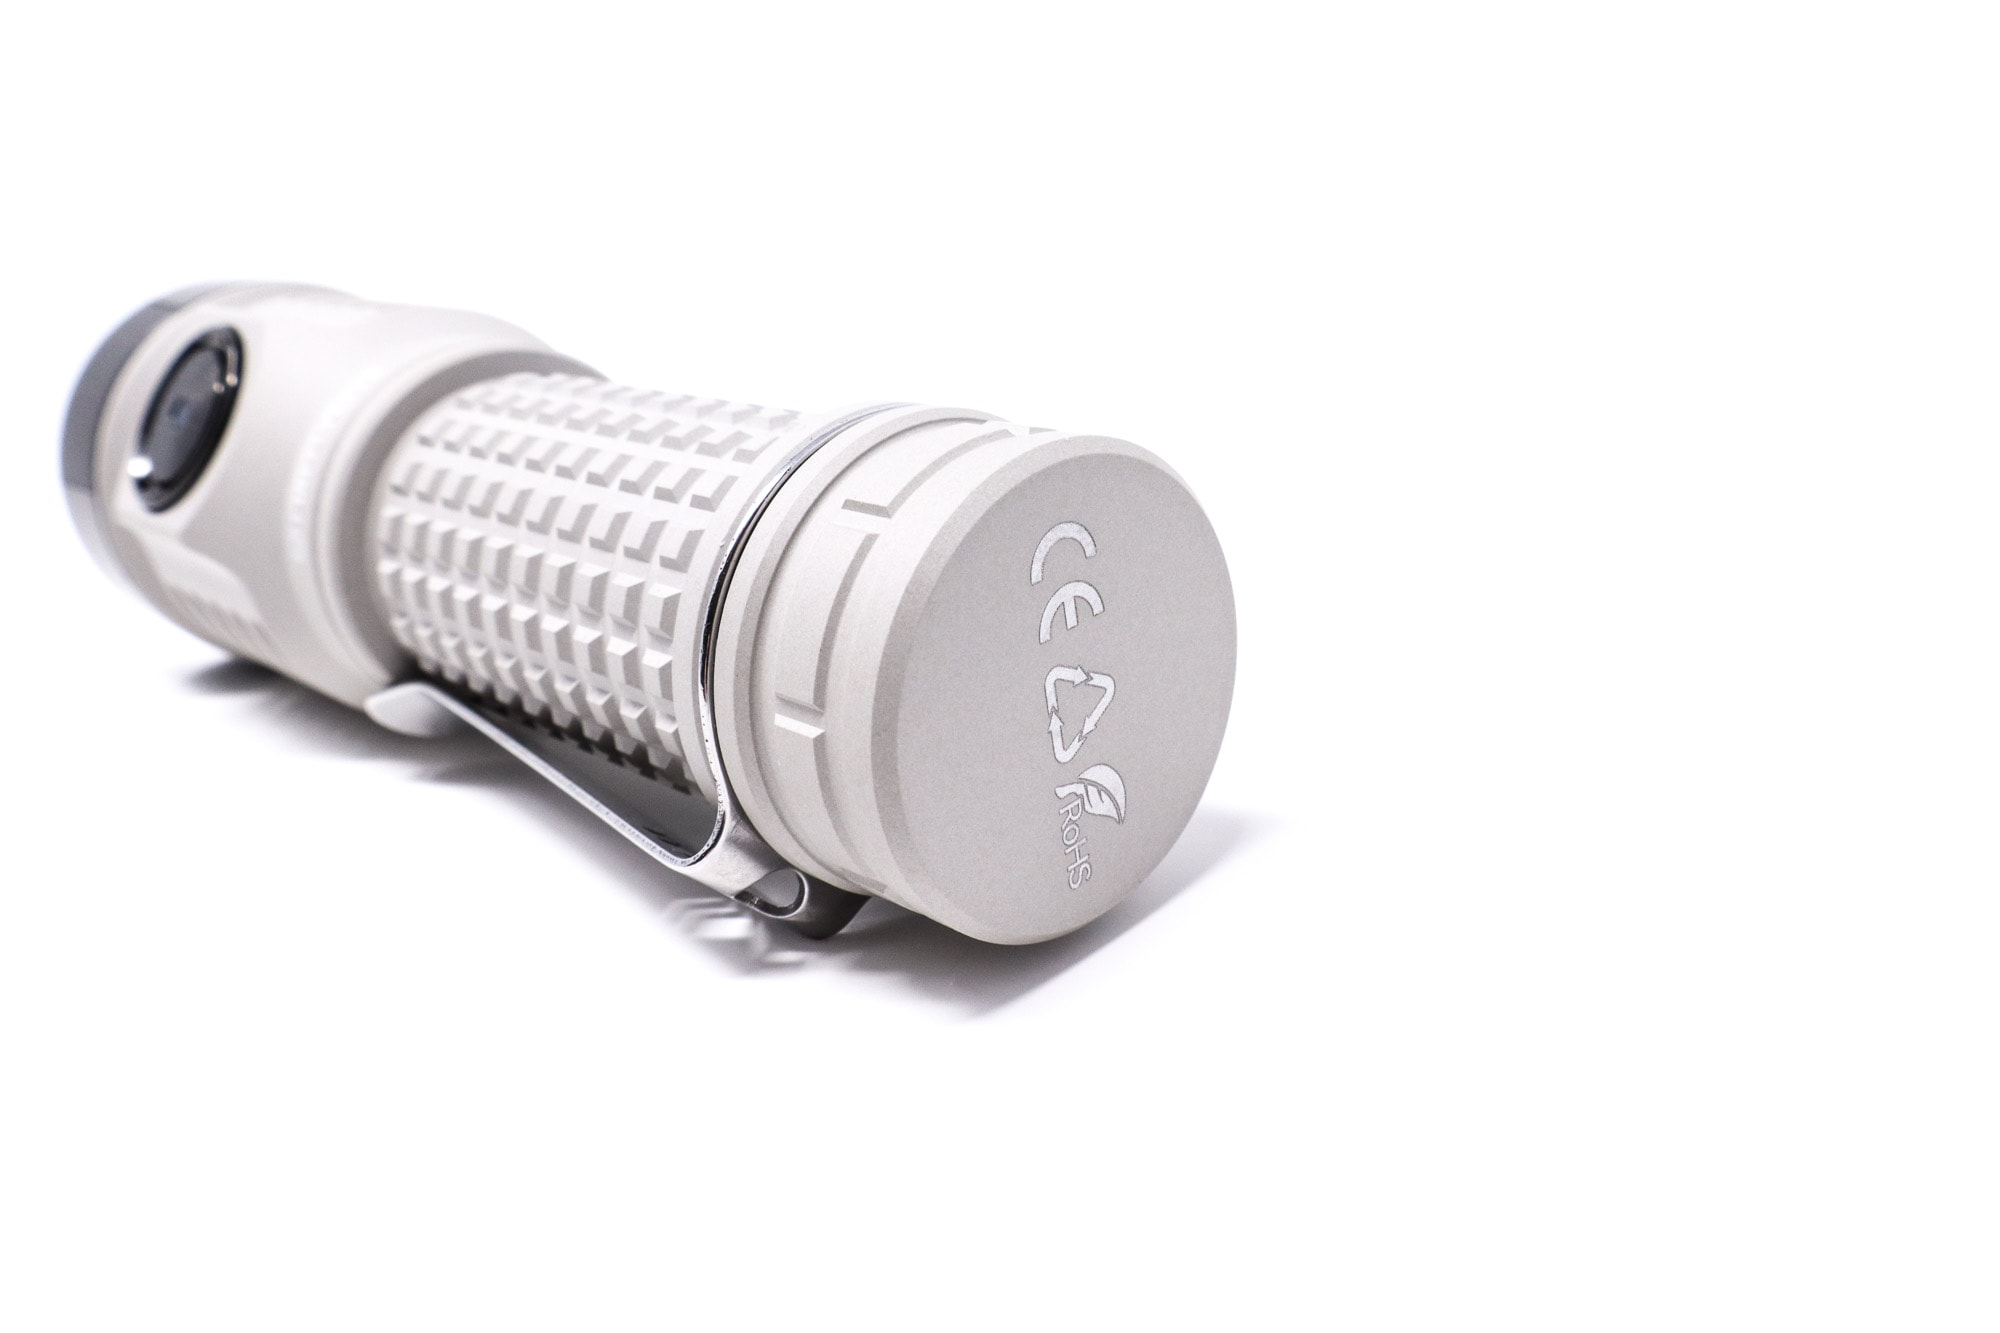
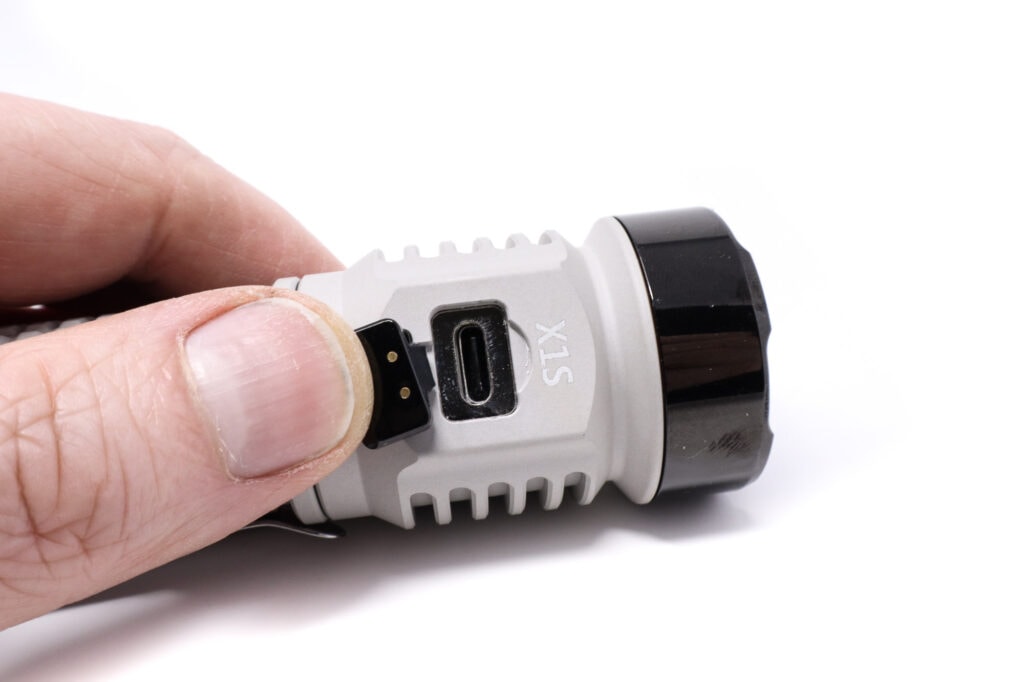
The head has some deep heat sinking fins, and there’s an e-switch mounted in the middle of the head on a raised section. I had no trouble reaching it from all grip angles. It has a PVD (Fireflylite calls it diamond black VEP) black stainless steel button with a central LED indicator for on-state and charging (blue standby, red for charging). There’s also AUX LEDs under the TIR, which are configurable through the UI. The switch click action is good, with slightly soft, but positive clicks with good feedback and feel. The USB C charging port cover is also stainless VEP coated in the same black color, along with the finely-polished stainless bezel. The contrast with the matte white MAO finish is awesome and it looks great! The charge port is a brand new and patented design with a magnetic closure, and according to Fireflylite, it’s fully waterproof even when the port is open. For pocket carry, the clip is a captured design retained by the tailcap. There’s no lanyard hole on the actual light, but you can clip the lanyard onto the pocket clip.
For the Pharos, I’m happy to report zero issues with the build quality (although that does not extend to the firmware side of things…more on that later). Everything’s nicely put together with no anomalous gaps or misaligned parts. I kind of expect that at this price range. That said, plan on spending about $110 US for a ‘base’ X1S, more if you add a battery and upgraded LED. It isn’t what I consider a budget light, but not a bad deal.
The X1S is milled from 6063 aluminum alloy. I consider this an upgrade because 6063 takes a nicer surface finish, is more corrosion resistant, and has better electrical and thermal properties (very important for flashlights). The machining? Meticulous with no defects and every edge has been smoothed. You get a choice of two MOA (micro arc anodizing) finishes: Fossil gray and dark white, along with a standard type III HA hard anodized finish in matte black. The test light came in the dark white MAO and it’s more of a light gray color, but it’s really grippy and looks awesome against the black bits.
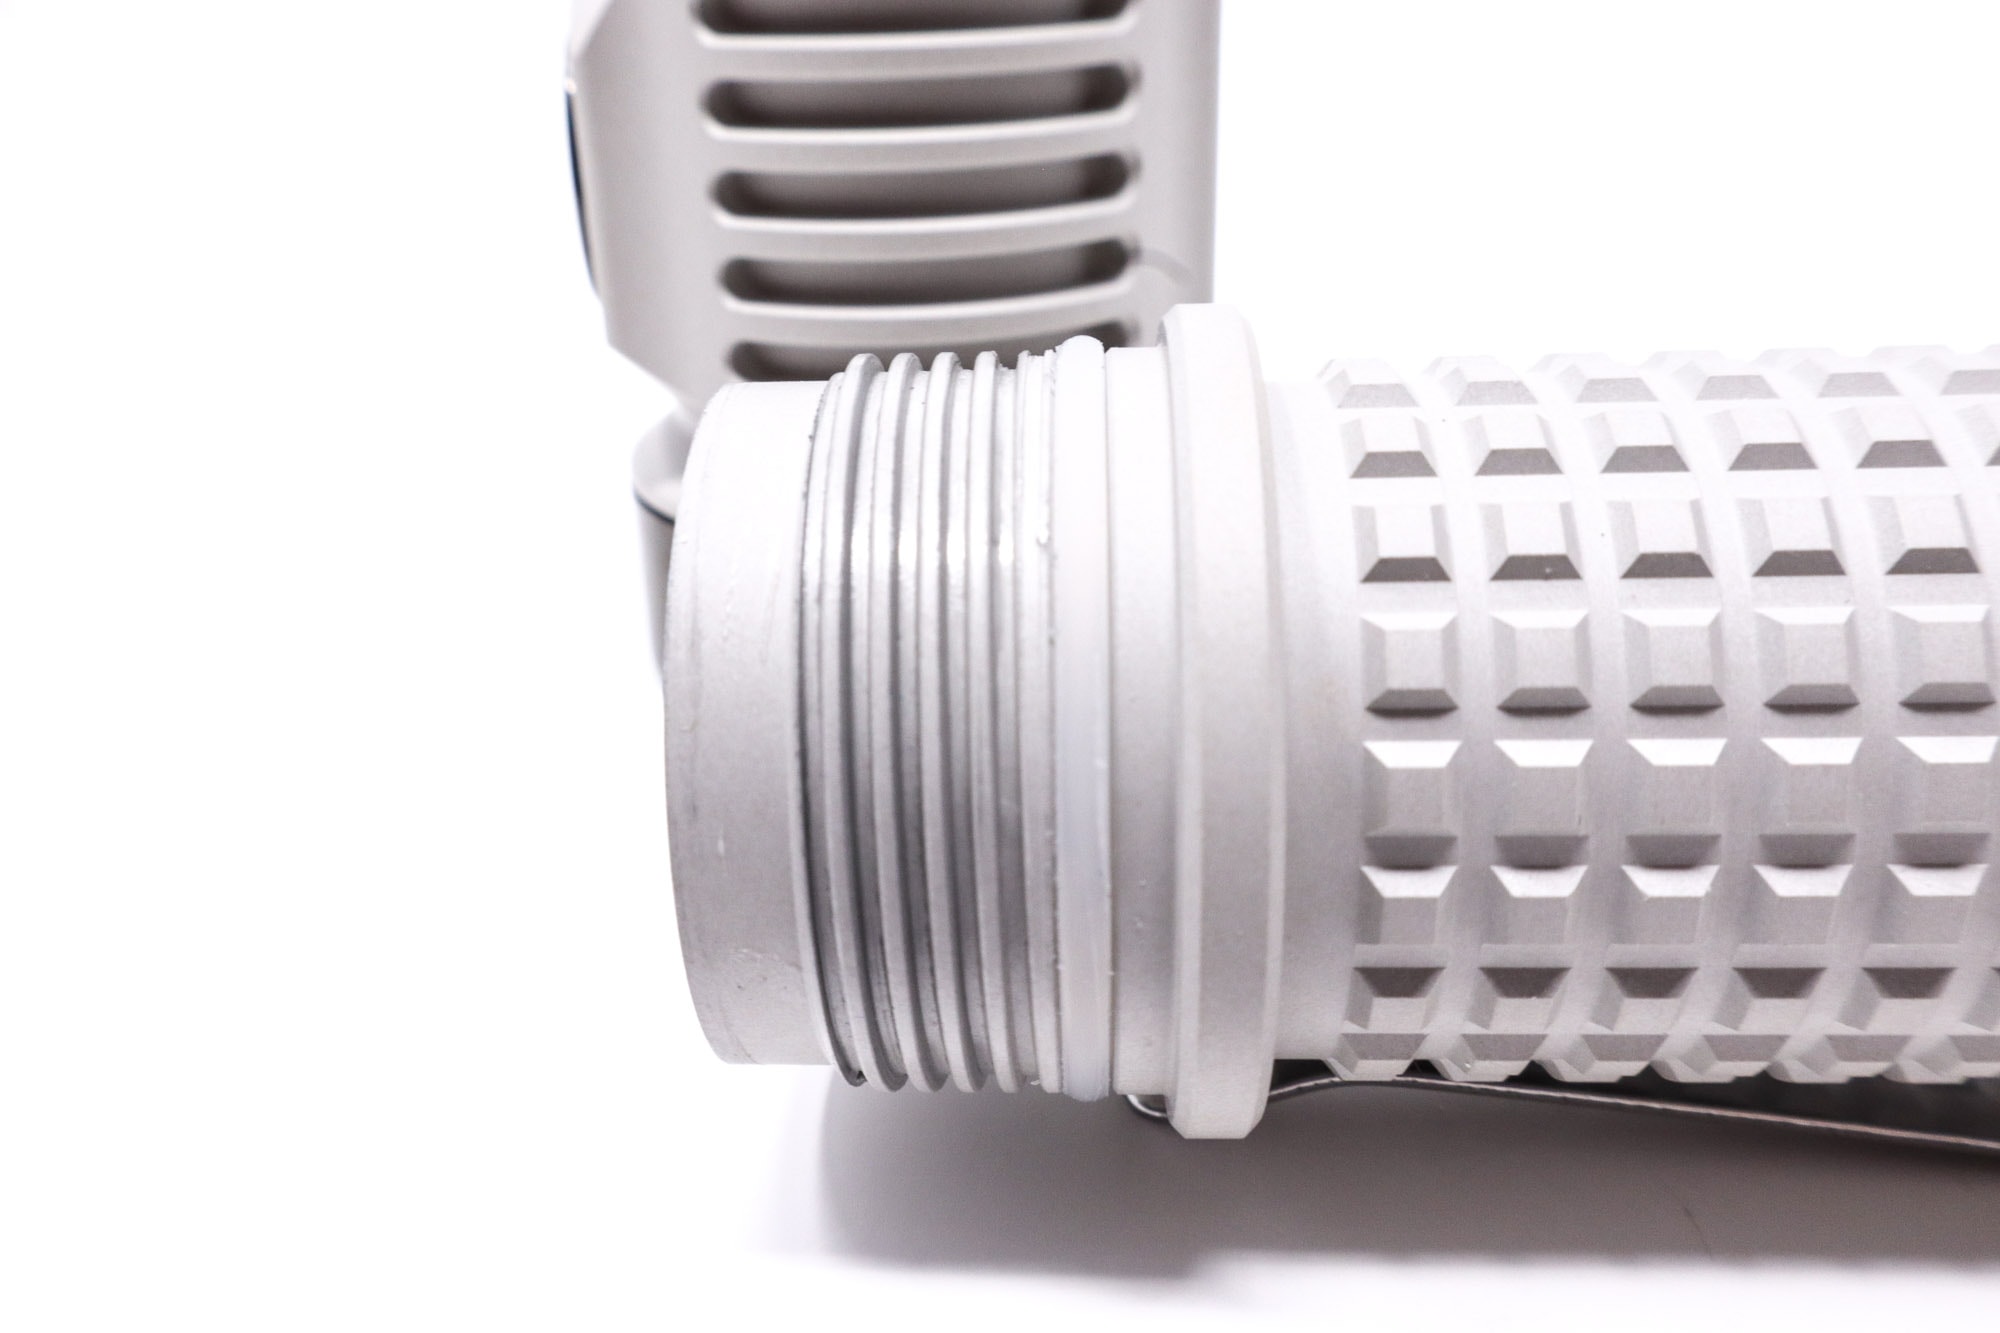
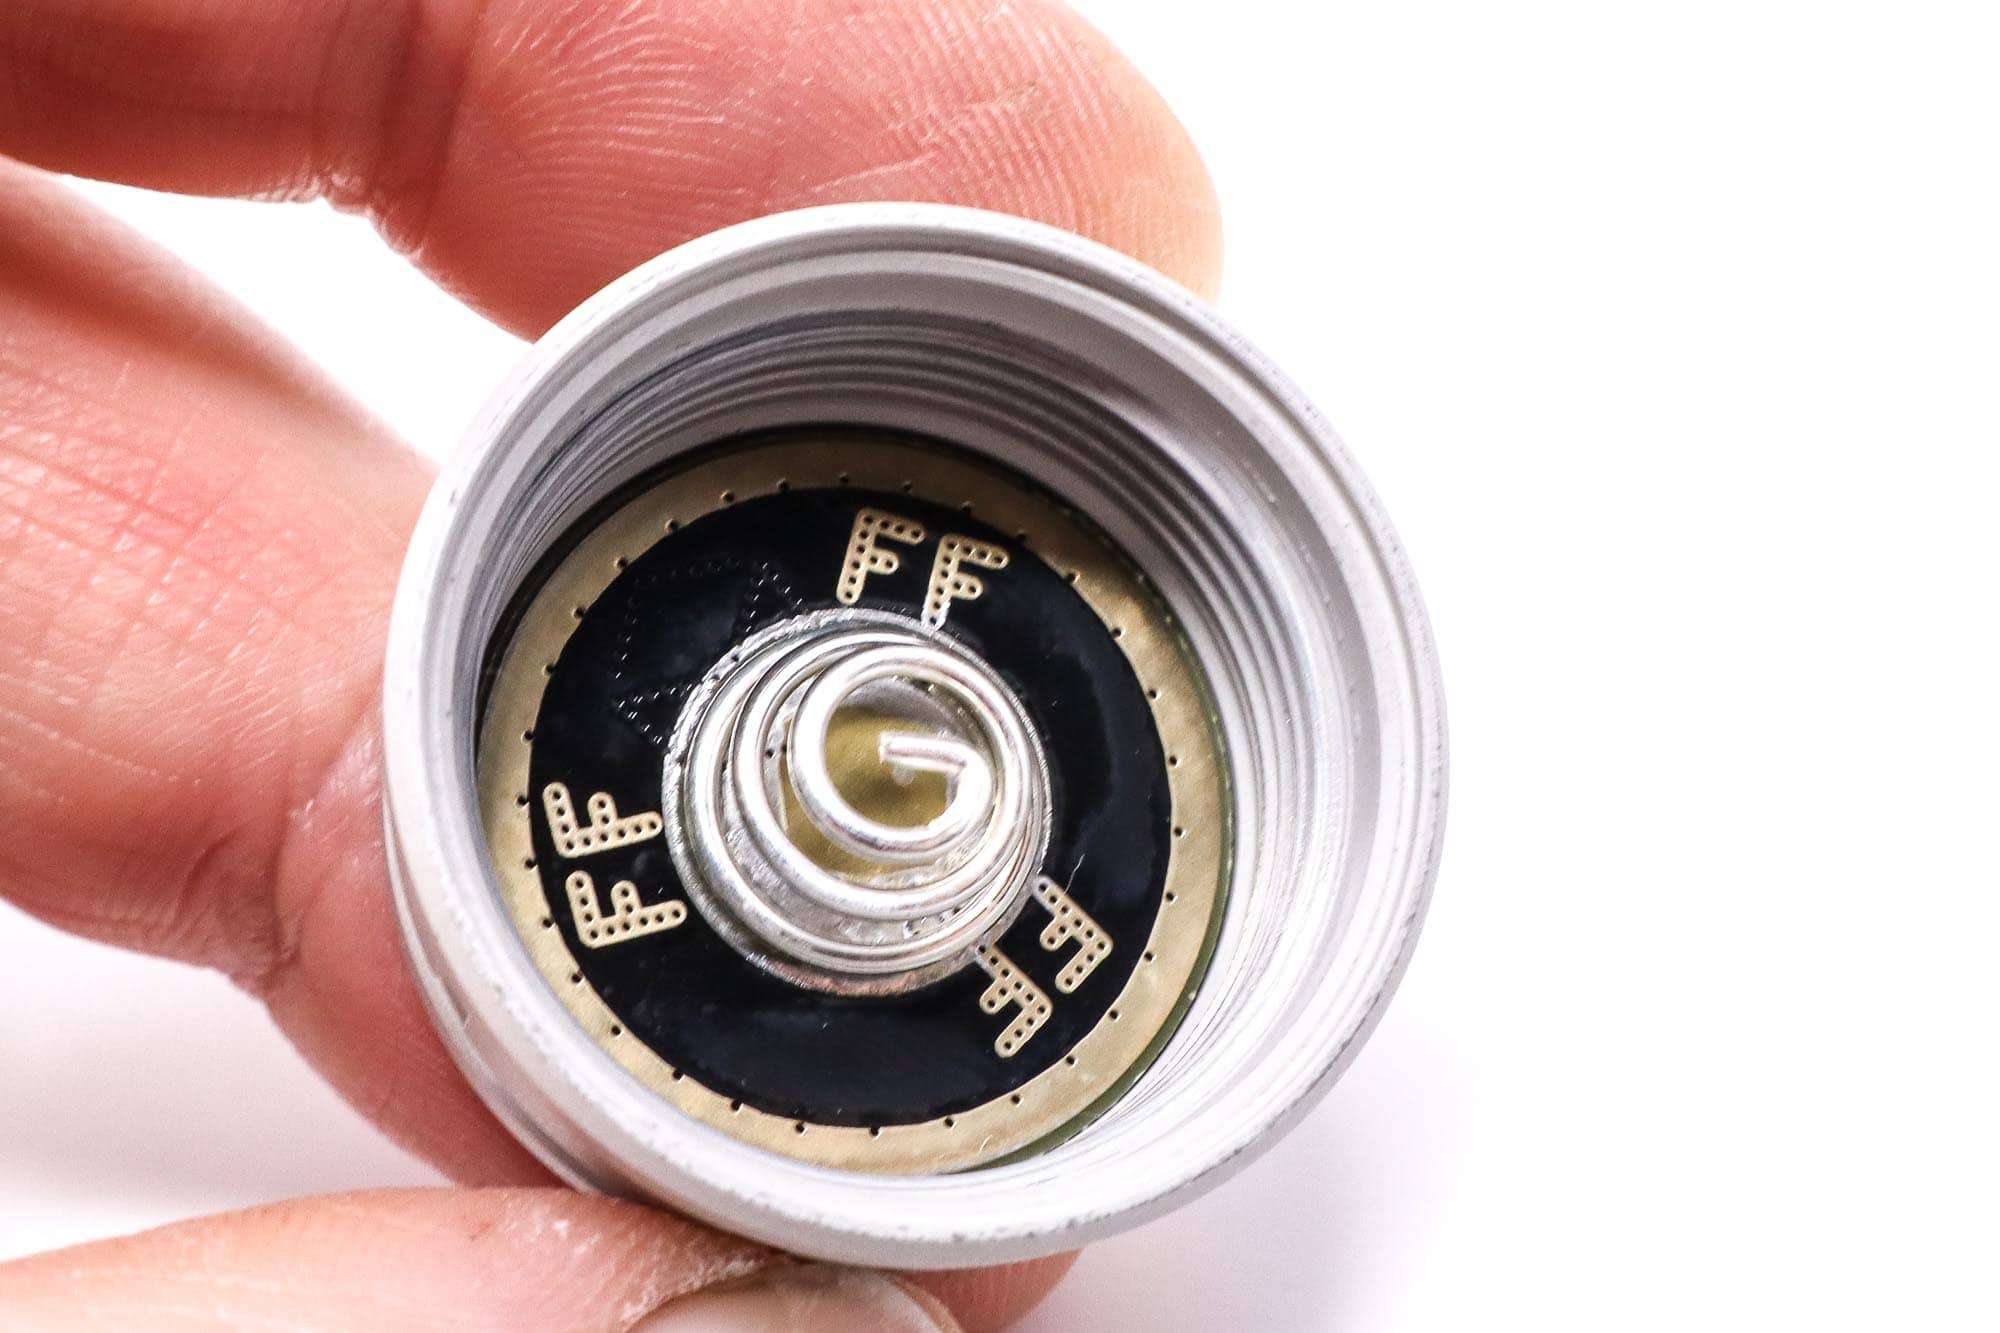
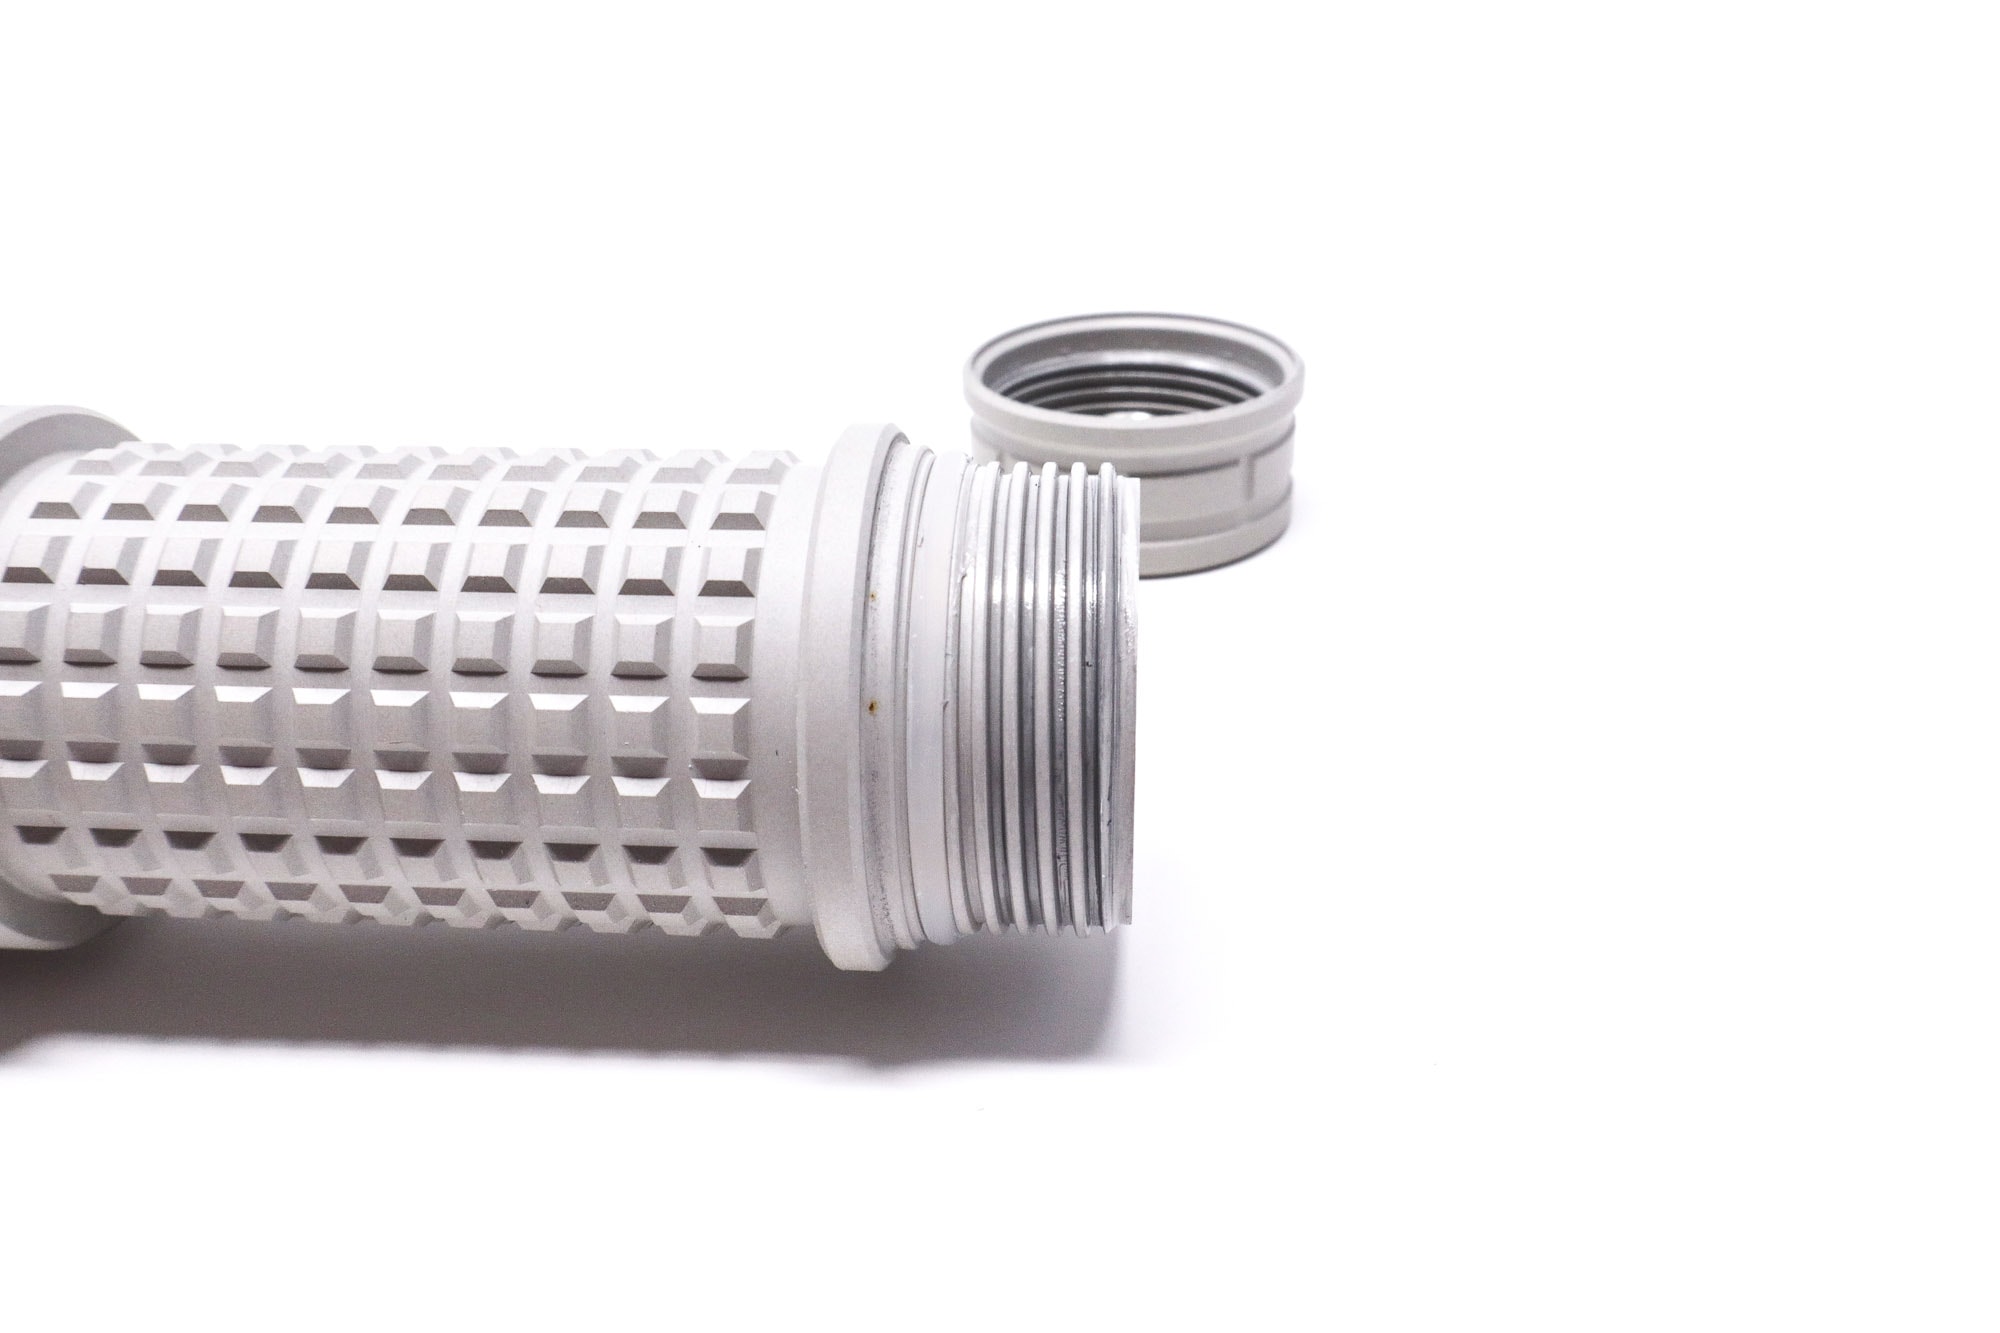
The light can be fully disassembled, which is nice if you want to mod it further (it honestly doesn’t need it) or just do your own maintenance. That might get old though since tightening the tailcap to the battery tube and the tube to the head requires excessive force. This was observed across all the test lights (two E07X, the NOV-Mu V2, and this one). The first 3 turns go pretty smooth, but the last 2 turns are very stiff and have a lot of resistance.
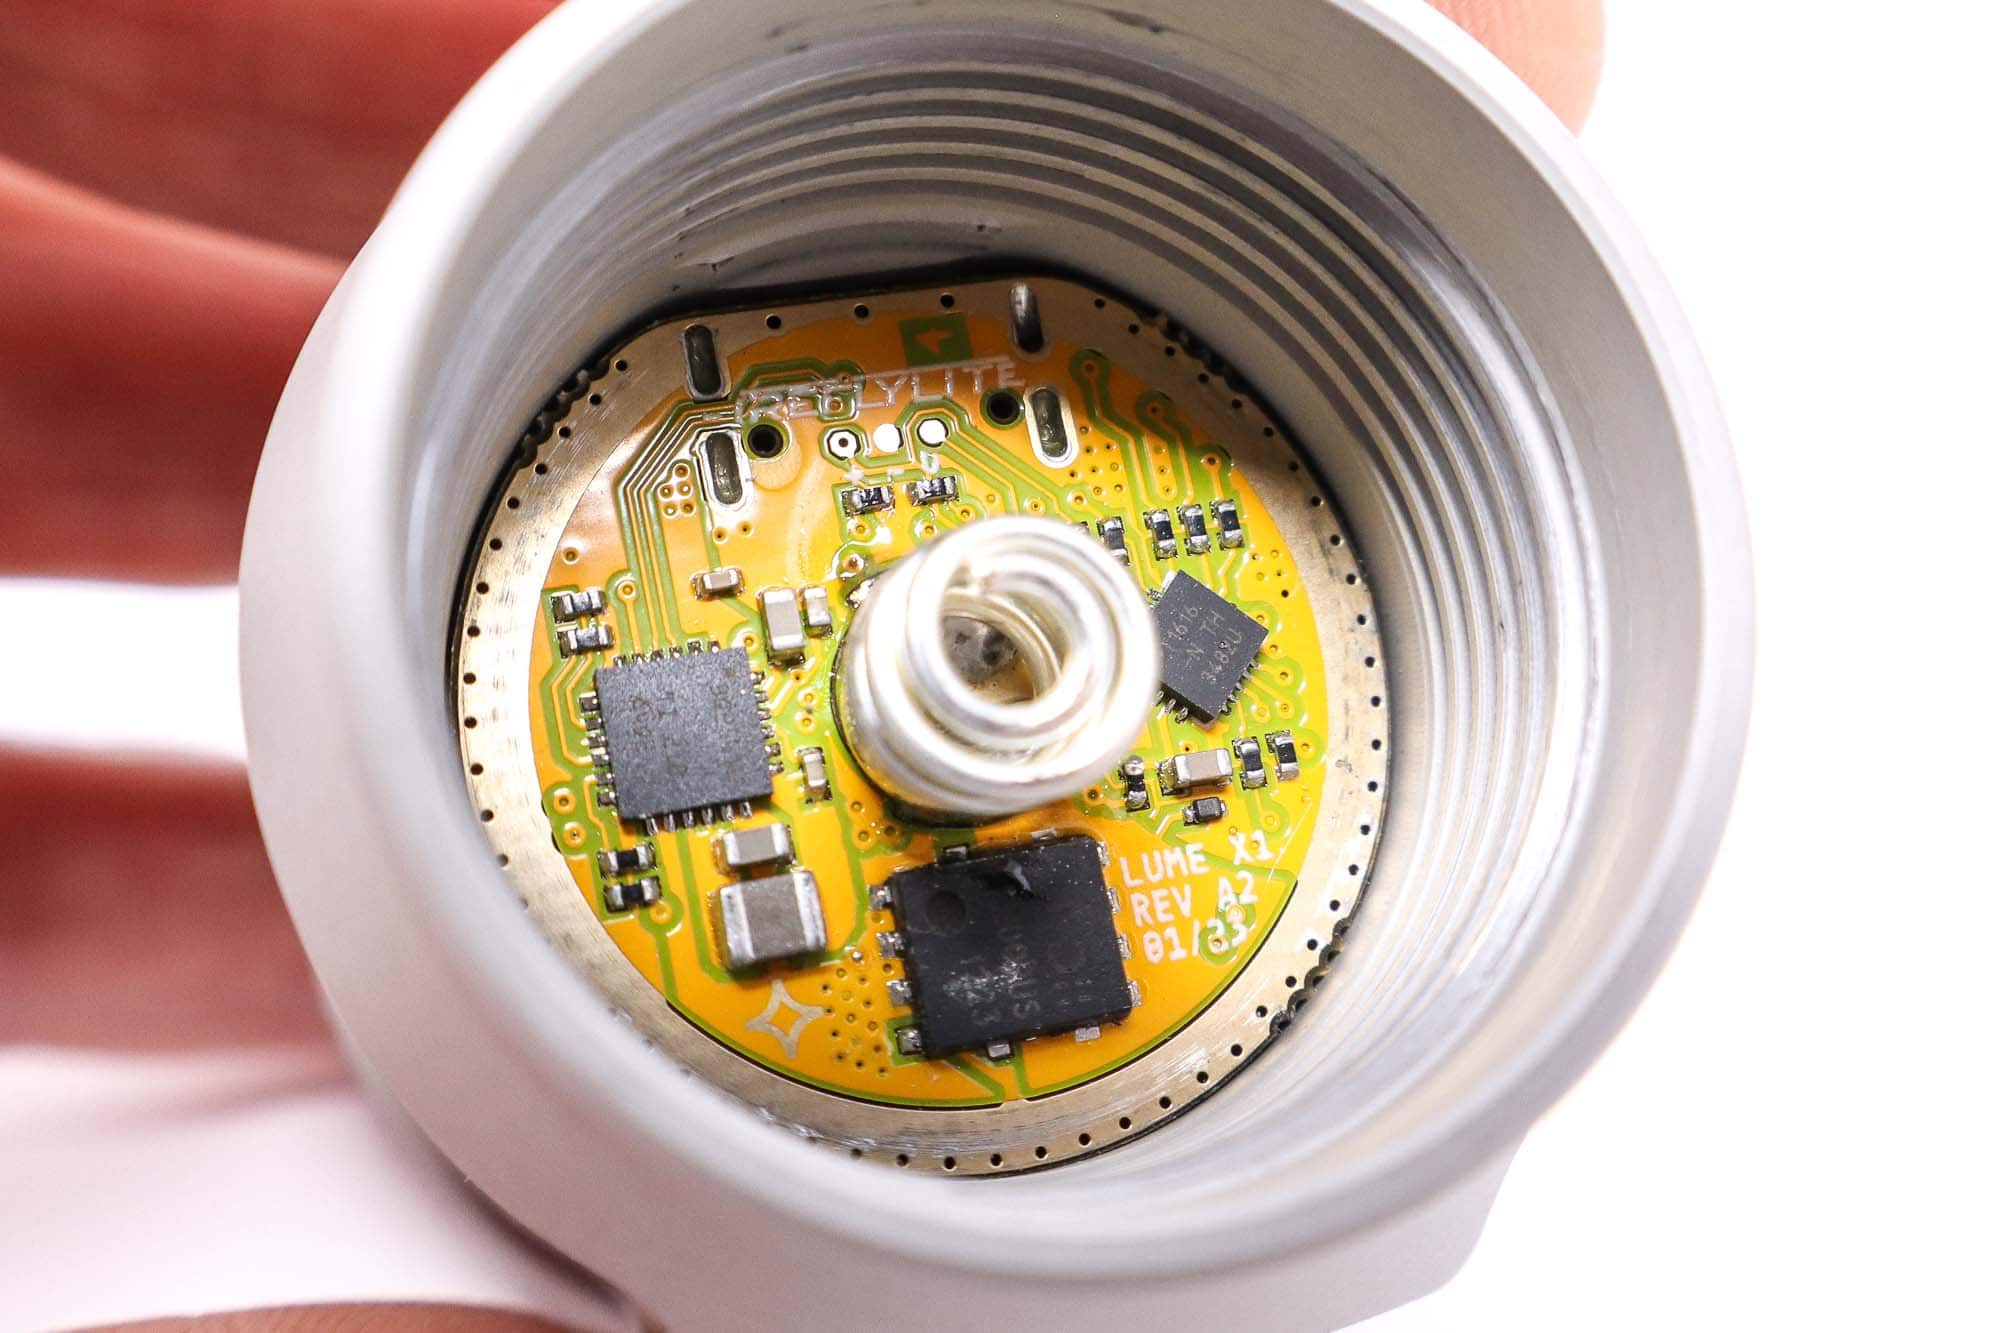
I added SuperLube to the o-rings and threads, and it helped, but it still took more effort than I like. The resistance from compressing the pocket clip against the shoulder it rests against didn’t help that, The threads have been redesigned and are fully anodized T-shape threads. I don’t know where they got ‘T’ from, but these are rectangular and they’re very precisely cut. There’s o-rings sealing every joint as well: Both ends of the tube, bezel, and the lens. The IP rating has been upgraded to IPX8, up from IP66. This is a nice upgrade, even if not the proper IP68. For springs, you get a driver spring and a tailcap spring. They’re nonmagnetic copper alloy with a silver plating, and plenty thick for good current handling.
For the warranty, I couldn’t find anything on the FireflyLite website, but their old website, ff-light.com, does list warranty information, so take it away FF-light! We provide 3 years’ manufactory warranty to fireflies flashlights. (Consumable batteries are not in warranty. ) DOA products can be returned and refunded within 15 days, We will bear all the returning shipping cost.
LED, Lens, Bezel, Beam, and Reflector
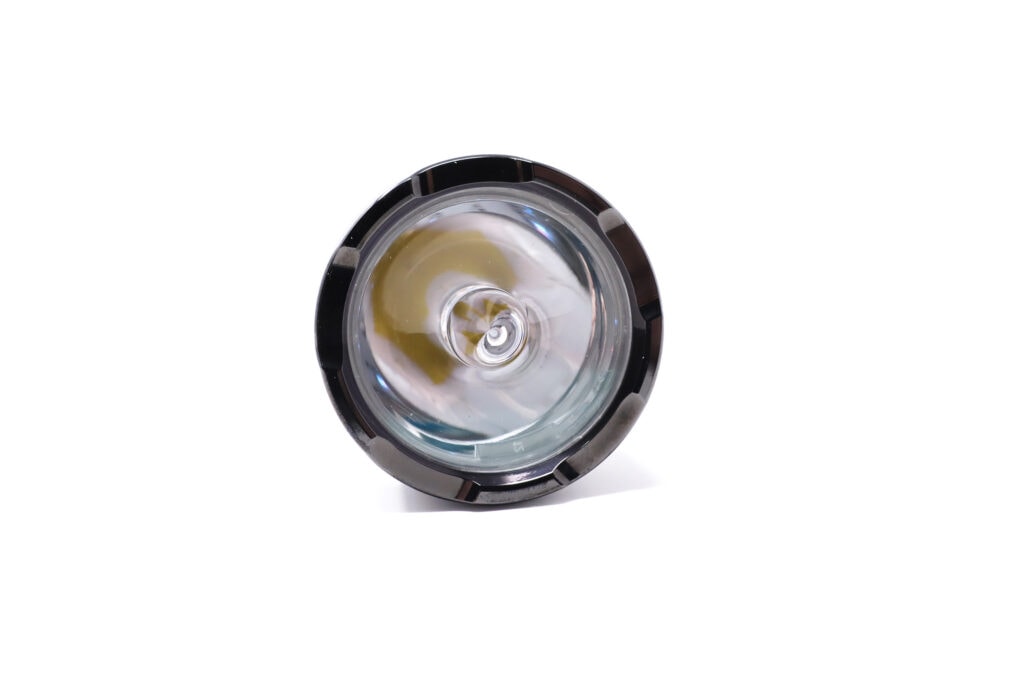
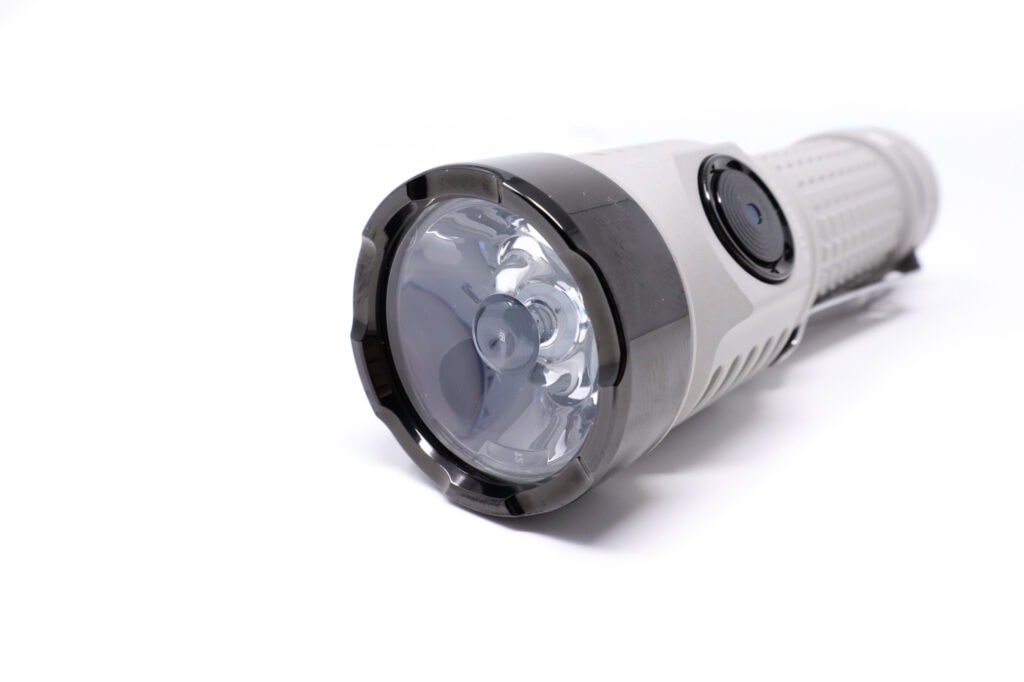
This is a TIR-based light, so you get a single LED under a TIR lens. You can spec the X1S with a choice of 3 LEDs. There’s two Cree XHP50.3 HI options in 5000K or 4000K, both 90 CRI, and the FFL505A in 3500K 95 CRI. The test light came with the 6 volt Cree XHP50.3 HI 5000K in 90 CRI. This is the domeless version of the XHP50.3, the 3rd gen of Cree’s 5050 size high output quad die CSP (clip chip) LED. They come in 3, 6, or 12 volts. The high CRI entries are particularly nice, and if you’re used to the cold white versions of this LED, get ready to die and go to heaven because it represents the best balance of neutral tint and decent color reproduction. It’s nice on the eyes too and better for dusty/foggy conditions.
The TIR is new and FireflyLite sources it from Gaggione, a French company specializing in all things optics. I love it when companies do this since it ensures you (the customer) are getting top-quality products, so major kudos to FireflyLite here. The optic in question is Gaggione’s LLC25 series optical lens. The throw and beam shape depends on the LED you choose, but the test light’s beam is nice, with a defined hotspot and decent side illumination with more than enough beam distance for general purpose. Topping that optic is a gorgeous VEP coated black stainless bezel and a dual-layer AR coated mineral glass lens. The bezel is mildly crenulated and does offer some protection to the lens.
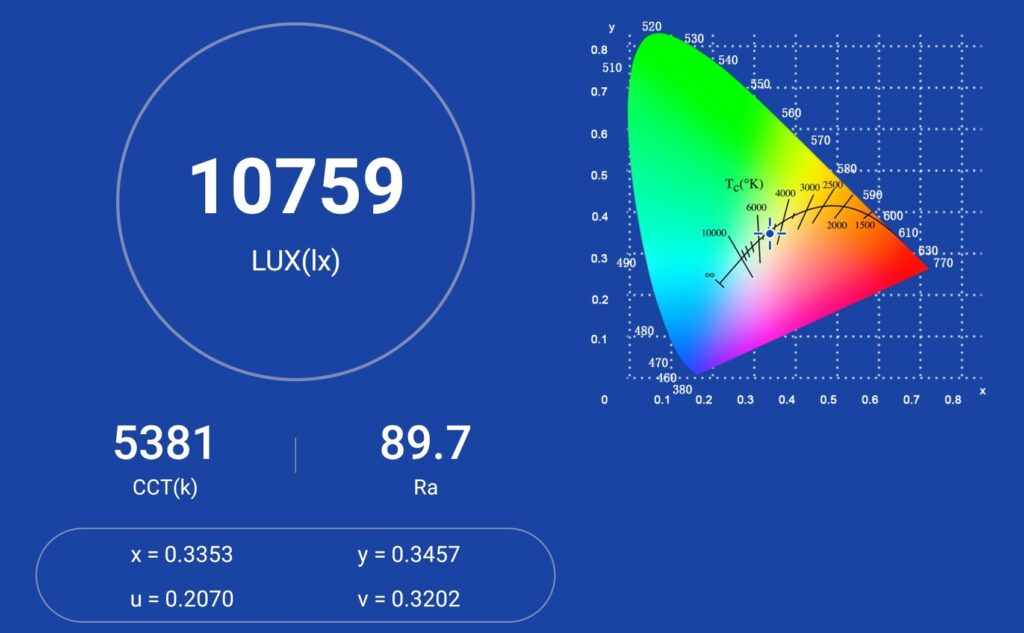
Spectral measurements:
I used an Opple Lightmaster Pro to measure the flashlight at 1 meters from the sensor
| Mode: | CCT: | CRI Ra: | duv |
|---|---|---|---|
| Turbo | 5381K | 89.7 | 0.0011 |
Dimensions and its competition
Dimensions:
| FireflyLite X1S | Millimeters | Inches |
|---|---|---|
| Length | 117 mm | 4.6 in |
| Head diameter | 36.5 mm | 1.4 in |
| Body diameter | 26.5 mm | 1 in |
Dimensions are rounded to the nearest millimeter and the nearest tenth of an Inch.
Weight:
| FireflyLite X1S | Weight in grams | Weight in oz |
|---|---|---|
| Without battery | 126 g | 4.5 oz |
| With VapCell T50 | 197 g | 7 oz |
Weight is rounded to the nearest gram and tenth of an Oz.
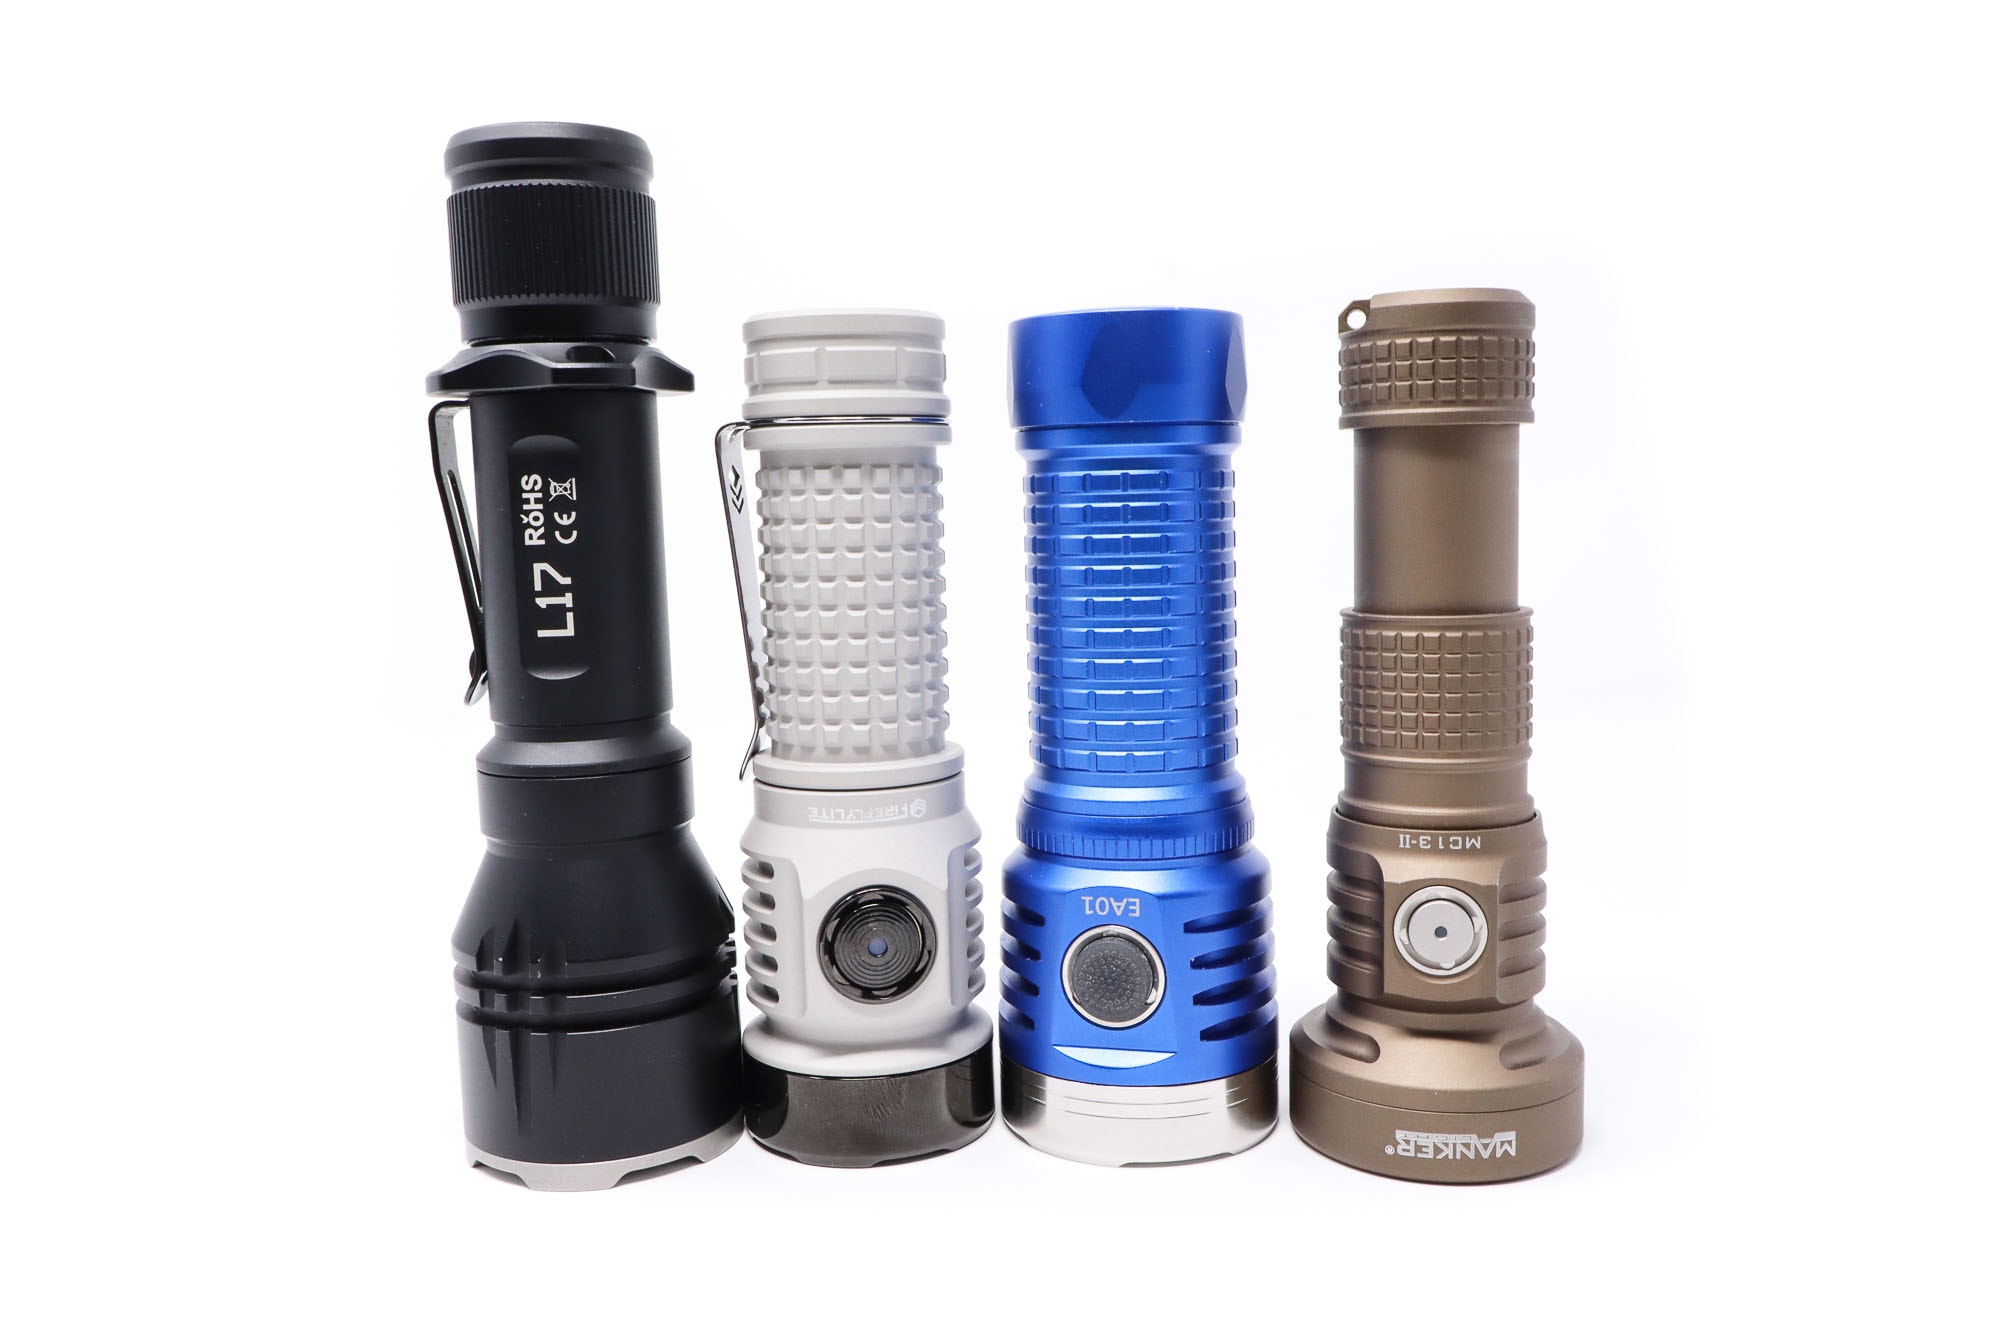
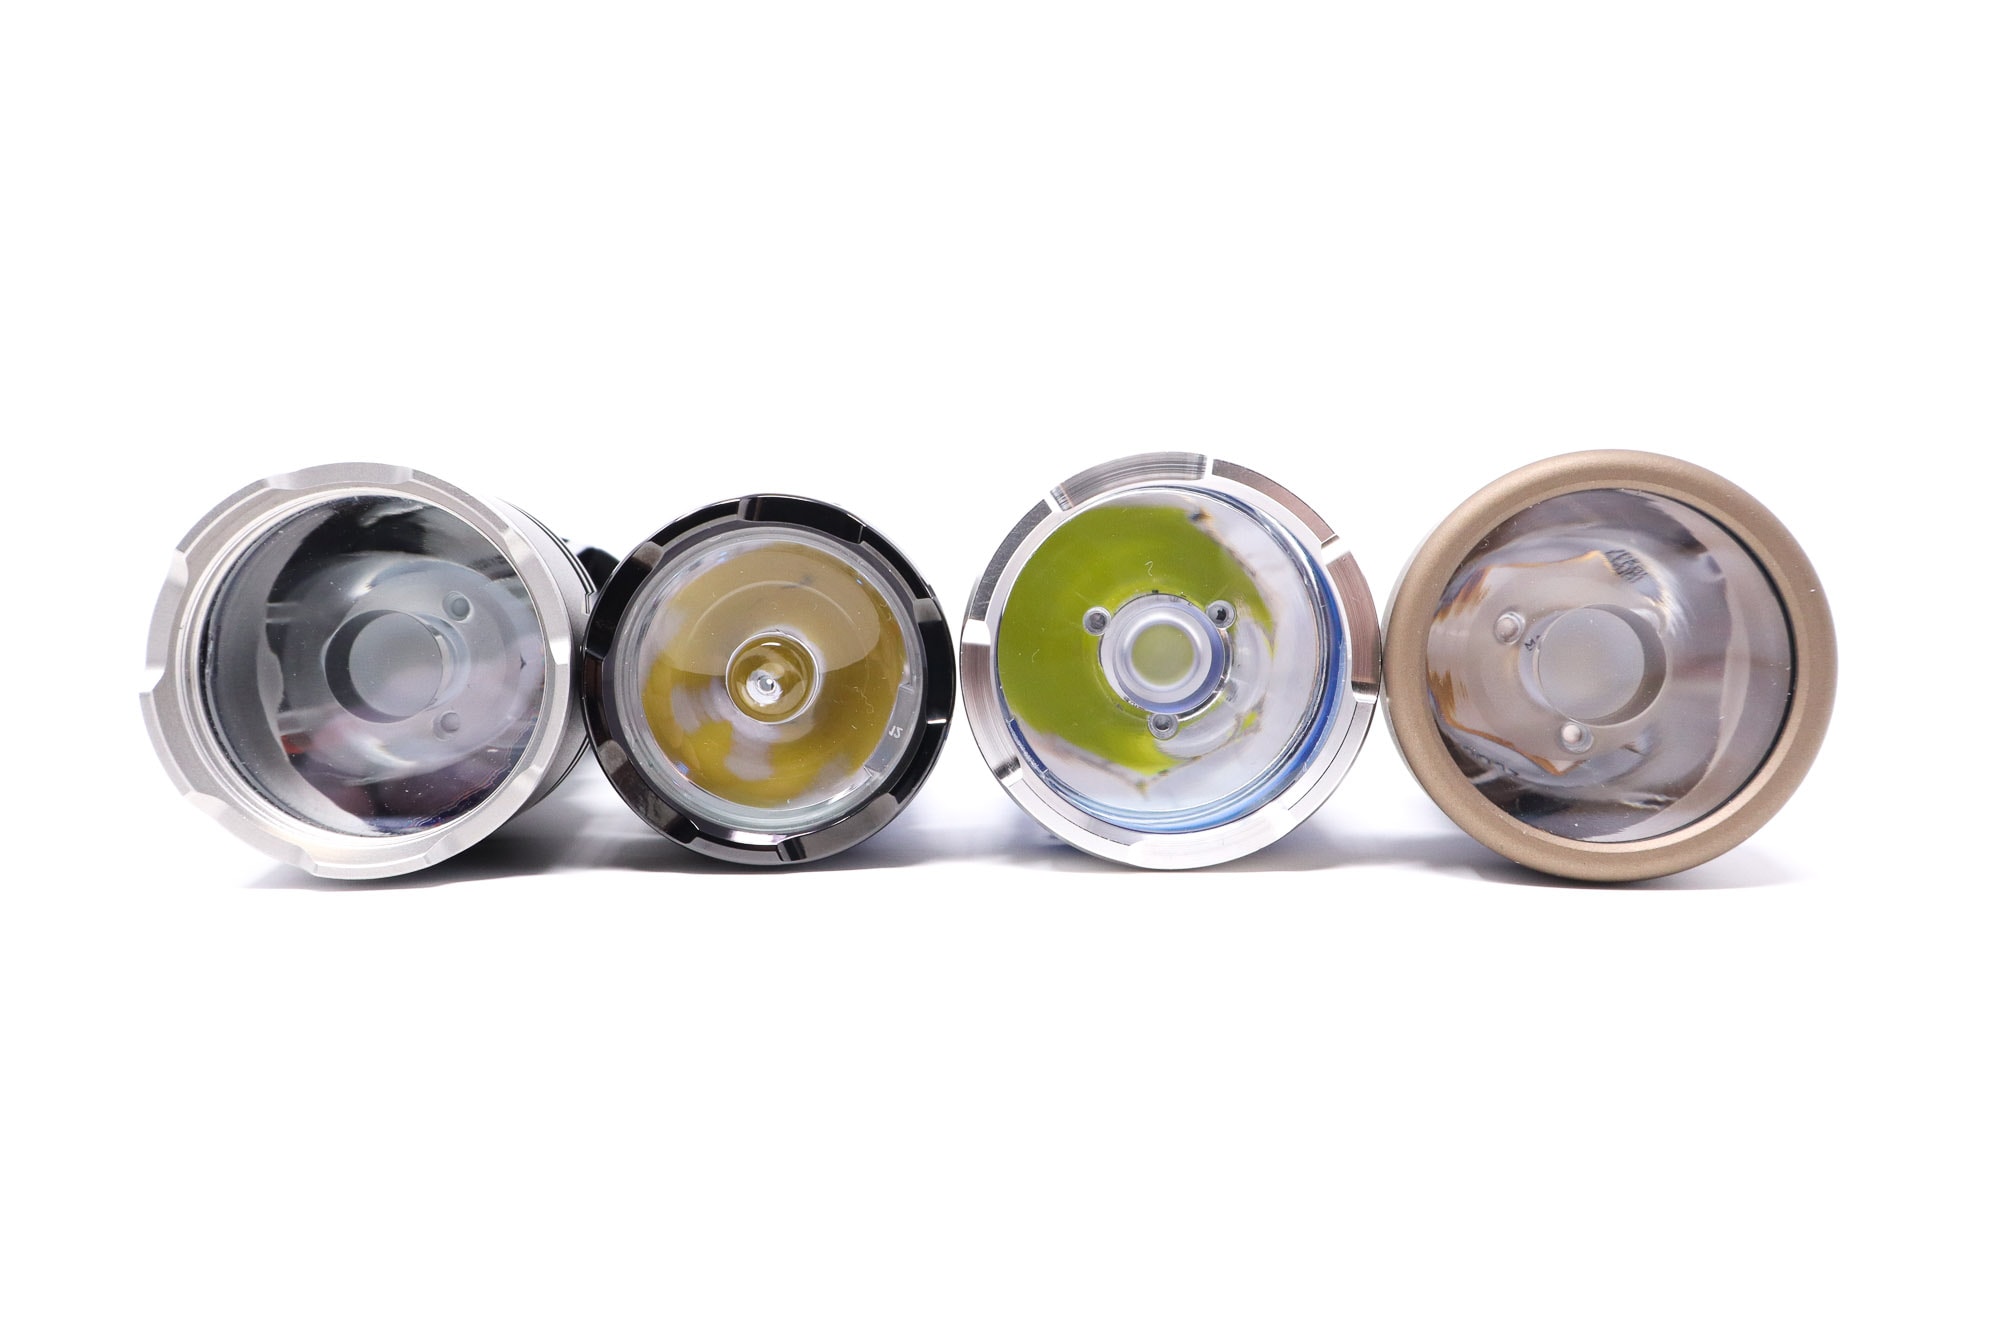
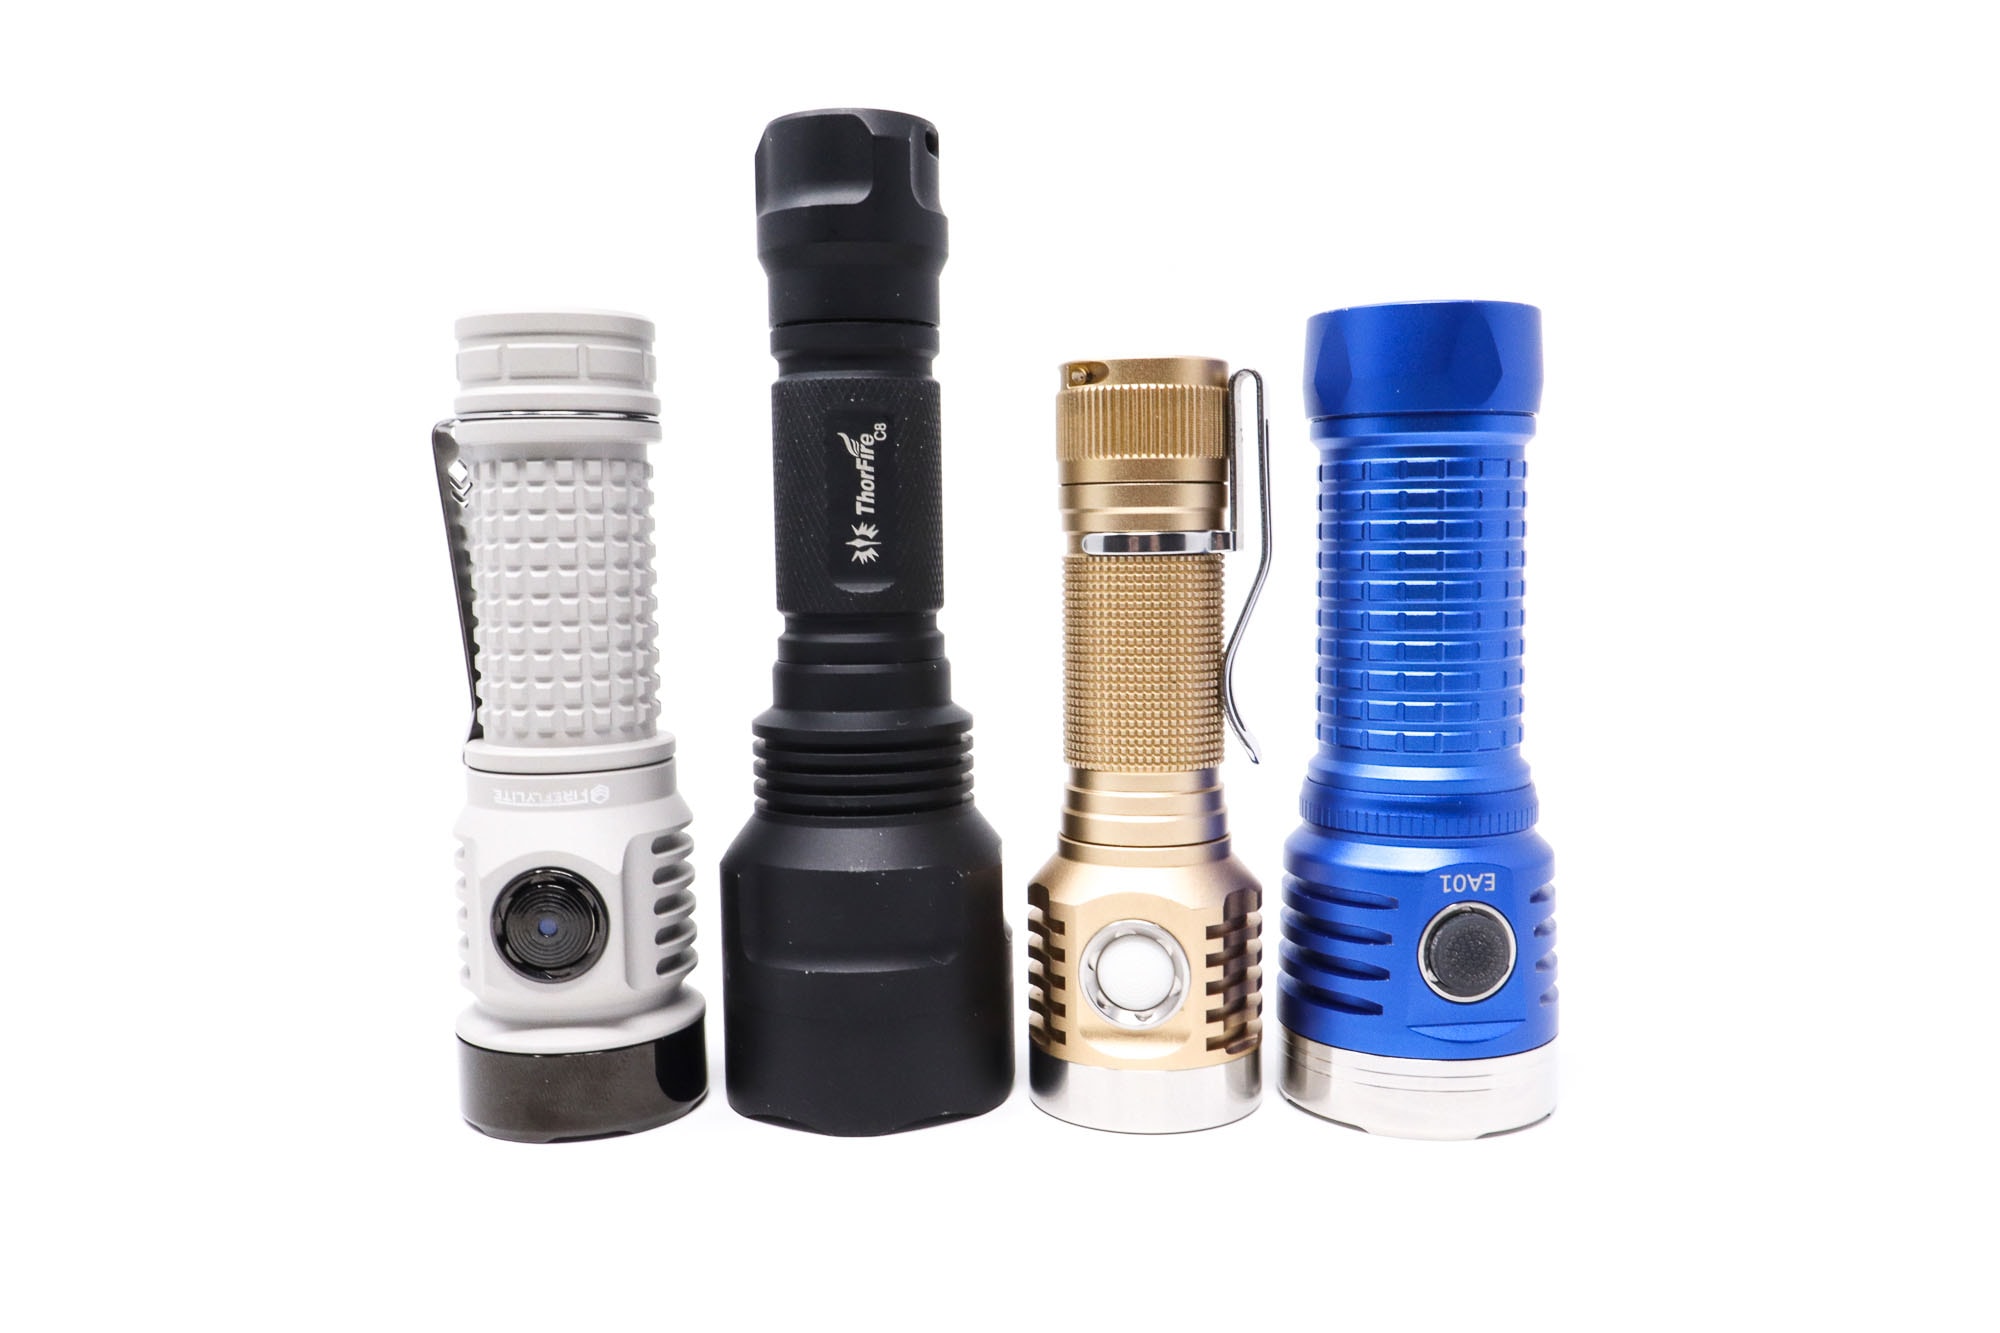
Flashlight size comparison with its competition:
Group 1 left to right: Acebeam L17, FireflyLite X1S, Astrolux EA01, Manker MC13 II
Group 2 left to right: FireflyLite X1S, Thorfire C8, Emisar D1 V2, Astrolux EA01
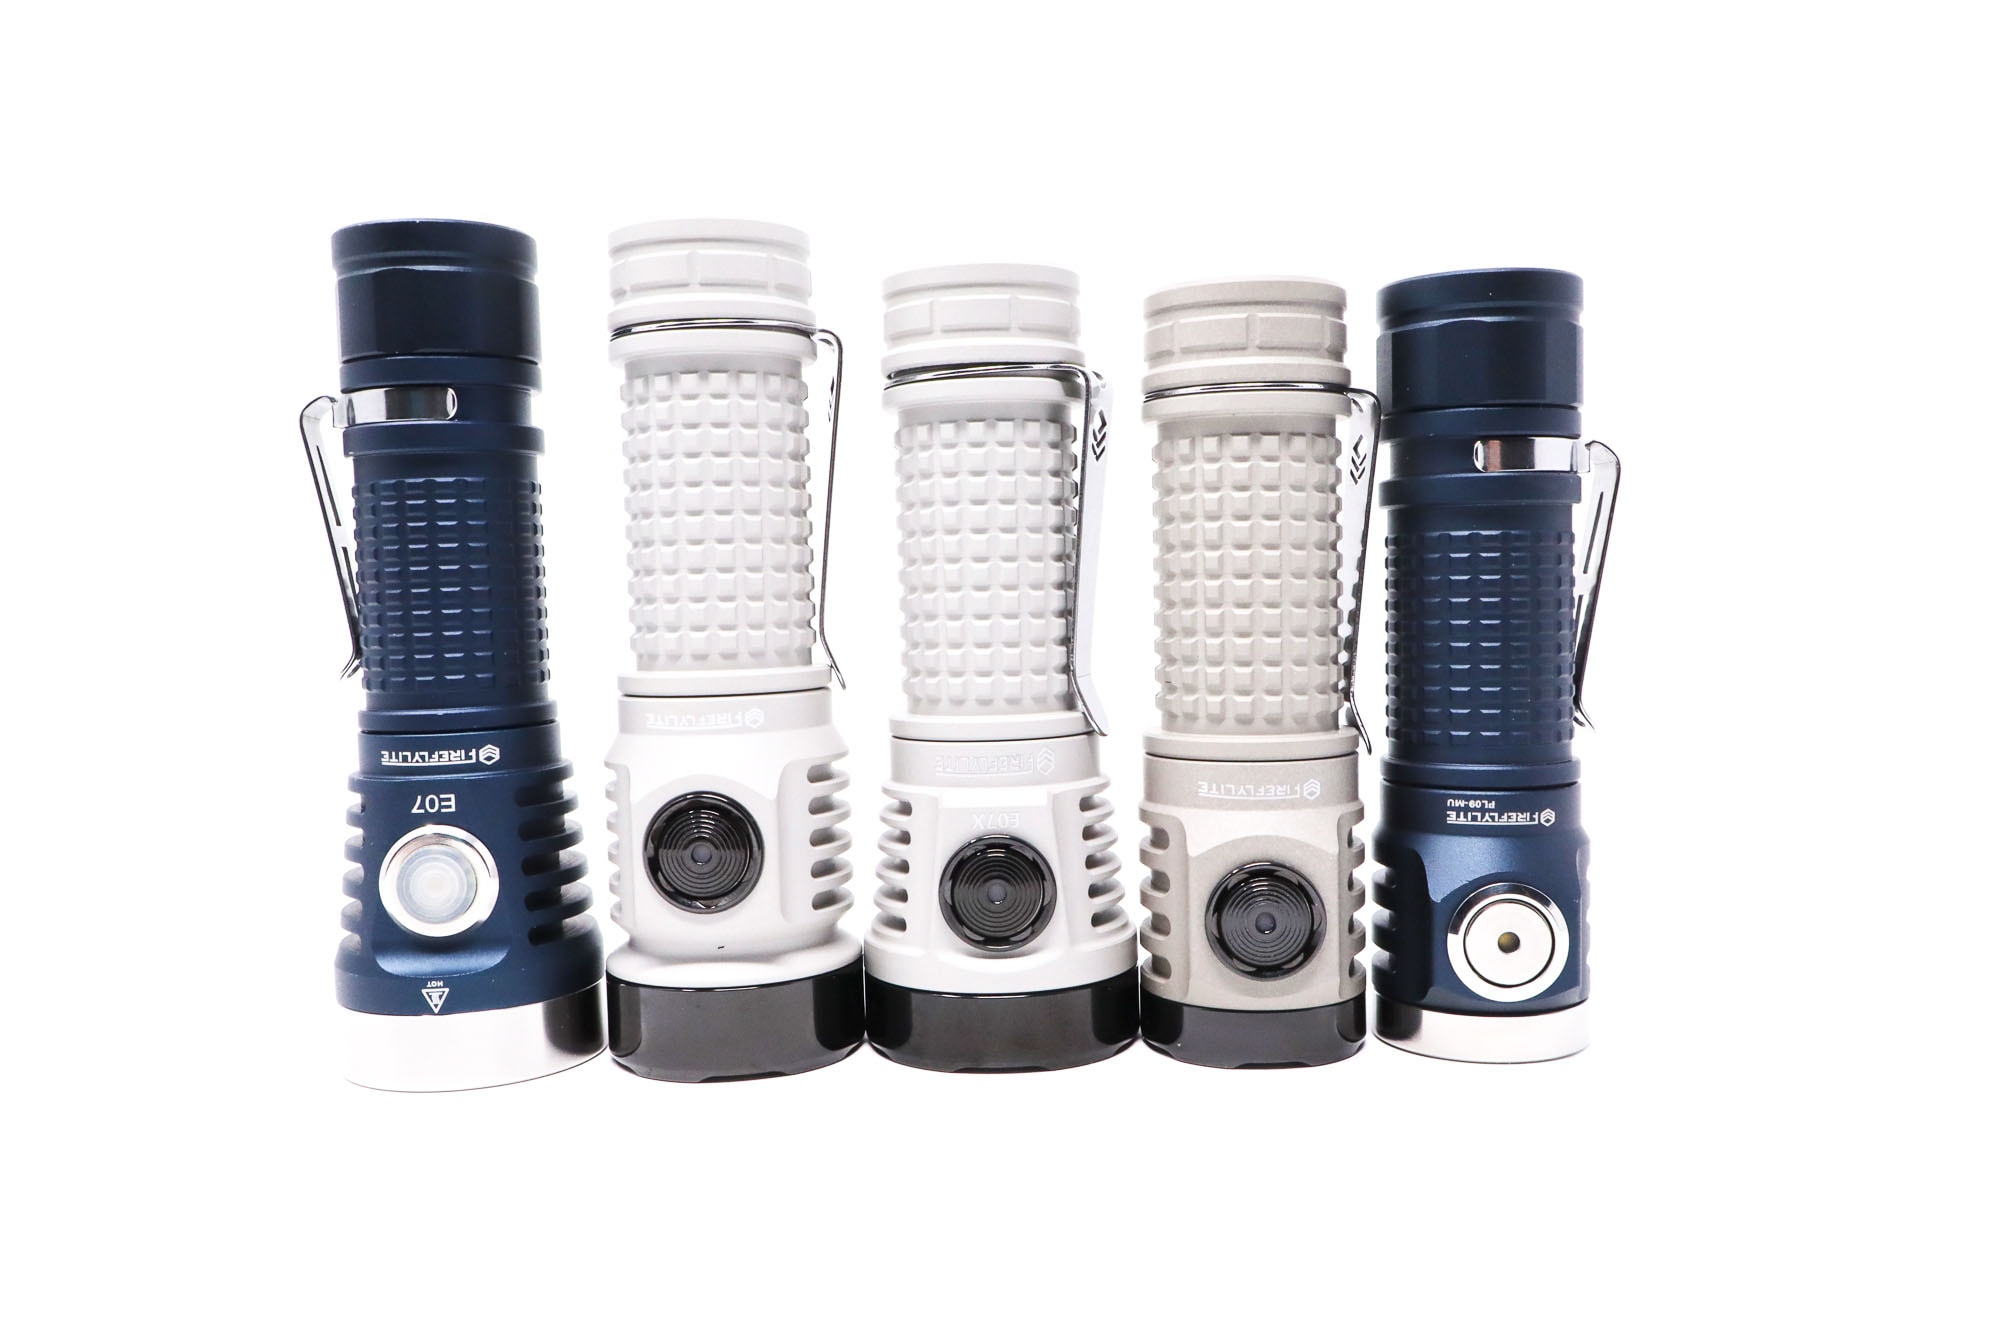
Group 3 left to right: Fireflies E07 2021 Edition, FireflyLite X1S, FireflyLite E07X, FireflyLite NOV-Mu V2, Fireflies PL09 Mu
FireflyLite X1S Pharos UI: User Interface and Driver
The X1S driver is designed by Loneoceans and this one’s the 40 watt high output boost version of the Lume1 driver, the X1. It’s an Attiny1616 MCU based driver for 6 volt LEDs, so it’s 1S input and 6 volts output. Unlike the 3 volt Lume1 drivers, this one doesn’t have a FET channel for direct drive. According to Fireflylite, this one’s been tweaked a bit from the original for higher efficiency.
The UI is ToyKeeper’s Anduril 2 and needs no introduction other than it’s pretty much the most advanced, full featured (and complicated) flashlight UI in the world. This version of Anduril 2 is the newest one, with a unique ‘soft start’ when turning on/off and changing modes in the stepped ramping. The Thrunite TN50 had this feature and I liked it there, but on this light, it hasn’t grown on me.
Anduril 2 User Interface
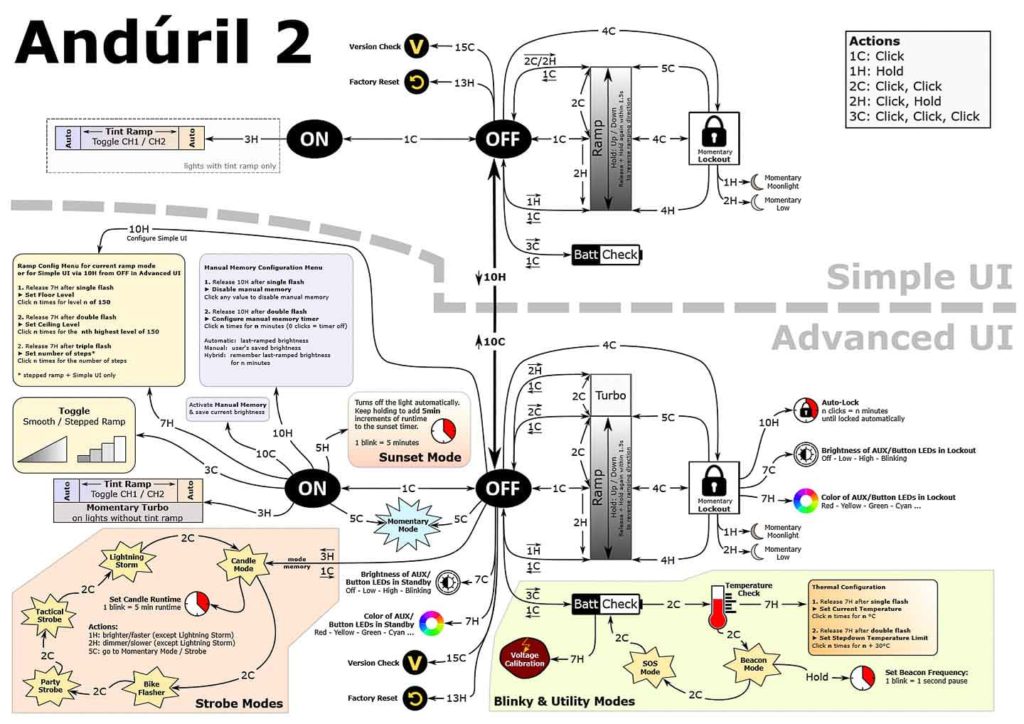
Here is another Anduril 2 image.
And by default, it uses the Simple UI… and here is the UI diagram:
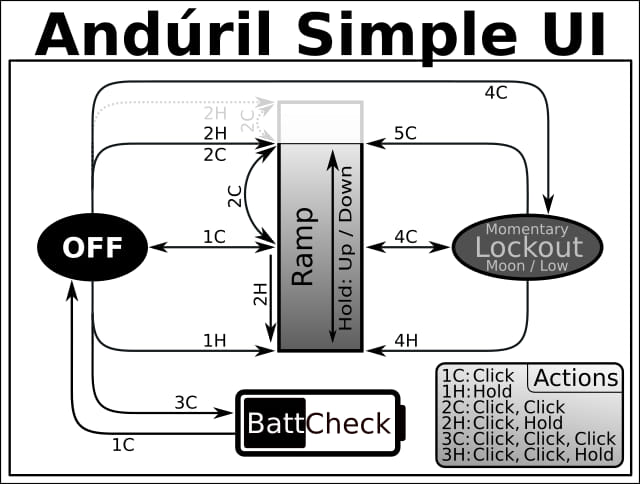
Anduril2 has two UI’s available: Simple and Advanced. The light came with the Simple UI enabled, and I think it’s kind of a misnomer because it’s still a little complicated for a first-time user. However, those familiar with the original will pick it up pretty quickly. Simple UI is missing some of the familiar features present in the original, namely the special blinky modes, temp check, and thermal configuration (those are present in the Advanced UI), and there’s no “muggle” mode either. You still get access to smooth ramping (stepped is, you guessed it, only available in Advanced UI), lockout, momentary high, battery check, and some useful lock/unlock modes.
The Advanced UI is appropriately named because it’s, well, advanced and there’s a plethora of options and configurations available. There’s probably way more features than the average user would ever dip into, but it’s nice to know you can tweak things like the voltage sensor calibration for batt check, AUX LED settings, and even configure the auto-lock. I found this to be a pretty useful feature that enables the light to automatically turn off after a certain amount of time if the light is accidentally activated.
Modes: Simple and Advanced UI both have many standard and blinky modes available, but the main modes are stepped and smooth ramping, but stepped ramping is only available in Advanced UI, and smooth is enabled in both Simple and Advanced.
Switch to Advanced UI from Simple: 10 clicks, but hold on the 10th click
From OFF:
- Press and hold: Turns on in either smooth or stepped ramp (depending on which mode is enabled)
- Single click: Turn on in last mode (step or ramp state-again depends on which mode)
- Double click: Ramp ceiling/turbo
- Triple click: Battery check (in Simple and Advanced UI)
- Triple click and hold: Special strobe modes-remembers last used (in Advanced UI)
- Quad click: Lockout mode. In lockout mode you have different options available:
- 1 click: momentary moon (bottom of ramp)
- 2 clicks: momentary (higher floor)
- 4 clicks: turns on in ramp mode
- 4 clicks with a hold: on in ramp mode, lowest/floor
- 5 clicks with a hold: on in ramp mode, highest/ceiling
- 10 clicks with a hold: configure the lock timeout threshold (in Advanced UI only). This is a new feature for Anduril2, it allows you to set a timeout to the lock, where the light will lock after a pre-set elapsed time.
From ON:
- Press and hold: Ramp up (depending on the mode)
- Single click: Turn off
- Double click: Ramp ceiling/turbo
- Double click and hold: Ramp down
- Triple click: Toggle between smooth and stepped ramping (in Advanced UI only)
- Quad click: Lockout mode (see above for the lockout options)
Mode memory:
- Yes, memorizes last on state setting either smooth or stepped ramping, but does not remember blinkies
Low voltage warning:
- Yes, when in operation, the light steps down brightness gradually until turning off when the cell is around 2.9 volts.
Strobe/blinkies
- Yes, many! The blinkies are accessible from off with 3H (click click click-hold) in ADVANCED UI only. You switch between strobe modes with 2 clicks:
- Candle mode
- Bike flasher
- Party strobe
- Tactical strobe
- Lightning storm
Lock-out mode:
- Yes. In Simple or Advanced UI, lockout is accessed by 4 clicks from on or off. 4 clicks to unlock. The lockout enables momentary operation in the moon mode, however, 2H (click click-hold) enables low mode. There are other lockout modes available (see the diagram).
Temp check and thermal calibration mode
- In the first version, you could do both the ambient temperature sensor calibration and thermal ceiling at the same time, but in Anduril2, it’s a little different. When in temp check, click 7 times and hold on the 7th to enter the thermal configuration. To configure the ambient temp, wait for the first flash and then set the ambient, but once you’ve done that, you need to go back to the temp check and click 7 times, hold on the 7th, this time, don’t let off the button. Wait for the 2nd blink, and then you can set the thermal ceiling.
Additional/summary info on the UI:
- It’s no secret that I am not a huge fan of really complicated UIs, but for most guys and gals, if you leave it alone, Anduril 2 is actually nice. Leave in Simple UI or switch to Advanced UI to unlock next-level tweaking. Once you get the hang of it, this is a really useful UI with more features and functions than I’ll ever hope to use.
- After comparing dozens of ‘ramping UIs’ on many flashlights, Andril has the best smooth ramping/stepped modes of any flashlight UI ever, and very good LVP also. There’s no limit to the tweaking available here, and thanks to it being open source, you can write your own revisions/additions.
- The great thing about Anduril 2 is the thermal calibration is done at the factory, and for this light it is on the money, within +/- 1 to 2 degrees C of ambient, and pre set to 50 C on the thermal ceiling. I do recommend setting that to at least 60 C to get the best output.
FireflyLite X1S Pharos Charging and batteries
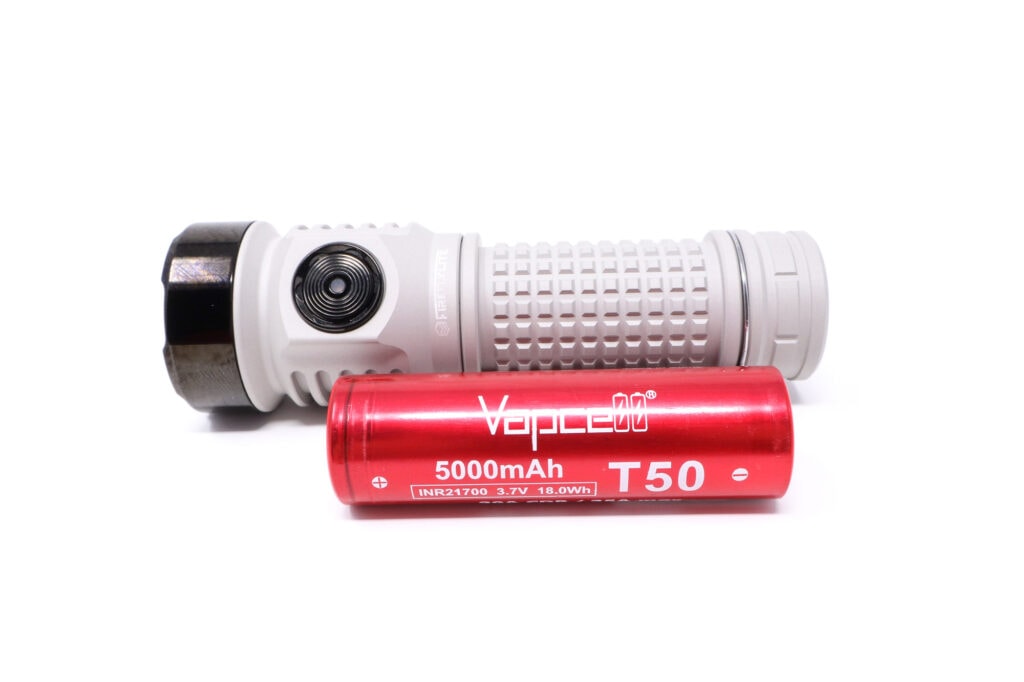
The X1S uses a 21700 li-ion cell. It doesn’t come with one, but the VapCell T50 is an optional add-on. I recommend getting it since it’s only about $10 extra and I think the VapCell is a rewrapped Samsung 50S which is an excellent fairly high current cell. For cell compatibility, FireflyLite says it takes up to a 71 mm cell, and the only ones I had that fit were standard length cells, flat top only. Even unprotected button tops were too long and I couldn’t seat the tailcap fully.
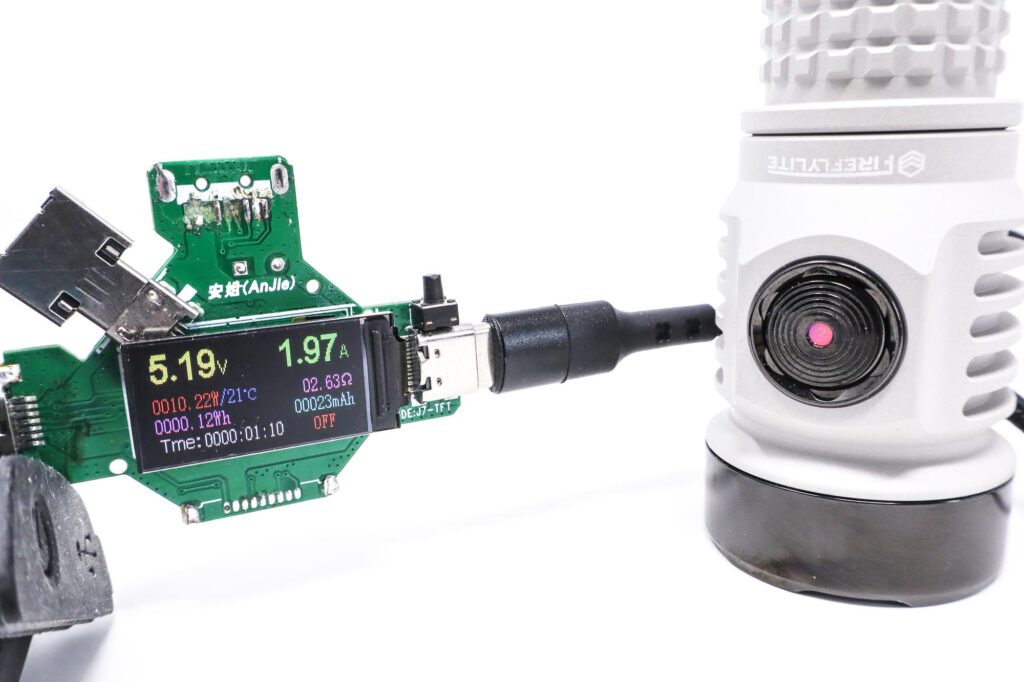
The X1S features onboard USB C charging, but it’s been modernized with a magnetic charge port cover instead of the rubber one. The cover itself is brand new, and FireflyLite put a lot of R&D into this, so much so, it’s patented. The great feature here is the IPX8 rating is retained even with the cover open, which solves a big issue with lights with onboard charging should the port cover fail or come open unintentionally. The charging speed is unchanged from before, with up to 2 amps (10 W) on tap. Using the Ruideng AT35 type A and my Hidance universal type C testers, I got the advertised 5 volts 2 (often 2+) amps.
| Charge type | Fits | No fit | Charge time |
|---|---|---|---|
| Onboard USB-C | Standard flat top | 71 mm long 21700s | About 3 hours for a 5 Ah 21700 |
Performance test
Lumen measurements
How Lumens are Measured: Understanding ANSI FL1 Standards How Lumens are Measured: Understanding ANSI FL1 Standards: The ANSI FL1 standards specify that output in lumens should be measured 30 seconds after turning on, as this is the standardized time for measuring brightness according to the industry standard. This is why we focus on this part in our measurements. The ANSI FL1 standards require an ambient temperature of 22 ± 3°C. We record the ambient the ambient temperature to identify potential reasons for any observed discrepancies.Lumens are measured in my 50 cm integrating sphere with a Digi-Sense 20250-00 data logging luxmeter. The sphere has been calibrated with a Convoy S2+ measured to 260 Lumens and the figures are within 10% of actual. I use a Thisinde B18B+ multimeter with 14 gauge wire on banana plugs in the meter for low current and my FY219 clamp meter for higher currents over 200 mA. and tested the stepped modes in the Advanced UI. The thermal ceiling was set to 65 C for the testing. I used the included VapCell T50 for the testing.
| Mode | Amps at start | Specified | Turn on | 30 sec. | 10 min. |
|---|---|---|---|---|---|
| L1 | 0.5 mA | ? | N/A | N/A | – |
| L2 | 25 mA | ? | 9.8 | 9.8 | – |
| L3 | 226 mA | ? | 111 | 111 | – |
| L4 | 943 mA | ? | 406 | 406 | 394 |
| L5 | 2.88 A | ? | 1045 | 1033 | 959 |
| L6 | 7.88 A | ? | 1980 | 1906 | 922 |
| Turbo | 12.38 A (5.8 A at 30 sec.) | 3000 | 2521 | 2362 lm | 922 |
Ambient temperature during testing:
- 19.5 °C
Parasitic drain:
- AUX LEDs off: 5.7 mA
- AUX LEDs on: 7.7 mA
Prior to receiving the rest light, I was informed about a bug in the firmware that causes the standby current to be excessive, and it is! I measured almost 6 mA with the AUX LEDs off, and over 7 mA with them on (on the RGB setting). No mention of this being expressed beyond the sample lights, but time will tell. It can be fixed by flashing the driver with a firmware update, and FireflyLite will supply the hex file if requested. This issue isn’t the end of the world, but it could be since this light doesn’t take protected cells, and if you left the light alone without the current path isolated, it would drain even a 4500 mAh battery down to a very low level in about 25 days with the AUX LEDs off.
FireflyLite X1S Pharos Battery Life: Runtime graphs
How Runtimes are Measured: Understanding ANSI FL1 Standards About ANSI FL1 runtime standards: The runtime is measured until the light drops to 10% of its initial output (30 seconds after turning on). This does not mean that the flashlight is not usable anymore. The last column shows how long the light actually works till it shuts off. If there is a + symbol, it means that the test was stopped at that particular point, but the light was actually still running. This happens on certain occasions, with certain drivers, firmware, or batteries.Lumens are measured in my 50 cm integrating sphere with a Digi-Sense 20250-00 data logging luxmeter. The sphere has been calibrated with a Convoy S2+ measured to 260 Lumens and the figures are within 10% of actual. I use a Digi-Sense 20250-92 data logging thermocouple for the temperature measurements. The probe is affixed to the head using kapton tape and uses the same 5 second sampling rate for logging. I tested stepped modes L4, L5, L6 and Turbo in Advanced UI. The thermal limit was set to 65. I used the included VapCell T50 for the testing.
| Mode | Specified | Runtime (ANSI FL1) | Time till shut off |
|---|---|---|---|
| L4 | ? | 4h 52m | 5h 1m* |
| L5 | ? | 2h 3m | 2h 19m* |
| L6 | ? | 1h 47m | 2h 8m* |
| Turbo | ? | 1h 44m | 2h 6m* |
*Note: The light was still running at a very low level when I terminated the testing
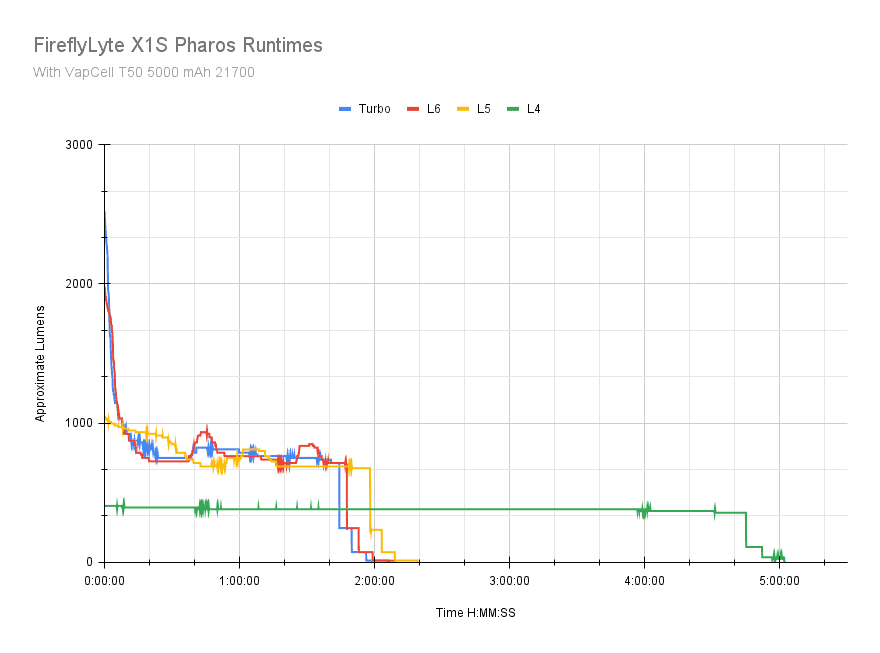
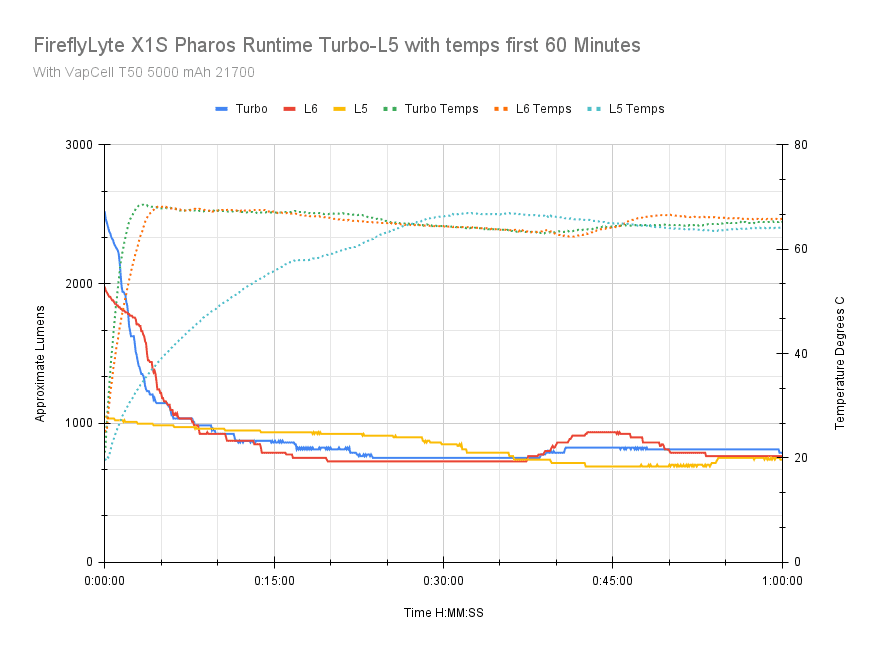
The runtimes look great! The Lume1 boost driver does a great job and keeps the output up over the useful life of the battery. With a good high capacity cell like the T50, you’re guaranteed consistent high sustained output. You really don’t need a high current cell for this light though. Something like a Samsung 50G or 50E3 would be perfect.
There is a step down for Turbo and L6, with nice regulated output of around 800-1000 Lumens for nearly 90 minutes. There is thermal regulation due to the high thermal ceiling (65 C), but a lower thermal limit (60 or 55 C) would limit that fluctuation. At that high level, the light is no longer hand-friendly after about 4 minutes on Turbo, and a little longer on L6, when the tube hits 56 C.
For LVP, it’s typical Anduril, with the output dropping very low and continuing to run at a very low level. I let it run a bit before terminating the test after this final step down. The battery was discharged down to 2.8 to 2.9 volts after each test.
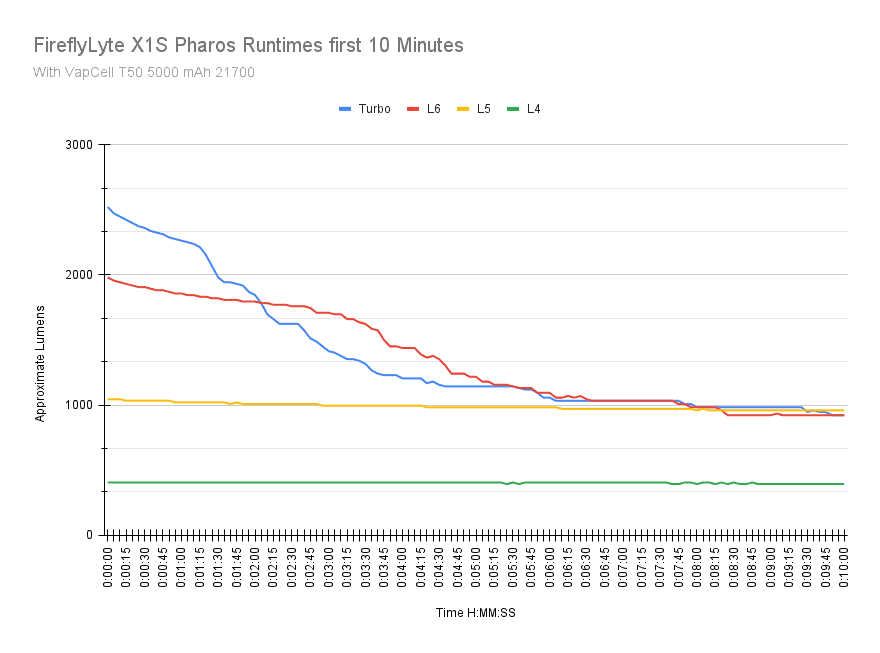
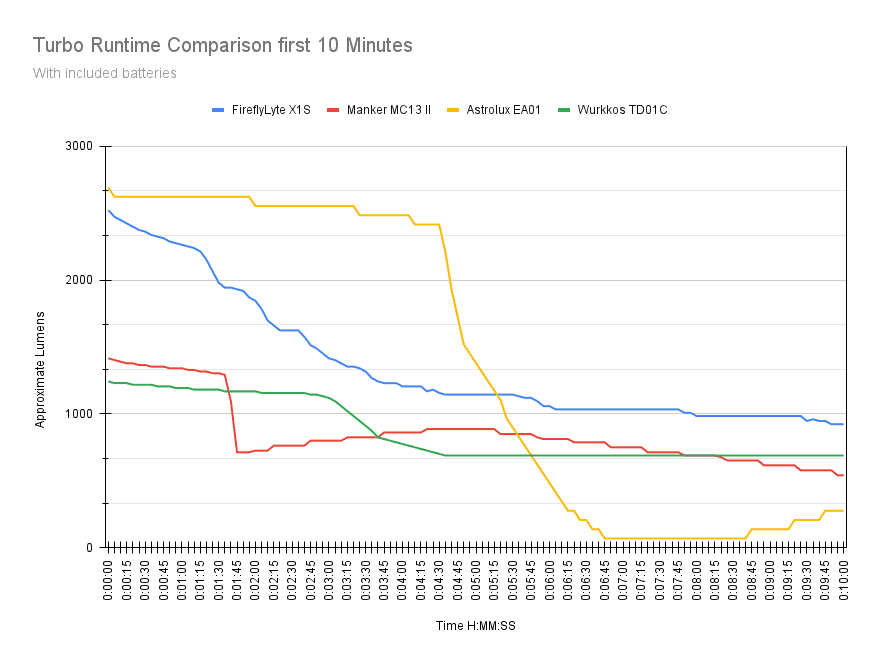
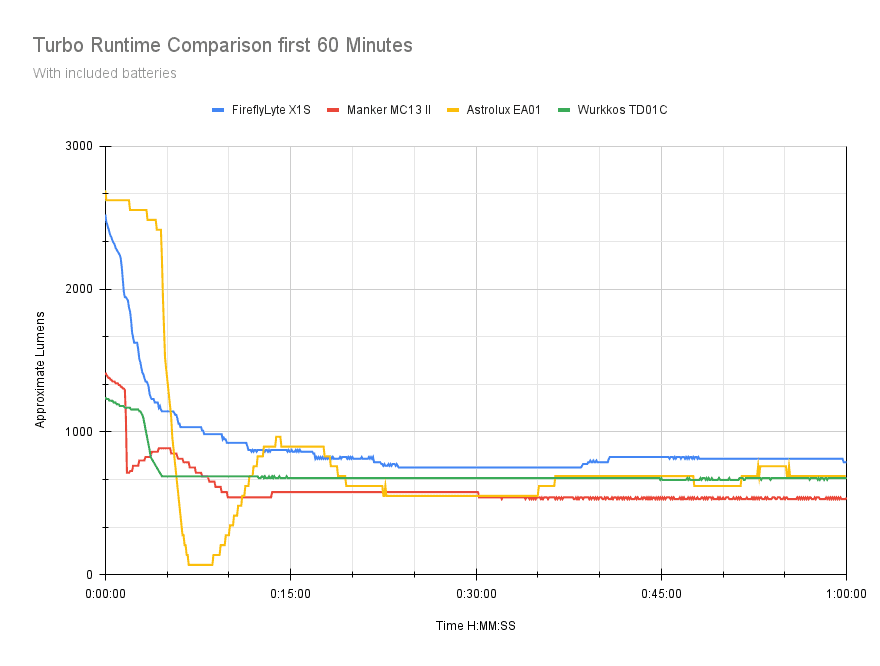
For the comparison graph, I included some other TIR based lights, the Manker MC13 II with SFT-40-W, Wurkkos TD01C, and the Astrolux EA01 with XHP50.2 and Anduril 1. You can see that these are all handily beaten in sustained output thanks to the Lume X1 driver. The EA01 beats it out of the gate for the first couple minutes, but drops down to 100 Lumens before throttling back up. It comes closer to the X1S in sustained output, but it’s not consistent due to its unregulated driver. Overall, this is excellent performance from a pocketable single cell light.
Peak beam intensity and beam distance measurements
About Peak beam intensity: Understanding ANSI FL1 Standards About peak beam intensity The calculated value of distance in meters at which the flashlight produces a light intensity of 0.25 lux. (0.25 lux is about the brightness of a full moon shining on an object). This means that the intensity has decreased so much, it becomes difficult to see darker objects, or objects that don’t reflect light. The columns ‘Meters’ and ‘Yards’ use rounded numbers.Beam distances are measured using a Uni-T UT383S luxmeter measured indoors at 5 meters using the included fully charged battery. Measurements taken at 30 seconds. I used the included VapCell T50 for the testing. The battery was topped off and the light was allowed to cool between the L6 and Turbo measurements.
| Mode | Specified | Candela measured | Meters | Yards |
|---|---|---|---|---|
| L1 | ? | N/A | N/A | N/A |
| L2 | ? | 200 | 28 | 31 |
| L3 | ? | 2100 | 92 | 101 |
| L4 | ? | 8275 | 182 | 199 |
| L5 | ? | 20,050 | 283 | 309 |
| L6 | ? | 37,450 | 387 | 423 |
| Turbo | ? | 44,725 | 423 | 463 |
Ambient temperature:
- 19.6 °C
The specs say 400 meters on the throw, and I got slightly higher. There’s a lot of beam distance with this light for having a sub 40 mm head and a powerful LED. This is a very useful beam with more than enough beam distance.
Beamshots
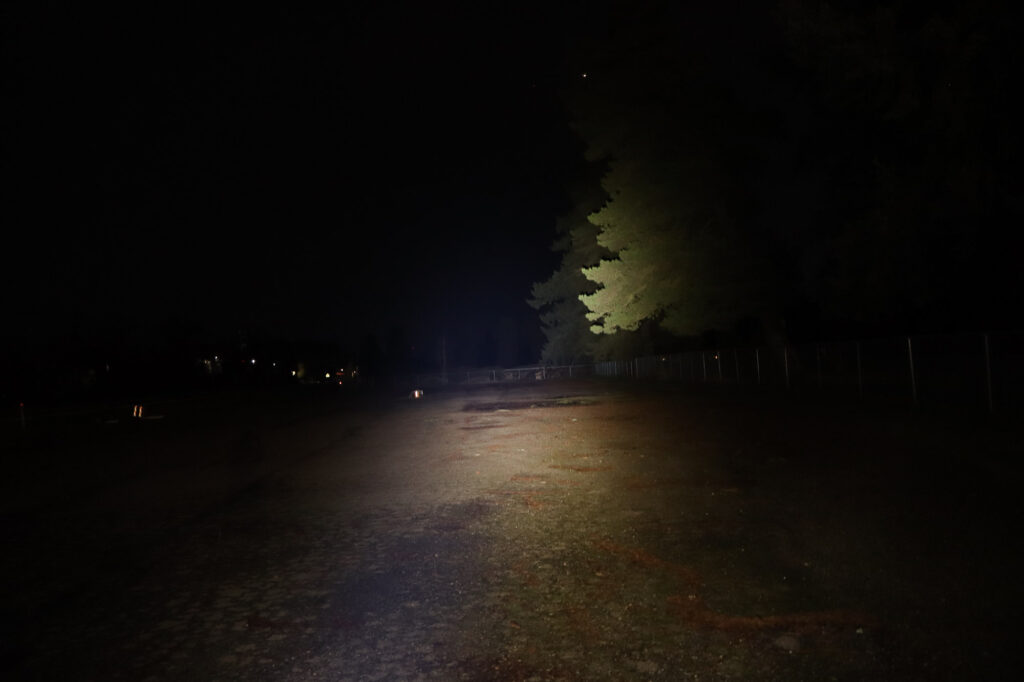
Camera settings and distance: Photos taken with a Canon EOS R100 and Canon R-FS 18-45mm STM lens set to 0.3s, f5 ISO 1600 and 5000K WB.The fence is 95 meters away. The trees beyond the fence are about 150 meters distant.
Beamshots of the following flashlights compared:
- FireflyLite X1S
- Astrolux EA01 (note that this light has a de-domed XHP50.2)
- Manker MC13 II
- Olight Seeker 4
Please note that the following beamshots are mainly intended to showcase the beam pattern and beam quality, rather than overall performance. These images are typically taken directly after activation, and in different seasons or weather conditions, and therefore do not fully represent its overall performance. For accurate performance metrics, such as output, beam distance, and runtimes, you need to look at the performance section of this review.
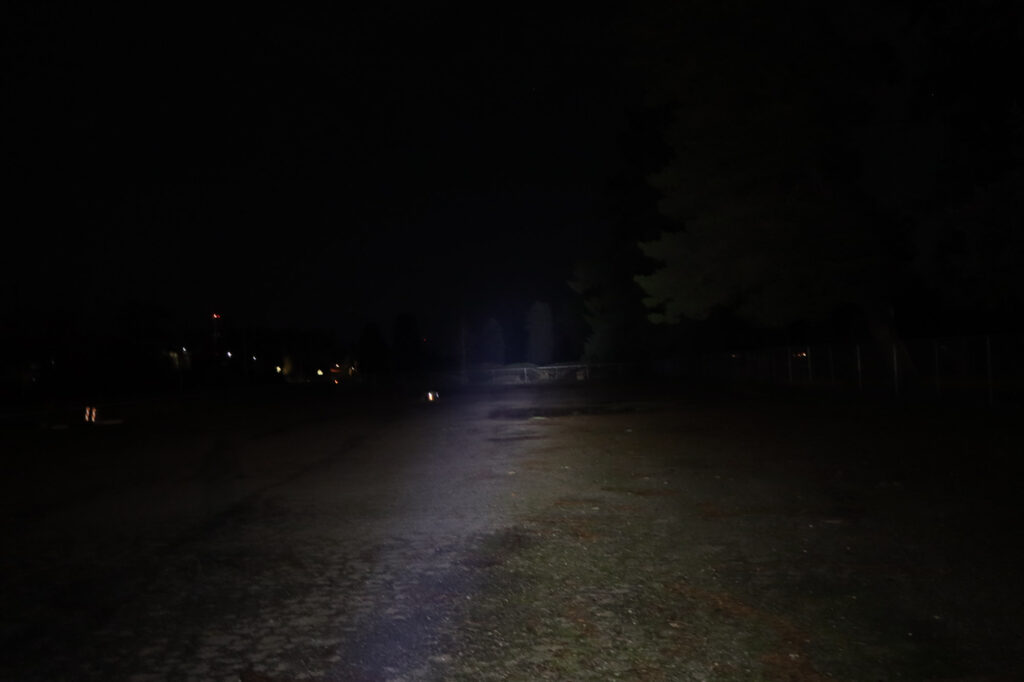
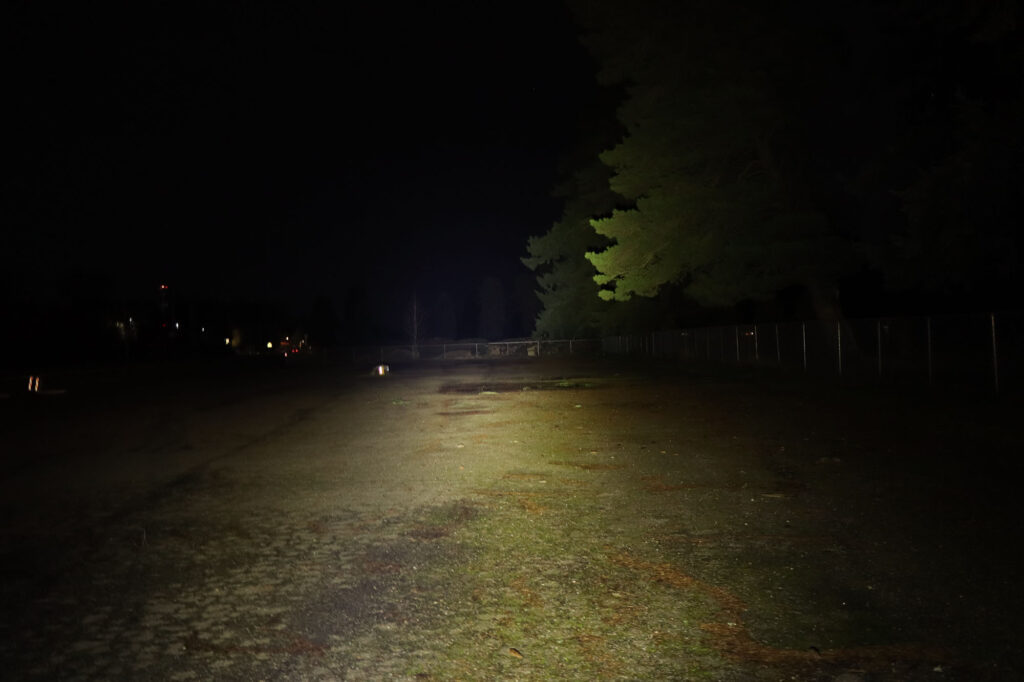
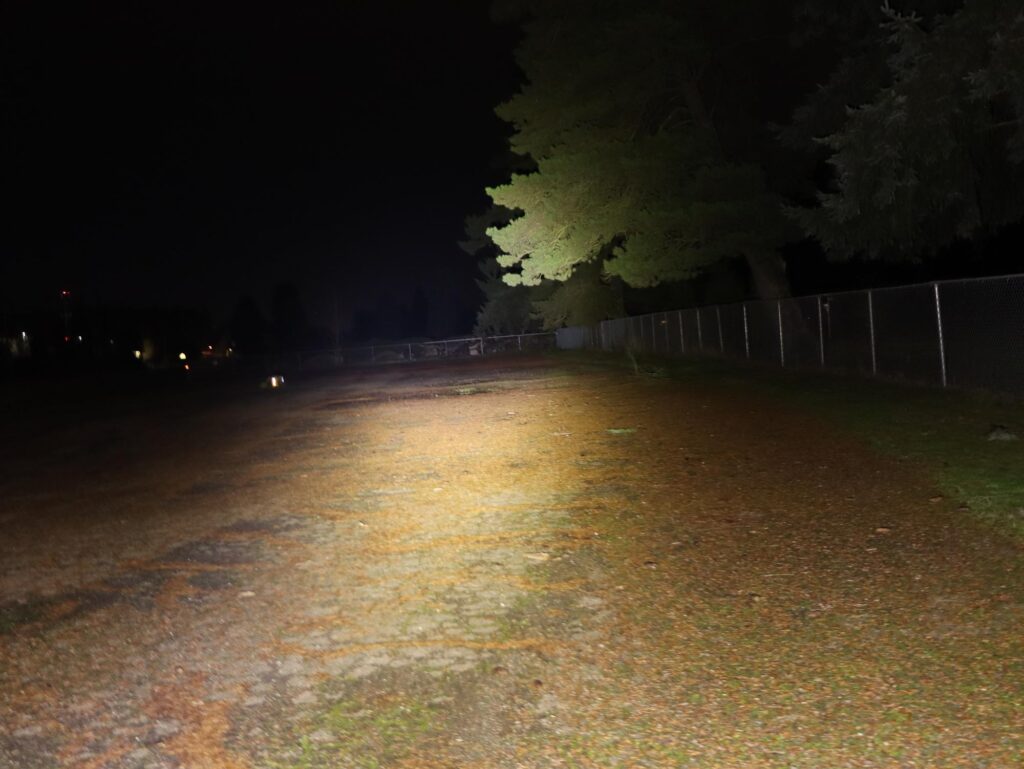
Disclaimer: This flashlight was sent to us for review at no cost by FireflyLite. We have not been paid to review, nor have we been holding back on problems or defects.
Final Verdict
Pros
- Excellent build quality, fit and finish
- Fully regulated driver with onboard charging
- Choice of high CRI LEDs
- Nice runtimes and sustained output
- Great beam distance
Cons
- Tailcap and head are tough to screw on (o-rings weren’t lubed)
- Firmware bug caused high standby current, but is fixed in all new copies.
- No lanyard mounting point on the host
Explanation on star ratings:
1: Avoid: a match would be a better choice – 2: Poor: significant defect or issues; almost unusable – 3: Average: some defects or issues; but still usable 4: Good: recommended (minor issues) – 5: Great: highly recommended

4-4.5 stars: ★★★★⋆
While our star rating provides a reliable indicator, we encourage you to read the full review to make an informed decision based on your own needs and preferences.
TIRs are getting more popular, and while an easy way to ‘tune’ the beam of a flashlight to your liking (just swap the optic), reflectors still rule the roost, so to speak. The first TIR light I ever tested was the Acebeam L17, which earned the spot at the longest-throw tactical light at the time (in late 2019). Now there’s lots of TIR lights, including this all-new X1S Pharos. Better driver (a boost driver), onboard charging, access to 6 volt LEDs, onboard charging, and a slick new design.
They’ve also foregone rummaging through the Chinese market flashlight parts bins and gone with a legit optic from a company who specializes in optics.
All good stuff, and the result? A compact, high performance enthusiast flashlight for the masses. This one has been a while in coming, but it was worth the wait!
Once again, Loneoceans hits it into next week with the Lume1 boost driver, and I really enjoyed the finish and nice beam from that premium TIR. It seems very nicely matched to the XHP50.3 HI emitter, and the nice, neutral tint. I think it’s one of the better pocket TIR lights out there now, with the only real competition being the Noctigon DM11 and Astrolux EA01 (which isn’t made anymore), and some from Convoy, but I think this represents the top of the pack in terms of sustained output, size, and features. Seriously, the only things I didn’t like were the tough to tighten tailcap/head, and the fact there’s no lanyard mounting point on the flashlight itself, just the pocket clip.
The firmware bug is also a drag, and totally preventable, so I’ll chalk that up as a quality control fail. Keep in mind that the new flashlights will all be shipped with the correct firmware
Overall, those issues notwithstanding, I’m impressed with the Pharos and I recommend getting one if you’re looking for a high performance pocketable TIR based flashlight. If this didn’t have the firmware bug it’s a 4.5 star light, but issues are issues, so 4 stars for the X1S.
Note: all new flashlights will be shipped with the new, upgrade firmware!
Buy your FireflyLite X1S with a discount
Get 10% off at Firefly Outdoor store, using our exclusive discount code: 1lumen
1lumen selects and reviews products personally. We may earn affiliate commissions through our links, which help support our testing.