1lumen selects and reviews products personally. We may earn affiliate commissions through our links, which help support our testing.
Haikelite HK95 review
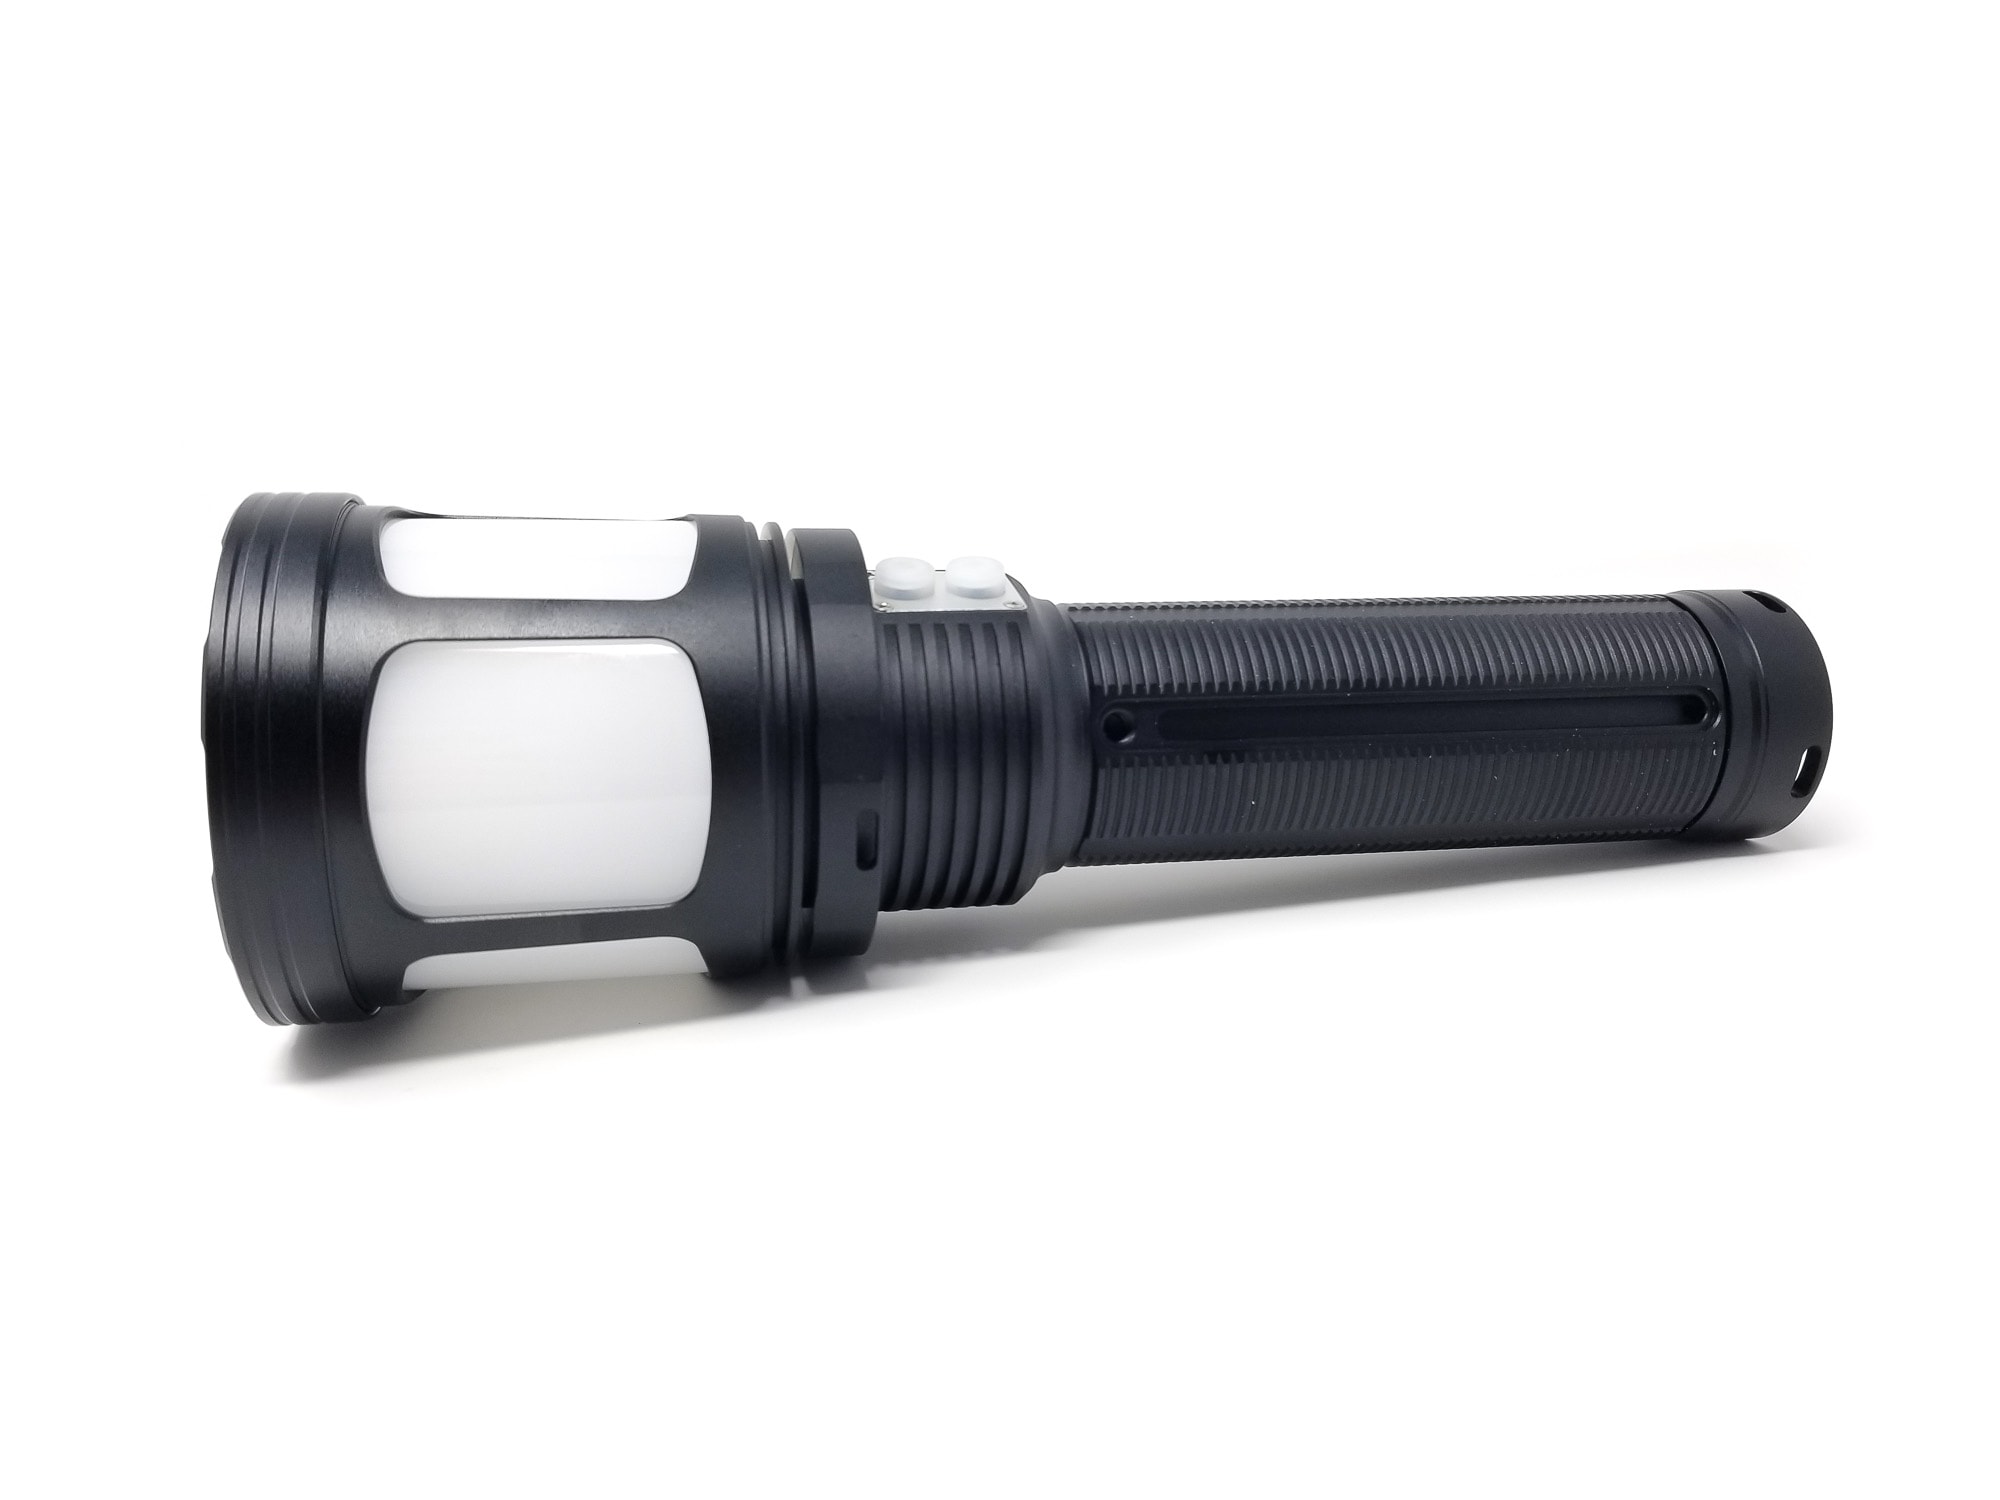
Haikelite HK95 specifications
| Brand & Model | Haikelite HK95 |
|---|---|
| Flashlight category | High Output General Purpose +camping Lantern |
| LED | 1 x SHF55, 5 x H50 |
| Max. output | 23,000 lumens |
| Max. beam distance | 1700 meters |
| Max. beam intensity | ? |
| Battery config. | 6 x 18650 battery pack |
| Onboard charging | USB C |
| Main modes | 6 |
| Blinkies | Strobe, S.O.S, Tactical Strobe |
| Waterproof | IPX8 |
| Review publication date | February 2024 |
Review intro:
If you could trace the origin of the uber high performance flashlight to a single point, I think one could finger Haikelite as the progenitor of the high output handheld light. In the early days, enthusiasts turned to Haikelites (like the MT03, MT09R, MT07) for some of the highest output affordable flashlights on the market. They were good out of the box, but if you were proficient with modding, you could make them even better.
That’s not the case these days where factory lights are just as good or better than modded lights. We’ve reviewed some Haikelites, myself included, and the consensus? High output, no-nonsense flashlights at reasonable prices. While flashlight tech has stagnated somewhat, that hasn’t stopped Haikelite from soldiering on, and now there’s a new one, part of their newer HK lineup. Dubbed the HK95, this one’s an oddball for sure (but I like that): A dual-light source consisting of a high output thrower and an equally high output lantern. You heard me right. It features a battery pack (maybe the first from Haikelite) and a smooth ramping/stepped mode UI. At first glance, the word ‘torch’ immediately came to mind. You’ll see why!
What’s in the package?
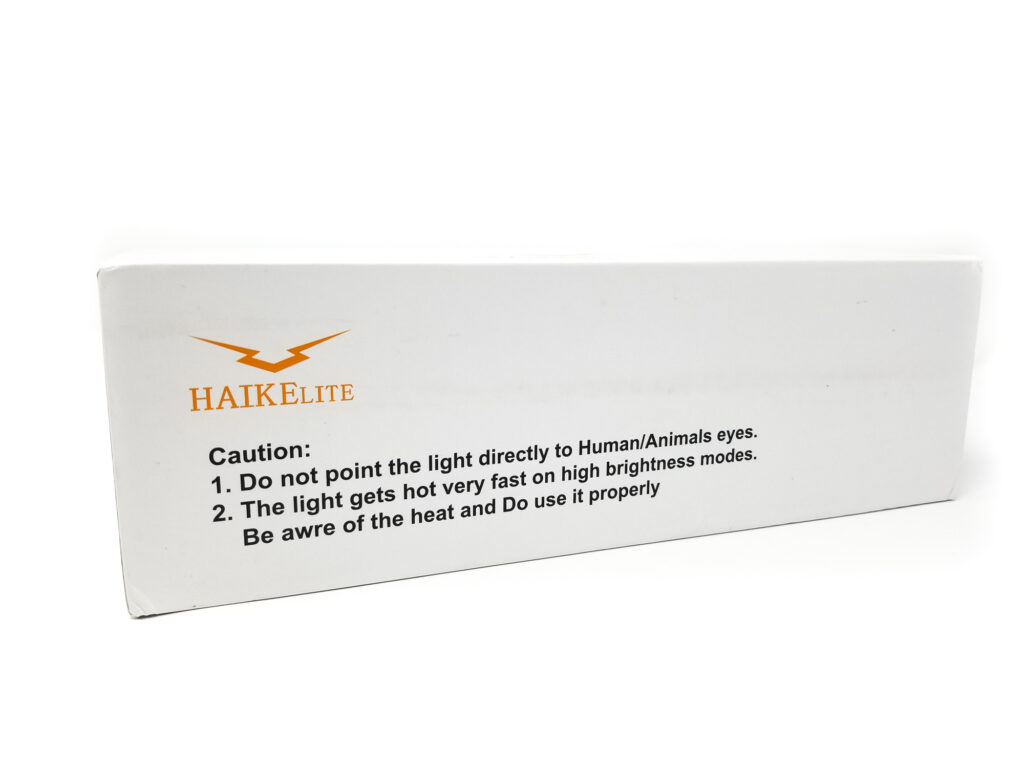
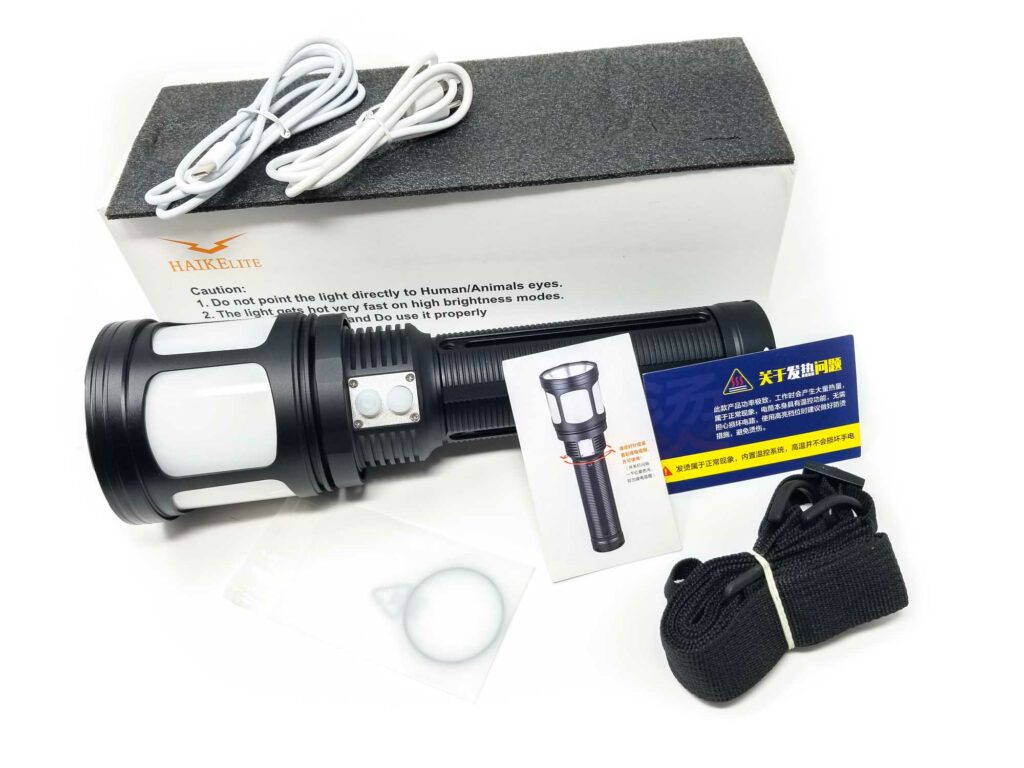
Haikelite packages lights in unimposing and blase boxes, which is totally fine, but still befitting of the price bracket. The HK95 comes in a nice package nonetheless, a pretty plain lift-off lid box with the HK95 in some foam with the accessories on the sides.
- Haikelite HK95
- O-ring
- Quick start card
- Info card
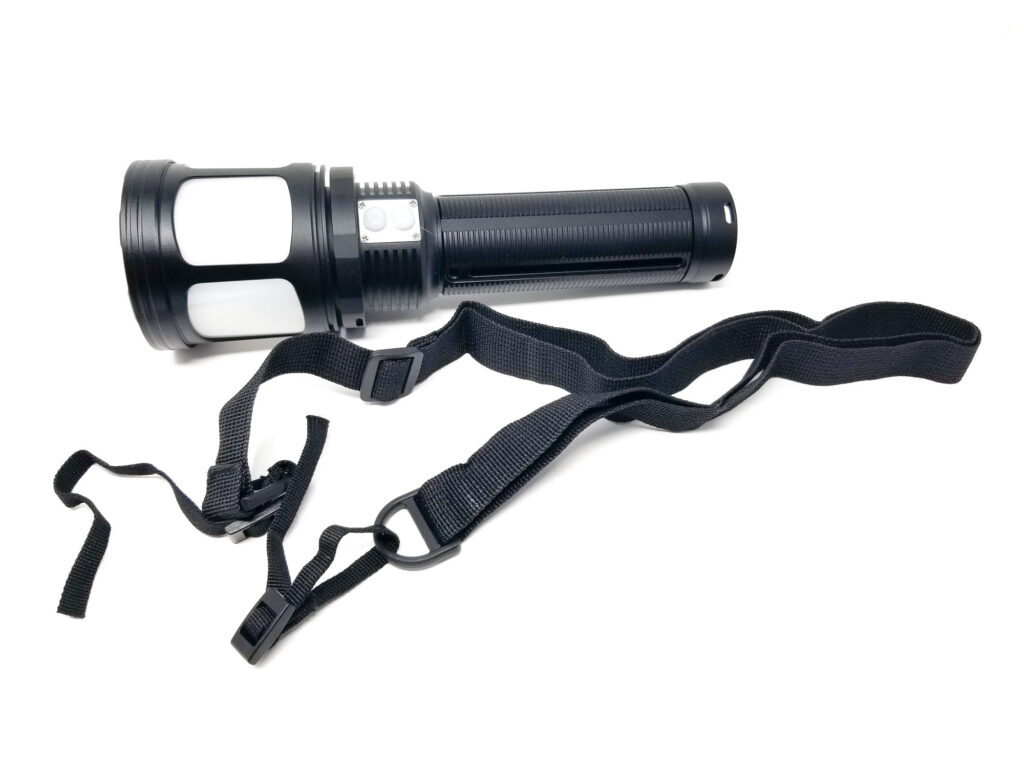
- Carry strap
- USB type C to C cable
- USB type A to C cable
This is a mostly complete kit and ready to go out of the box. Missing was an instruction manual or guide of any kind, shape or form. What was included though was a couple of business cards in Chinese. One I assume was for warranty or support, and the other was for tightening the battery tube to the head before using. I really like that there’s two USB cables: Both for charging, but one for the power bank. The battery came charged to 8.14 volts, so pretty much 95% charged. Not great for storage, but guarantees full output out of the box. The carry strap looks cheap and it’s like one for a camera that has to be ‘installed.’
Flashlight in use, Build Quality, and Warranty
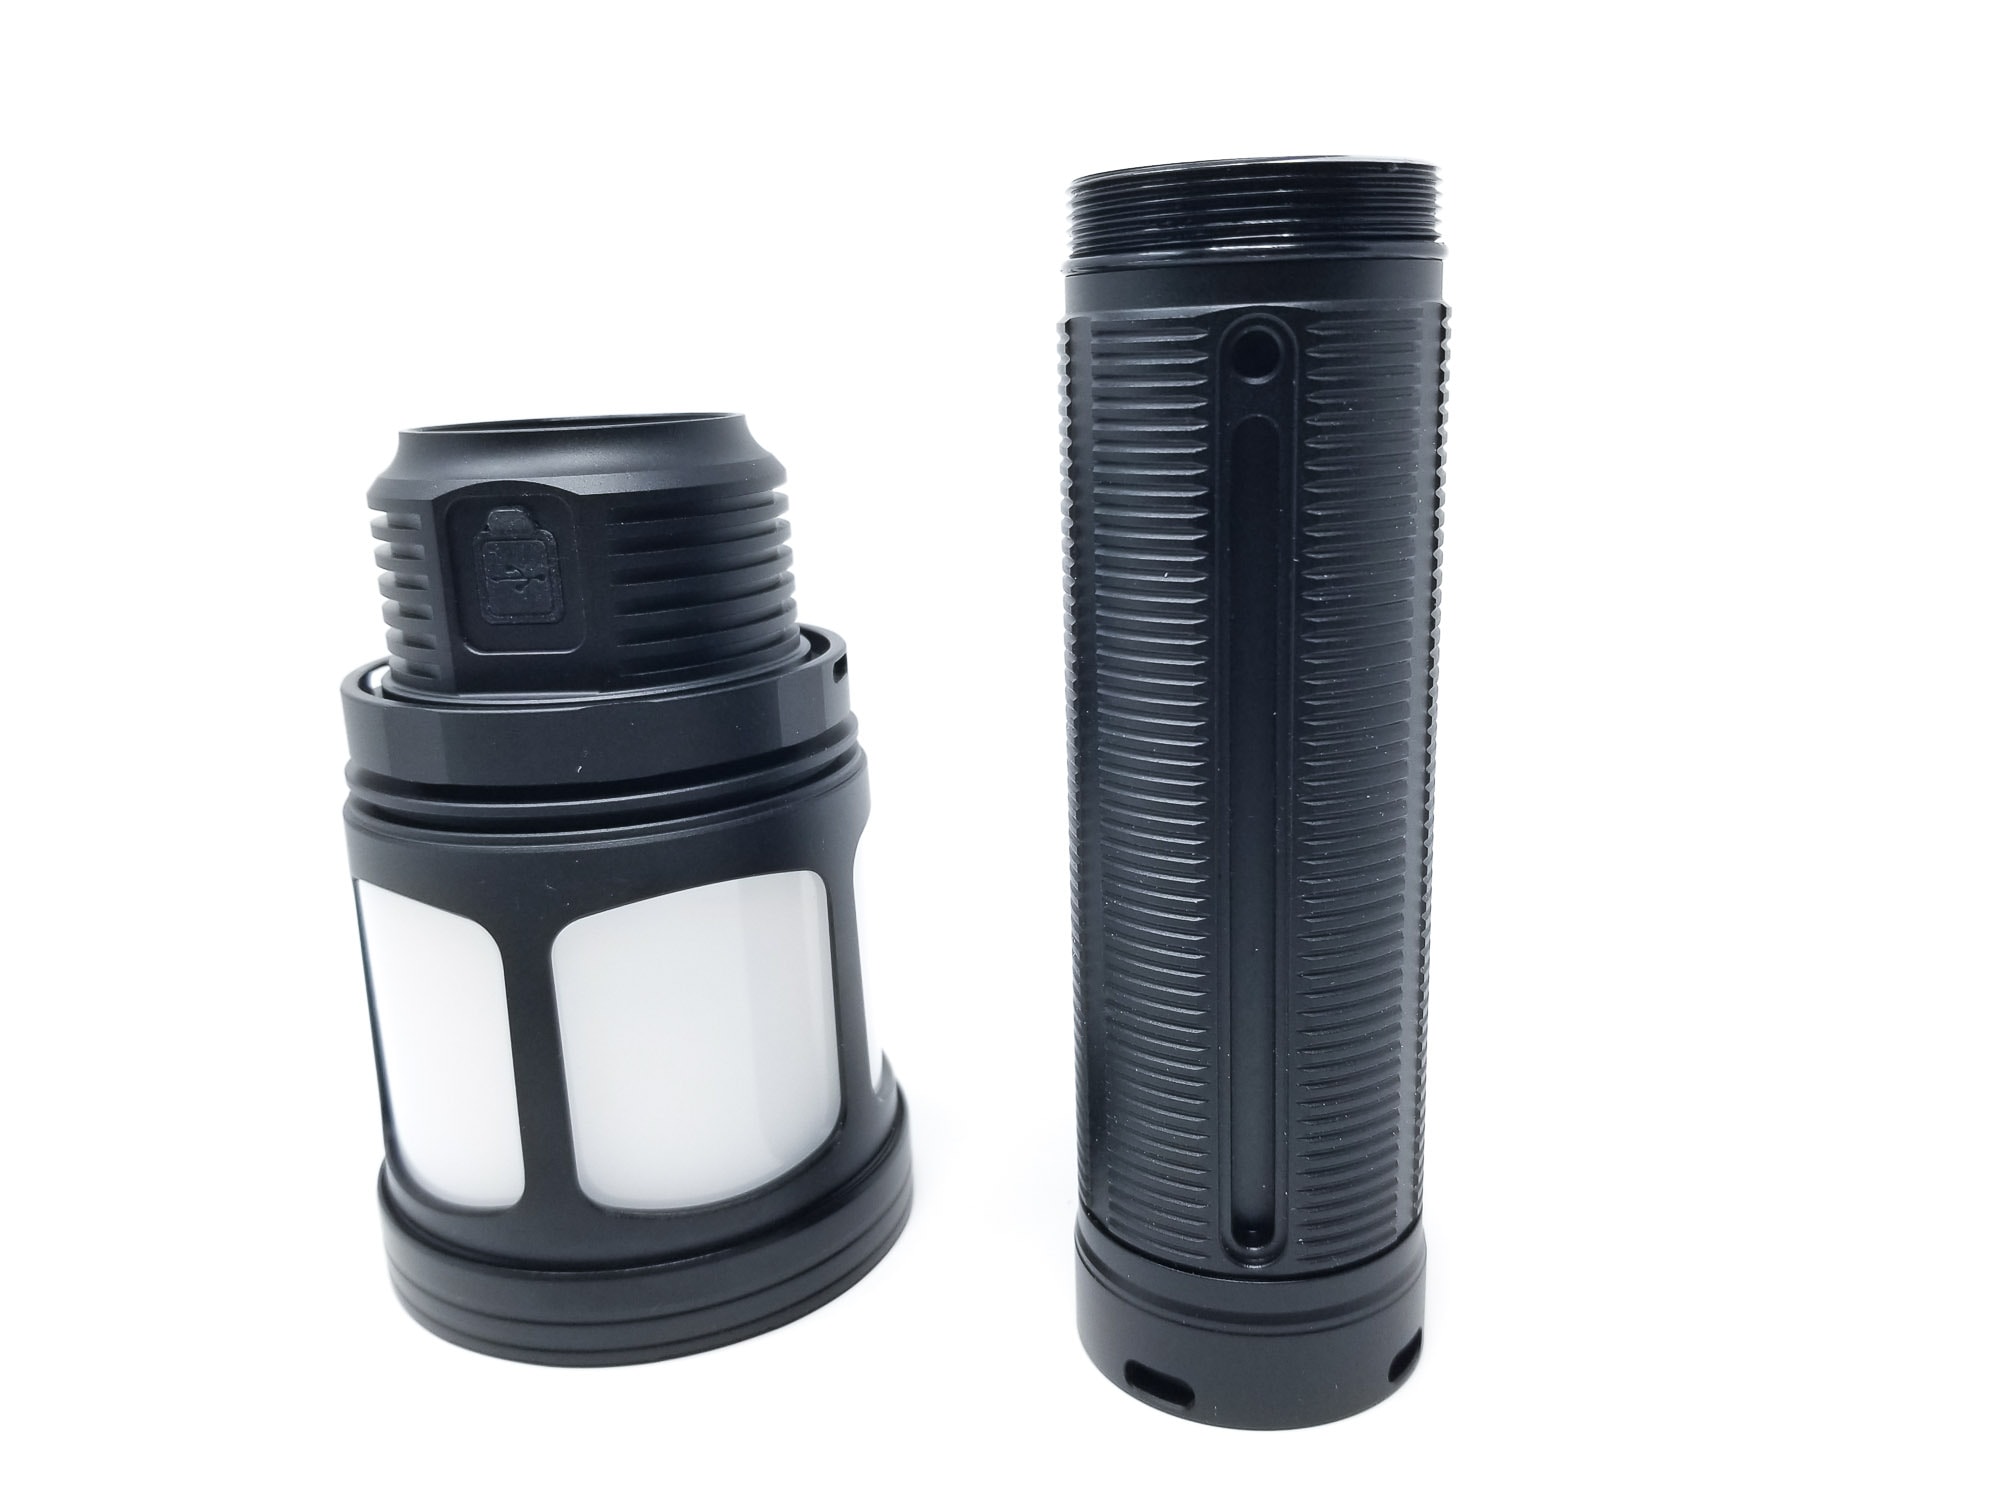
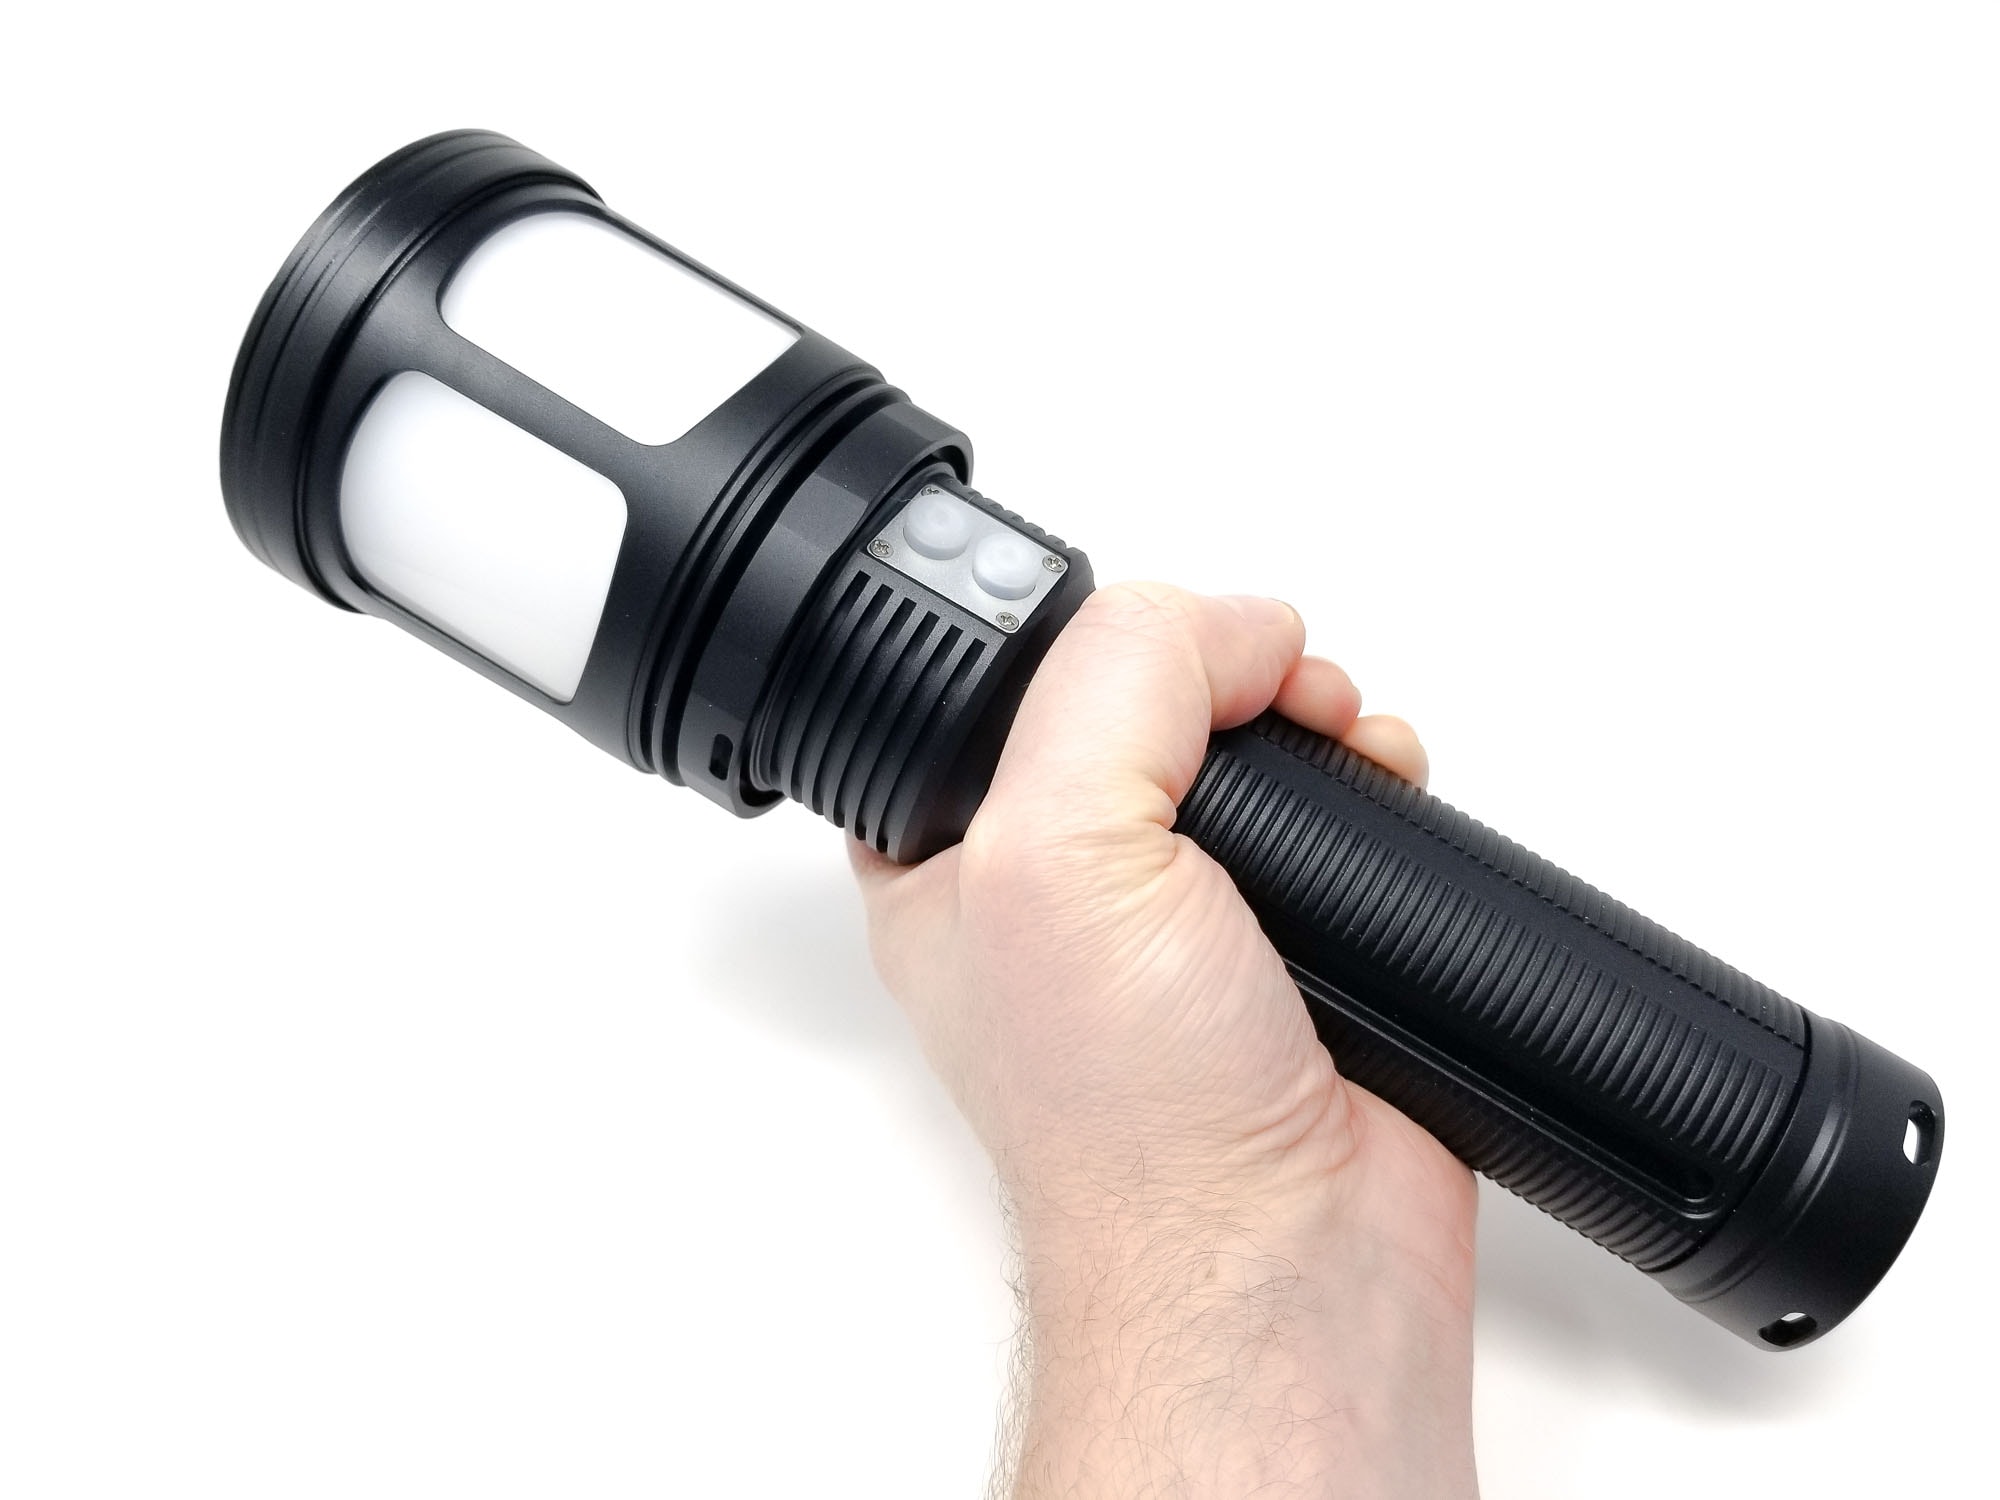
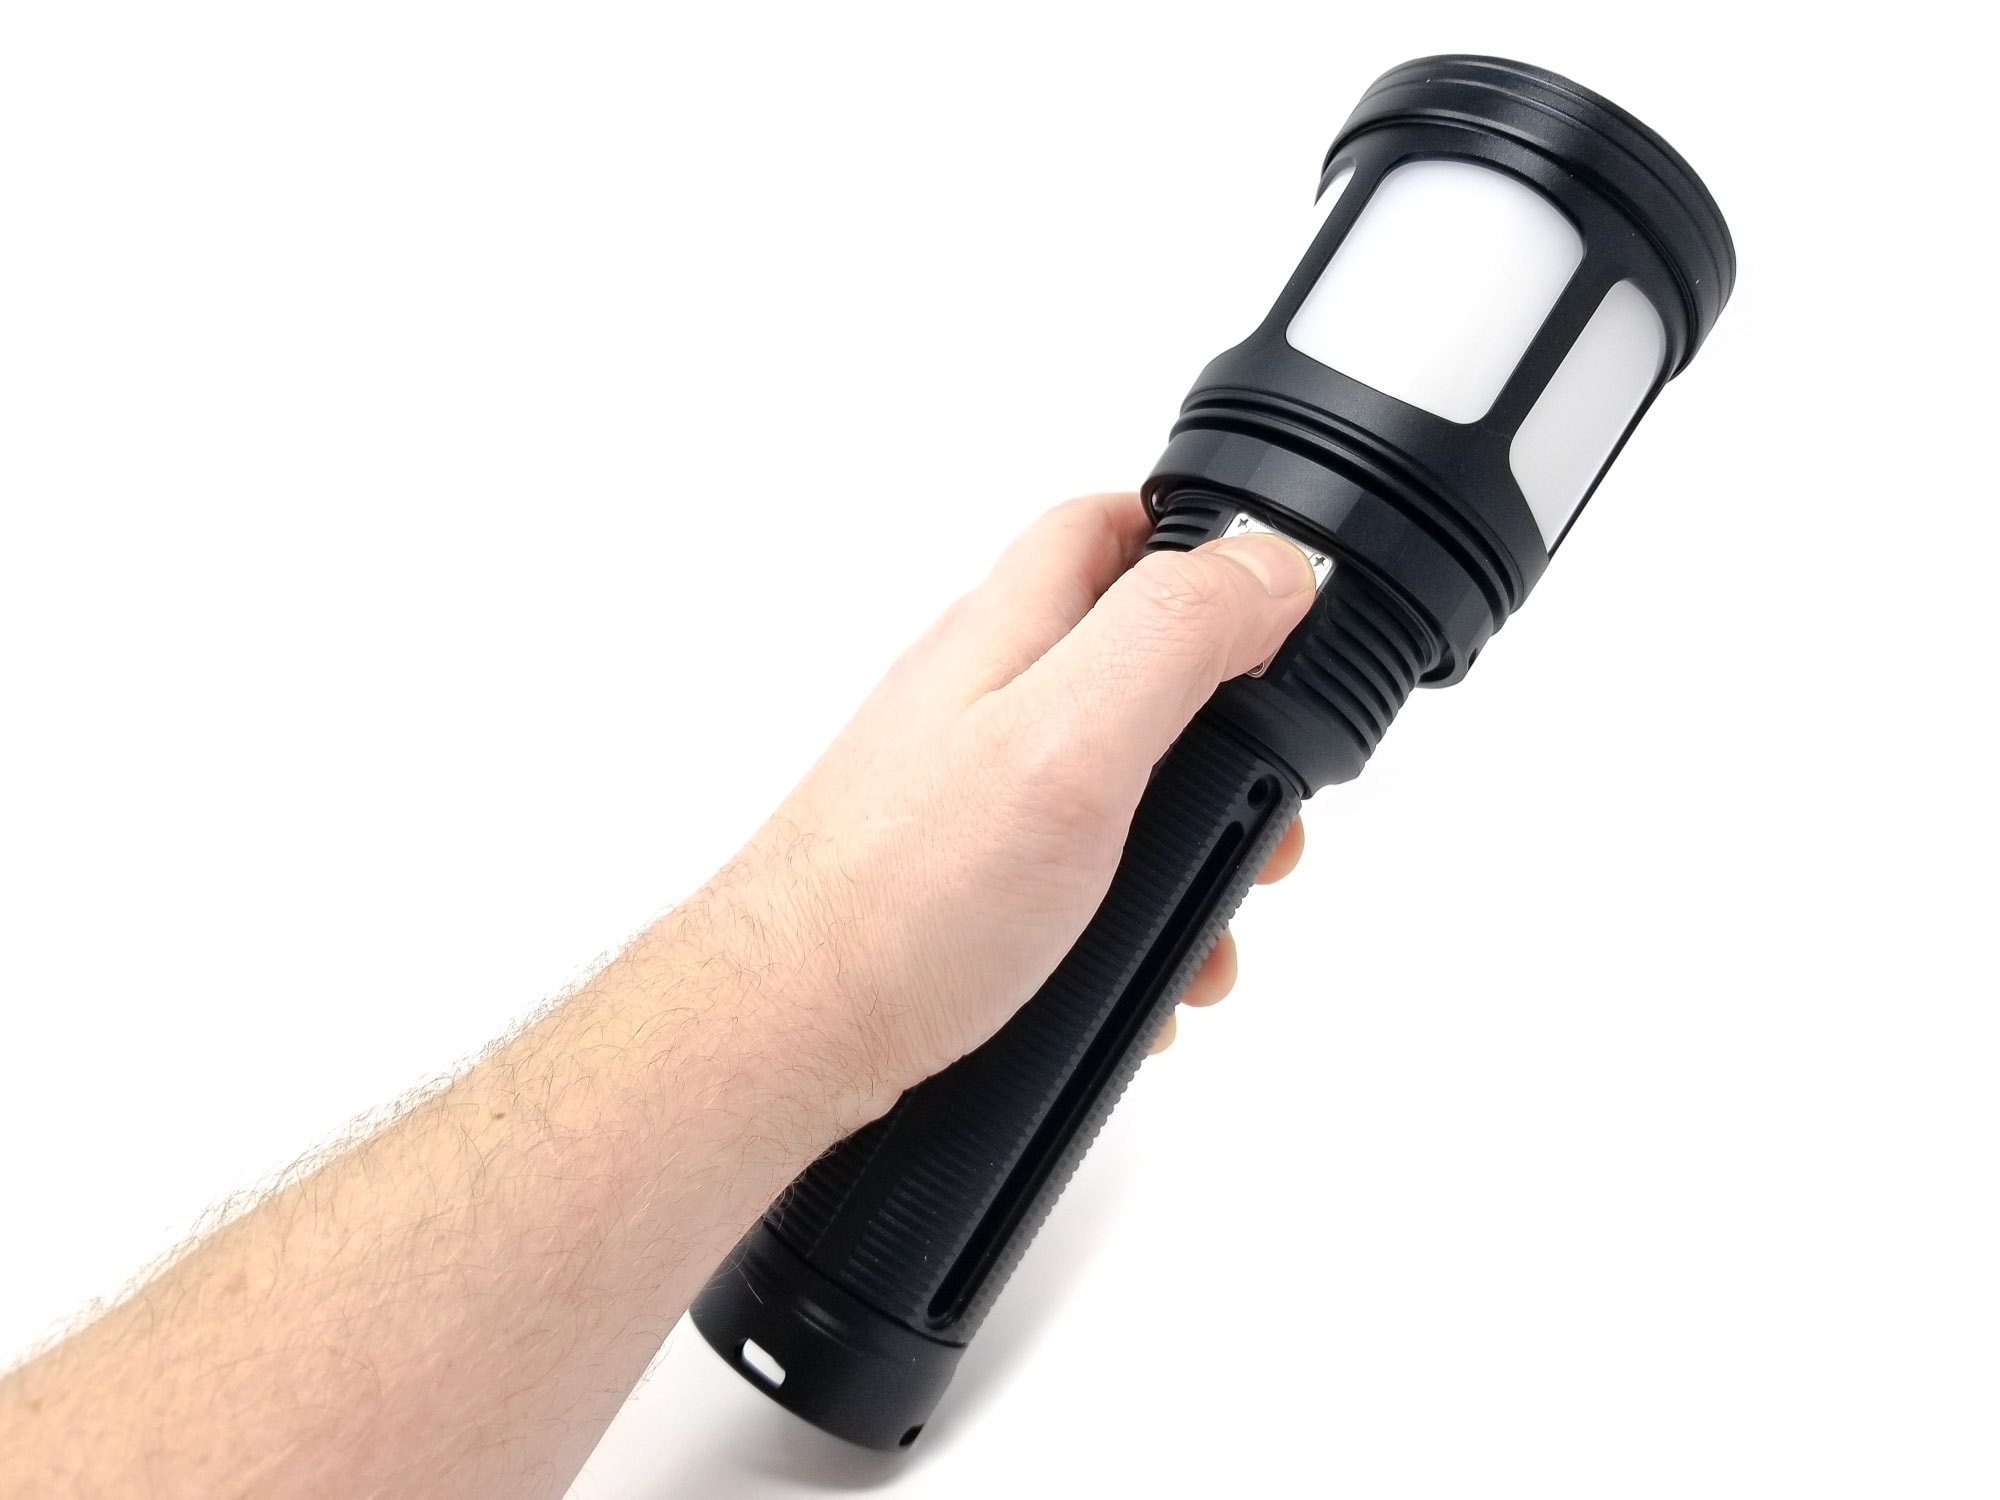
The HK95 is a bit of an odd duck since it’s a flashlight and a lantern in one: I mean a true lantern. You get a big reflector in the top, surrounded by a frame with a diffuser on the sides of the head. I think it’s neat!
Use case? It’s a lantern and a flashlight, so light up things far away, or light up a big area. Tailstanding is possible, so use it like a regular lantern, or it can be hung/suspended for area lighting. The head is big and the body is long, but not too girthy as this is housing 18650 cells, not 21700s. It is heavy at over 1 kg, and it is a bit awkward and top heavy, but it’s surprisingly not too unwieldy. You can hand carry this, but unless you’ve got arms like Eddy Hall, you’re going to want to use the shoulder strap Haikelite includes for toting it around. The strap is pretty cheap though and doesn’t have quick release clips. You need to actually install it like a camera strap.
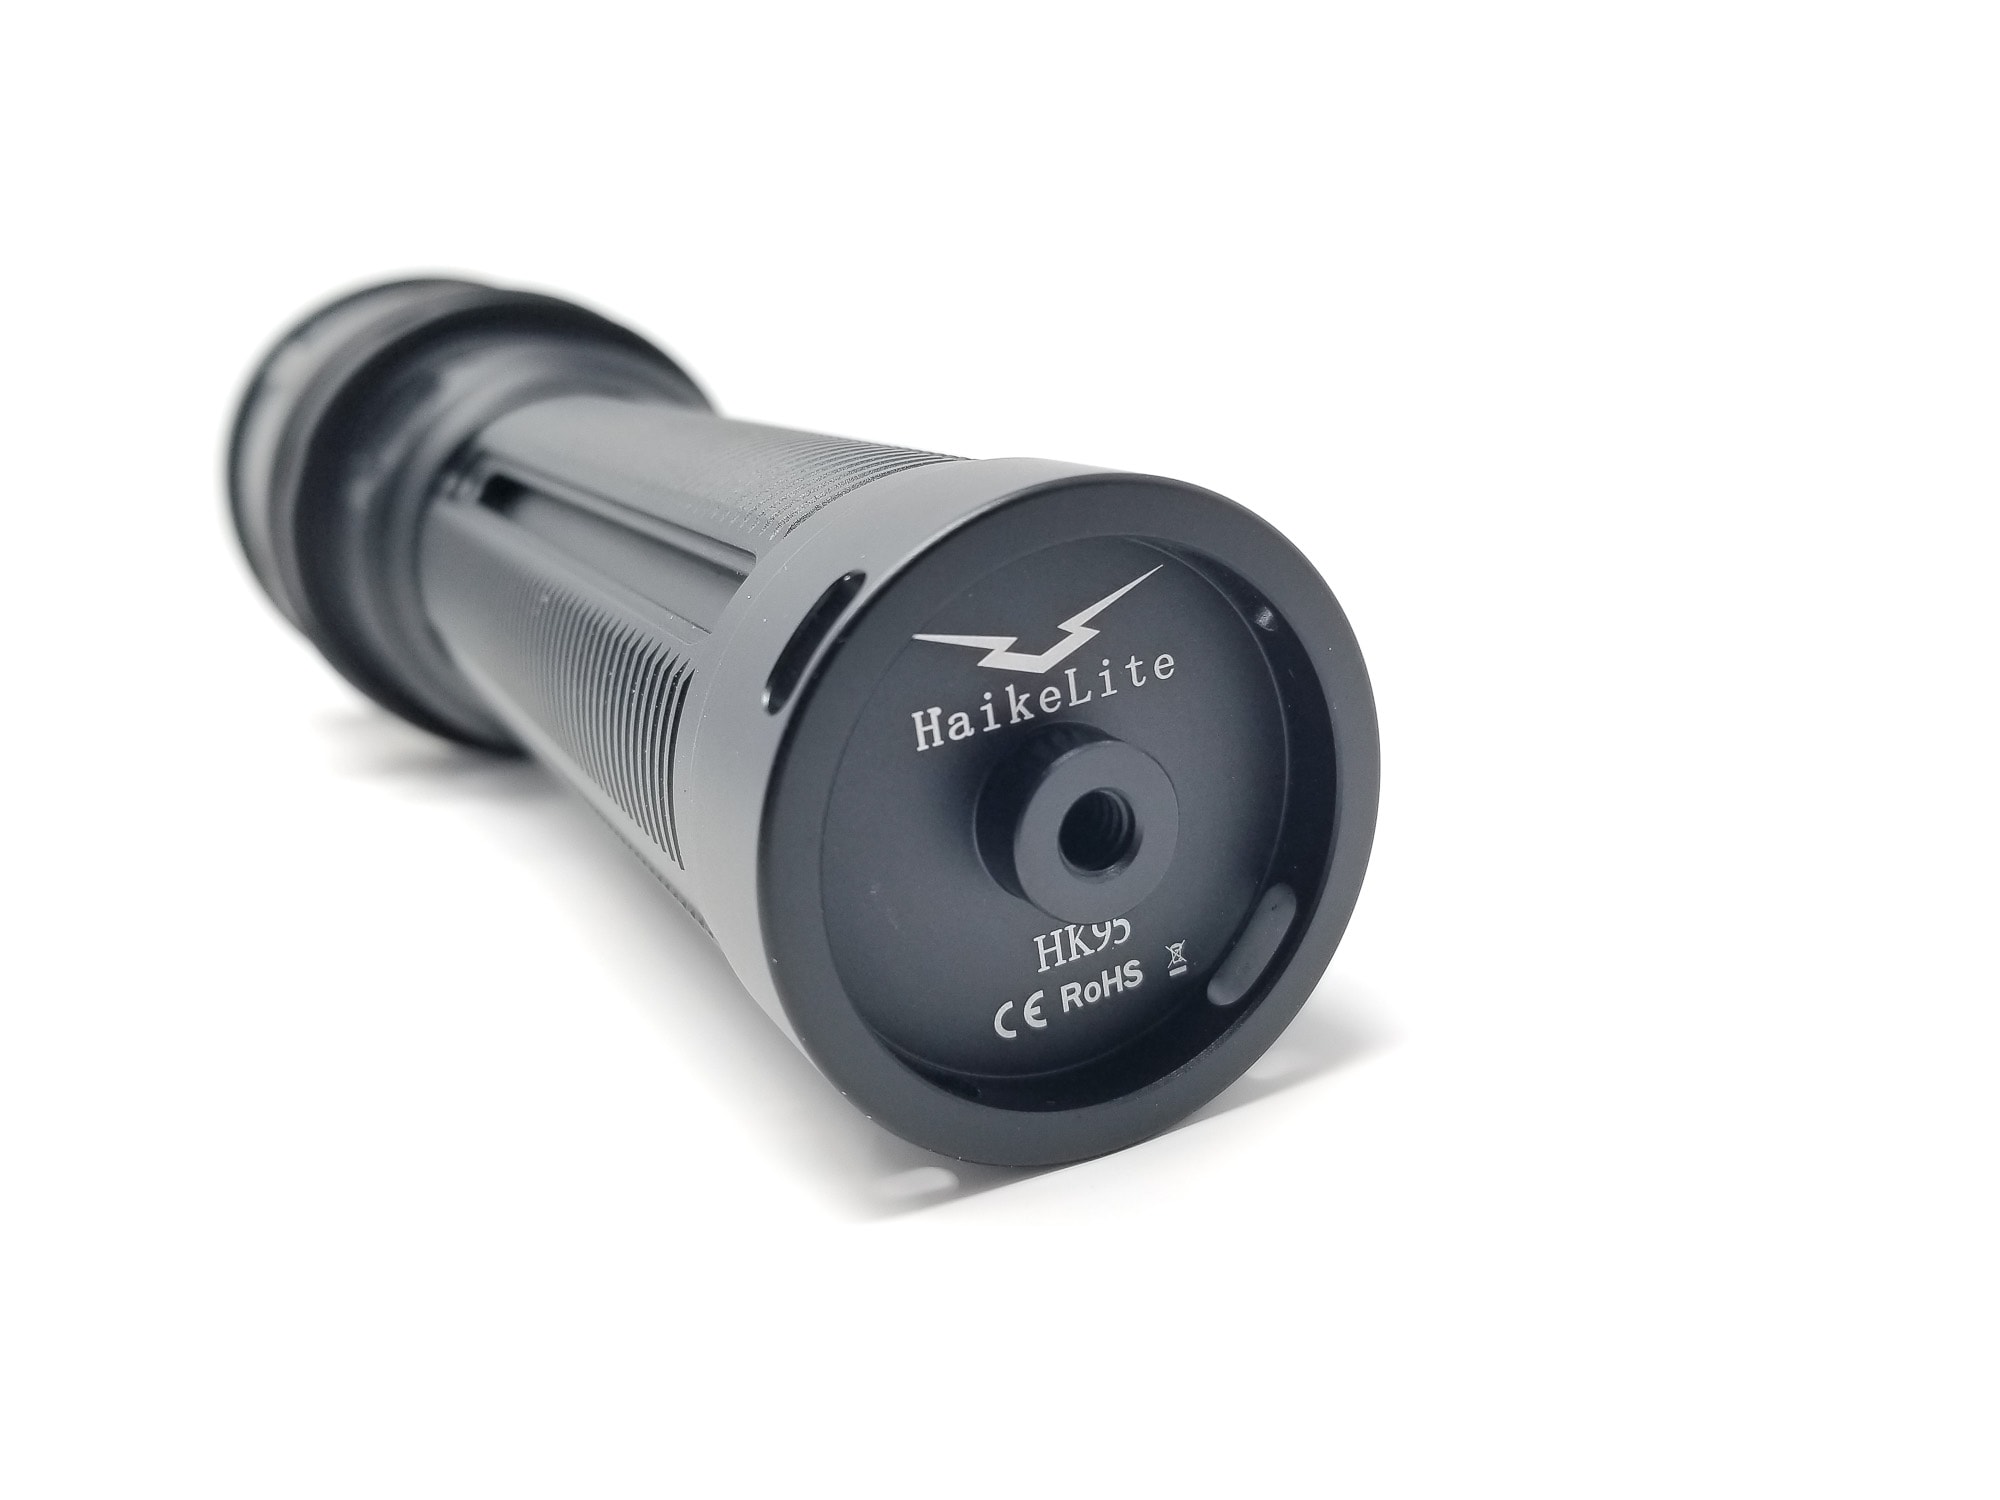
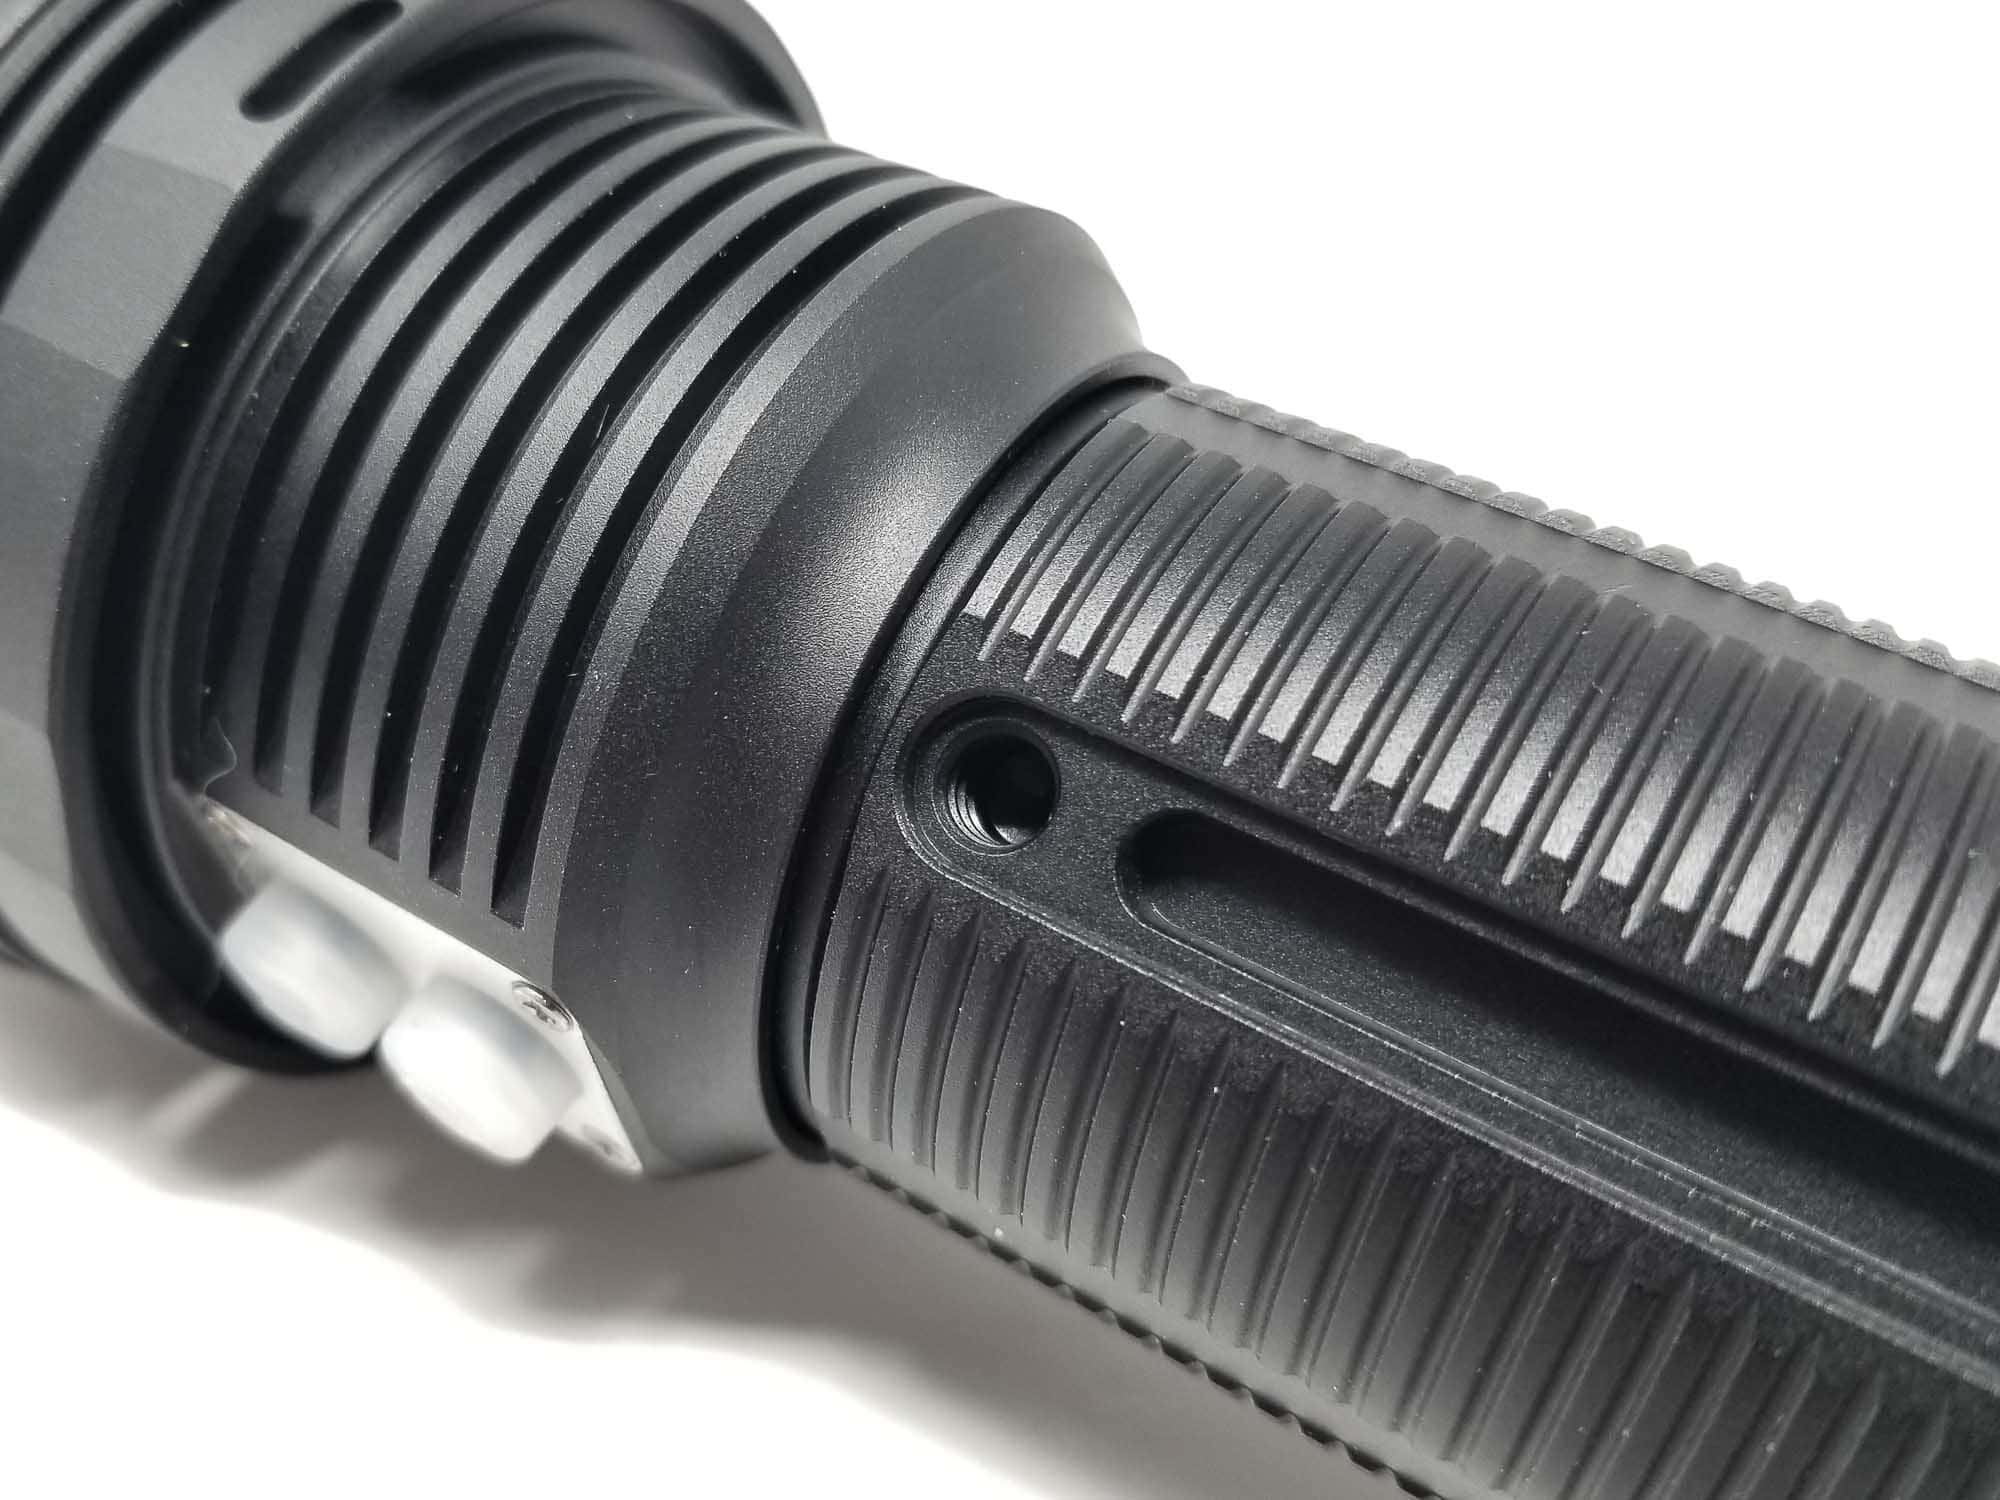
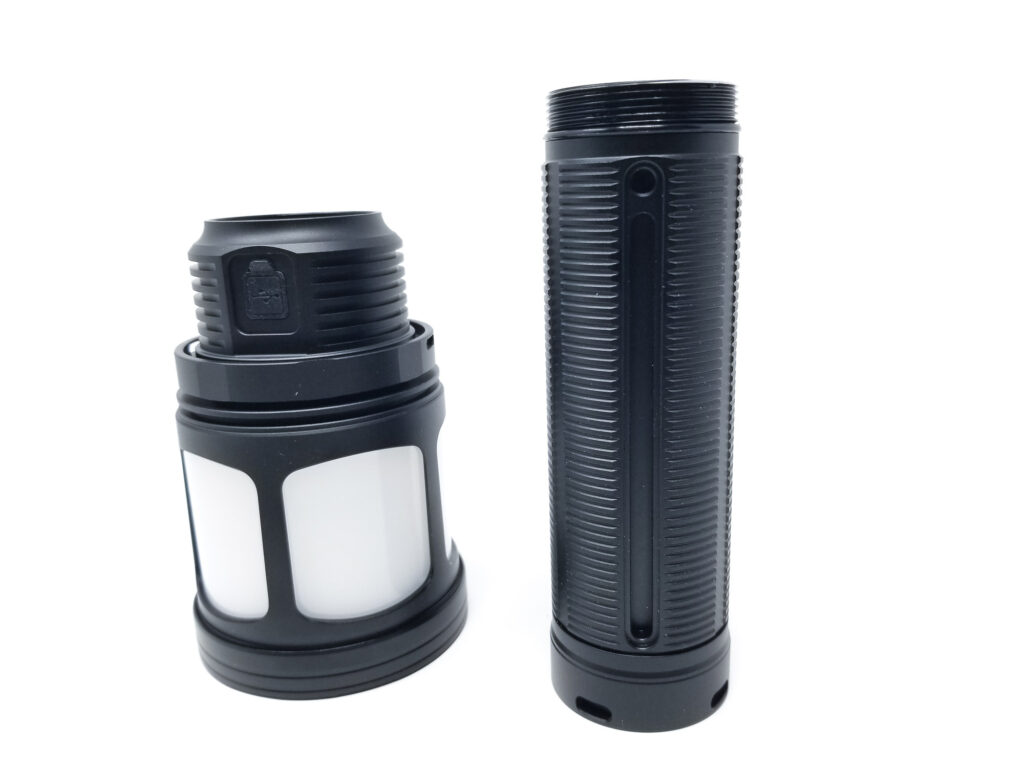
There’s 4 cutouts at the 12, 3, 6, and 9 o’clock positions on the tail and behind the head. There’s also 3, ¼ UNC threaded mounts for attaching a tripod shoe or sling stud at the 12, 6 and 9 o’clock positions on the tube, and a single threaded mount on the tailcap. The body has some gippy grooves milled into it for a good grip, and somewhat deep channels milled along the length of the body, maybe for weight savings?
You get two e-switches behind the head. One controls the spotlight, the other for the lantern function with an infinitely variable ramping/stepped ramping UI (more on that later). These are standard e-switches with very proud translucent rubber boots set in a stainless frame secured with 4 screws. The top switch has an LED backlight for charge, power bank, battery, and on state. They have good feel and click action. Opposite the switches is the USB C charging input/output (for the power bank) sealed with a rubber cover that looks lifted from the Nightwatch NI03 series. That’s an issue since it’s hard to get open unless you’ve got long fingernails. I resorted to picking at it with my pinkie to lift it sufficiently to prize it open. The light will tail stand, but it’s a bit unstable. I think a wider, flatter base would be great here since this is a lantern.
For quality, Haikelite products are generally of sound build quality. The lantern diffuser looks like ABS plastic. It didn’t seem flimsy, and I was glad to see it protected by the aluminum supports on the side. Depending on where you buy the HK95, plan on paying about $150-200 US for it. I didn’t notice any major or obvious quality blunders here. The machining is tidy without any defects. The light is milled from 6063 aluminum, which we don’t see too often (usually the typical 6061-T6) and I think it’s a good choice. Why? 6063 aluminum is actually a nice material to make a big flashlight out of. It has better corrosion resistance, thermal and electrical properties, and it takes a finer surface finish when machined.
The finish is evenly applied with no blemishes, and it isn’t too grippy or matte, but more semi-gloss. Not my favorite, but it seems durable. It’s advertised as ‘army-grade III,’ but I doubt it. It’s probably just type III HA.
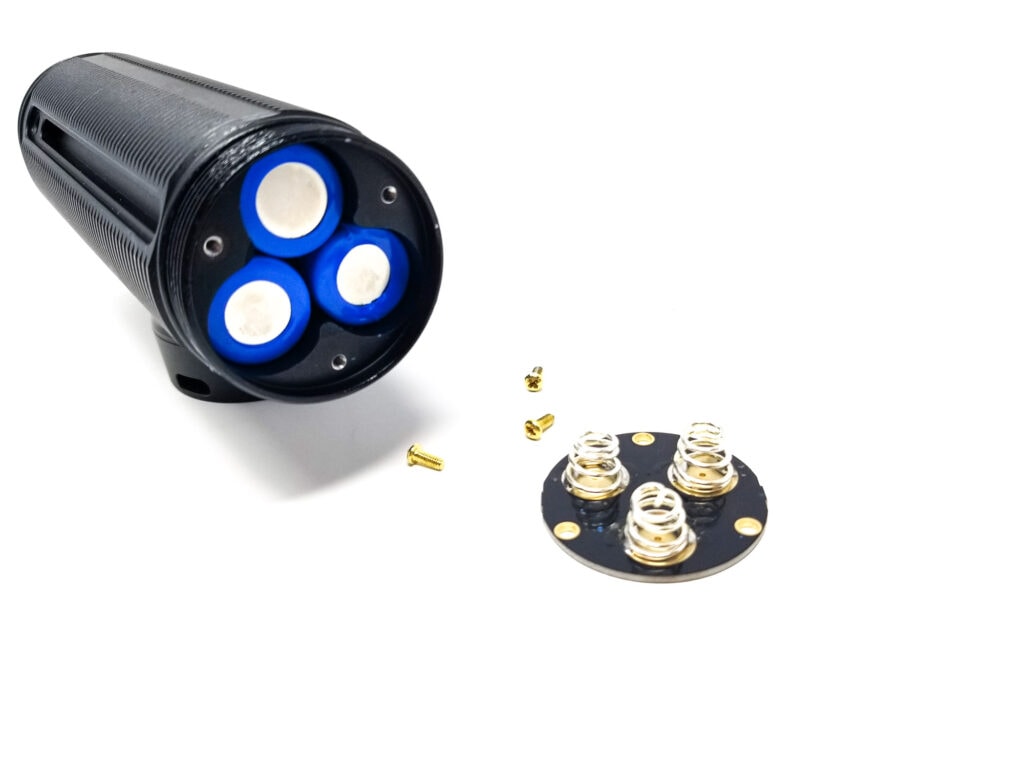
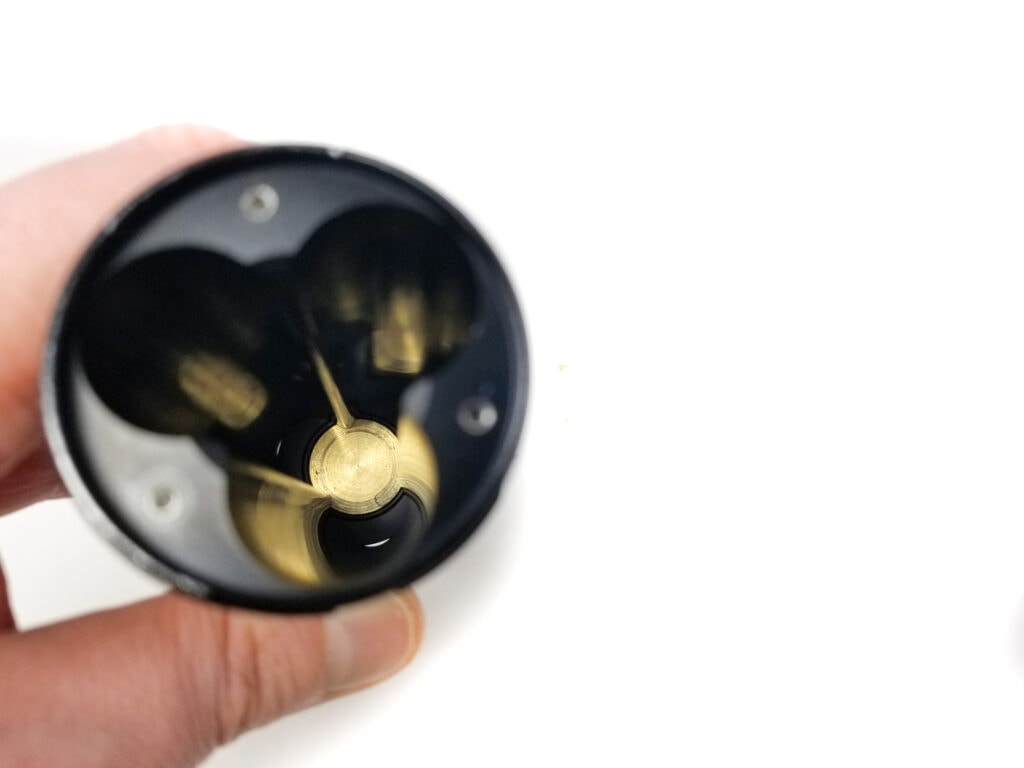
The bezel unscrews by hand, but the lens and reflector wouldn’t budge when I tried to ‘liberate’ them, and I quit before breaking out the tools. Maybe they’re glued or screwed in? The bezel threads are a bit fine, triangular cut and pretty smooth, but unlubed. The battery tube unscrews from the head, and it has very smooth, fully anodized robust-looking triangular cut threads. The top of the tube is capped with a plate that has a brass contact for the positive contact and the outside of the tube as the ground. It has 3 hex head screws and I didn’t try to remove those, however, under the tailcap, there’s a PCB with 3 brass screws that were begging, taunting me to unscrew them, so you know how that goes! Under that PCB are three, thick silver plated copper alloy springs, and on the other side of the springs were the back of 3 18650 batteries? Hmmm. More on that later though. For water and impact resistance, I couldn’t find any specs on that, but it seems sealed up good enough, so I think it would be fine for routine water resistance.
Warranty? It mostly depends on who you buy the light from. Plan on the standard 30 day return, DOA policy, and maybe a 1 year warranty. If you buy this from Nealsgadgets (who sent it over, so big thanks again to Neal), he will take care of any issues with the light.




LED, Lens, Bezel, Beam, and Reflector
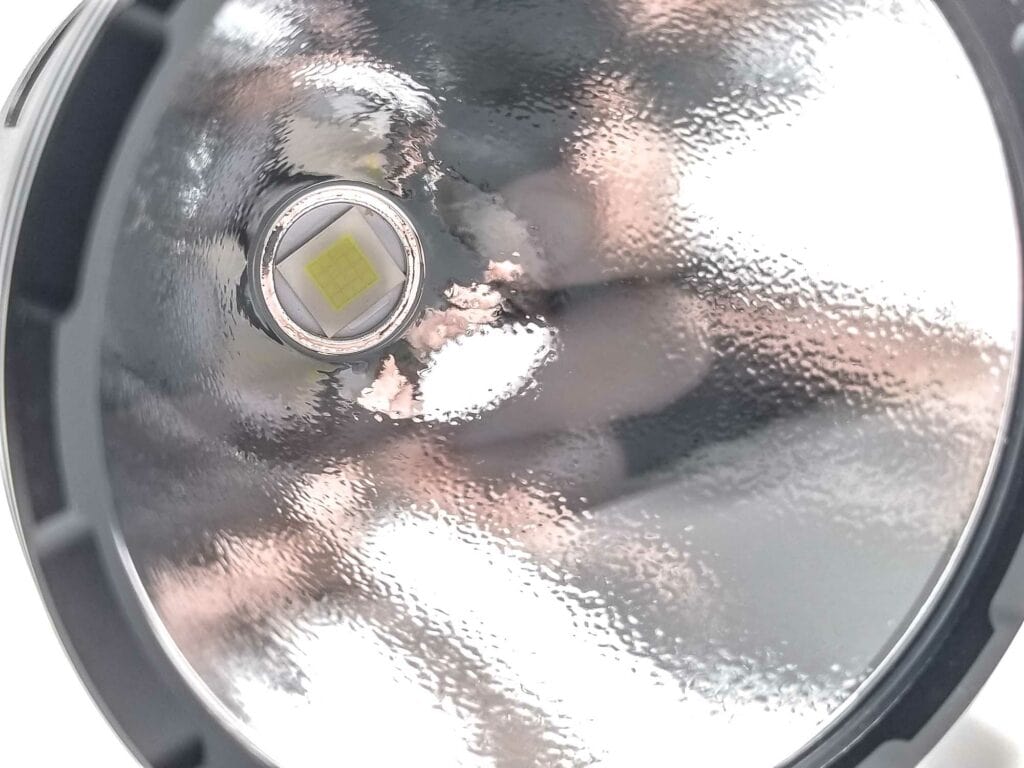
The HK95 uses two types of LEDs, one for the flashlight part, and one for the lantern bit. The flashlight reflector has a familiar LED we’ve seen before, the SFH55. This is an ultra high output LED built on with the CSP process on a 10 x 11 mm footprint. The LES consists of 16 individual light emitting elements arranged on a non homogenous grid with a total of 16 dies (4 rows of 4 individual dies). In this configuration the vF is unknown, but it’s probably driven at 3 volts. It’s the same LED in the Amutorch NB90.16 lights I tested prior, and it gets properly bright if driven hard enough with a lot of power capable of 10,000 Lumens. It’s cool white for this one at 6000-6500K or so.
The lantern light source LEDs are unknown, and Haikelite only lists these as ‘H50’ LEDs. They’re probably 5050 size LEDs, like XHP50.2 clones Per Haikelite’s specs the LEDs come in at 3800-4800K. The SFH LED sits at the bottom of a large OP reflector. It produces a somewhat focused hotspot with lots of spill and impressive beam distance.
The beam is pretty clean, but there is a visible corona and some tint shift. The lantern produces a lot of light. I mean, a lot to the point it’s almost overwhelming indoors There’s no low mode here, so I think it’s better suited for outdoor use. The tint is pleasantly warm, about what I get from my Coleman 288, but with more volume of light and much larger area of illumination.
Spectral measurements:
I used an Opple Lightmaster Pro to measure the flashlight at 1 meters from the sensor for the lantern, and 2 meters for the flashlight
| Mode: | CCT: | CRI Ra: | duv |
|---|---|---|---|
| Turbo Flashlight | 6107K | 70.4 | -0.0005 |
| Top of ramp Lantern | 4156K | 80.2 | 0.0057 |
Dimensions and its competition
Dimensions:
| Haikelite HK95 | Millimeters | Inches |
|---|---|---|
| Length | 265 mm | 10.4 in |
| Head diameter | 83 mm | 3.3 in |
| Body diameter | 47 mm | 1.8 in |
Dimensions are rounded to the nearest millimeter and the nearest tenth of an Inch.
Weight:
| Haikelite HK95 | Weight in grams | Weight in oz |
|---|---|---|
| Without battery pack | 509 g | 18 oz |
| With battery | 1112 g | 39 oz |
Weight is rounded to the nearest gram and tenth of an Oz.
Flashlight size comparison with its competition:
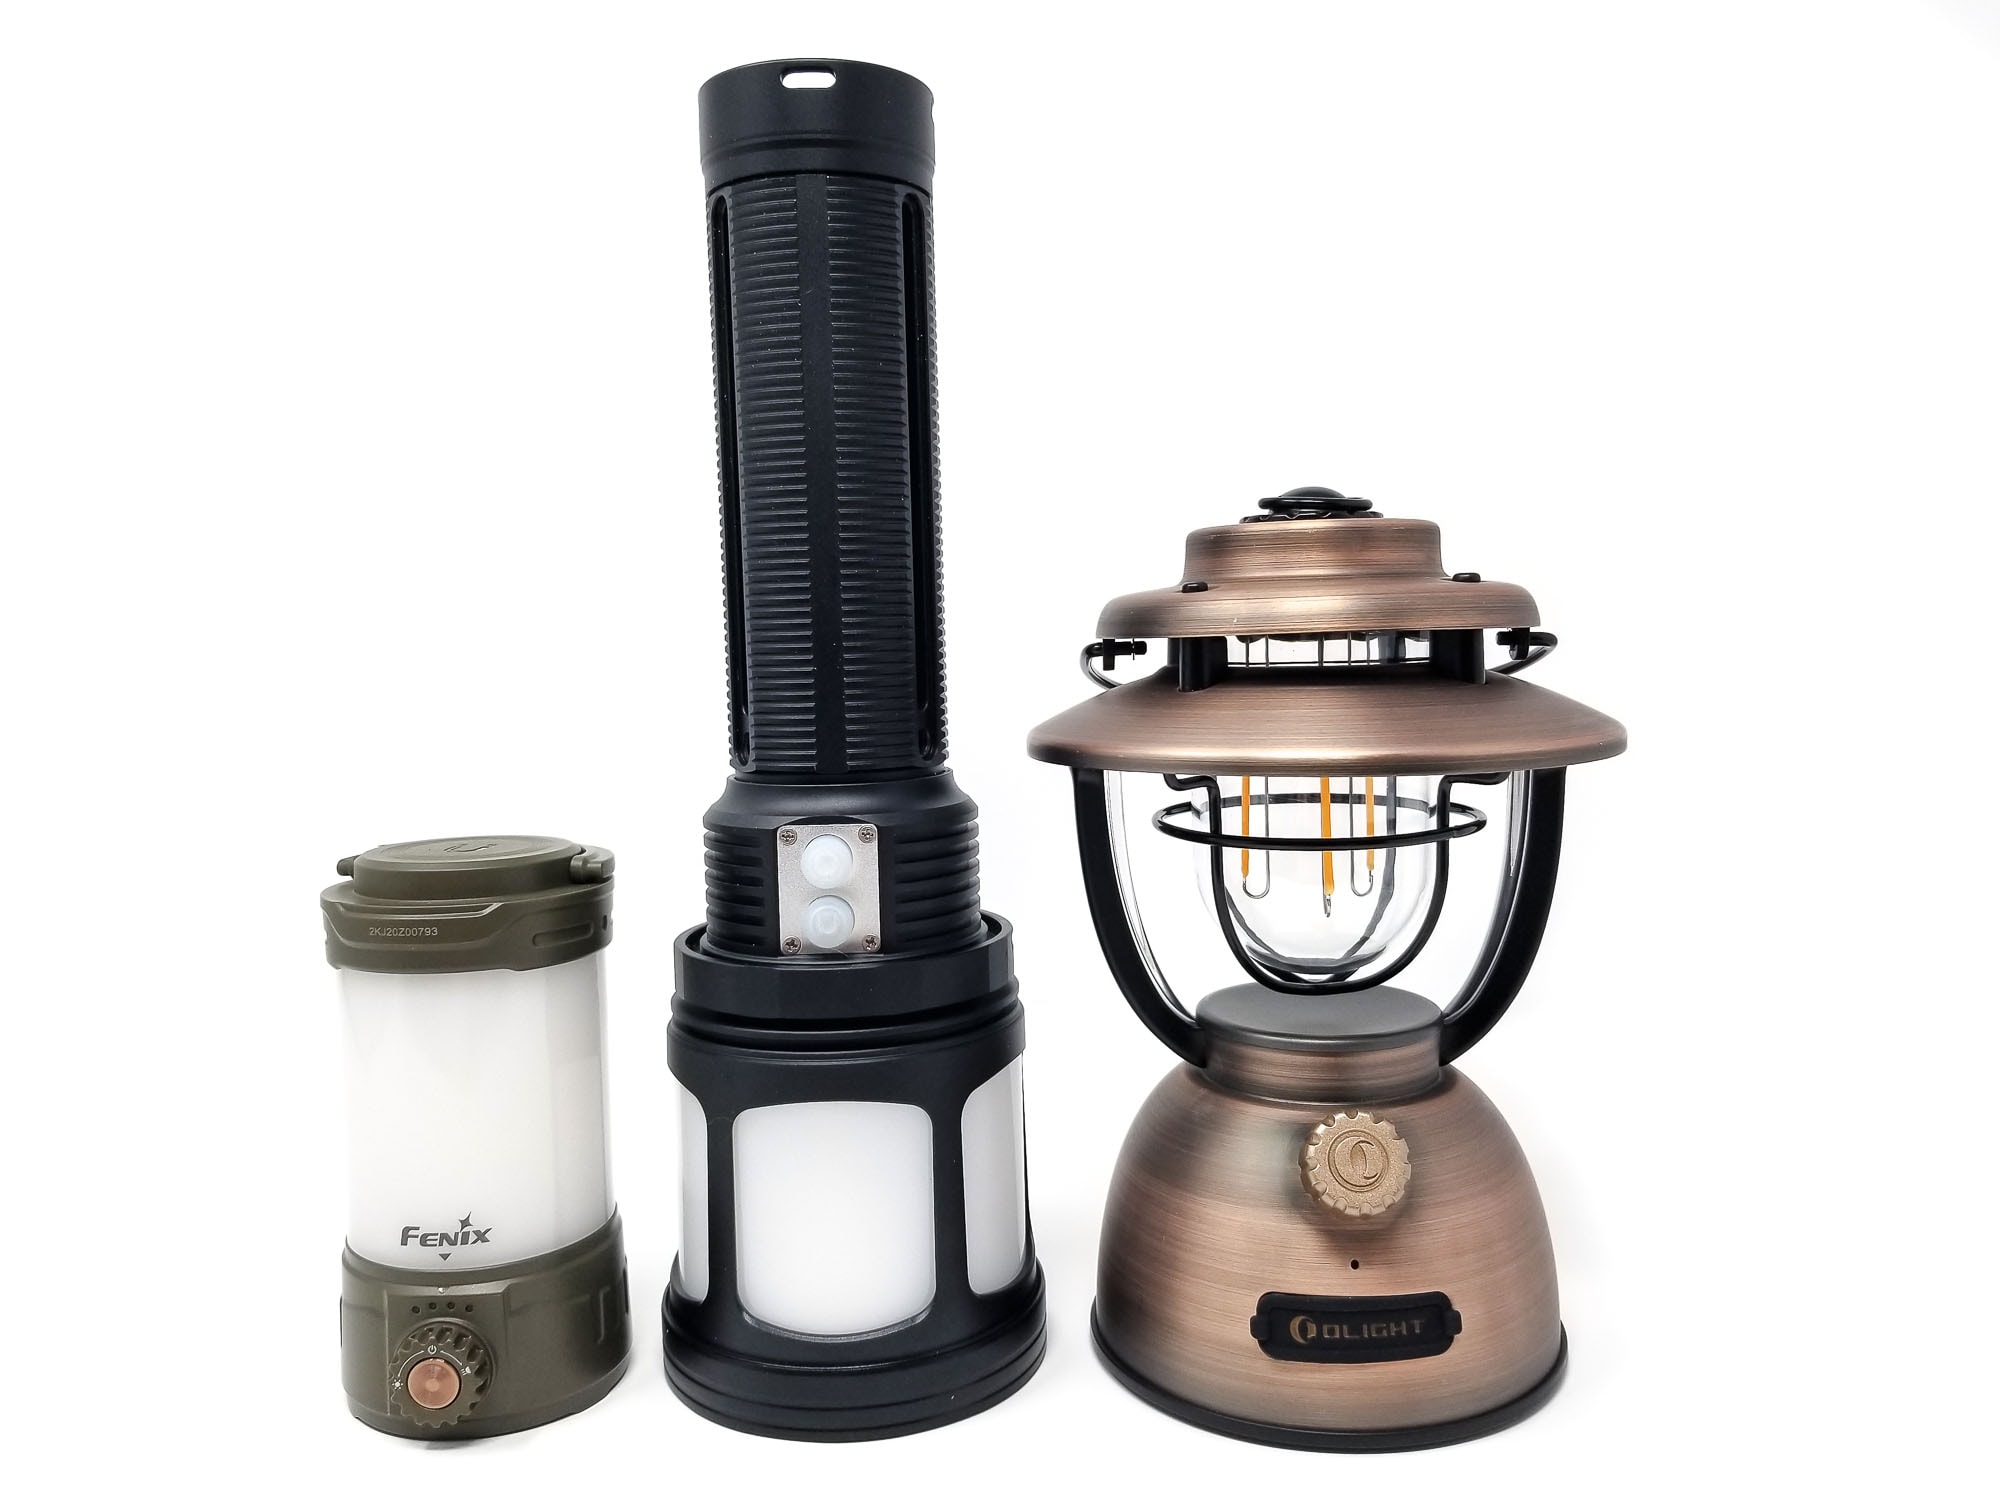
Group 1: Fenix CL26R Pro, Haikelite HK95, Olight O Lantern Classic 2 Pro
Group 2 with diffusers: Fireflylyte PL09MU, Manker MC13 II, Haikelite HK95, Manker E14 IV, Mateminco MT-911
Group 3 reflectors left to right: Lumintop PK21 (XHP70.3 HI), Haikelite HK95 (SFH55), Nightwatch NI03S Super Valkyrie (SFP55.2L)
Group 4 left to right: Haikelite HK90, Haikelite HK95
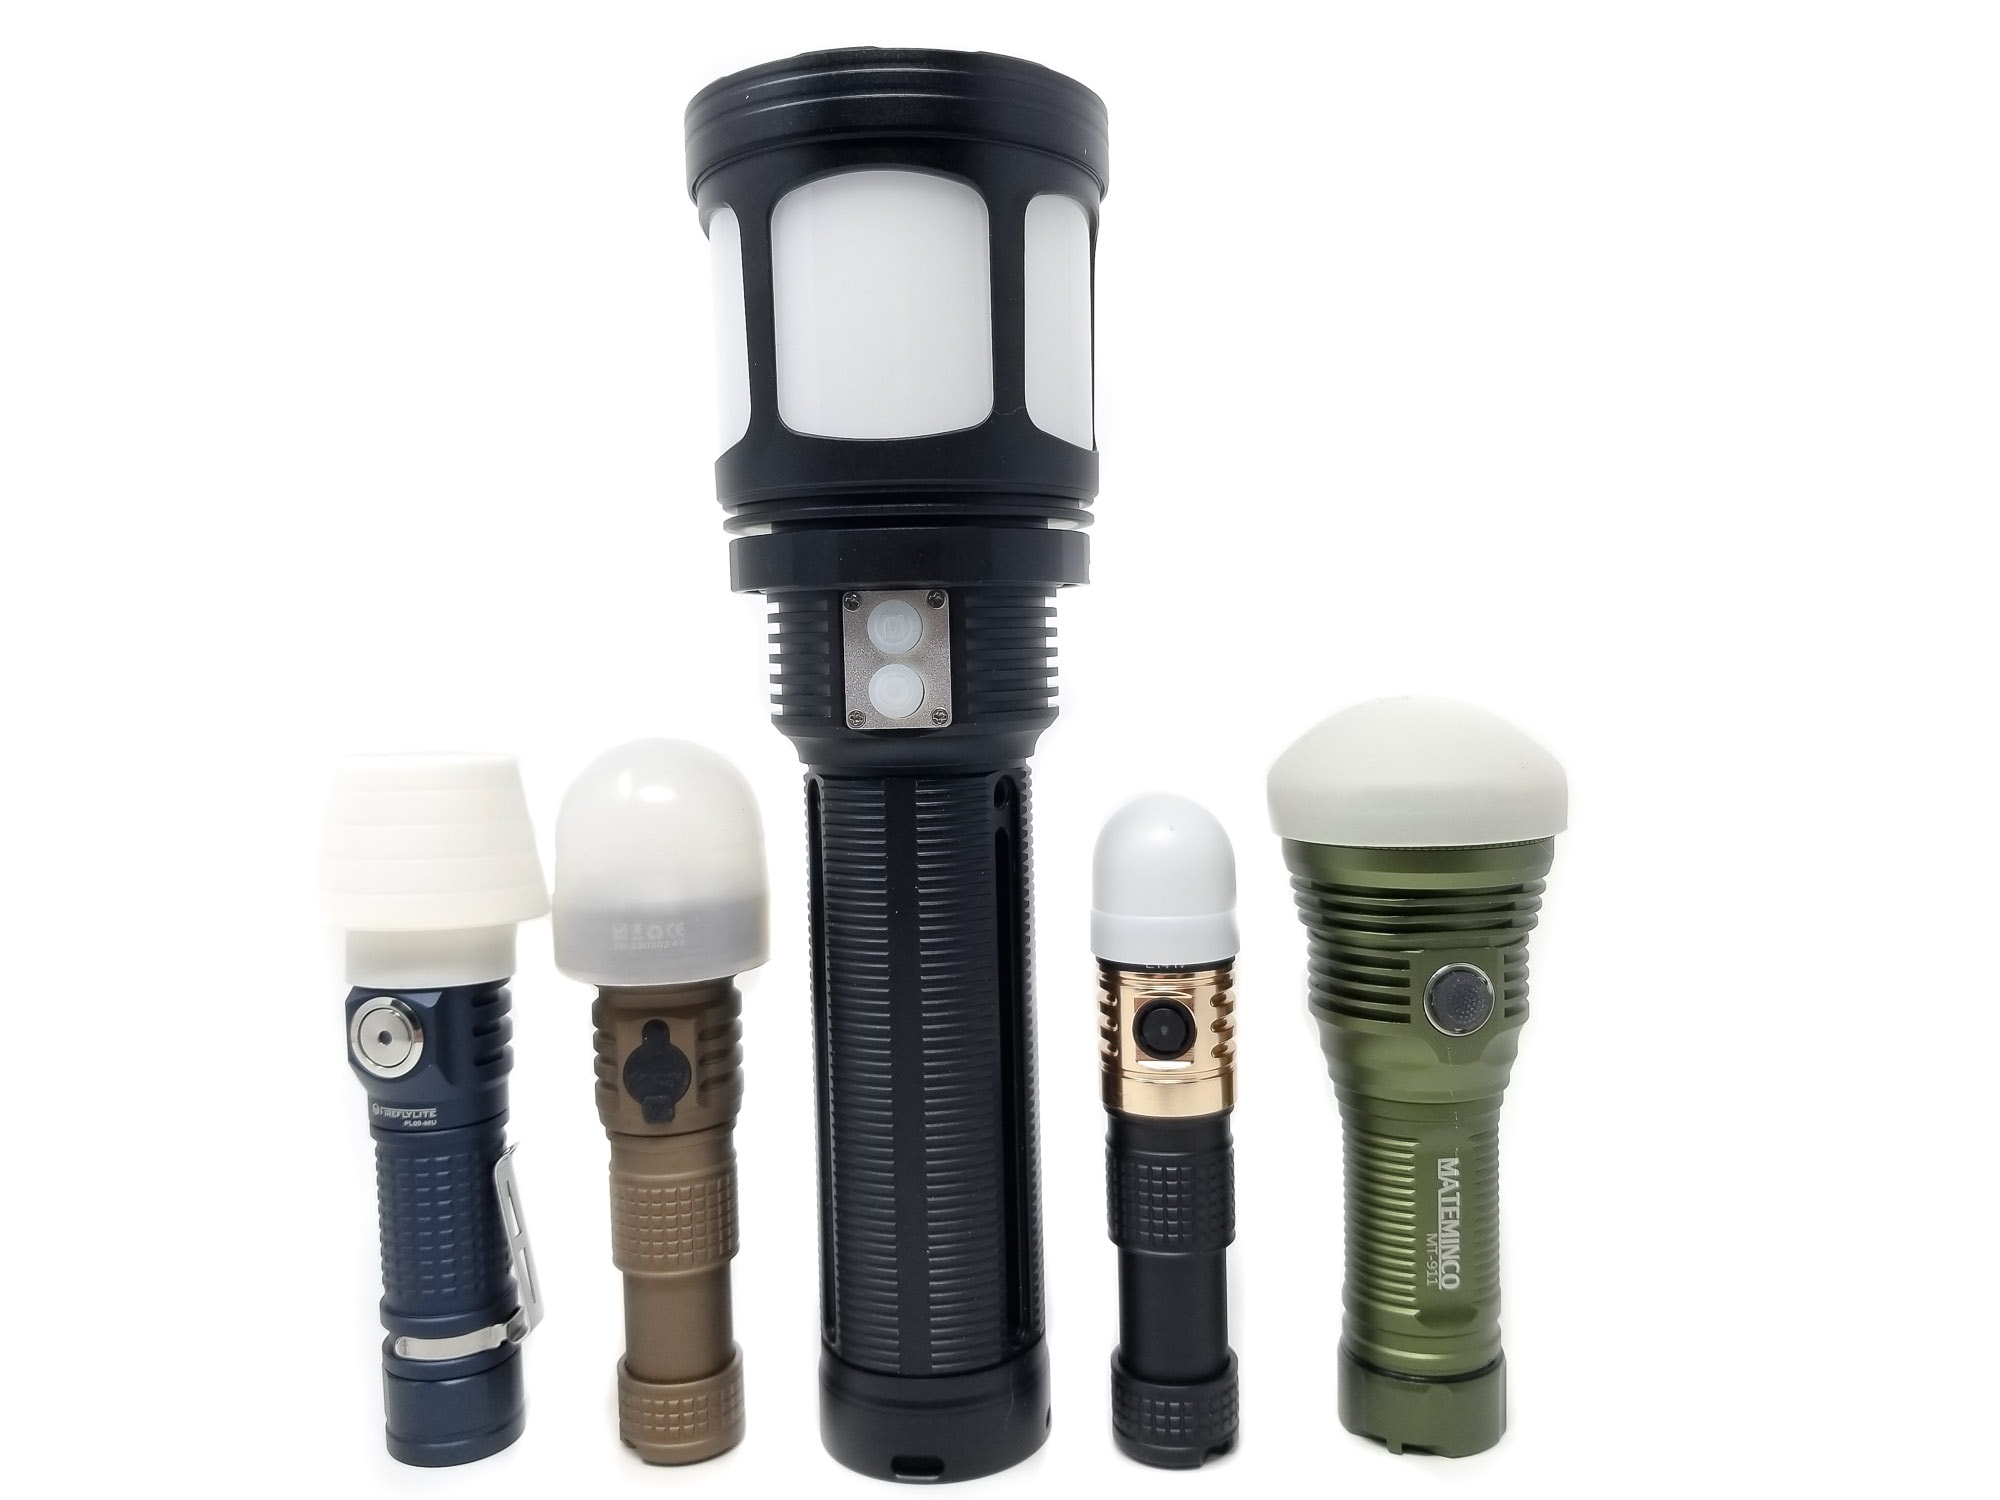

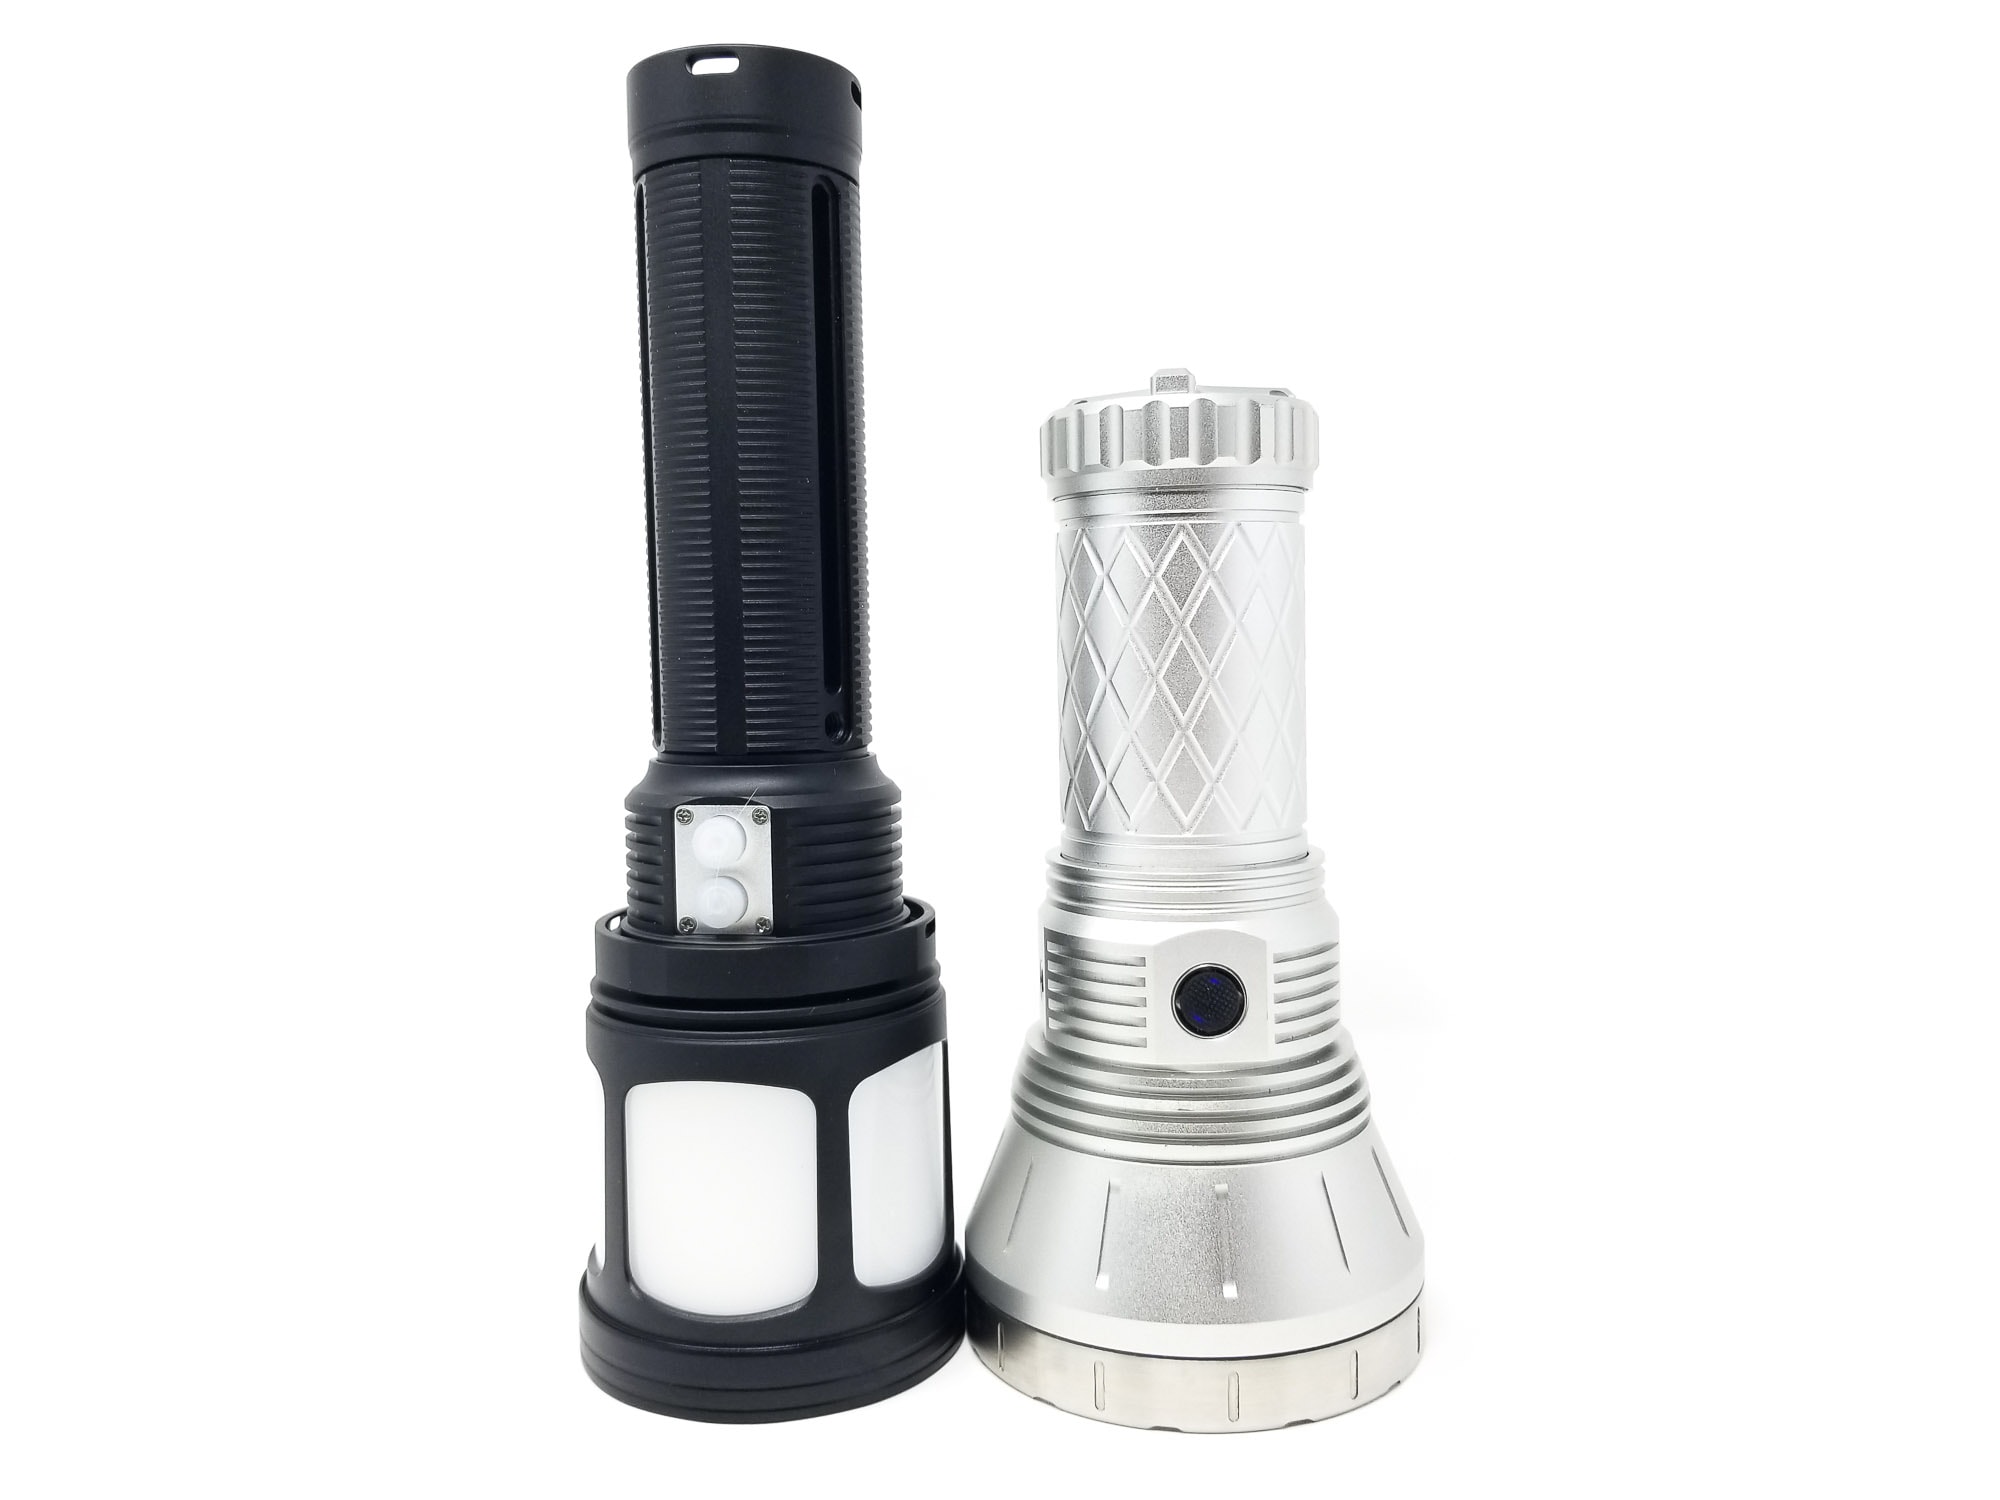
Haikelite HK95 UI: User Interface and Driver
The driver supplying all this firepower is another unknown. Since the battery is 8.4 volts, it could be a buck driver powering 3 volt LEDs. The UI is well thought out, but a bit quirky. There’s two mode groups controlling the two lighting functions. By default it’s smooth ramping, but you can also unlock a stepped mode group, but it only works with the flashlight function. The top switch is marked M and controls the spot light and the bottom has the on/off symbol, and controls the lantern. The switches work independently of each other as well, so you can turn on or off either lighting mode and control their brightness independently, even while both are on. The manual wasn’t much help in deciphering the modes, and finding solid information on this light was a bit like searching for Noah’s Ark, so I’m giving the modes my own labels. Here goes!
Available stepped ramping modes:
- 1, 2, 3, 4, 5, Turbo
Available blinky modes:
- Strobe, S.O.S, Tactical Flash
From OFF Smooth Ramping (both spotlight and lantern):
- Single click M switch: Turns on in last used brightness
- Double click: N/A
- Press and hold either switch for 3 seconds: Activates electronic lockout
From ON Smooth Ramping (spotlight and lantern):
- Press and hold either switch: Ramps up. Release and press and hold again to ramp down
- 1 click: Turns off
- 3 fast clicks on the M switch: Switches to stepped ramping for the spotlight. Repeat to switch back.
From ON Stepped Ramping (spotlight only):
- Press and hold M switch: Cycles through the stepped modes 1-2-3-4-5-1
- 1 click: Turns off
- Double click: Turbo. Double click again to enter the blinky modes
- 3 fast clicks: Switches to smooth ramping (for the spot light only)
Mode memory:
- Yes, remembers last used brightness for each light source. Turbo and blinkies are not memorized
Shortcuts:
- To Turbo: Double click the M button from on
- To Strobe: In Turbo, double click the M button for Strobe, double click again for S.O.S, and Tactical Flash
Low voltage warning/protection:
- Yes. The M switch has an LED indicator for battery state: flashing blue for 6.6v and above, red flashing for 6v or less, with shut down at 5.7 volts for LVP.
Strobe/blinkies
- Strobe, S.O.S, and Tactical Flash
Lock-out mode:
- Yes. Each light source can be independently locked or unlocked. From off, long press the M or power switch for more than 3 seconds to lock out the respective light source. The light will do a quick flash to indicate the lockout. Repeat to unlock (with another flash to acknowledge)
PWM
- Yes, very fast PWM not visible with the naked eye
Additional/summary info on the UI:
- I give Haikelite a lot of credit for this UI. It’s well thought out and mostly tidy, but at the same time it’s a bit quirky and annoying. While both light sources can be controlled independently and have access to the smooth ramping, only the spotlight has the stepped modes.
- In addition, the lantern doesn’t have Turbo or blinky modes. I get not having the Turbo or blinkies, but I think stepped modes would have been nice on the lantern also.
- Both light sources can be locked out independently of each other, so you can lock out the lantern and just use the spotlight, or vice versa. I think this is a very useful feature.
- However, what isn’t so useful is the brightness levels. If this was just a high output light I wouldn’t mind, but this has a lantern with a warm tint built in, and a moonlight or ultra low mode at least would have been nice. The lowest (bottom of the ramp) brightness for the lantern is waaayyyy too bright!
- Also, when doing the lockout, the blink that accompanies it is very bright as well (read: very disorientating). I think they could have done without that and maybe used the switch LEDs as the indicator? Other features include a 55 C thermal ceiling and LVP.
Haikelite HK95 Charging and batteries
The HK95 has a built-in battery pack inside the battery tube. Haikelite would make you think it’s not user-serviceable, but it’s not. I don’t recommend it, and I’m sure Haikelite doesn’t, but unscrewing the bottom of the tube exposes a PCB with some brass phillips screws. Remove those and the PCB (actually a spring PCB) comes off, giving access to three battery packs.
I removed them and they’re made of two 3300 mAh 18650 cells for a total of 8.4 volts in a 2S3P configuration. You could conceivably use loose 18650s in this light, but you’d need 6 button top cells of identical capacity, current rating, age, and brand. Haikelite’s spec says 20,000 mAh total capacity for the battery pack. Apparently the laws of physics don’t apply to Haikelite because that’s quite impossible. The most you can practically get based on the 2S3P is 9900 mAh.
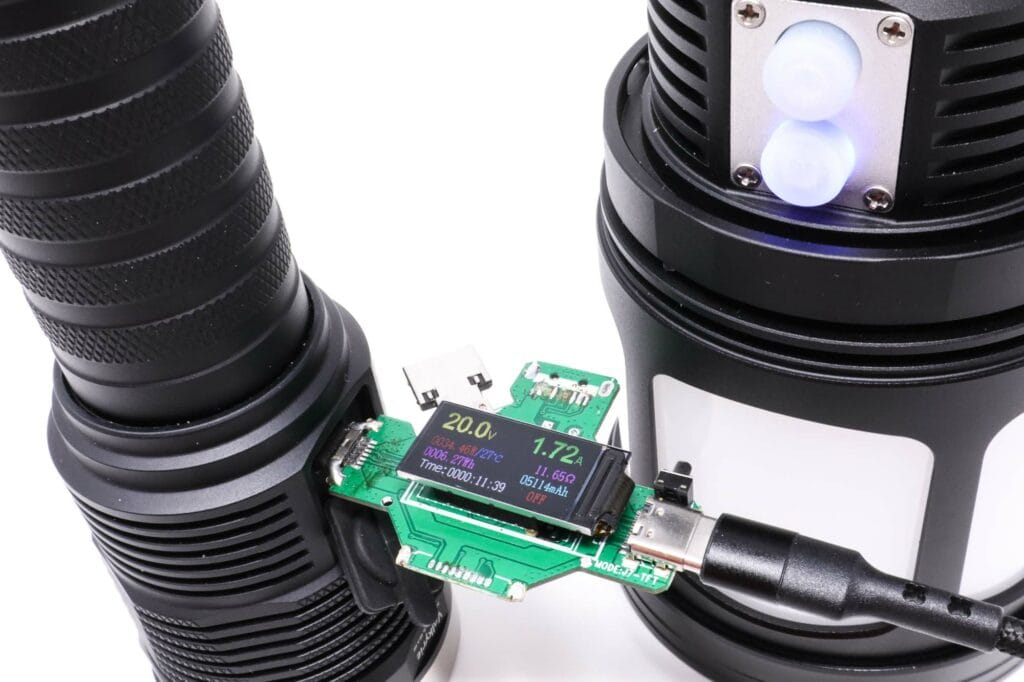
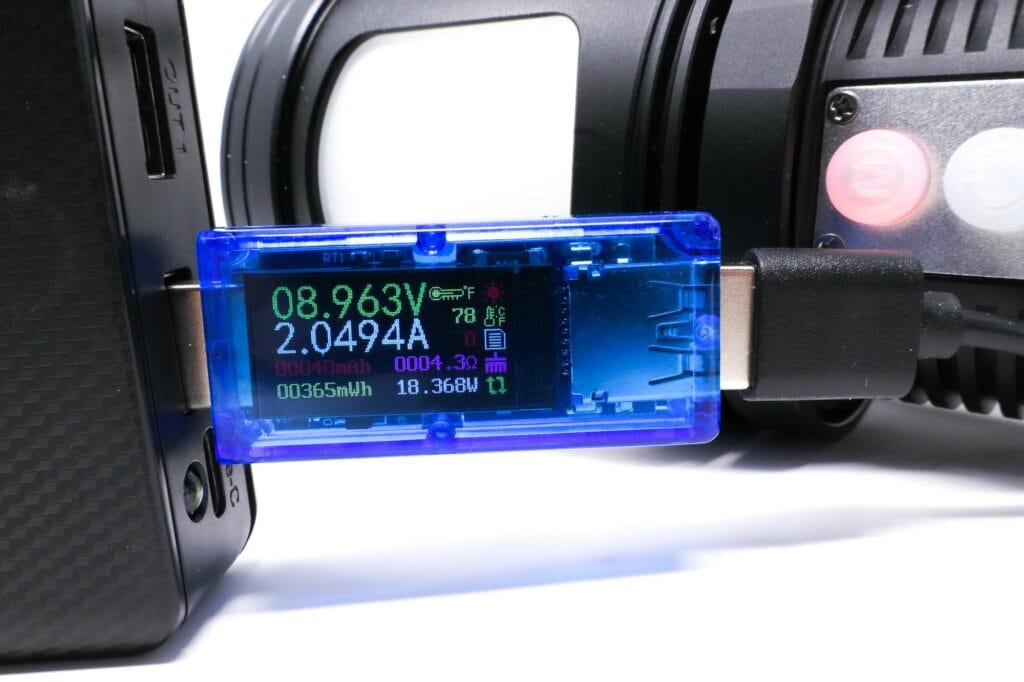
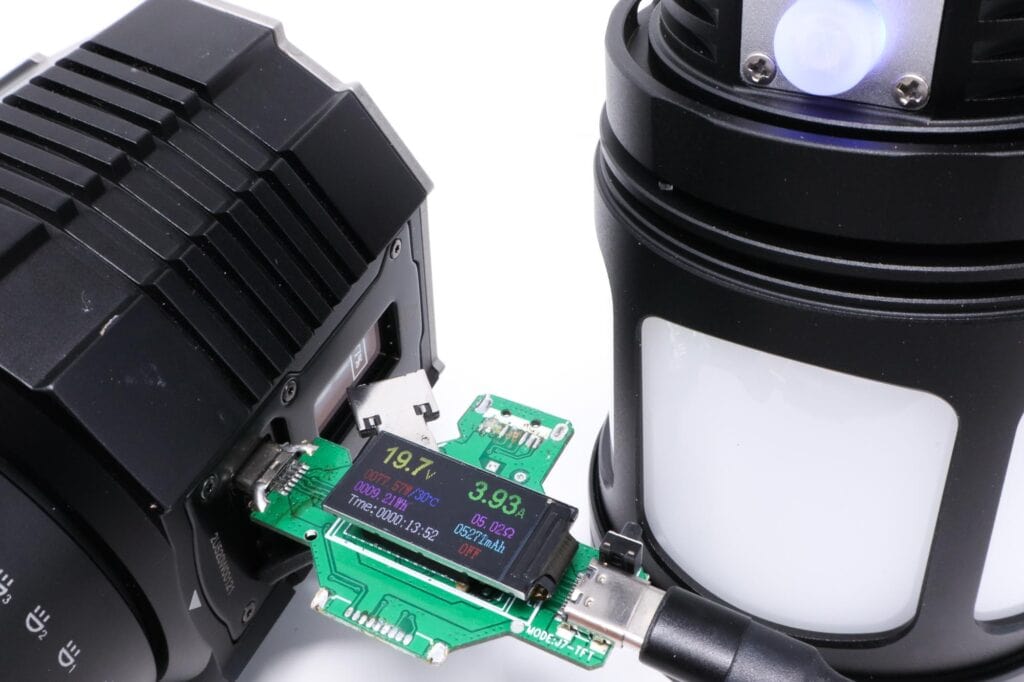
There’s USB type C charging onboard, good for 45 watts (20v 2.5a), along with a bidirectional power bank good for the same 45W. Haikelite doesn’t include the necessary charger, so you’re on your own with that, but any wall wart with a USB A or C output will work. I tested the type A to C input with my Ruideng AT35 tester and the USB C to C with the Hidance tester.
I used the Fenix LR60R (which supports 45W charging) to charge the HK95 and got about 43 watts on the first try, but after a runtime test, I put it back on and was getting 77W peak! Maybe a glitch? I plugged the Nightwatch Super Valkyrie into the power bank and it charged at around 37 watts. On a 45W PD charger after a runtime test, I was seeing a solid 45 watts (20.1 volts at 2.3 amps). The charge completion LED came on at 2 hours in when the light was still drawing the full 20.1 volts and about 200 mA. I let it boil for 14 more minutes until the current was 0 mA. The highest capacity I observed was a tick over 7700 mAh after a runtime recharge.
| Charge type | Fits | No fit | Charge time |
|---|---|---|---|
| Onboard USB-C | Included battery only | Everything else | 2 hours 14 minutes |

Performance test
Lumen measurements
How Lumens are Measured: Understanding ANSI FL1 Standards How Lumens are Measured: Understanding ANSI FL1 Standards: The ANSI FL1 standards specify that output in lumens should be measured 30 seconds after turning on, as this is the standardized time for measuring brightness according to the industry standard. This is why we focus on this part in our measurements. The ANSI FL1 standards require an ambient temperature of 22 ± 3°C. We record the ambient the ambient temperature to identify potential reasons for any observed discrepancies.Lumens are measured in my 50 cm integrating sphere with a Digi-Sense 20250-00 data logging luxmeter. The sphere has been calibrated with a Convoy S2+ measured to 260 Lumens and the figures are within 10% of actual. I used the fully charged battery pack. No current testing for this one due to the isolated current path. I tested stepped modes for the spotlight and the default smooth ramp for the lantern.
| Mode | Specified | 0 sec. | 30 sec. | 10 min. |
|---|---|---|---|---|
| Spotlight | ||||
| Level 1 | 1500 | 640 lm | 640 lm | – |
| Level 2 | 3500 | 1378 lm | 1378 lm | – |
| Level 3 | 4500 | 2023 lm | 2023 lm | – |
| Level 4 | 5500 | 2681 lm | 2620 lm | 2448 lm |
| Level 5 | 7000 | 3432 lm | 3358 lm | 1341 lm |
| Turbo | 13,000 | 6150 lm | 5658 lm | 1230 lm |
| Lantern | ||||
| Bottom of ramp | 1500 | 162 lm | 162 lm | – |
| Mid ramp | ? | 627 lm | 627 lm | – |
| Top ramp | 10,000 | 935 lm | 923 lm | 332 lm |
| Spotlight + Lantern | ||||
| Turbo + top ramp | 23,000 | 4920 lm | 4551 lm | – |
Ambient temperature during testing:
- 18.5 °C
Parasitic drain:
- Not measured
Okay, time to be frank: I didn’t expect the lantern to do 10,000 Lumens, and no surprise, it didn’t. Furthermore, I’m used to 70 or 80% of advertised output on cheaper lights, but the HK95 sort of falls into a different demographic, and this isn’t exactly a cheap light. For the spotlight, the advertised output vs. actual is about 50% across the board. For the lantern it’s even worse: less than 10%. The lantern+spotlight together on their maximum settings is even more abysmal: Just 4920 Lumens at start, dropping to 4551 by 30 seconds. Hey, it sure looks a lot brighter than it is though, and honestly the 935 Lumens on the top ramp is actually plenty.
Haikelite HK95 Battery Life: Runtime graphs
How Runtimes are Measured: Understanding ANSI FL1 Standards About ANSI FL1 runtime standards: The runtime is measured until the light drops to 10% of its initial output (30 seconds after turning on). This does not mean that the flashlight is not usable anymore. The last column shows how long the light actually works till it shuts off. If there is a + symbol, it means that the test was stopped at that particular point, but the light was actually still running. This happens on certain occasions, with certain drivers, firmware, or batteries.Lumens are measured in my 50 cm integrating sphere with a Digi-Sense 20250-00 data logging luxmeter. The sphere has been calibrated with a Convoy S2+ measured to 260 Lumens and the figures are within 10% of actual. I use a Digi-Sense 20250-92 data logging thermocouple for the temperature measurements. The probe is affixed to the head using kapton tape and uses the same 5 second sampling rate for logging. The battery pack was fully charged for the test. I tested the stepped modes for the spotlight 4,5 and Turbo, and the bottom, what looked like the middle, and top ramp for the lantern, as well as the lantern top ramp plus Turbo for the spotlight combined.
| Mode | Specified | Runtime (ANSI FL1) | Time till shut off |
|---|---|---|---|
| Spotlight | |||
| Level 4 | ? | 4h 10min | 4h 22min |
| Level 5 | ? | 4h | 4h 27min |
| Turbo | 60s+6h | 3h 5min | 4h 44min |
| Lantern | |||
| Top ramp | ? | 4h 33min | 5h 24min |
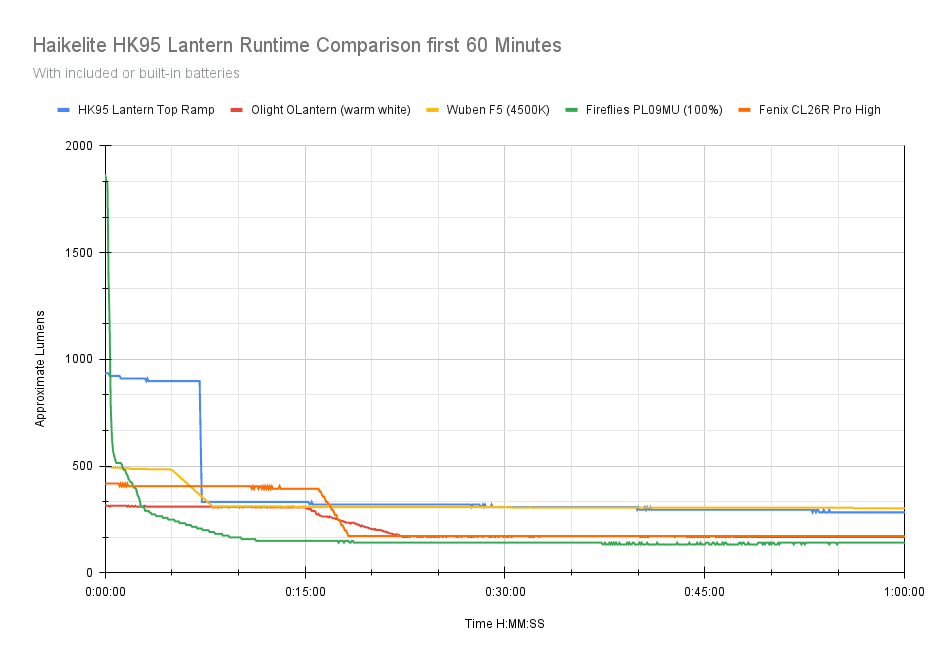
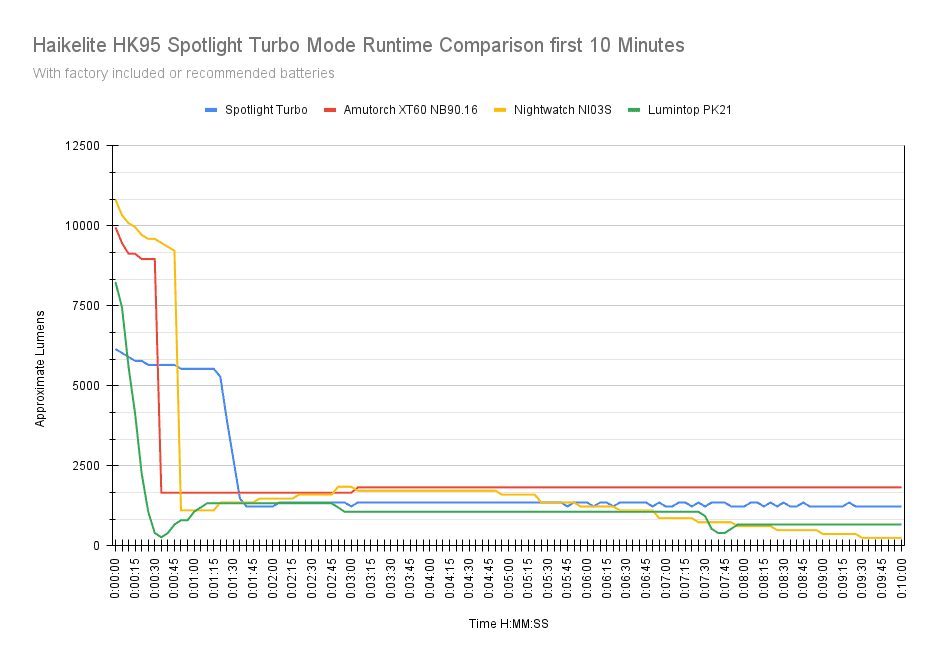
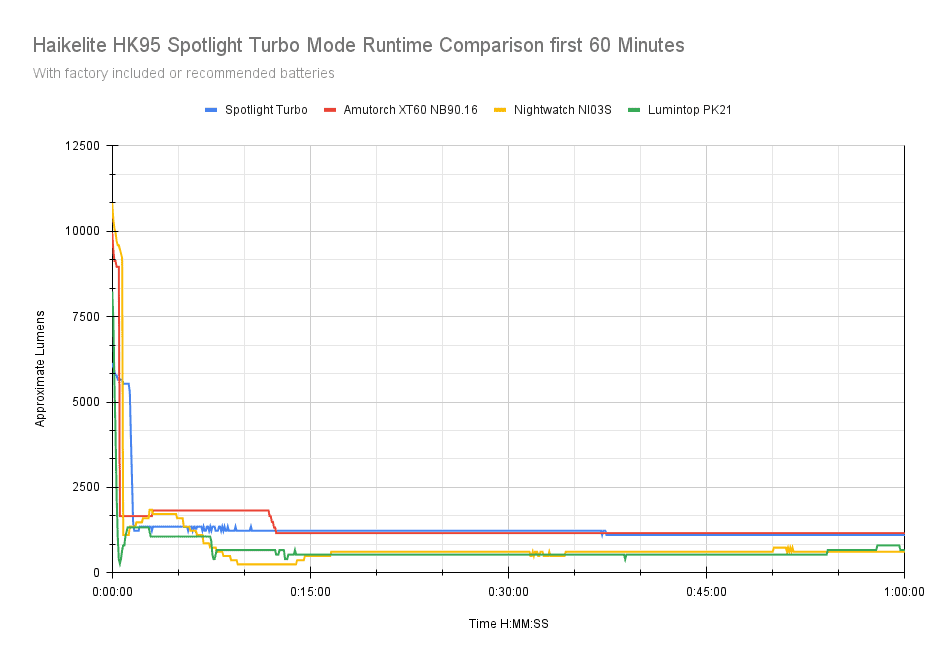
The driver is a current regulated driver (not a constant current driver), so the output tracks the battery discharge curve. Not ideal, but I think it works fine here, and the sustained output isn’t bad, with better than 3000 Lumens available for over 90 seconds on Turbo, and about 1000 Lumens for over an hour for the tested modes on the spotlight.
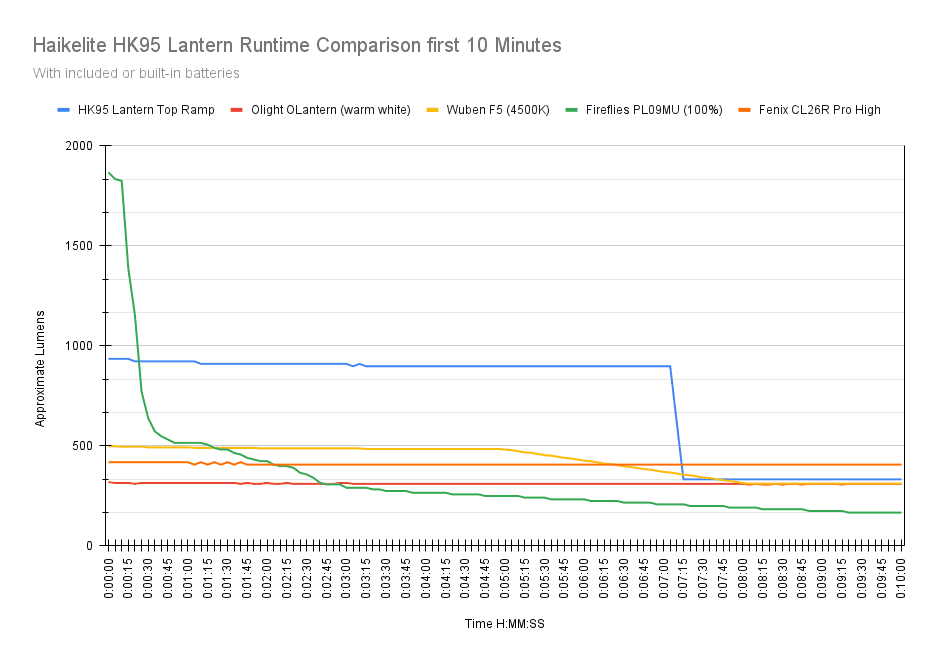
For the lantern, you get around 1000 Lumens, but only for about 7 minutes. The LVP works just fine, pulling the plug at about 5.8 volts. The light was usable after each test, and with a decent amount of output. There’s no visual LVP, but the ‘M’ switch LED turns red and blinks away until shut down. Temperatures were kept stable without thermal regulating interrupting the output, with a ceiling around 60 C for the spotlight, but it went higher for the lantern, cresting about 65 C. The tube stayed comfortably warm for handheld use though.
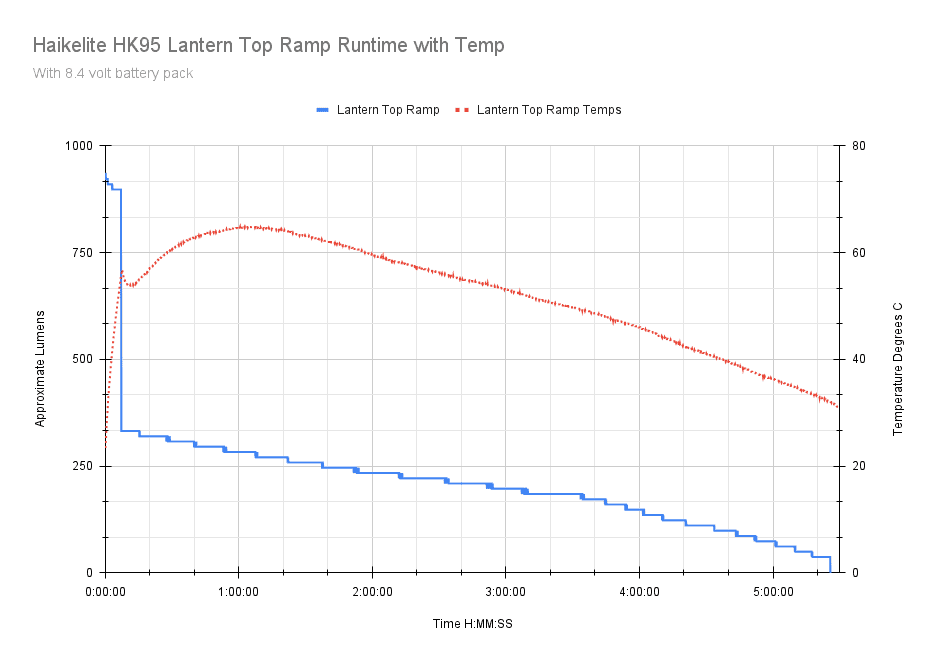
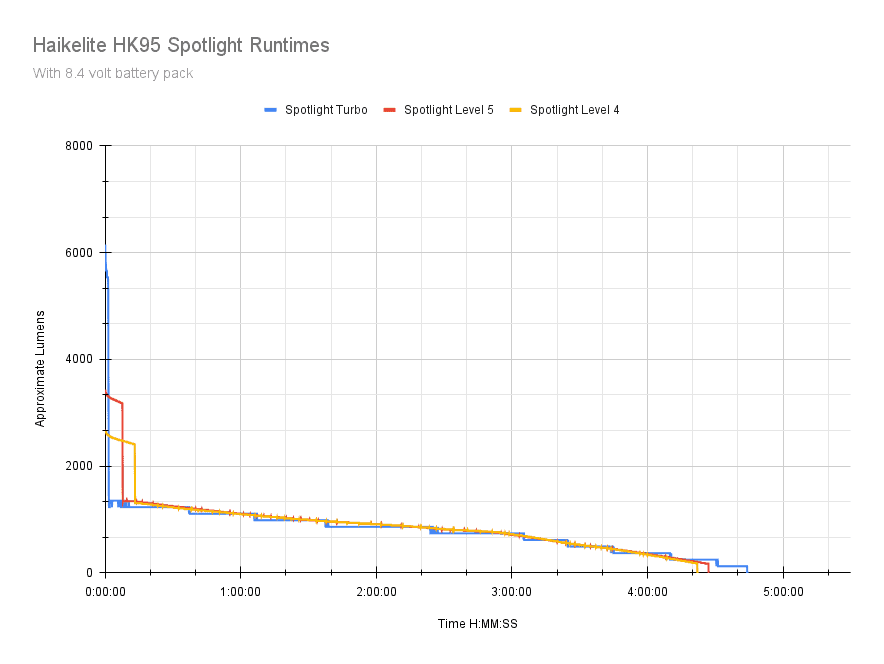
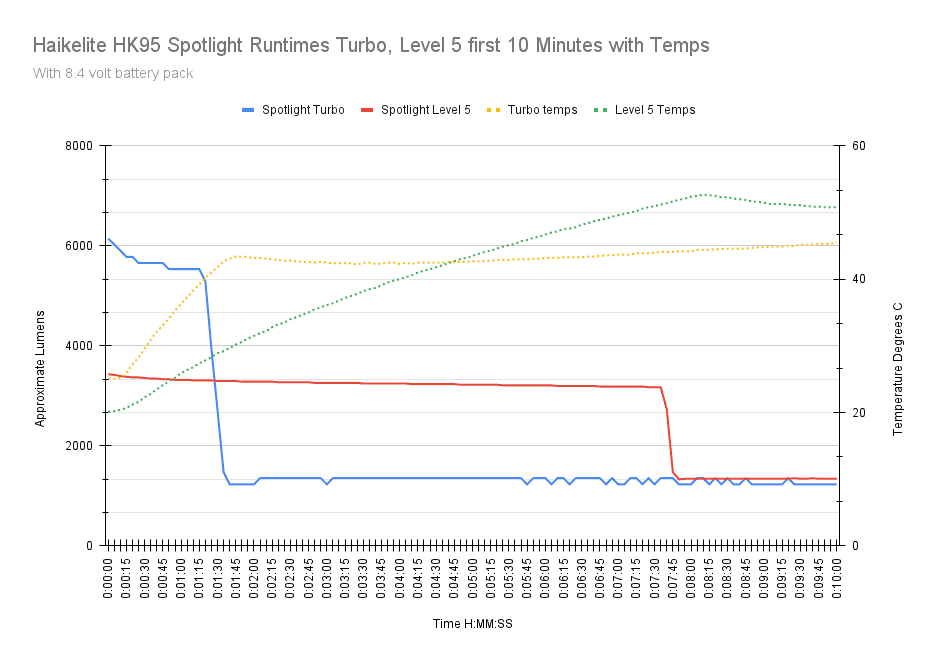
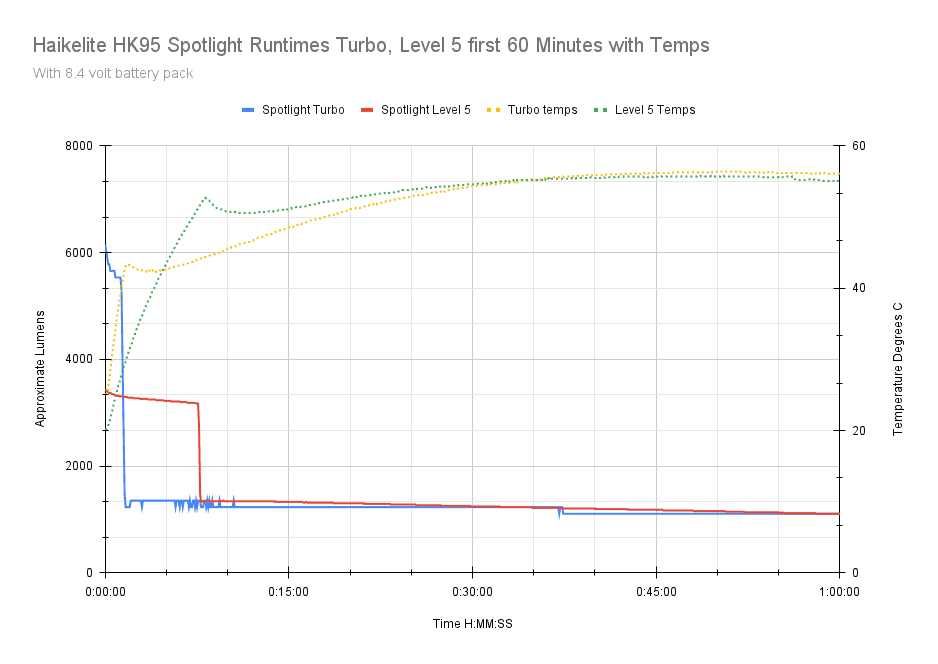
For the comparisons, the spotlight holds its own, but for a huge light, it’s not that great. The single cell lights are all brighter (except the Lumintop PK21 which is 2S), so the HK95 might be a bit of a dog here, but still good enough. For the lantern mode, it’s obviously brighter than the competitors, but the sustained output isn’t as good, and that’s where it counts for a lantern. Plus the HK95 is huge and all the smaller lanterns do better.
Peak beam intensity and beam distance measurements
About Peak beam intensity: Understanding ANSI FL1 Standards About peak beam intensity The calculated value of distance in meters at which the flashlight produces a light intensity of 0.25 lux. (0.25 lux is about the brightness of a full moon shining on an object). This means that the intensity has decreased so much, it becomes difficult to see darker objects, or objects that don’t reflect light. The columns ‘Meters’ and ‘Yards’ use rounded numbers.Beam distances for both lighting modes are measured using a Uni-T UT383S luxmeter measured indoors at 5 meters using the included fully charged battery. Measurements taken at 30 seconds.
| Mode | Specified | Candela measured | Meters | Yards |
|---|---|---|---|---|
| Spotlight | ||||
| Level 1 | ? | 24,725 | 314 m | 343 |
| Level 2 | ? | 47,500 | 436 | 477 |
| Level 3 | ? | 72,750 | 539 | 589 |
| Level 4 | ? | 97,125 | 623 | 681 |
| Level 5 | ? | 115,850 | 680 | 744 |
| Turbo | ? | 203,650 | 902 | 986 |
| Turbo at turn-on | ? | 218,300 | 934 | 1021 |
| Lantern | ||||
| Bottom of ramp | ? | 100 | 20 | 22 |
| Mid ramp | ? | 500 | 45 | 49 |
| Top of ramp | ? | 650 | 49 | 54 |
Ambient temperature:
- 19 °C
Beamshots
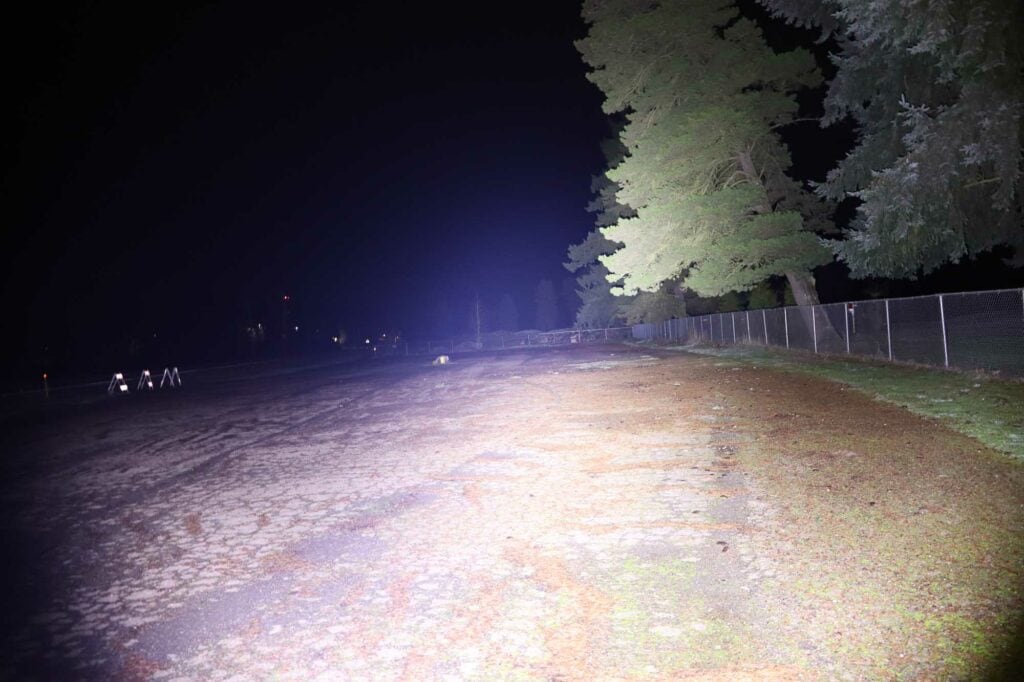
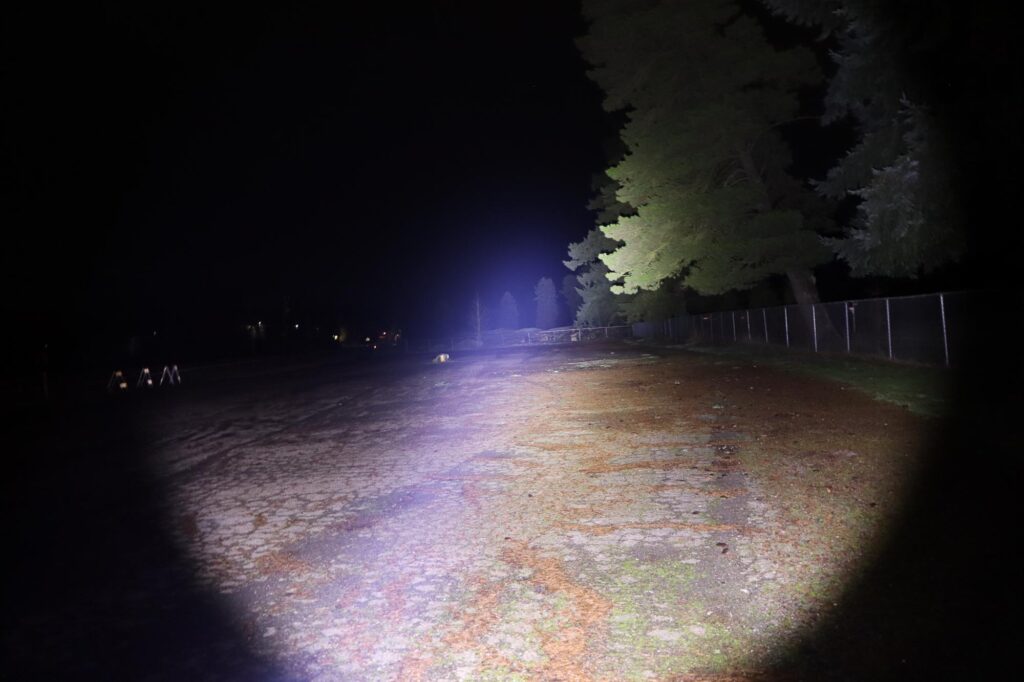
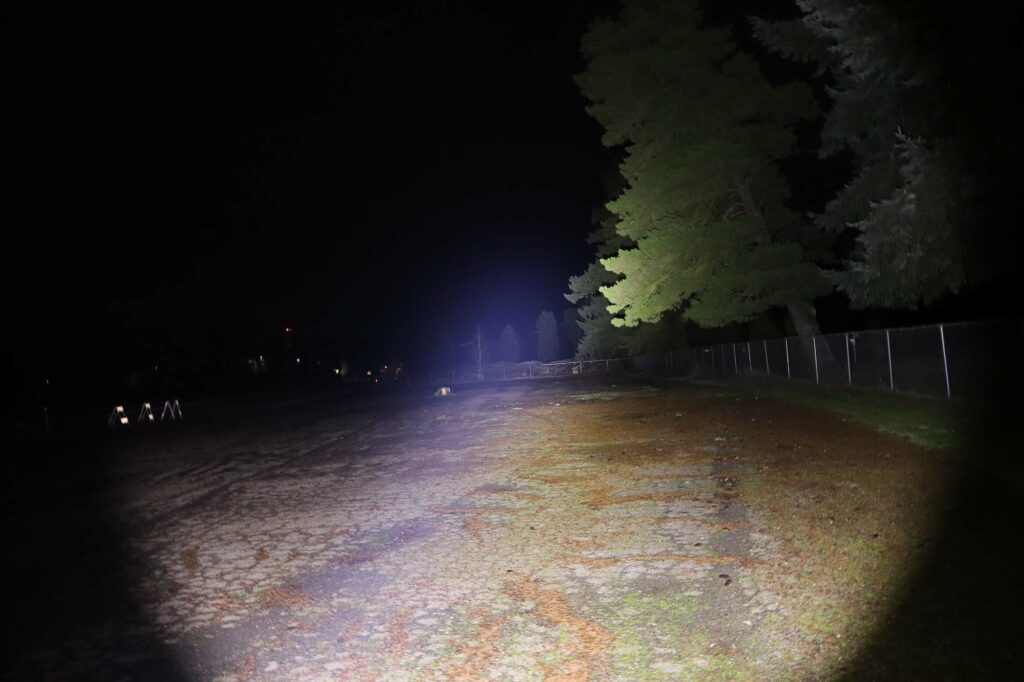
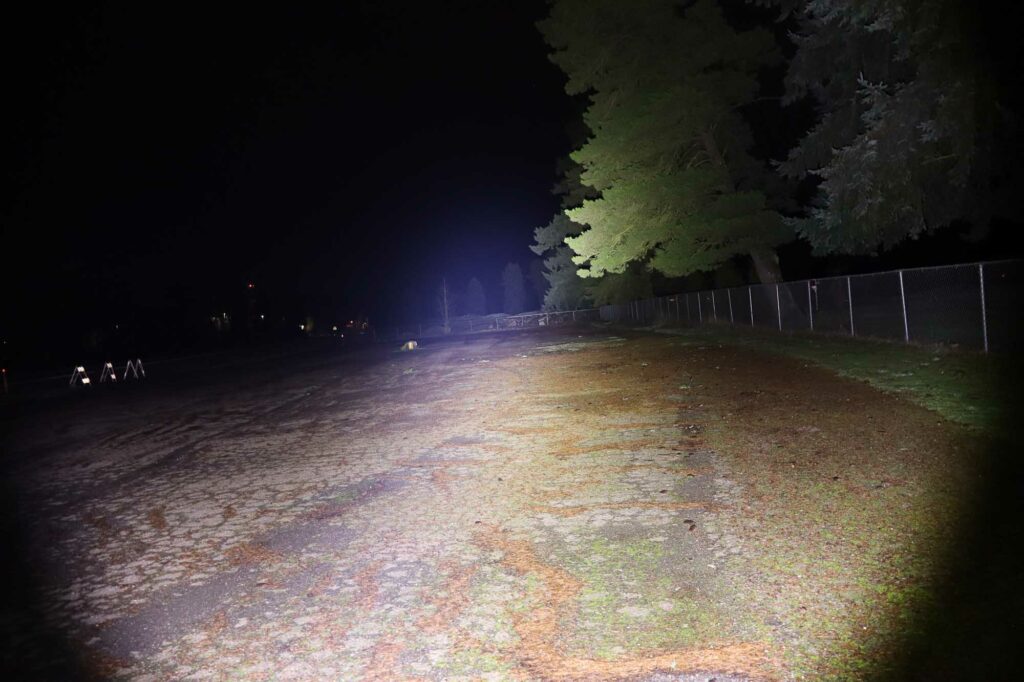
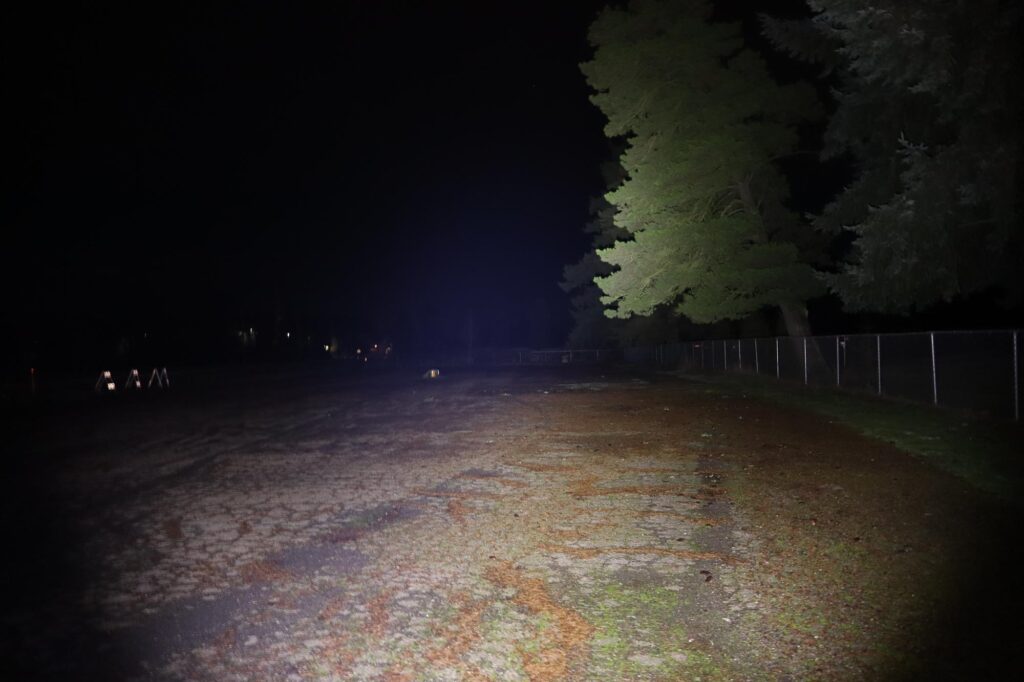
Camera settings and distance: Photos taken with a Canon EOS R100 and Canon R-FS 18-45mm STM lens set to 0.3s, F5 and ISO 1600. WB is locked at 5000K.The fence is 95 meters away. The trees beyond the fence are about 150 meters distant. The photos on my patio were taken with the same camera, but set to 1/60sec, F4.5 and ISO 1600.
Beamshots of the following flashlights compared (Spotlight):
- Haikelite HK95
- Amutorch XT60 NB90.16
- Amutorch XT45 NB90.16
- Mateminco LT40
- Nightwatch NI03s Super Valkyrie
- Lumintop PK21
(Lantern)
- Haikelite HK95
- Fireflies PL09MU
- FireflyLyte NOV-Mu
- Olight O’Lantern Classic Pro II
- Fenix CL26R Pro
- Coleman 288
Please note that the following beamshots are mainly intended to showcase the beam pattern and beam quality, rather than overall performance. These images are typically taken directly after activation, and in different seasons or weather conditions, and therefore do not fully represent its overall performance. For accurate performance metrics, such as output, beam distance, and runtimes, you need to look at the performance section of this review.



Disclaimer: This flashlight was sent to us for review at no cost by Nealsgadgets. We have not been paid to review, nor have we been holding back on problems or defects.
Final Verdict
Pros
- Lantern and flashlight in one
- Nice beam distance from the flashlight
- Nice warm tint from the lantern
- 45W bidirectional charging
- Easy to use dual-switch UI with smooth/stepped ramping
Cons
- Measured output is way down from the specs
- Lowest setting on the lantern is way too bright
- No stepped ramping for the lantern
- Unregulated driver
- Built in battery (sort of)
Explanation on star ratings:
1: Avoid: a match would be a better choice – 2: Poor: significant defect or issues; almost unusable – 3: Average: some defects or issues; but still usable 4: Good: recommended (minor issues) – 5: Great: highly recommended

3.5 stars: ★★★⋆
While our star rating provides a reliable indicator, we encourage you to read the full review to make an informed decision based on your own needs and preferences.
Haikelite has done it again, with an unorthodox flashlight. Marrying a lantern and flashlight isn’t a new idea, but Haikelite took it to the extreme here and made a pretty cool light.
The flashlight bit works just fine and gets pretty bright with respectable beam distance. The lantern part, while it could benefit from some refinements, gets pretty bright as well and just works. It also adds a lot of utility and handiness to the flashlight. While it’s a bit unwieldy for day to day use, I think for camping or general purpose use, this would be great.
The dual switch UI is also a bright spot, with stepped modes for the spotlight and smooth ramping for the lantern. I would have liked to see the same stepped modes for the lantern and flashlight, but it is what it is. Even with a FET driver, the runtimes have good thermal control and consistent LVP.
I was a bit disappointed with the outputs though, when actual output is less than 20% of advertised…that’s no bueno. I’m used to that from cheap one-hung-lo zoomies, not $100+ flashlights.
The battery: While you could feasibly swap it out, I’m sure Haikelite would discourage that, so I consider it to be non user-serviceable (do it at your own risk!). So, would I go out and spend my hard-earned cheddar on a HK95? If I were looking for a high output flashlight/lantern for a single lighting solution, I might since there’s really nothing like this on the market currently. However, depending on your needs, you might do better with a small lantern like the Fenix CL26R Pro augmented with a proper flashlight.
In short, Haikelite might have produced the ultimate sport utility flashlight, but it needs some tweaks to make it great. 3.5 stars for the HK95.
Buy your Haikelite HK95 with a discount
Use 1lumen711 for 15% off
1lumen selects and reviews products personally. We may earn affiliate commissions through our links, which help support our testing.