1lumen selects and reviews products personally. We may earn affiliate commissions through our links, which help support our testing.
Acebeam Terminator M2 review
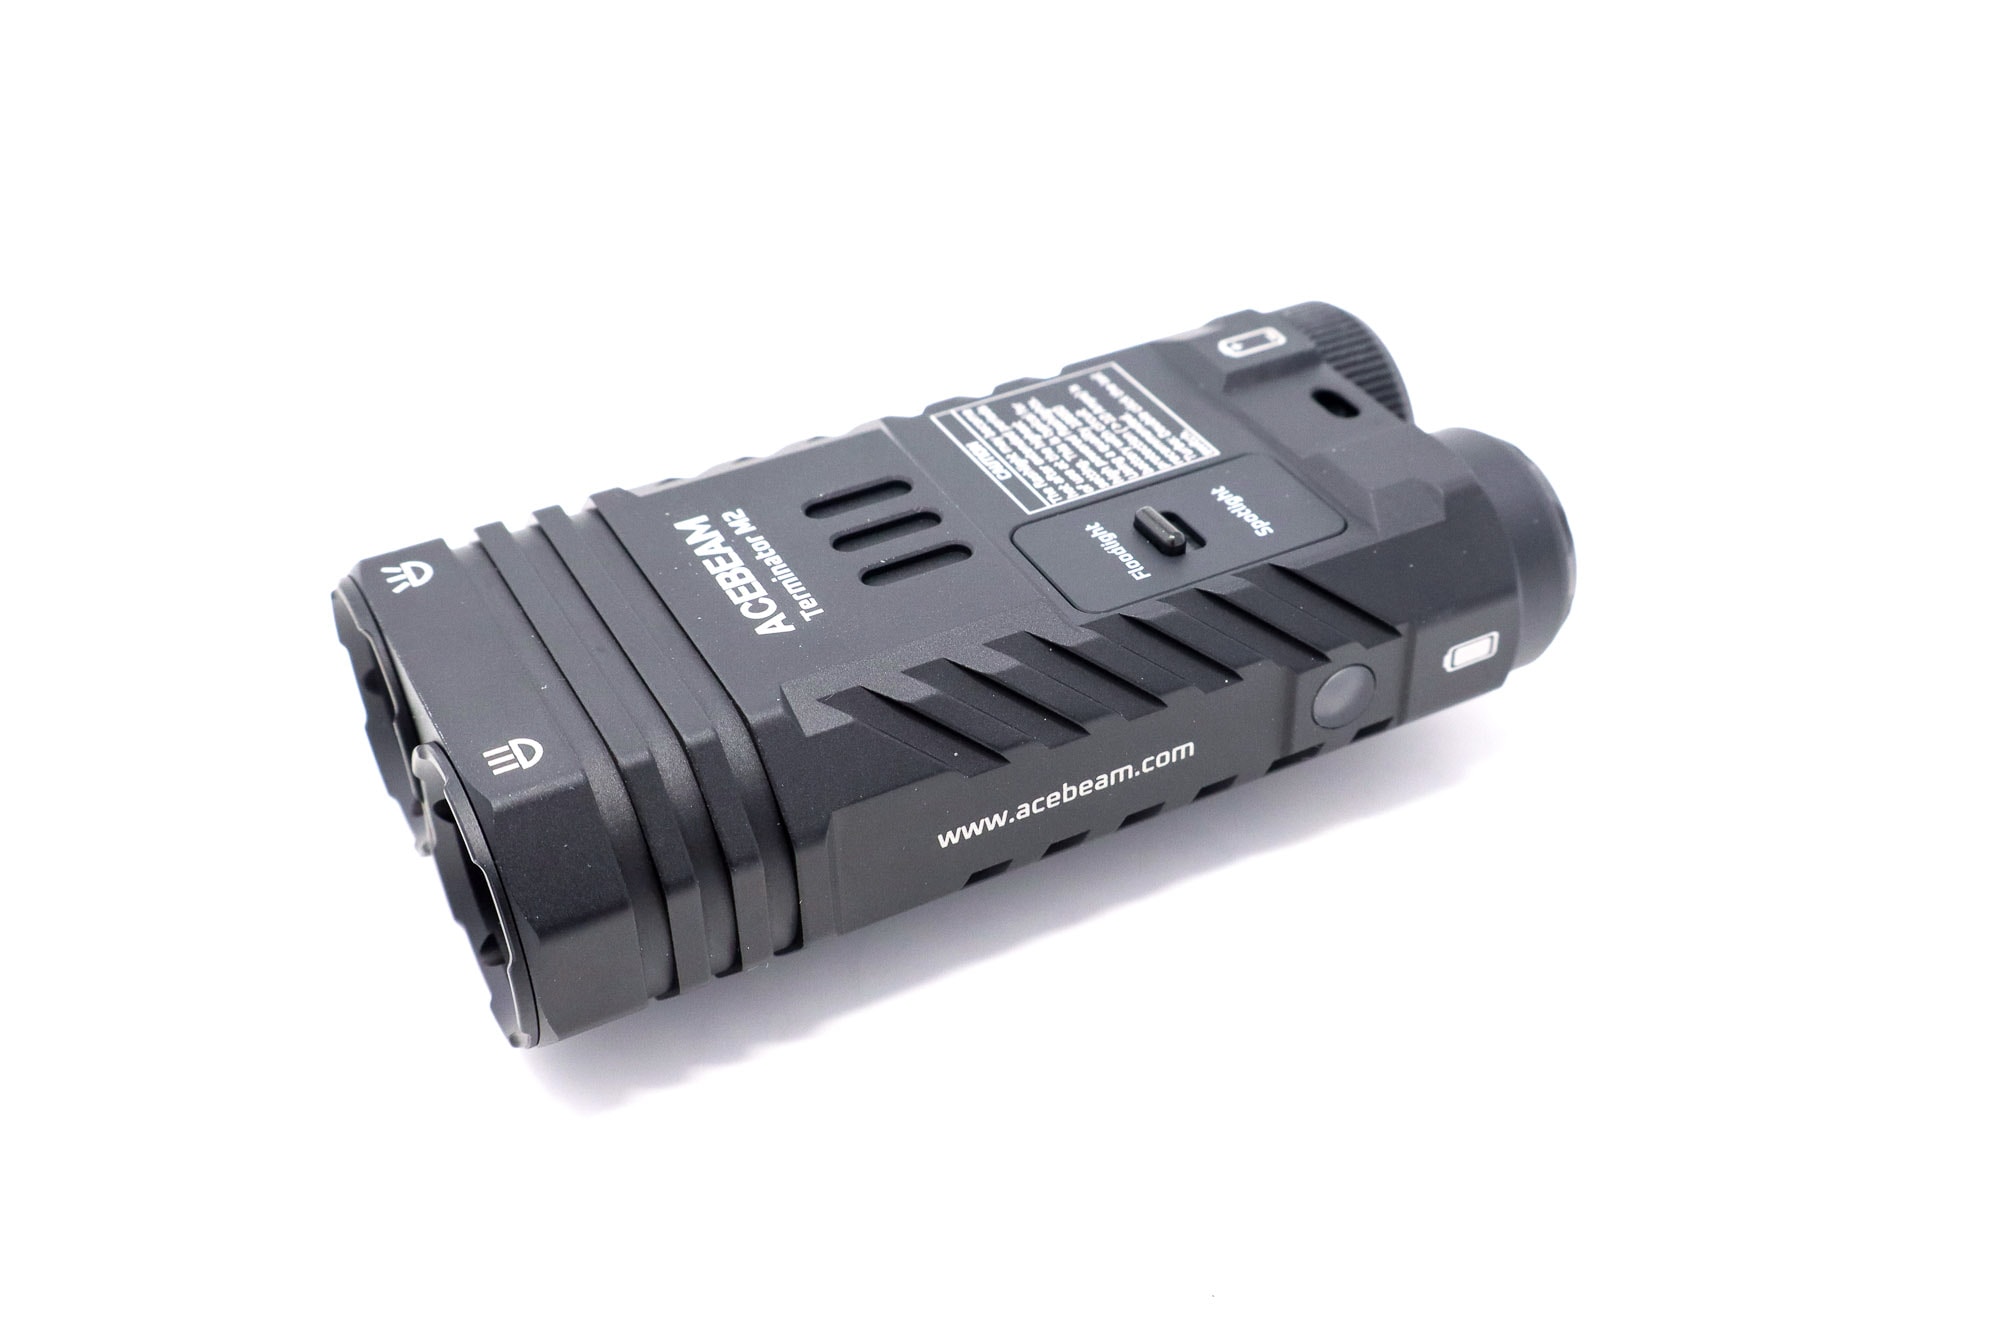
Acebeam Terminator M2 specifications
| Brand & Model | Acebeam Terminator M2 |
|---|---|
| Flashlight category | EDC |
| LED | Nichia 519A + others |
| Max. output | 2000 lumens (for Nichia, 3200 for CW) |
| Max. beam distance | 500 meters |
| Max. beam intensity | 62,500 cd |
| Battery config. | 1x 18650 |
| Onboard charging | No (battery with USB-C) |
| Main modes | 9 |
| Blinkies | Green Signal, Red SOS |
| Waterproof | IP68 |
| Review publication date | February 2024 |
Review intro:
For quite a while, I don’t feel like Acebeam got the attention they deserved. I loved the quality of their lights, even if they weren’t the most enthusiast-centric flashlights. But lately, Acebeam seems to be hitting some homeruns that have resonated with the flashlight community: the futuristic Acebeam Terminator M1 (flood+LEP), the Acebeam E75, the Pokelit, etc. The Acebeam E75 (Nichia) has been my go-to around-the-house/outdoors light since I received it. And my copper Pokelit (also Nichia) has been in my pocket most days. They just seem to be getting a lot of things right these days.
And what do you do when you’re winning? You better keep going if you want to stay towards the head of the pack. So right on the heels of the awe-inducing Terminator M1, Acebeam has released the M2 – a little brother to the popular dual-output flashlight. The changes include a smaller format (swapping in a 18650 in place of the 21700), replacing the LEP with a focused LED spotlight. But don’t worry – Acebeam didn’t just dumb things down. They also added some cool RGB aux under the floodlight optic. There’s a lot to unpack, so let’s get to it, shall we?
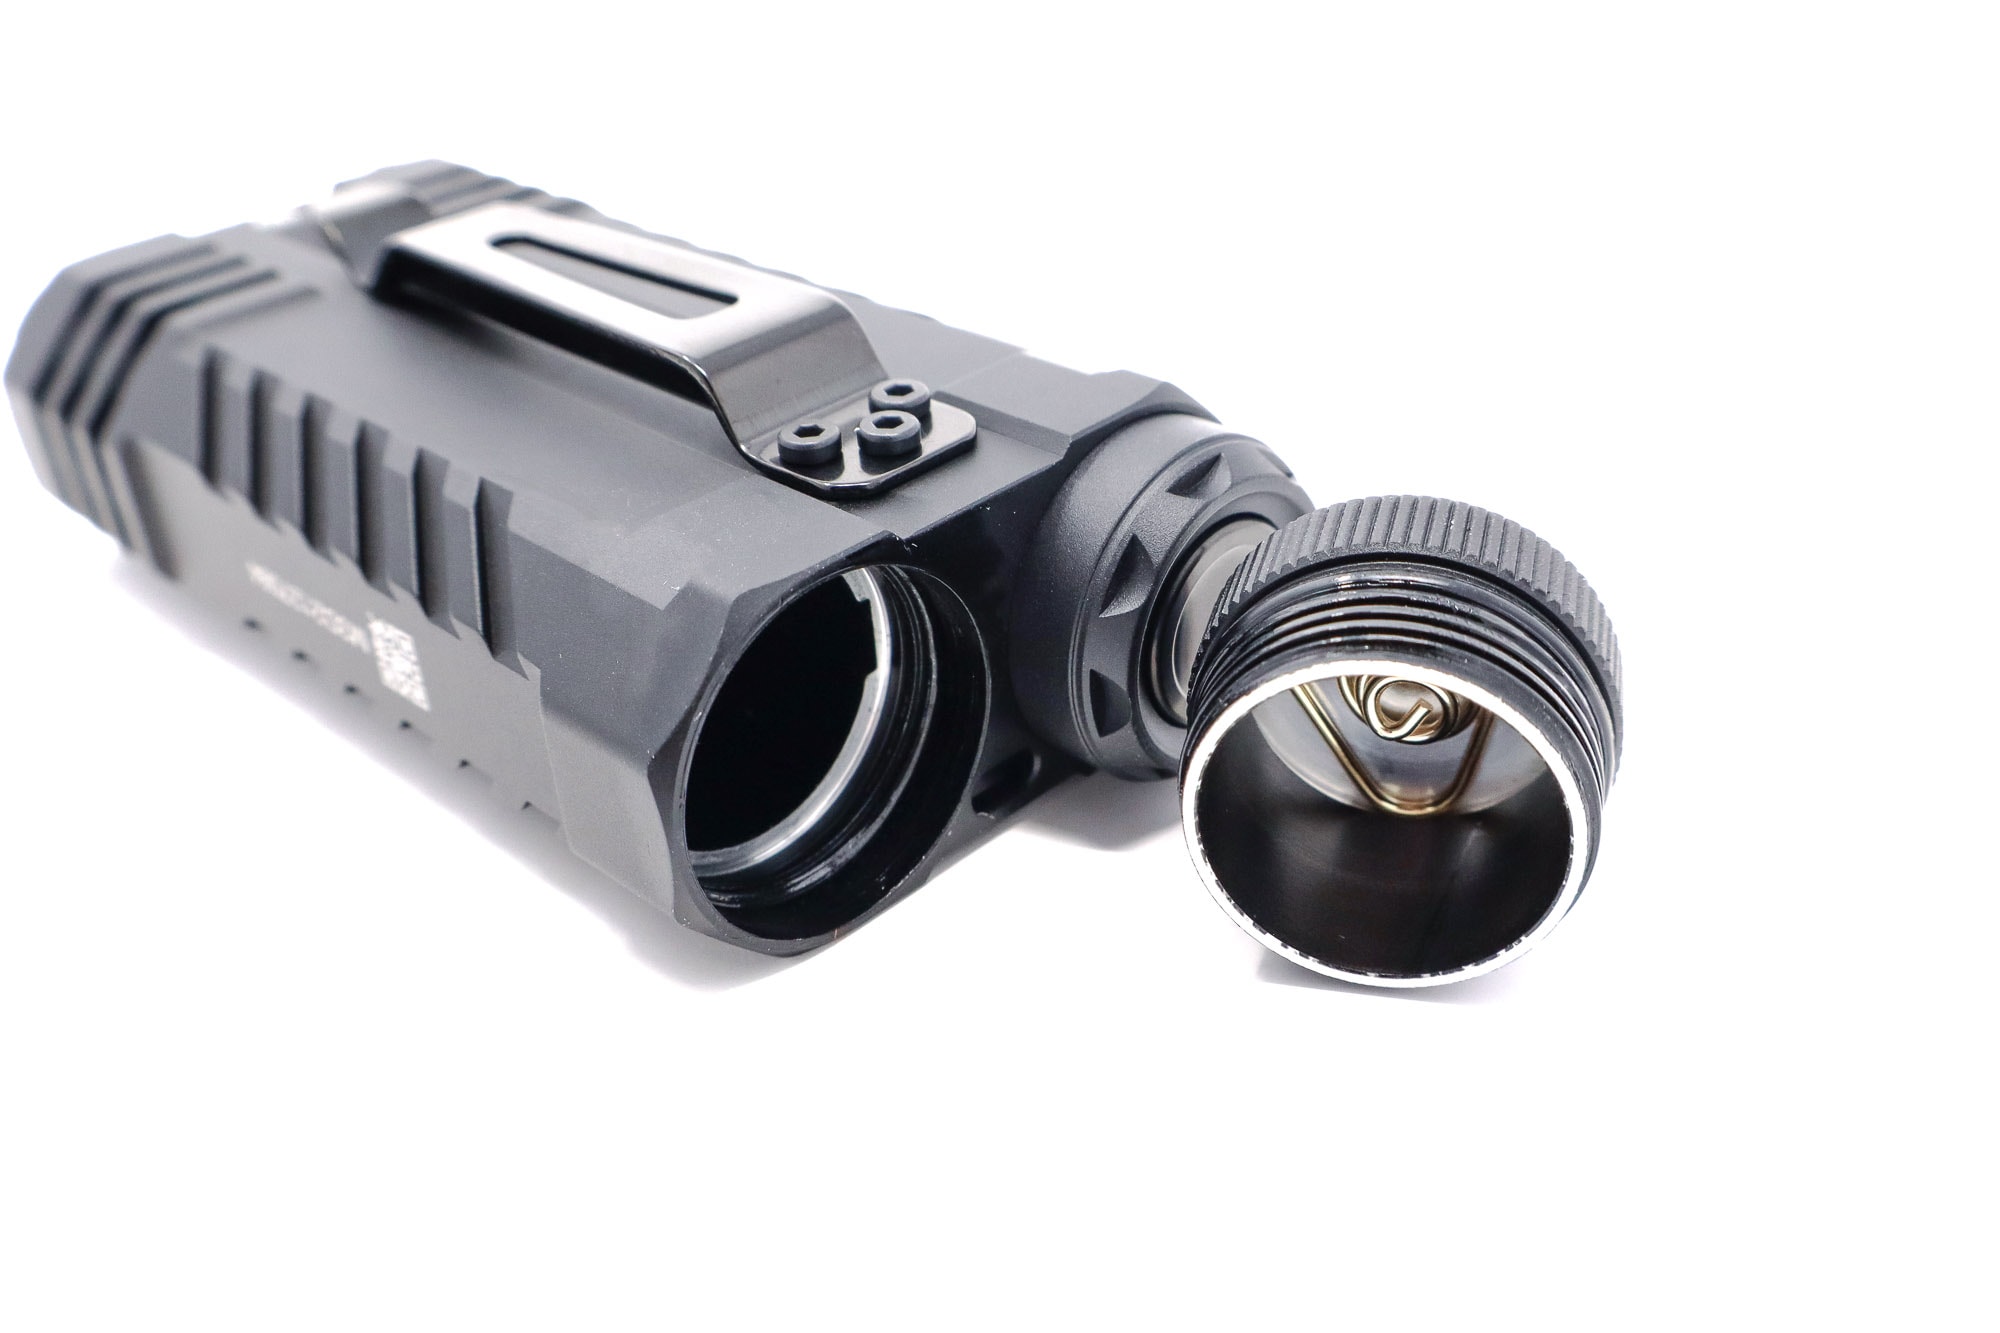
To get started with the Acebeam Terminator M2, unscrew the battery cover and remove the isolation disc.
What’s in the package
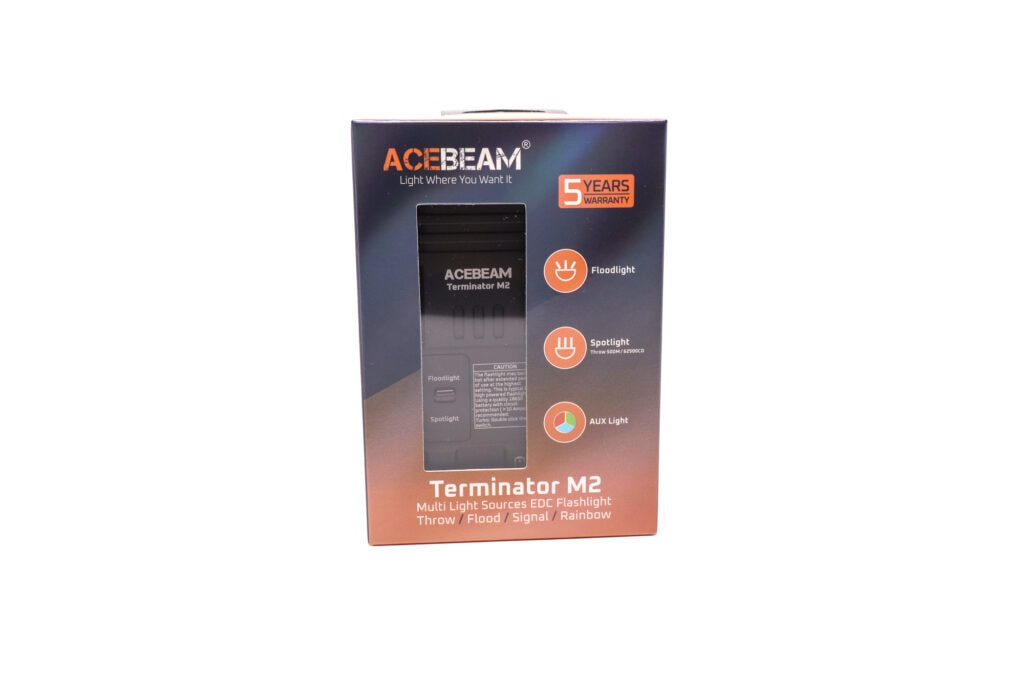
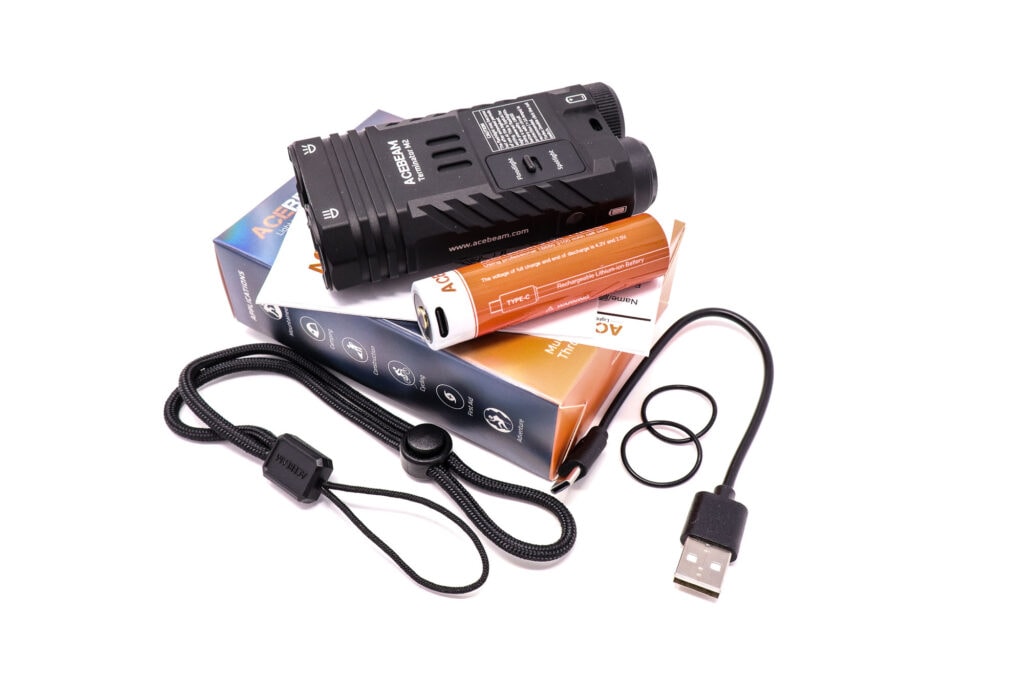
The packaging of the Terminator M2 was surprisingly compact and flashy. The box has a really cool iridescent look that is hard to pick up with the camera. There’s a little window that lets you peek inside the box, and a few tidbits of info about the flashlight. Pop open the top flap to slide out a plastic tray that’s holding the M2 and a little interior box where the goodies are neatly tucked aside. All told, the box contained:
- Acebeam Terminator M2
- Battery (18650, USB-C chargeable)
- Lanyard
- Charging cable
- Spare o-rings
- Manual
Flashlight in use, Build Quality, and Warranty
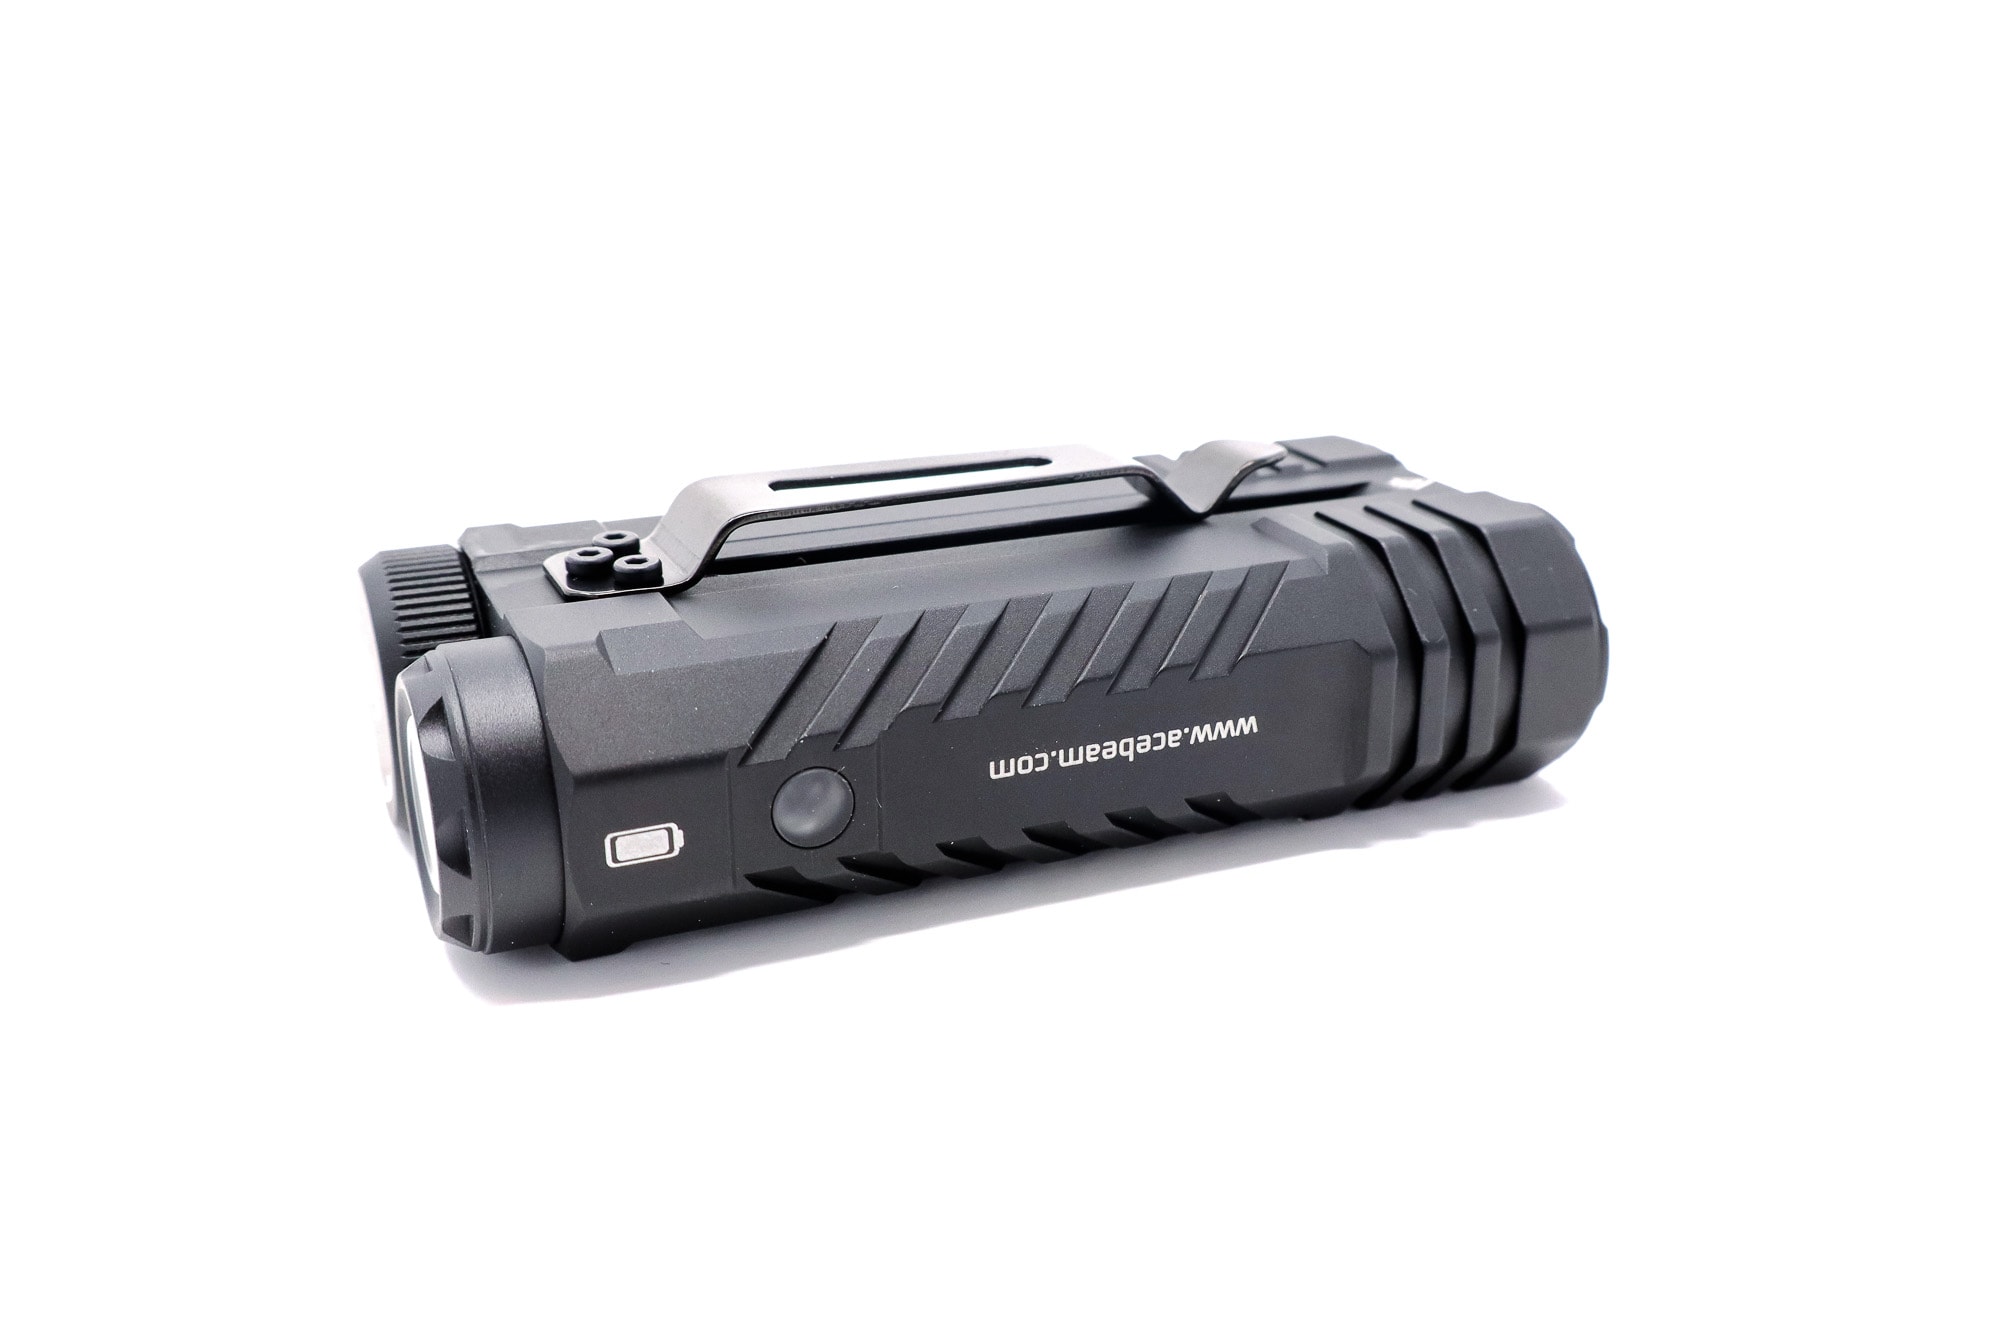
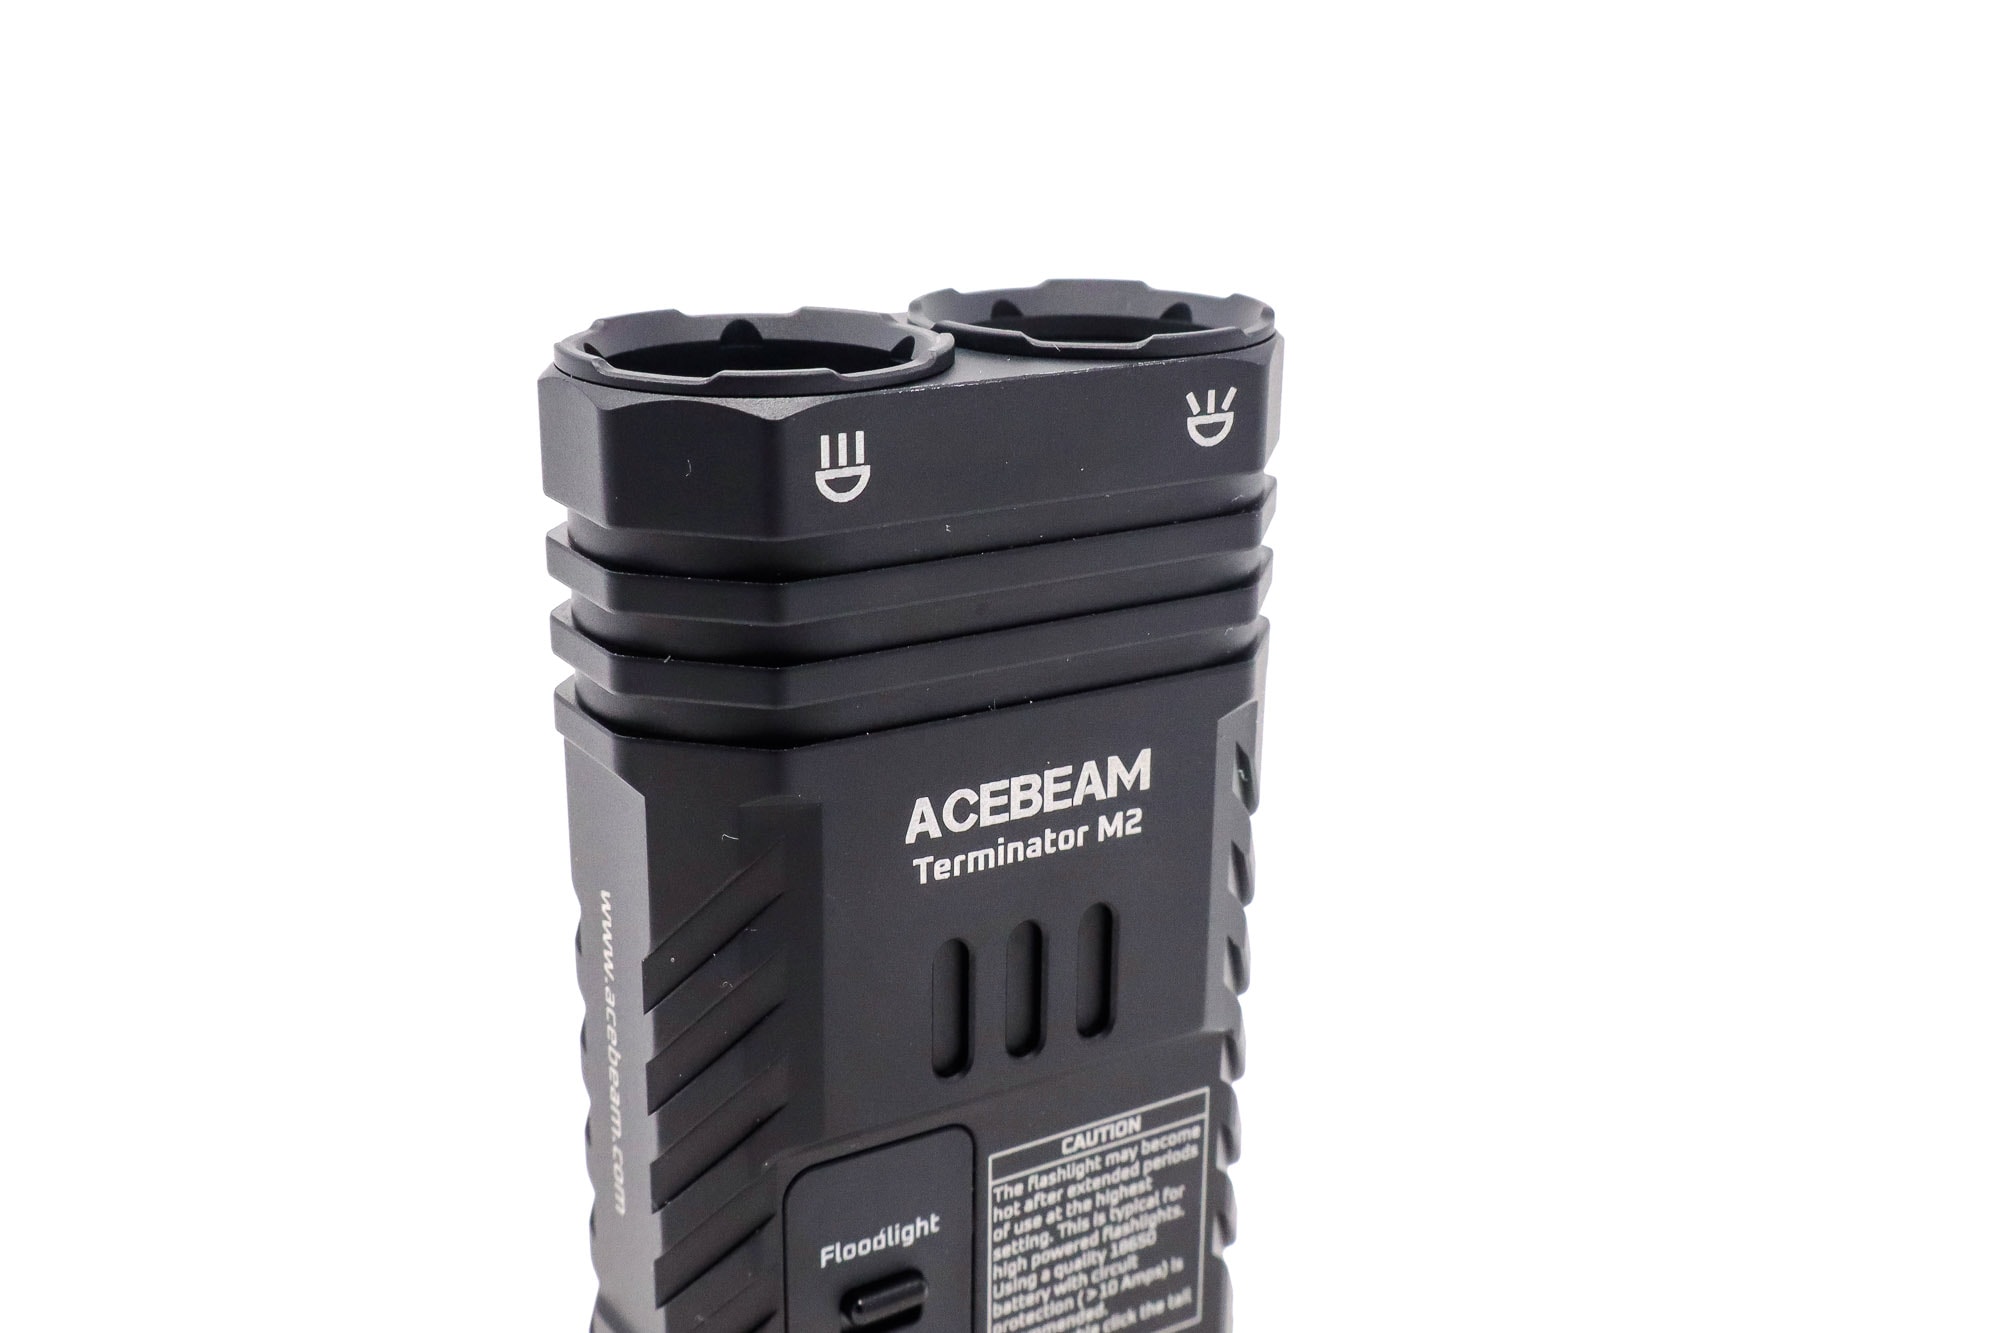
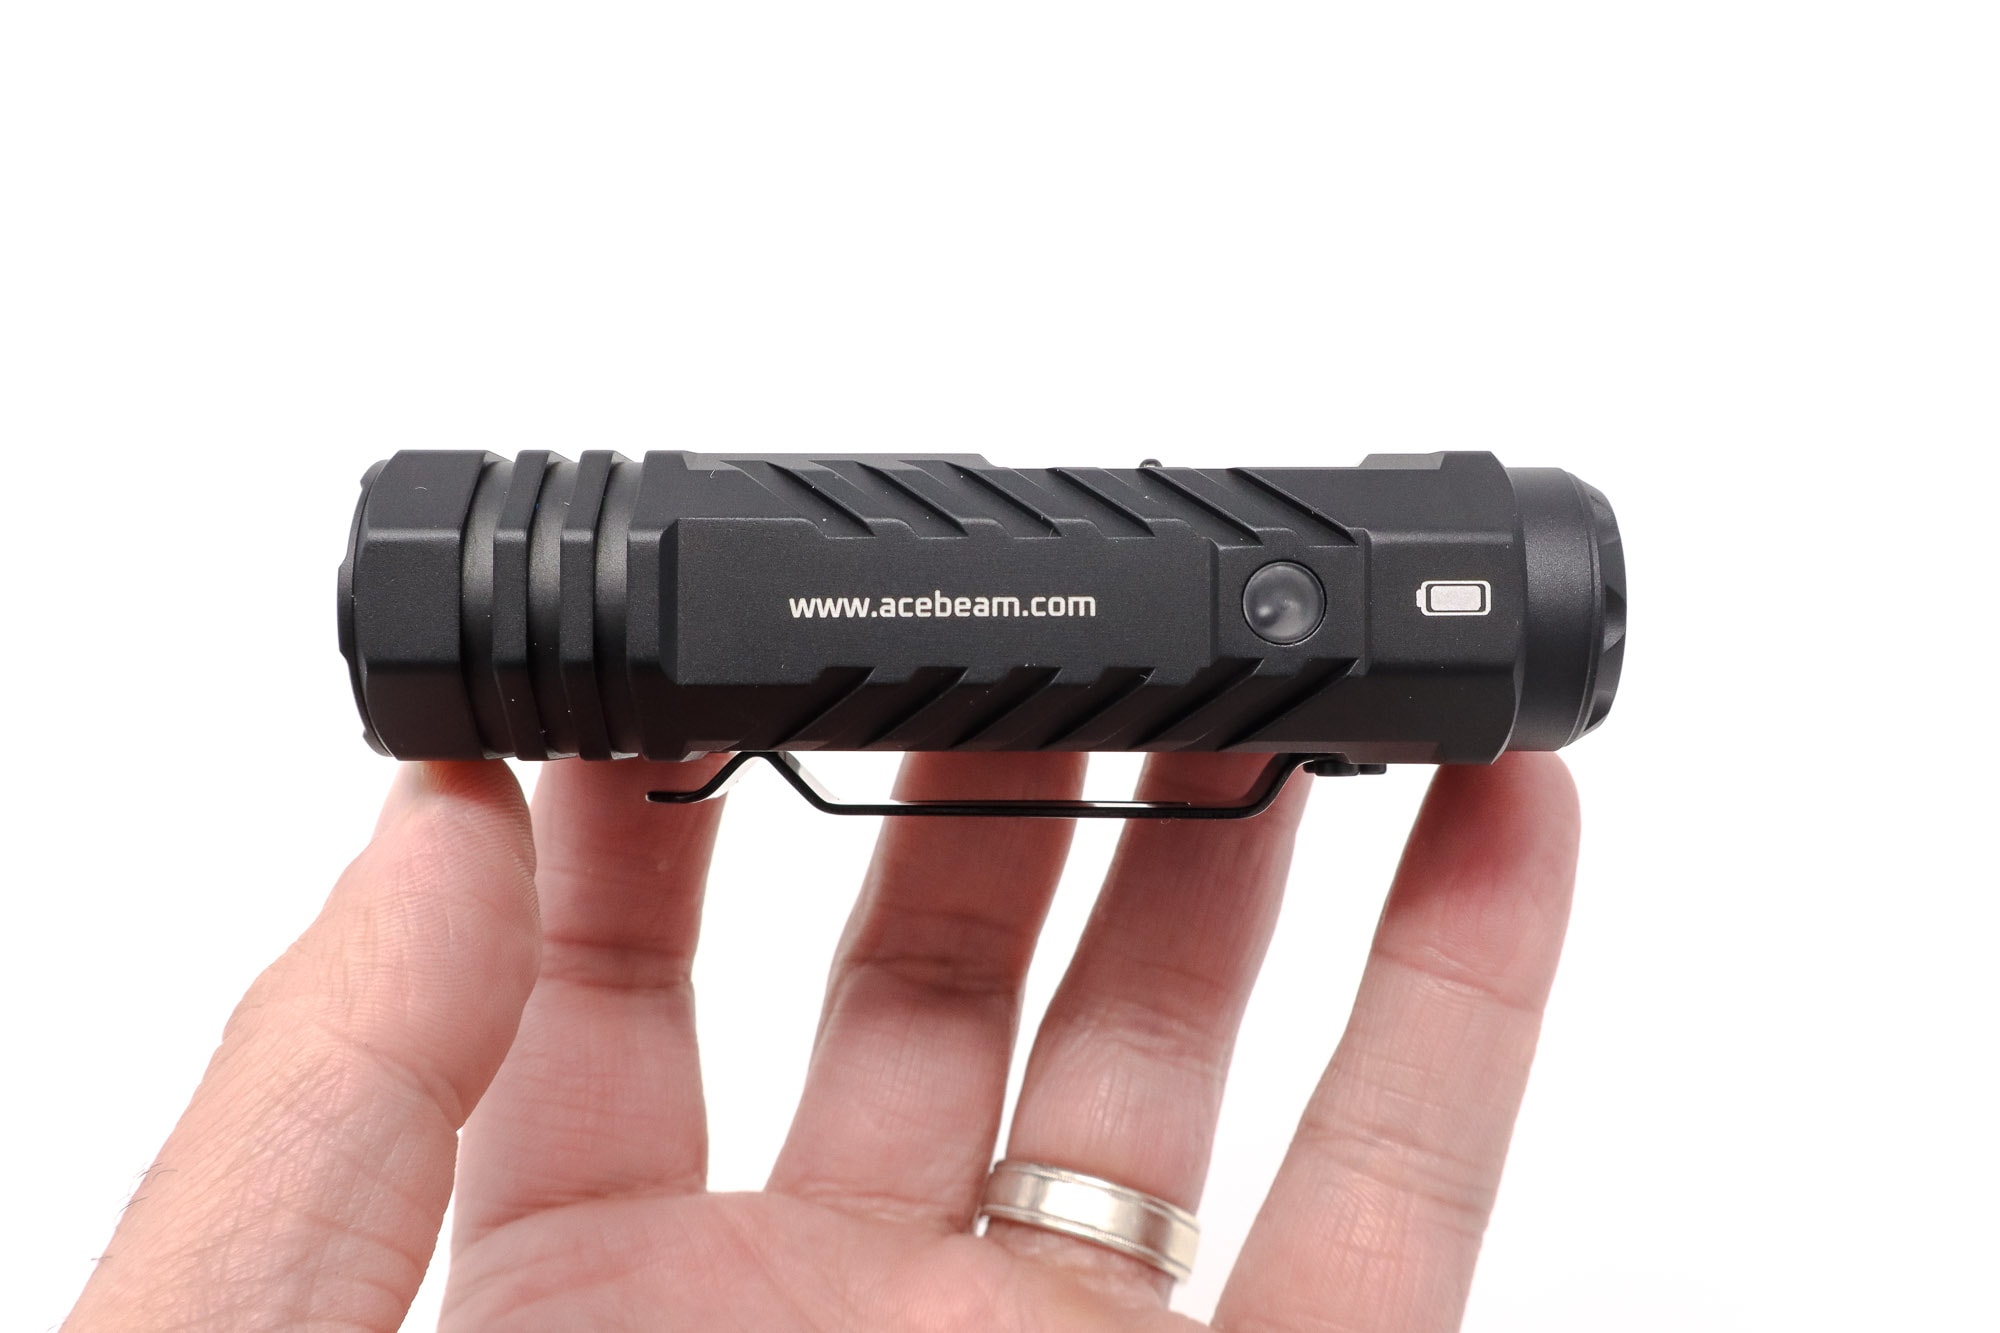
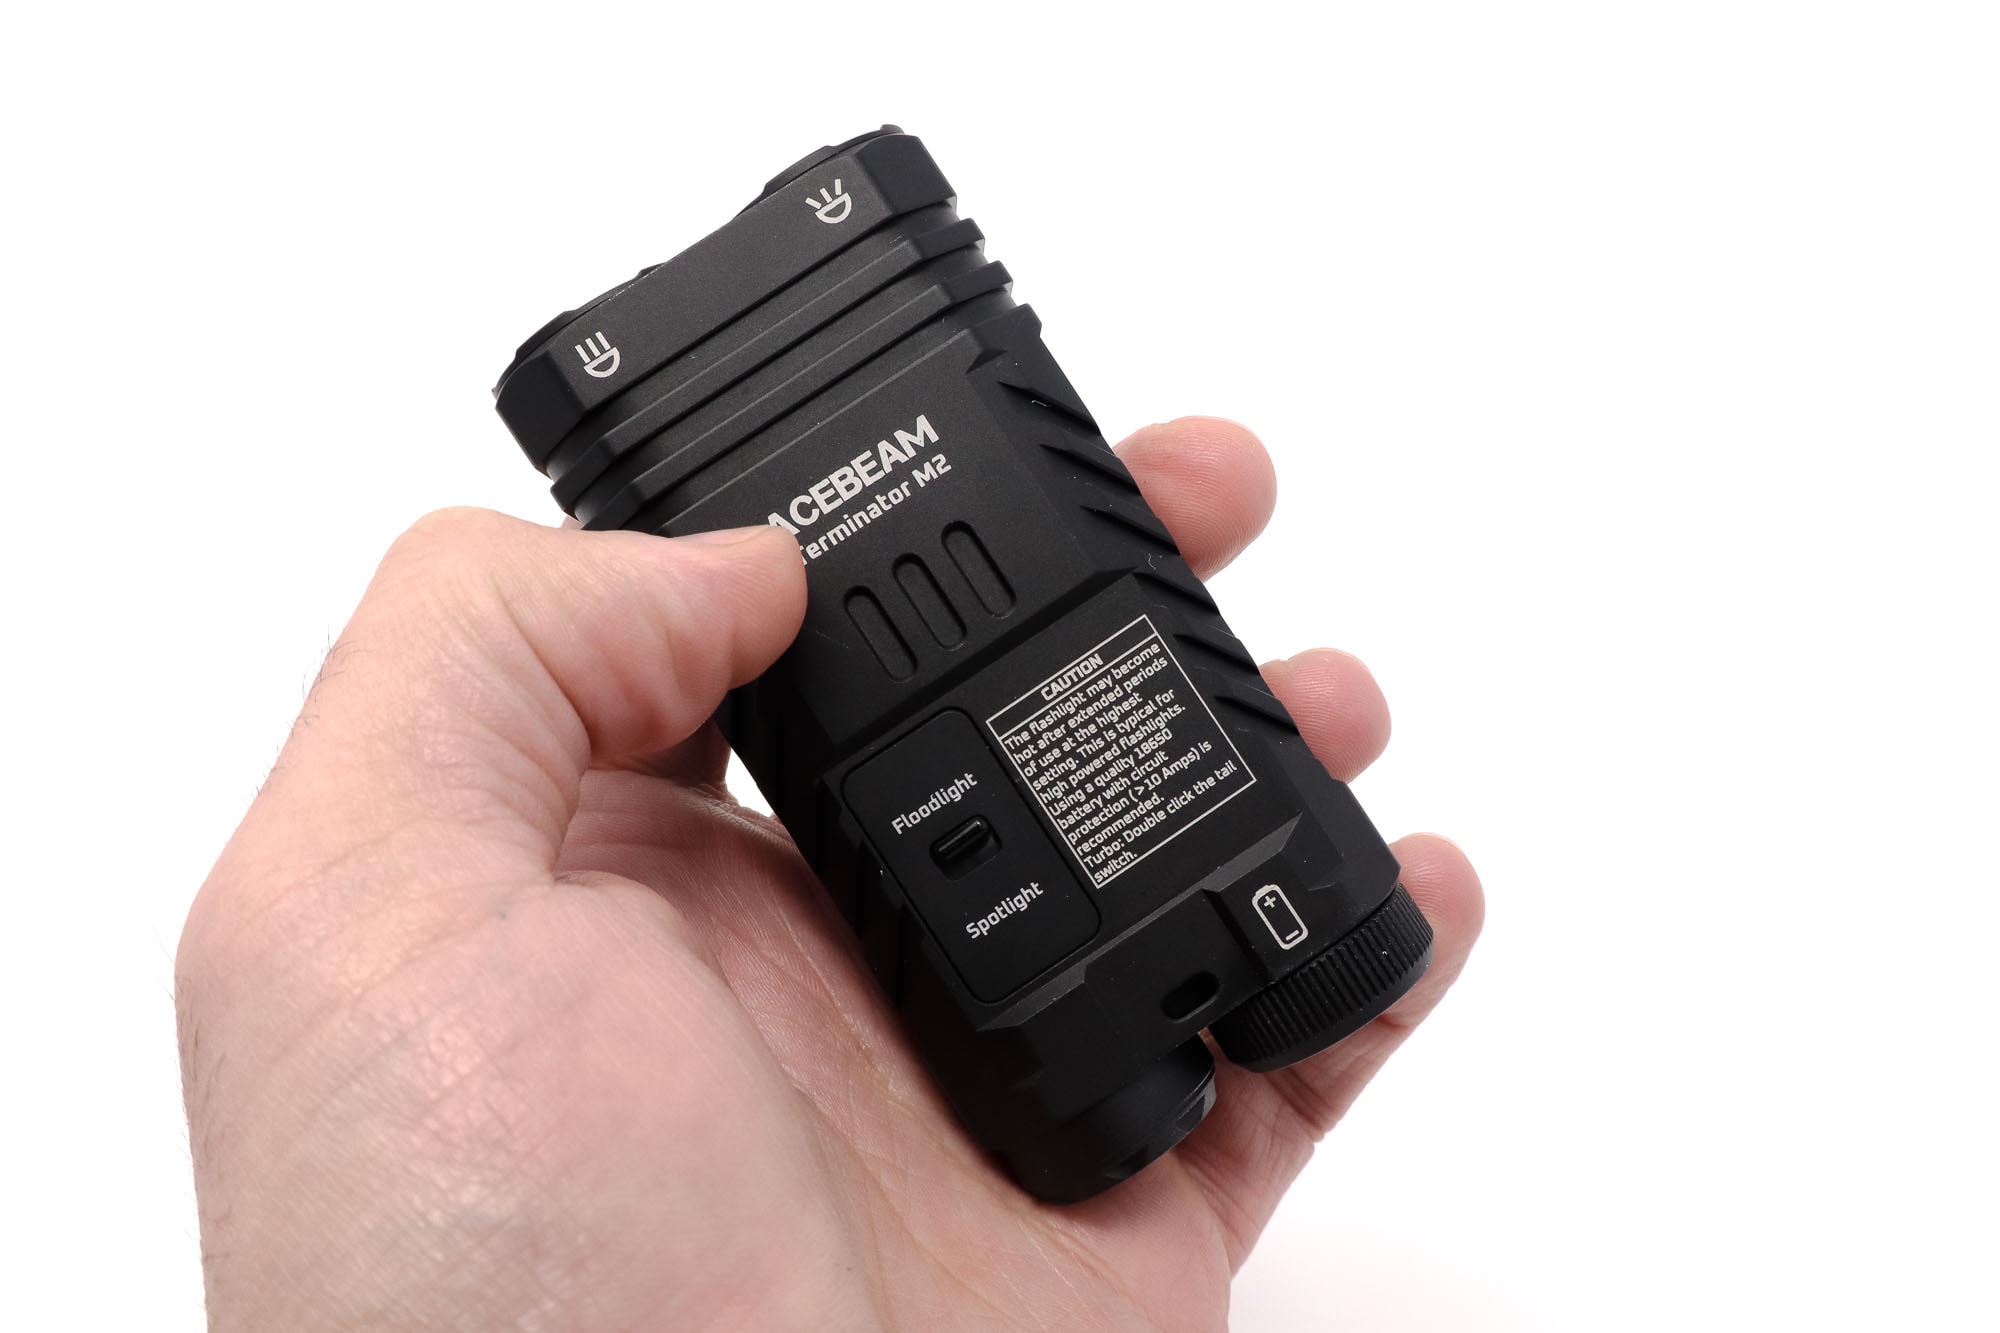
Normally when I’m looking through specs for a flashlight, I’ll find references to a certain type of aluminum (like 6061 or 7075) and the type of hard anodization that was used (such as HA Type-III). Perhaps I’ve just missed it, but I don’t see anything like that for the Acebeam Terminator M2. I’m not concerned about that, though. Acebeam seems to use quality materials, and the M2 certainly feels that way. The machining is nicely executed, with no sharp edges anywhere. The anodizing is clean and even; it’s on the matte side of things without being chalky. The Terminator M2 appears to be really well constructed. I will say that Acebeam went a little over-the-top with the laser etching. There’s an entire caution label etched onto the front of the flashlight. I could have done without that. At the minimum, move it to the back and out of the way.
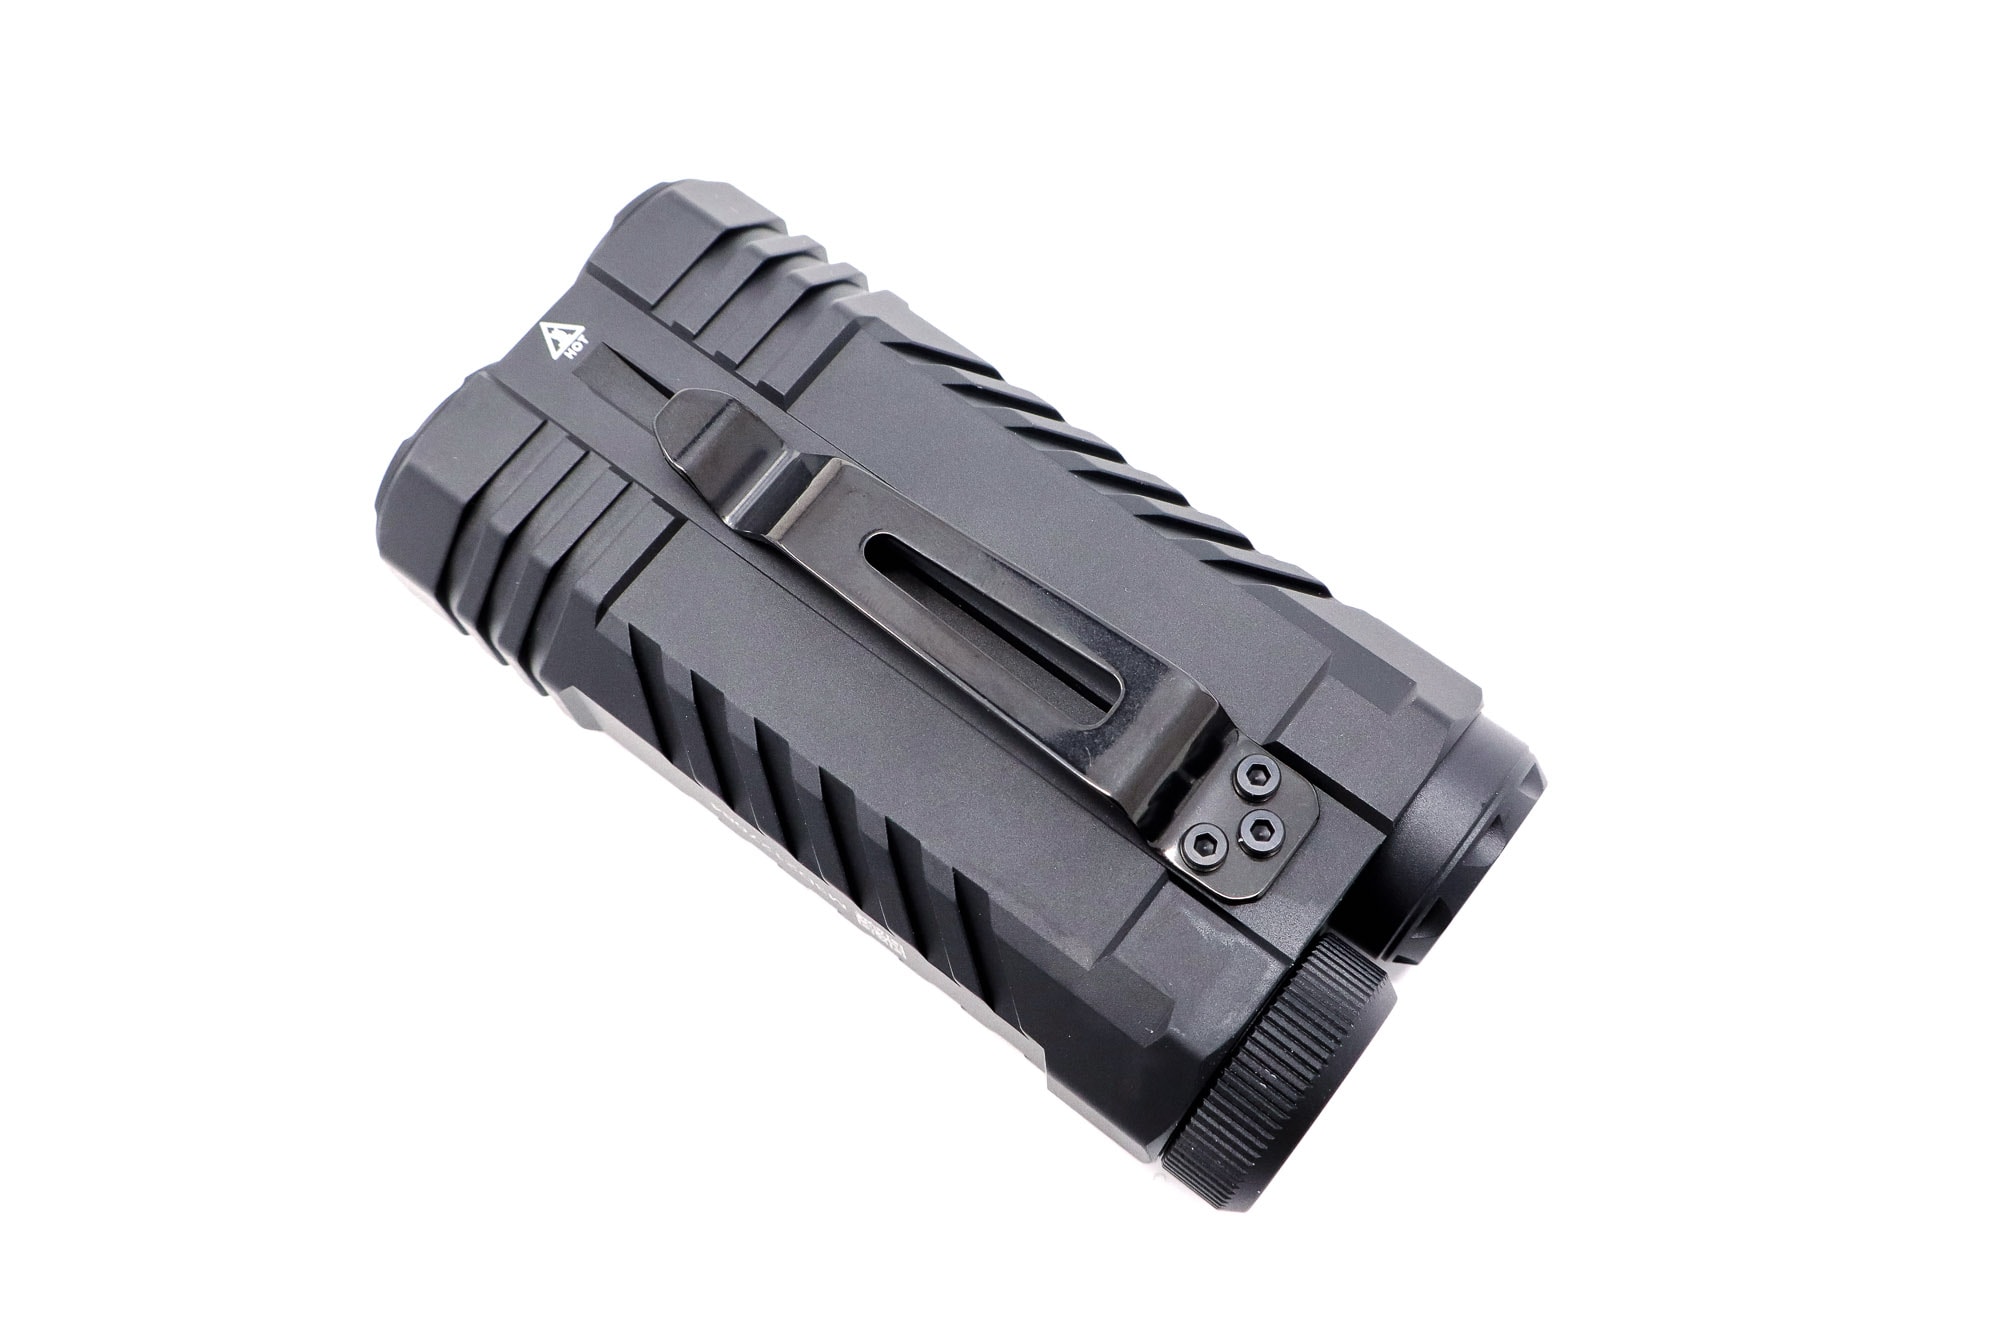
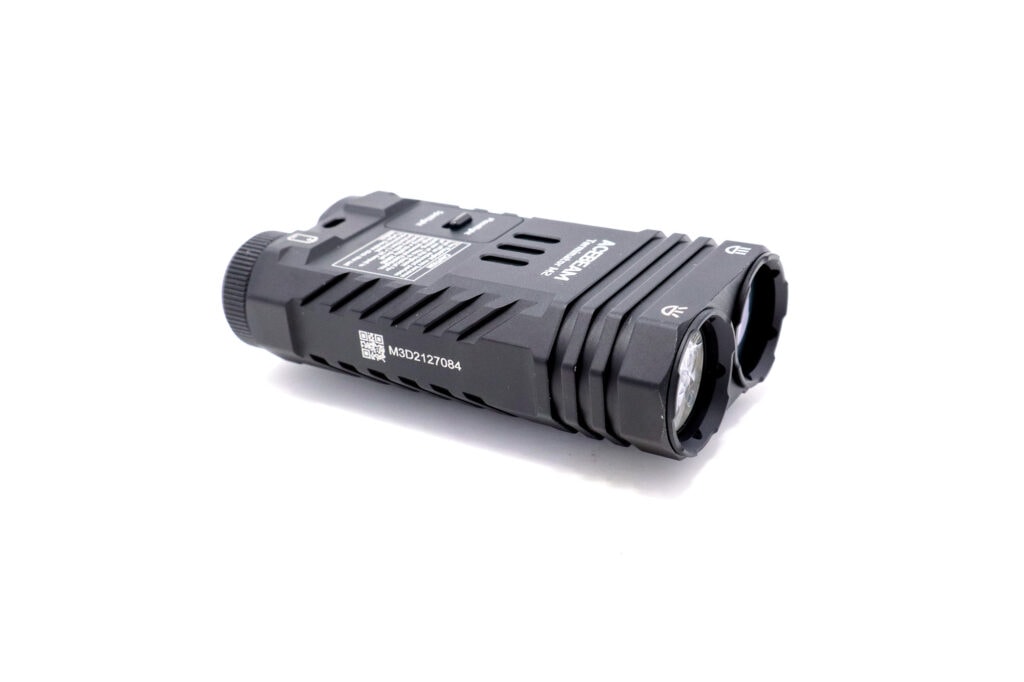
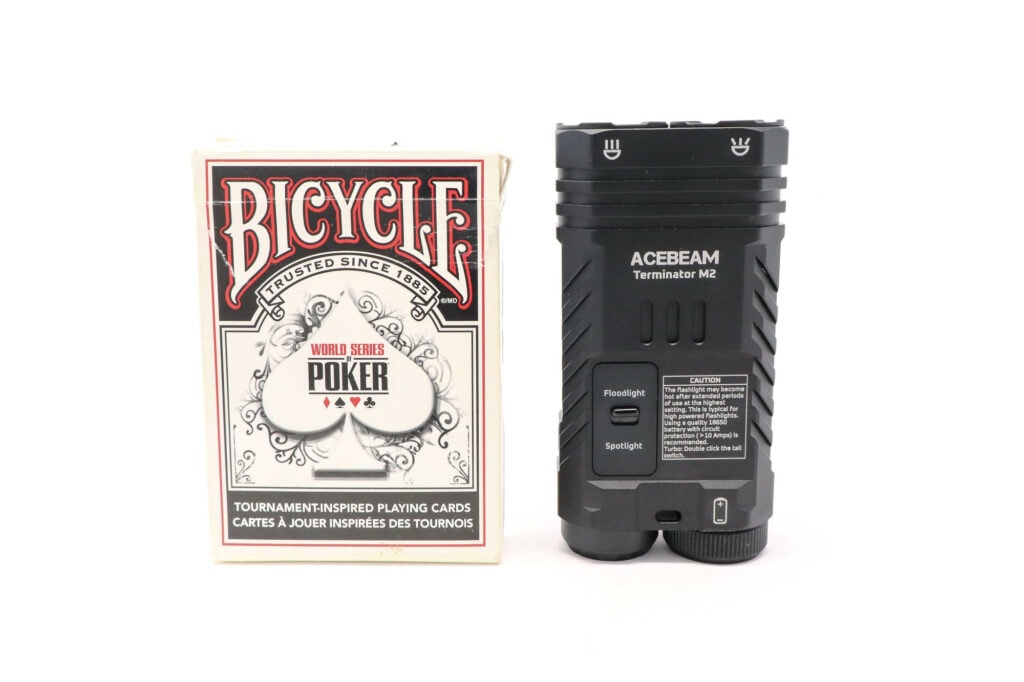
The M2 is supposed to be an EDC flashlight, and I suppose it could be. It’s a bit larger than I like to carry around on a routine basis (I’m more of a 14500 guy), but it’s not monstrous either. Imagine you took two Emisar D4V2’s and strapped them together – that’s about what you’re looking at. Or putting it another way, a bit narrower and thicker than a standard deck of playing cards. The clip is very stout and sticks out 5mm away from the body of the light, definitely not svelte by any means.
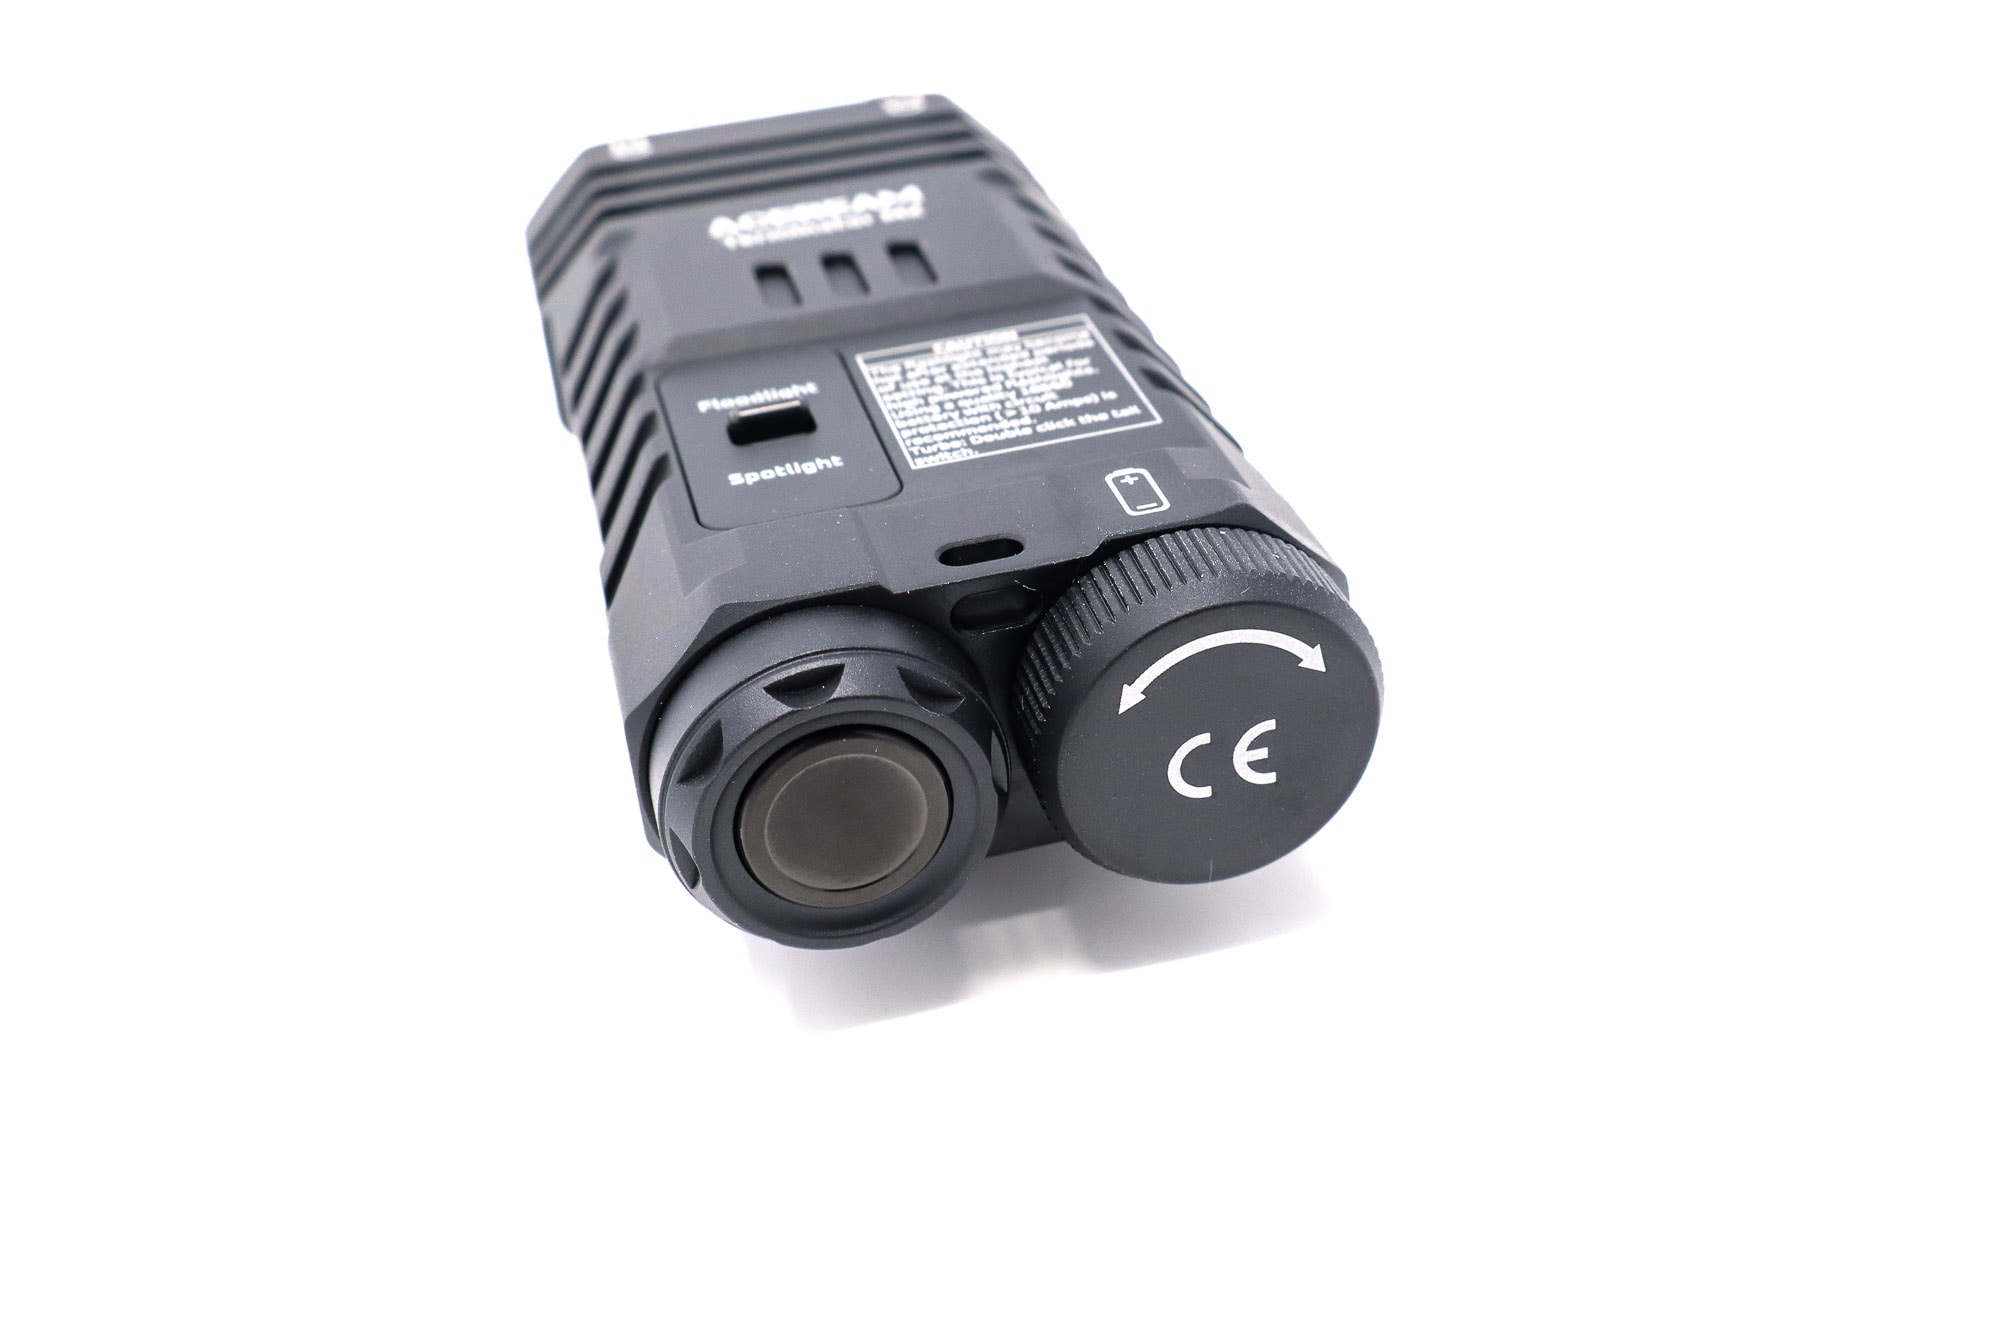
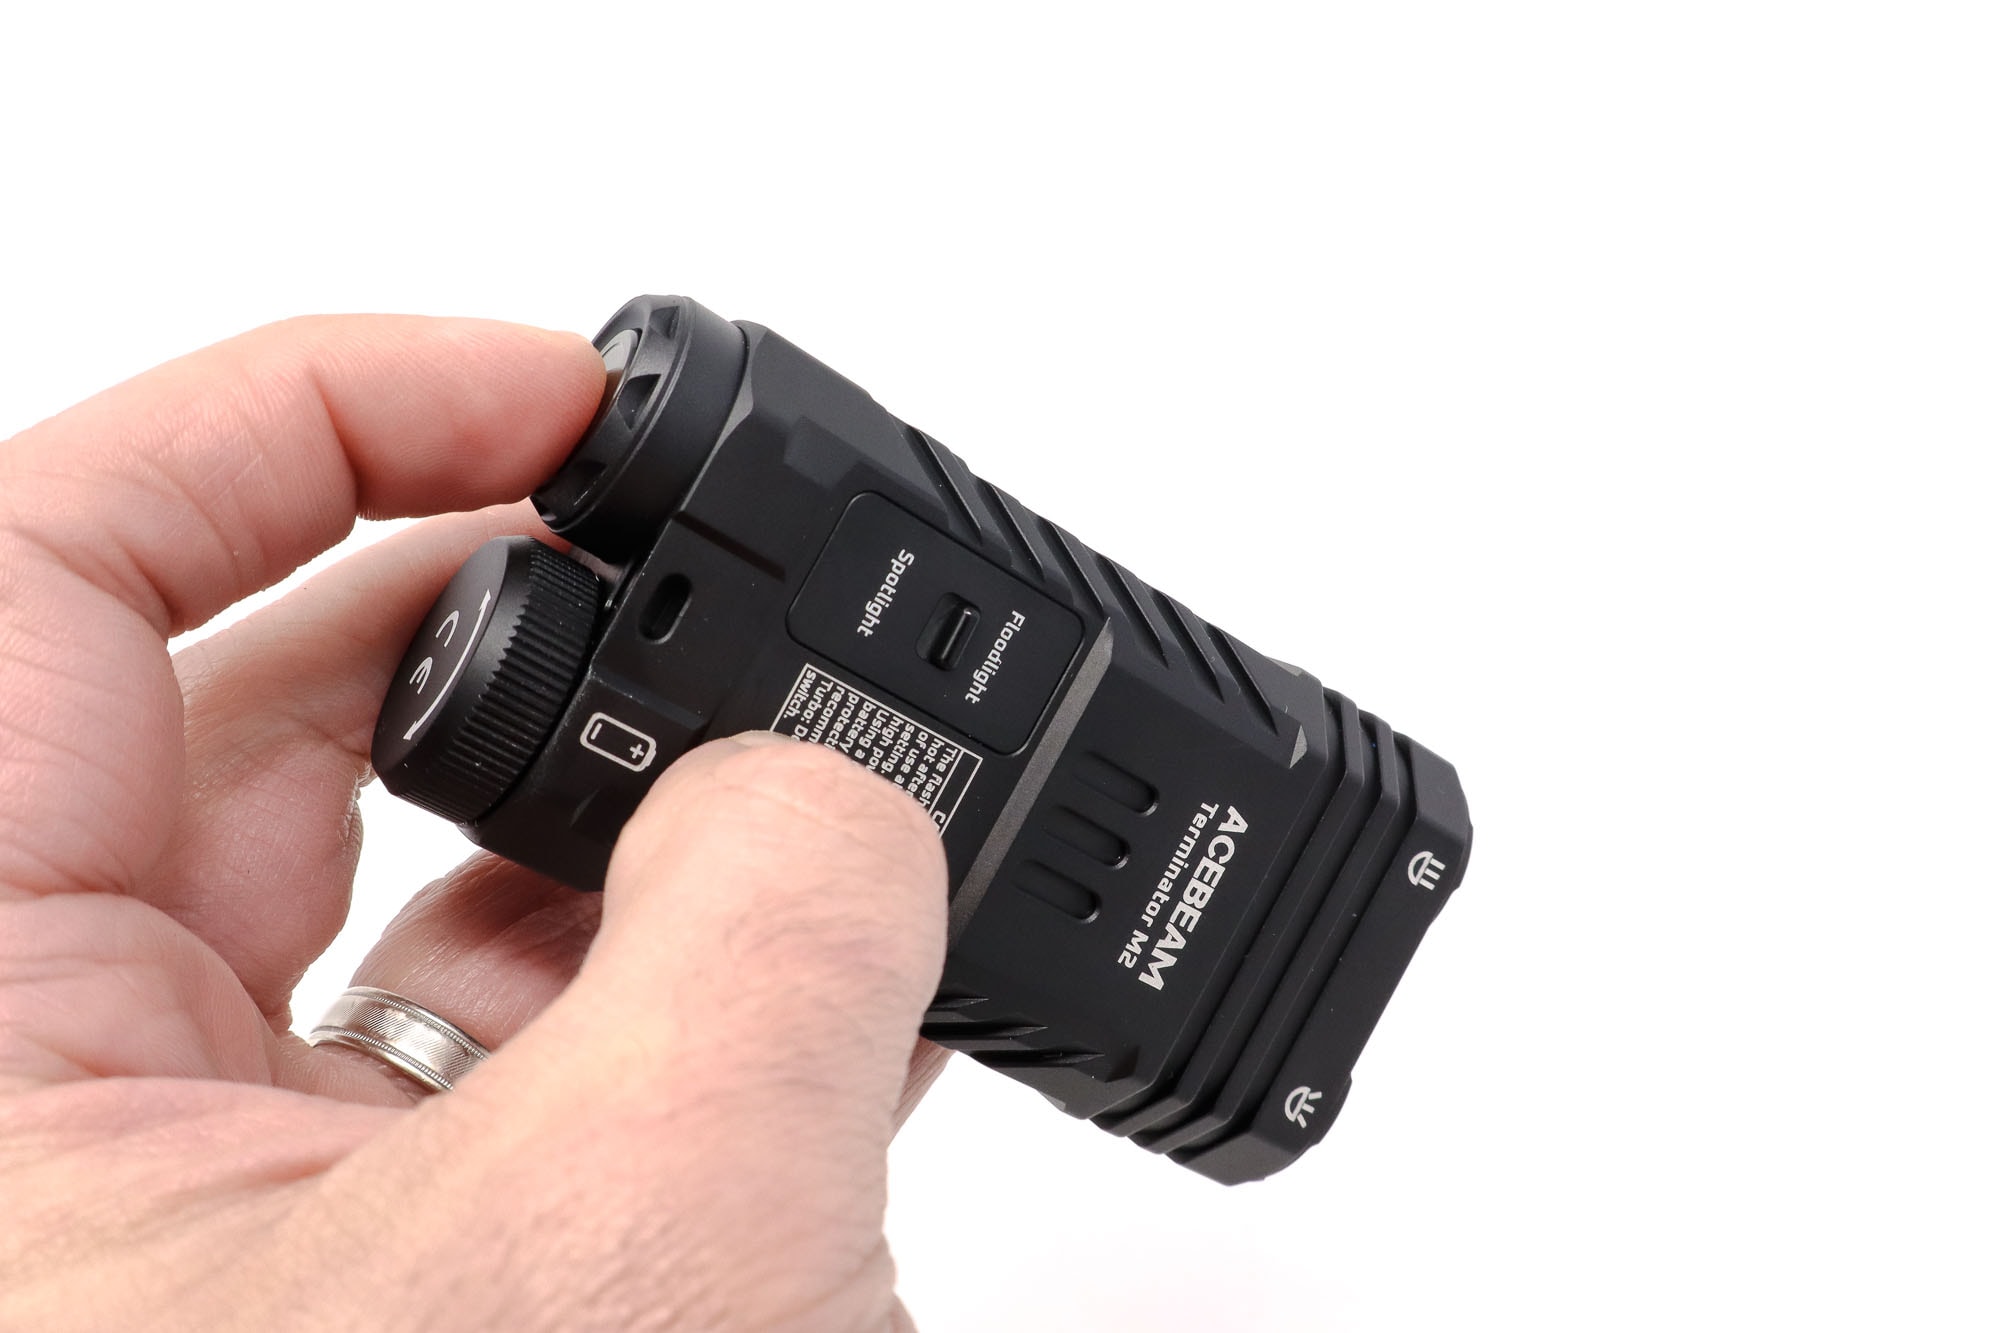
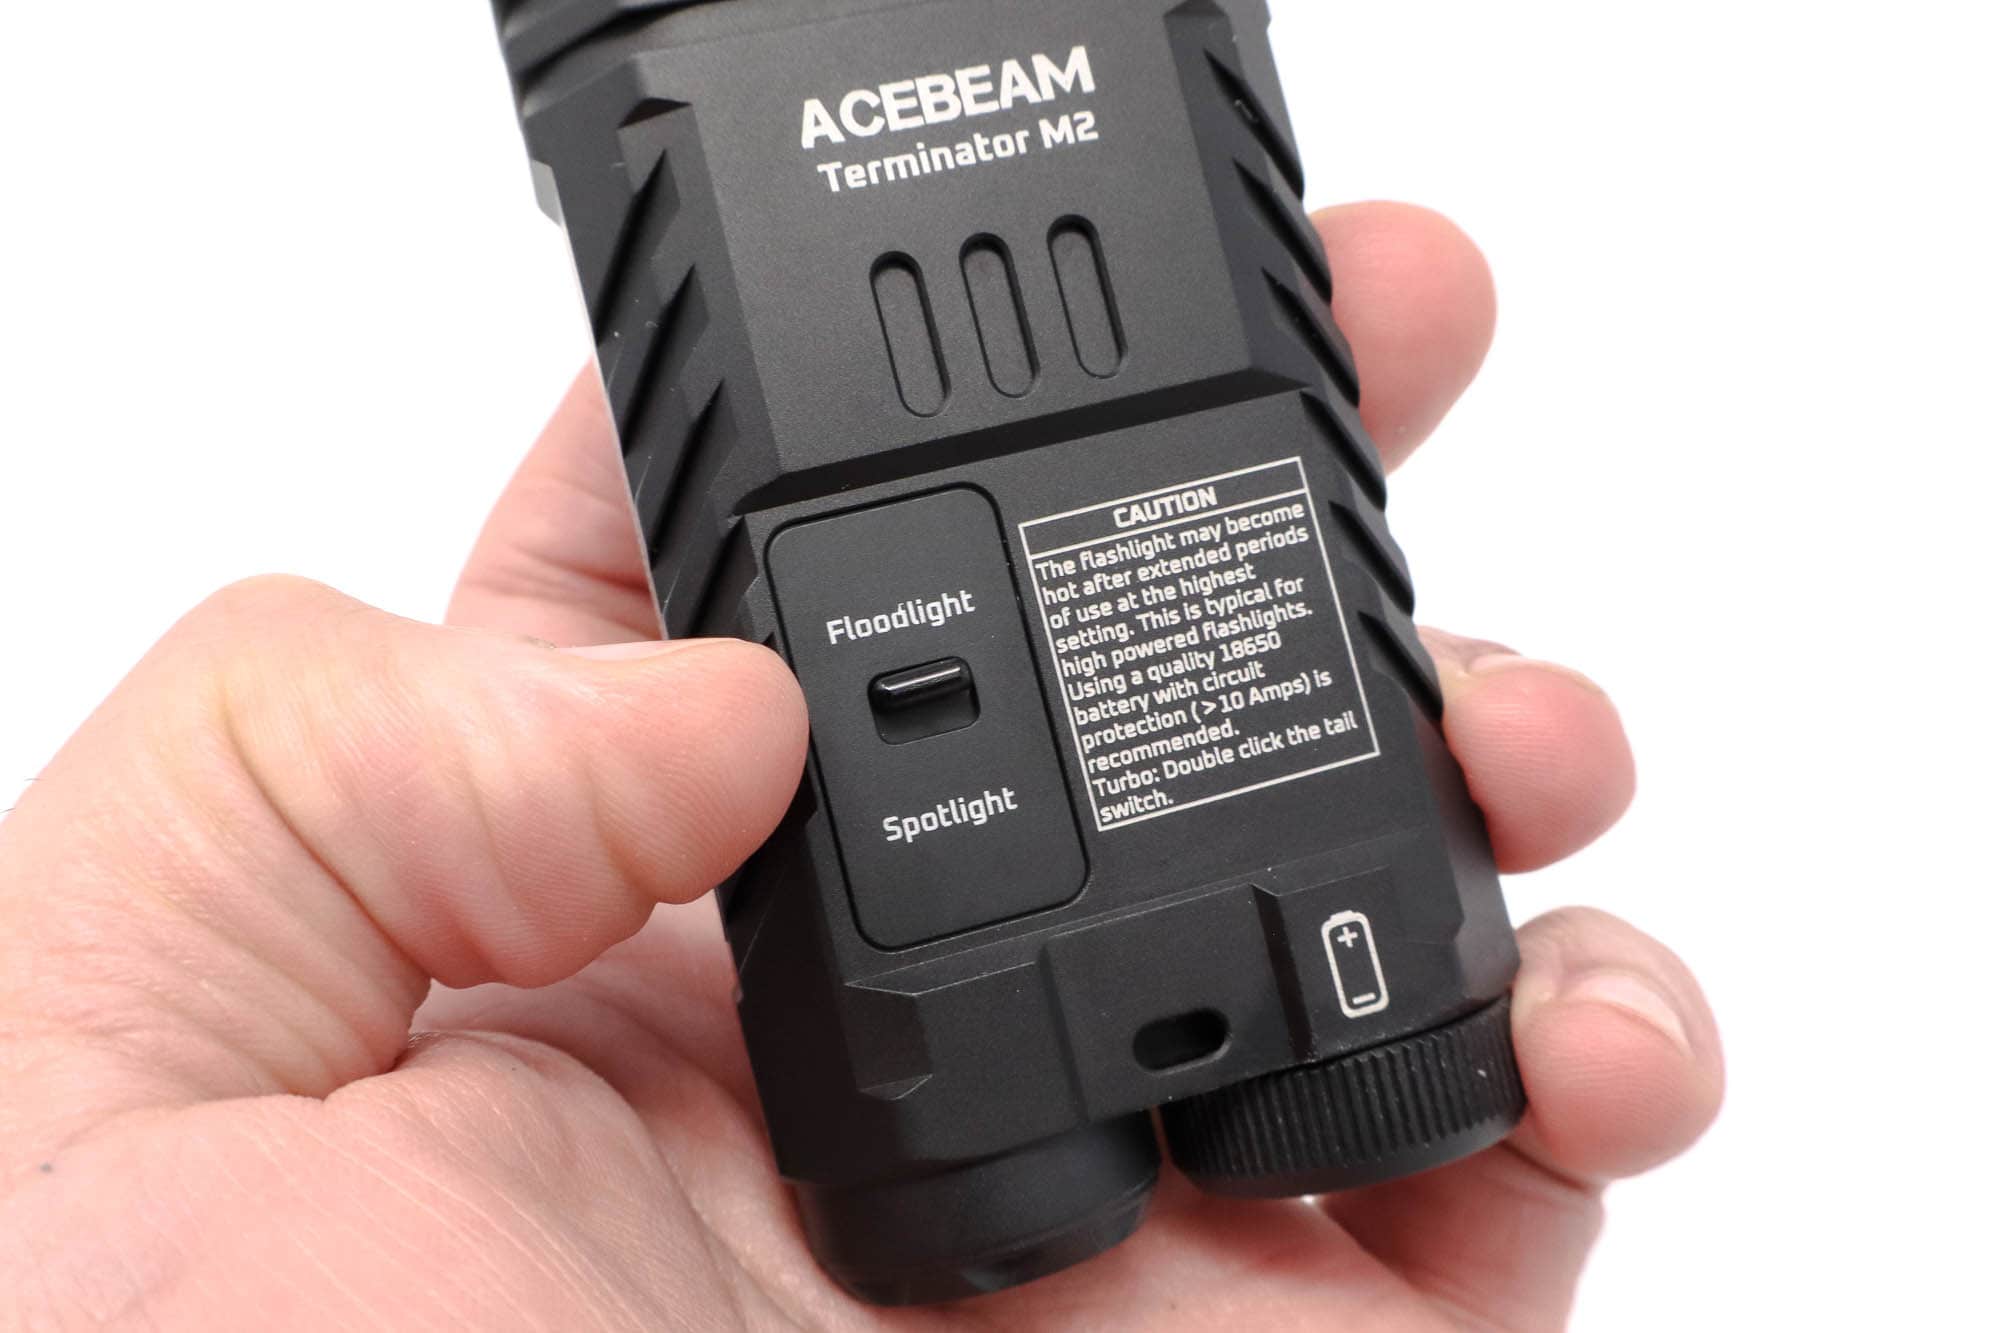
At the rear of the Acebeam Terminator M2, you’ll find two knobby protrusions. One is the battery cover / tailcap. The other is the tail e-switch. They’re almost identical in height, but not quite. Because of that, tailstanding may show a slight wobble, but seems to be generally pretty stable. The tail e-switch isn’t the only switch on the M2, there’s a slider on the front that very clearly lets you toggle between the Floodlight and Spotlight beams and is labeled as such (laser etched, of course, lest you forget). Compared to some dual-output flashlights that I’ve used before, this switch arrangement makes it crystal clear what you’re doing with the switches and how to change outputs. But due to the differing locations, it’s not very seamless to move your fingers from one switch to the other – you kind of need to move the M2 around in your hand to accomplish that. Not a big deal, as I don’t regularly sit around and continuously change output sources and levels simultaneously.
When pocketing the Terminator M2, the cuts on the sides of the flashlight (which remind me of slide cuts on a pistol) tend to catch the edge of my jeans pocket and make it a bit difficult to slide in. Making matters a bit worse, the rear e-switch is pretty easy to activate and on several occasions, I accidentally turned on the M2 while trying to get it in my pocket. If you plan on carrying this thing around, I’d recommend getting accustomed to locking it out, which is a bit annoying.
With the M2 featuring spot, flood, and combo beams, the Terminator is pretty darn handy. The spot beam can really reach out there – perhaps not as much as the pencil beam LEP on the Terminator M1, but likely more useful. And the floodlight is great for a lot of everyday tasks – around the house, reading, backyard, camping, etc. It’s not purely flood, as you see in some lights – it still produces a very usable beam.
Warranty? Yeah, Acebeam has you covered! The details are:
- If the customer experiences any problems caused by manufacturing defects in normal use with an Acebeam product within 15 days of purchase, the dealer will replace that product.
- If an Acebeam flashlight fails during normal use and any problem covered under warranty occurs within a period of 5 YEARS (60 months) of purchase, the dealer is responsible for warranty service.
- Acebeam flashlights enjoy a limited lifetime warranty – after 60 months the dealer will attempt to repair the flashlight for the cost of spare parts and shipping (i.e. no charge for labour).
LED, Lens, Bezel, Beam, and Reflector
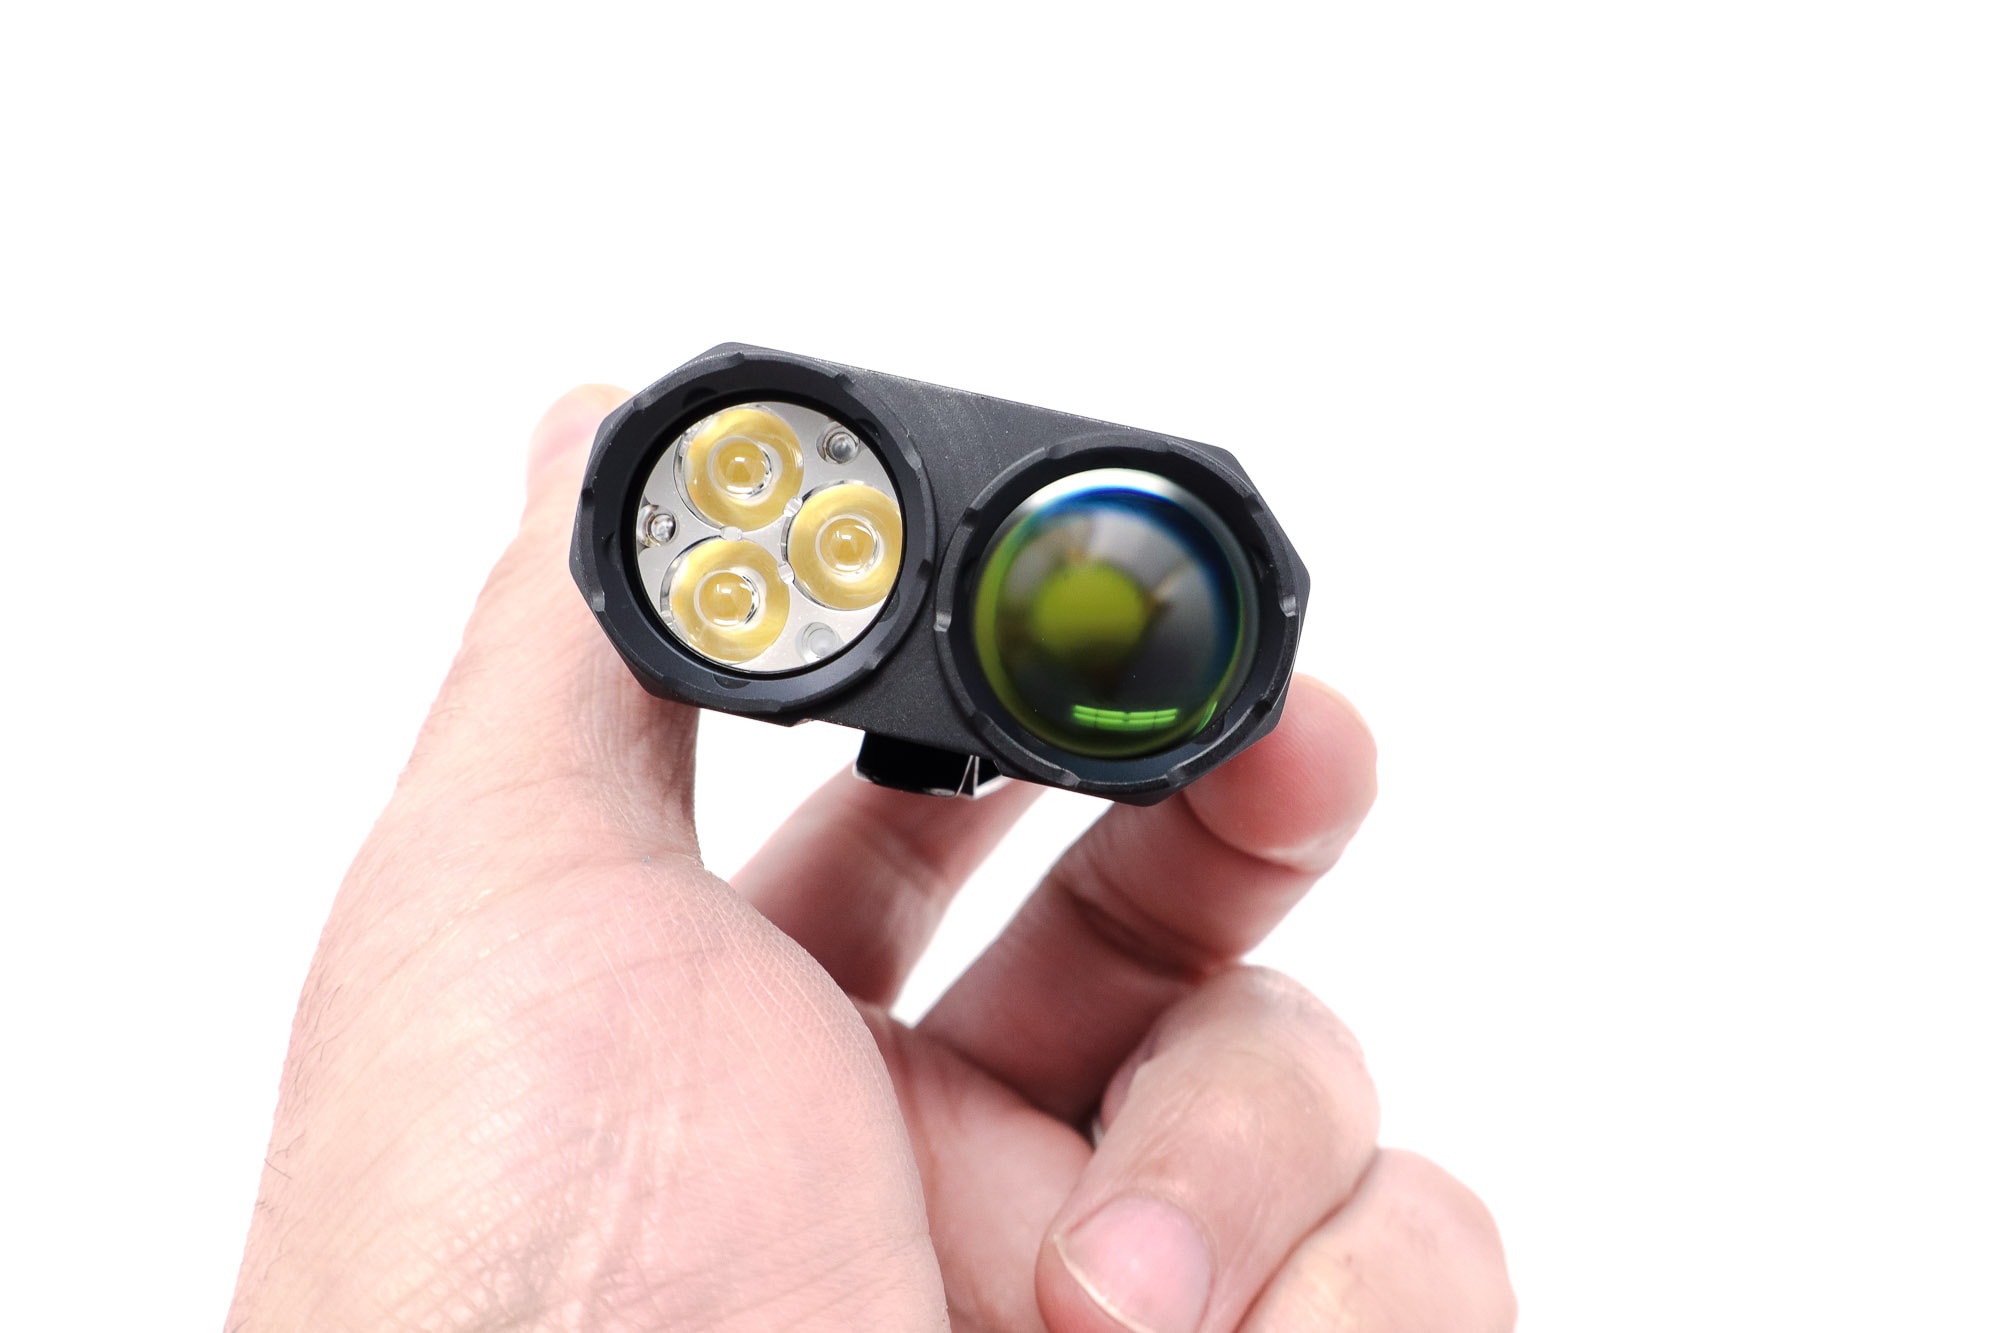
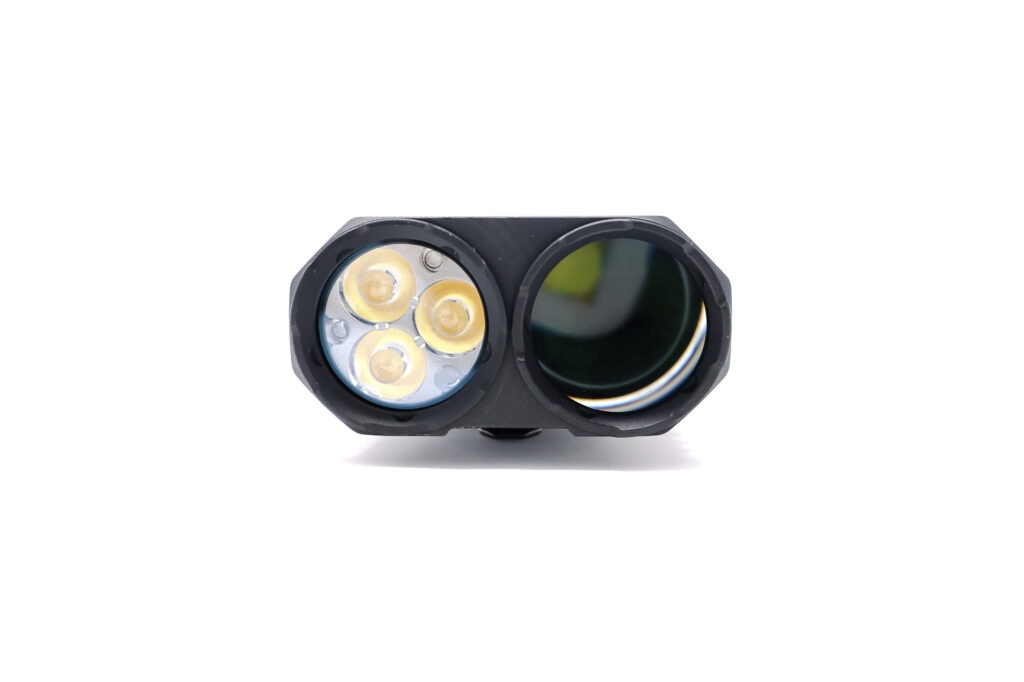
When you go to purchase the Acebeam Terminator M2, you have two options to pick from (at least as of the writing of this review). The first is a OD Green version with Cool White 6500K LEDs of an unspecified make/model. And then there’s the Black version with Nichia 519A 5000K 90-CRI LEDs. Acebeam was kind enough to send along the Nichia version for this review. Boy, do those 519A’s produce a beautiful beam!
The 3 LEDs of your selection sit below a standard-looking TIR optic lens. It’s clear and a bit on the throwy side for being a triple. Regardless of your LED choice, the other side of the dual-output light is occupied by an unspecified round-die LED. From what I can see by peering through the lens, it looks like a cross between a Luminus SFT40 (white substrate with a bond wire in each corner of the die) and a Yinding (rounded die). This spot LED and it’s lens makes a pretty clean spot with very minimal spill, as you’d expect from an aspheric lens.
Underneath the TIR optic are RGB LEDs, and they’re pretty cool. I like them and am glad they’re there – just don’t expect Anduril-like functionality with them. More on that later.
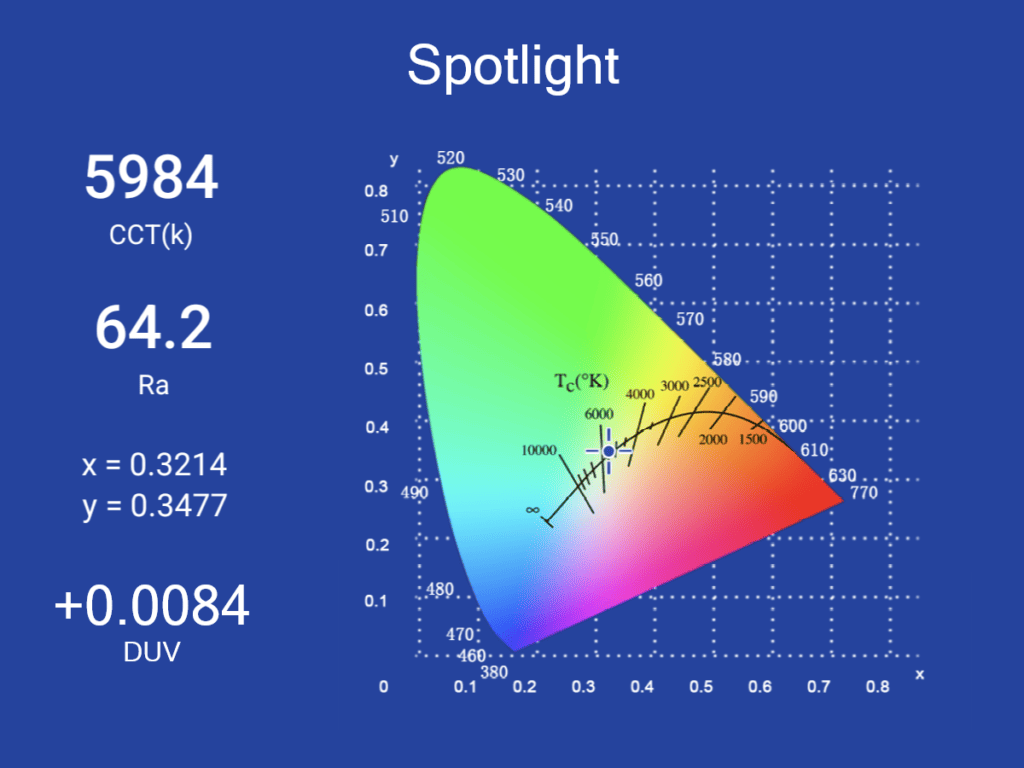
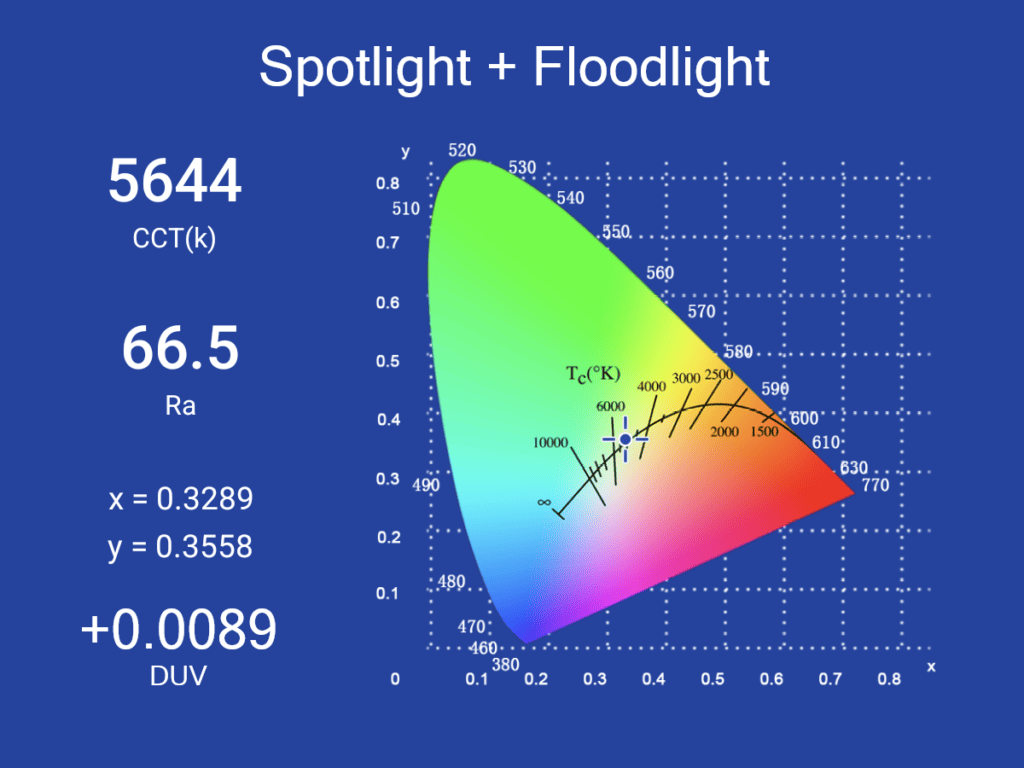
Spectral measurements:
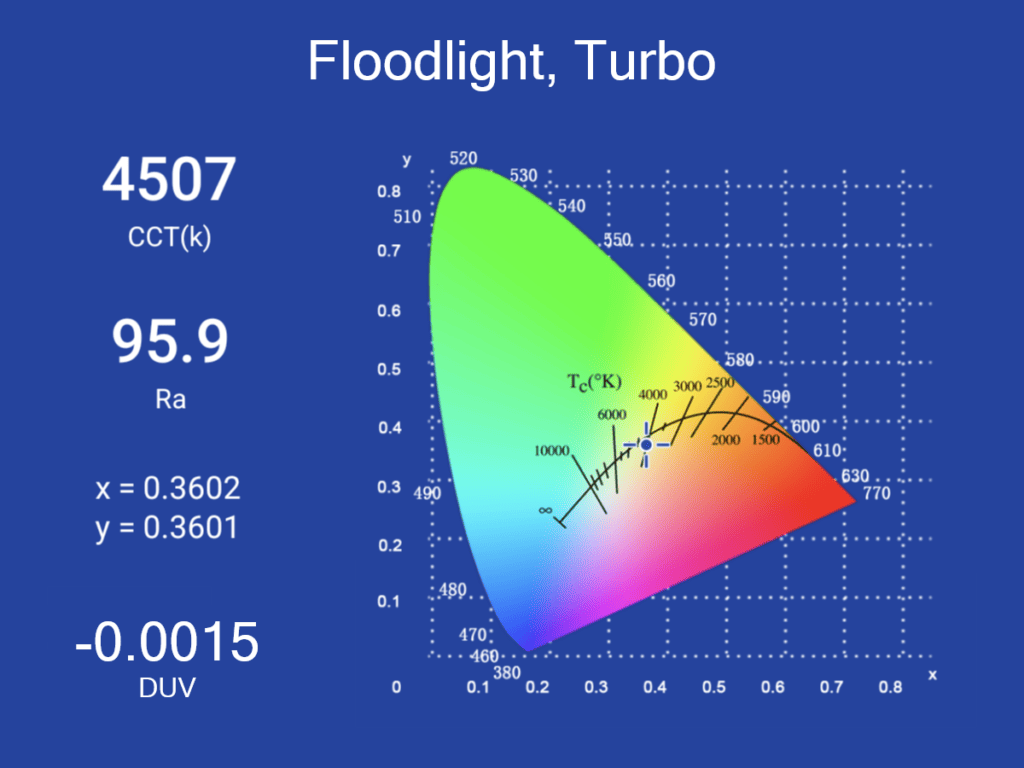
I used an Opple Light Master to measure the flashlight at 5 meters distance.
| Mode: | CCT: | CRI Ra: | duv |
|---|---|---|---|
| Turbo, Flood | 4507 K | 95.9 | -0.0015 |
| High, Spot | 5984 K | 64.2 | +0.0084 |
| Turbo, Combo | 5644 K | 66.5 | +0.0089 |
Dimensions and its competition
Dimensions:
| Acebeam M2 | Millimeters | Inches |
|---|---|---|
| Length | 95 mm | 3.8 in |
| Width | 49 mm | 1.9 in |
| Thickness (with clip) | 29 mm | 1.1 in |
| Thickness (without clip) | 24 mm | 0.9 in |
Dimensions are rounded to the nearest millimeter and the nearest tenth of an Inch.
Weight:
| Acebeam M2 | Weight in grams | Weight in oz |
|---|---|---|
| Without battery: | 148 g | 5.2 oz |
| With battery | 201 g | 7.1 oz |
Weight is rounded to the nearest gram and tenth of an Oz.
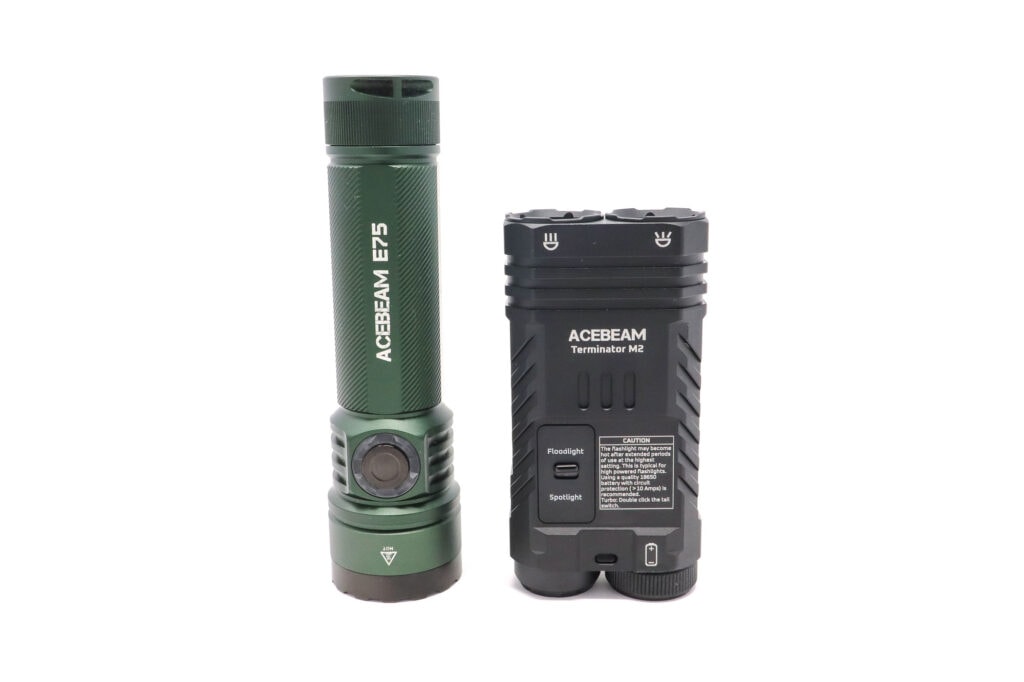
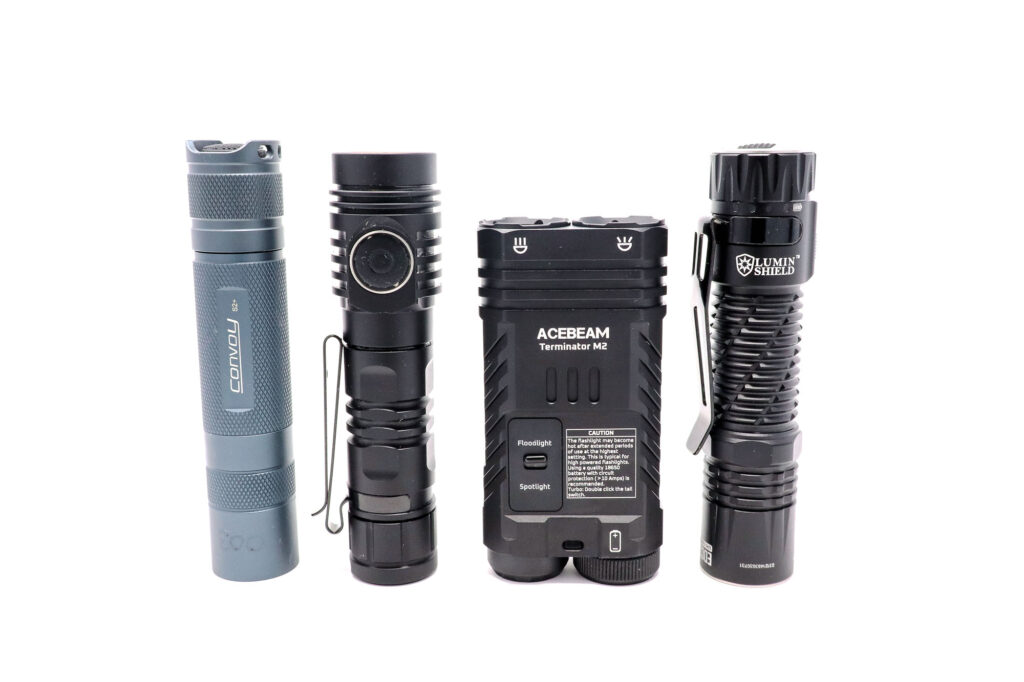
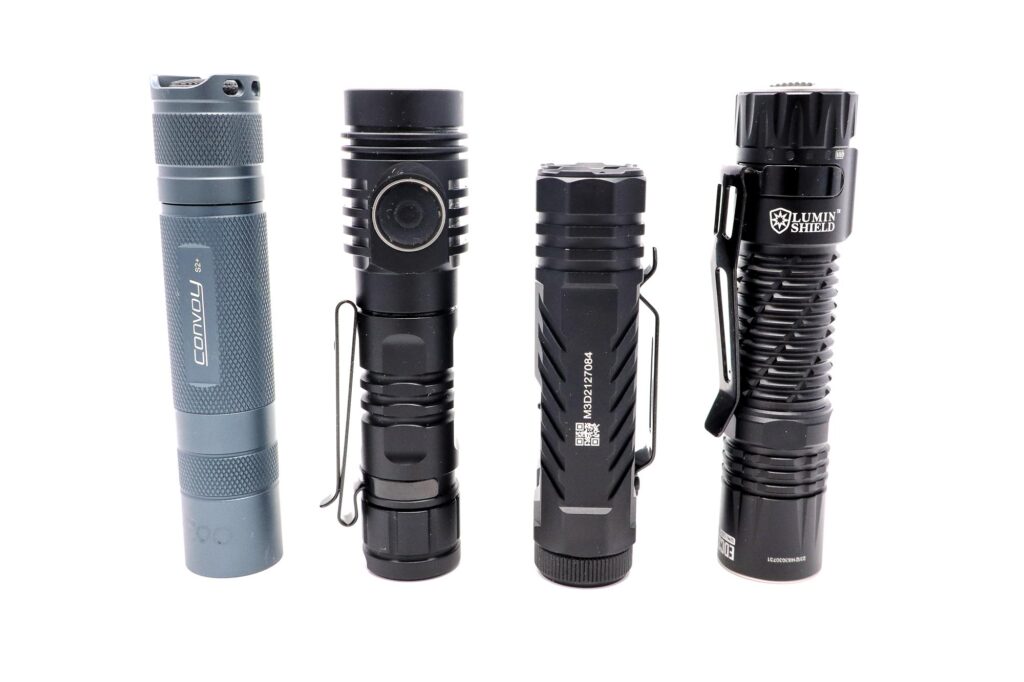
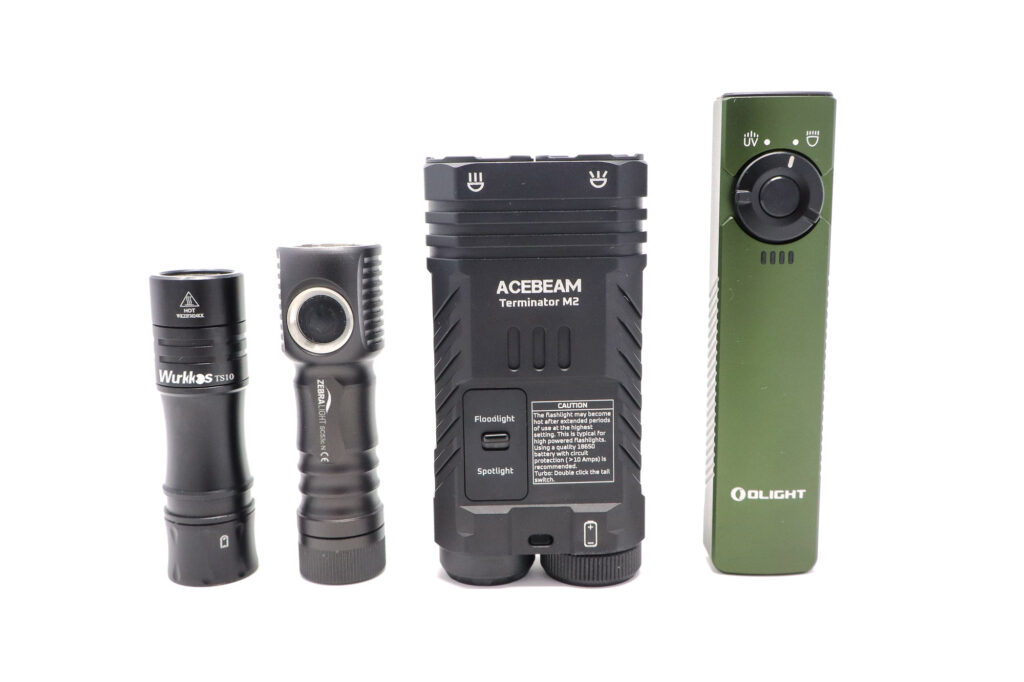
Flashlight size comparison with its competition:
Group 1: Acebeam E75, Acebeam Terminator M2
Group 2: Convoy S2+, Wurkkos FC13, Acebeam Terminator M2, Nitecore EDC33
Group 3: Wurkkos TS10, Zebralight SC53c N, Acebeam Terminator M2, Olight Arkfeld UV
Group 4: deck of cards, Acebeam Terminator M2
Acebeam Terminator M2 UI: User Interface and Driver
By keeping the spot/flood selector as a separate (magnetic) control switch, Acebeam kept the operation of the Terminator M2 pretty simple.
One thing that seems a bit confusing to me: the Acebeam website mentions that the Spot+Flood combo mode is available in both High and Turbo levels. The manual only mentions being able to turn both on at the same, and to be able to also do that as a strobe – no mention of High and Turbo.
Available modes:
- Floodlight: Moonlight, Low, Med1, Med2, High, Turbo
- Spotlight: High
- Floodlight + Spotlight: High, Turbo (?)
Available blinky modes:
- Strobe, Green Signal, Red SOS
From OFF:
- Press and hold 0.5 sec, Floodlight mode: Moonlight
- Press and hold 1 sec: seven-color Aux mode
- Press and hold, Aux mode: change Aux color mode
- Press and hold 3 sec: Lockout
- Single click: turn On
- Double click, Floodlight mode: Turbo
- 3 fast clicks: turn on Flood + Spot combo
- 4 fast clicks: Flood + Spot Strobe
From ON:
- Press and hold, Floodlight mode: change brightness
- 1 click: turn Off
- Double click, Floodlight mode: Turbo
- 3 fast clicks: turn on Flood + Spot combo
- 4 fast clicks: Flood + Spot Strobe
Mode memory:
- Low, Med1, Med2, and High can be memorized
- Other modes (Moonlight, Turbo, Strobe) are not memorized
- Aux color selection is not memorized; it always starts out in seven color mode
- Having Aux enabled is also not memorized – Aux never turns on automatically; you must manually enable it whenever you want it
Shortcuts:
- To Moonlight: press and hold 0.5 sec from Off
- To Turbo: double click
- Flood + Spot Combo: 3 fast clicks
- To Strobe: 4 fast clicks
Low voltage warning/protection:
- There is an LED window on the side of the M2, near where the tail switch is. It lights up according to the battery level:
- Green: >20%
- Red: 20-10%
- Red flash: <10%
- To me, it seems like 20% is a bit low to start to give a warning, but at least there is some visual indication
Strobe/blinkies
- Strobe: 4 fast click from Off or On
- Green Signal (beacon): 5th option in Aux modes
- Red SOS: 6th option in Aux modes
Lock-out mode:
- Press and hold the button for 3 seconds to Lockout
- Repeat to Unlock
PWM
- No PWM was detected
Additional/summary info on the UI:
- Spotlight has only one brightness level
- Aux needs to be manually activated whenever you want it
- Aux order is: Seven color, red, green, blue, green signal, red SOS
Acebeam Terminator M2 Charging and batteries
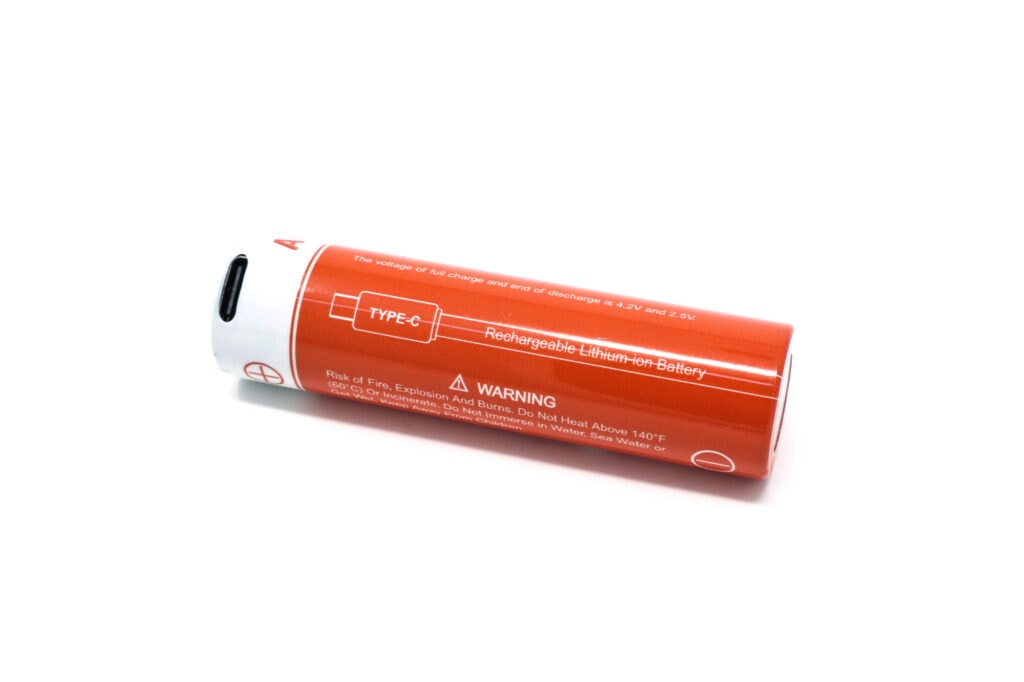
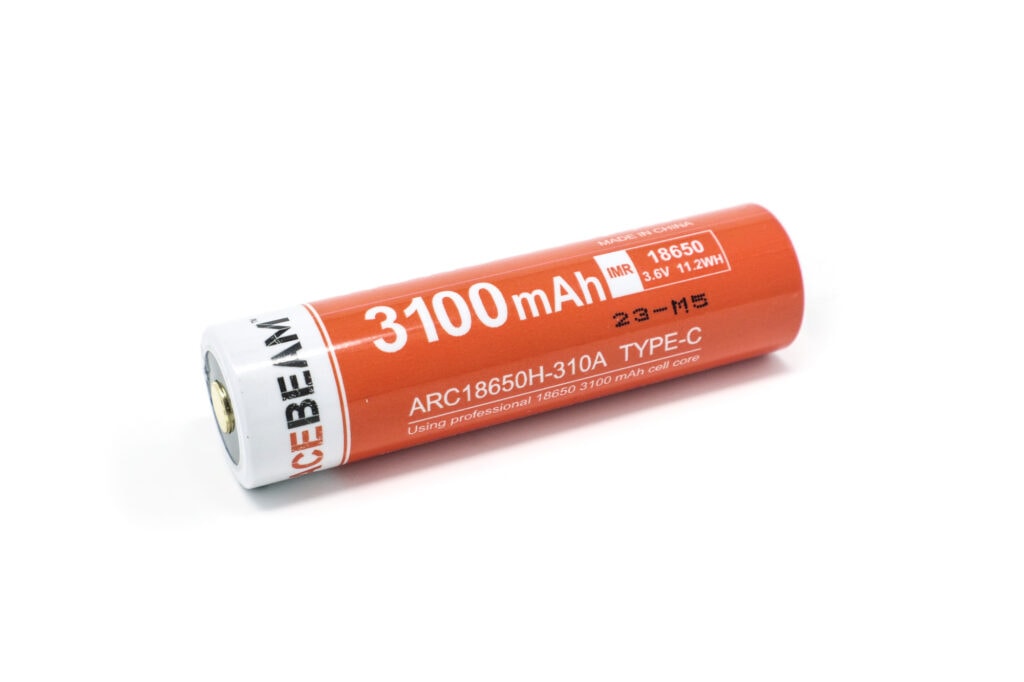
The Acebeam Terminator M2 comes with a 18650 battery with a built-in USB-C charging circuit. The capacity of the cell is 3100 mAh. The charge rate clocked in at 1.17 A at 5.08 V for 5.95 W. The charge cycle transferred 12.73 Wh of power.
While the button-top battery with built-in charging is a bit longer than usual, I had no problems with any other 18650’s that I tried. Even the flat-top 30Q worked without a hitch, thanks to the driver and tailcap both having springs, though the battery did rattle ever so slightly.
| Charge type | Fits | No fit | Charge time |
|---|---|---|---|
| Battery with USB-C charging, flashlight itself has none | All 18650 sizes, including a flat-top Samsung 30Q and button-top Sofirn battery | none | 2h 4min |
Performance test
Lumen measurements
How Lumens are Measured: Understanding ANSI FL1 Standards How Lumens are Measured: Understanding ANSI FL1 Standards: The ANSI FL1 standards specify that output in lumens should be measured 30 seconds after turning on, as this is the standardized time for measuring brightness according to the industry standard. This is why we focus on this part in our measurements. The ANSI FL1 standards require an ambient temperature of 22 ± 3°C. We record the ambient the ambient temperature to identify potential reasons for any observed discrepancies.Lux was measured by a UNI-T UT383 BT at 5 meters. Lumens were measured in a homemade lumen tube using a VEML7700 sensor, calibrated with a calibration light provided by 1Lumen. The included Acebeam battery was used in the tests.
| Mode | Amps | Specified | Turn on | 30 sec. | 10 min. |
|---|---|---|---|---|---|
| Moonlight | 70 mA | 1 lm | 1 | 1 | – |
| Low | 137 mA | 35 lm | 34 | 34 | – |
| Med1 | 355 mA | 150 lm | 116 | 115 | 114 |
| Med2 | 783 mA | 350 lm | 371 | 367 | 359 |
| High | 2.0 A | 800 lm | 886 | 862 | 813 |
| Turbo | 7.2 A | 2000 lm | 2295 | 2069 | 807 |
| Turbo at 3.6V | 2.7 A | 430 | 416 | – | |
| Spotlight | 4.2 A | 900 lm | 891 | 859 | 381 |
| Spot+Flood | 9.3 A | 2200 lm | 2481 | 2358 | 699 |
Ambient temperature during testing:
- 20 °C
Parasitic drain:
- No Aux: 76 µA
- Seven color Aux: ~10 mA average
- Red Aux: 8 mA
- Green Aux: 8 mA
- Blue Aux: 6 mA
Acebeam did a great job with these specs. My numbers line up really well with what they provided. And kudos to them for providing separate specs for the CW and Nichia versions. As to be expected, the Cool White version is said to be brighter, topping out at 3200 lumens in Floodlight.
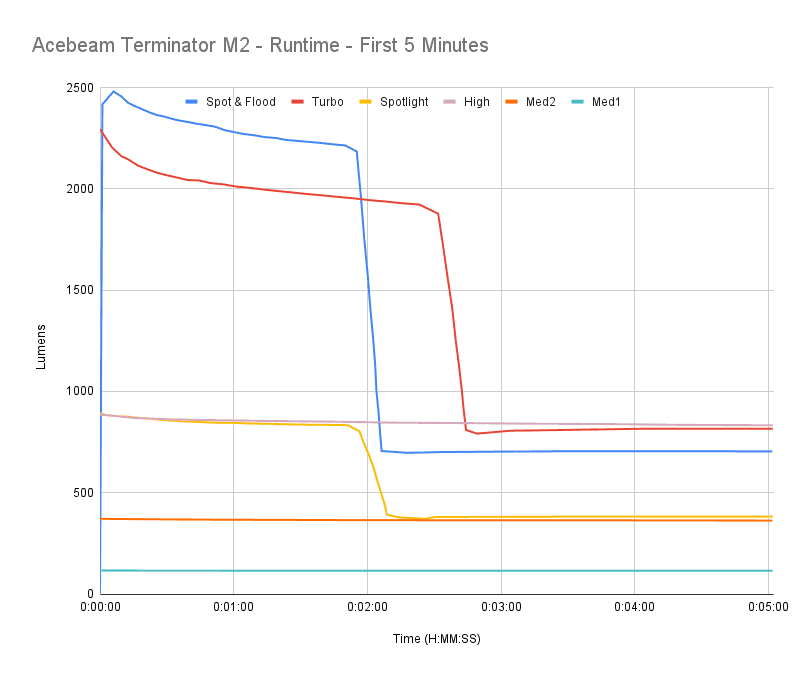
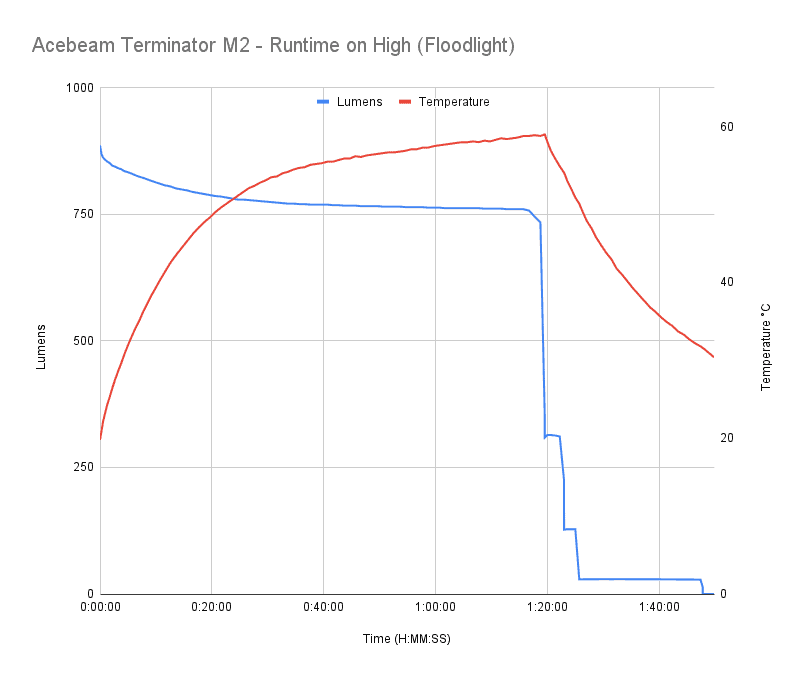
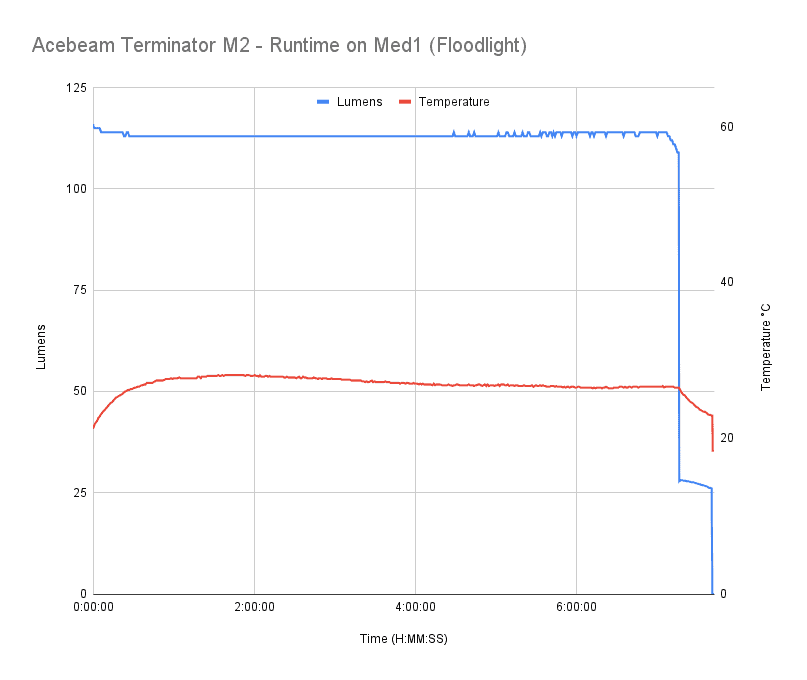
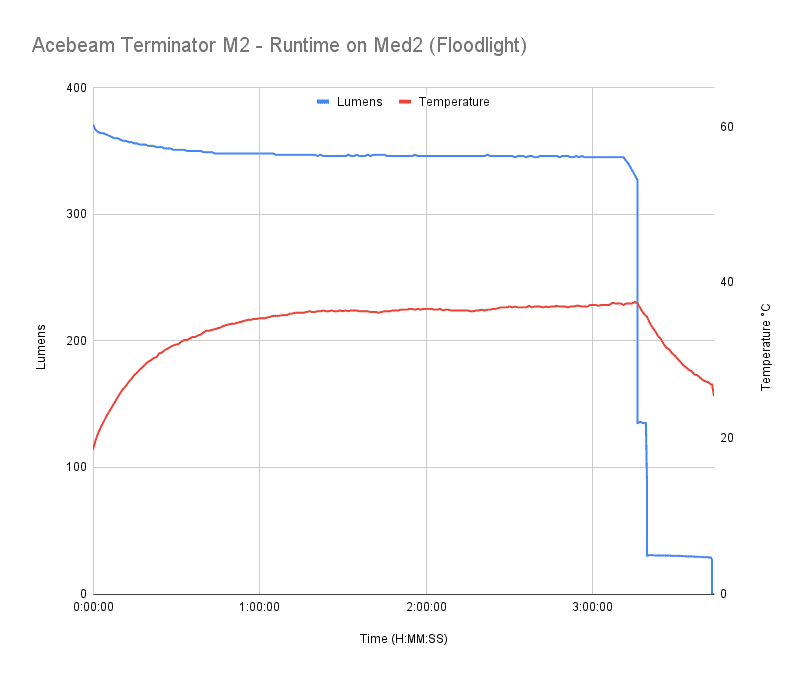
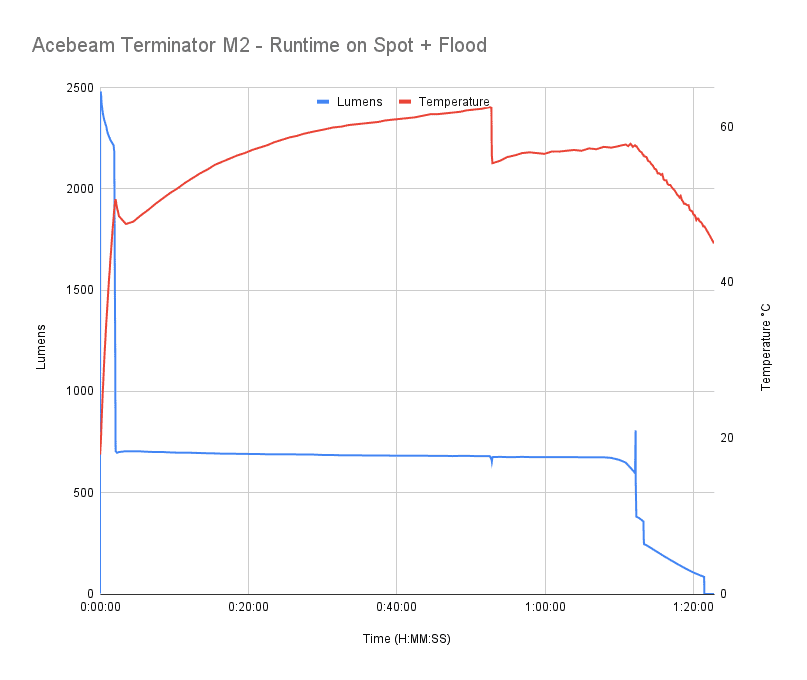
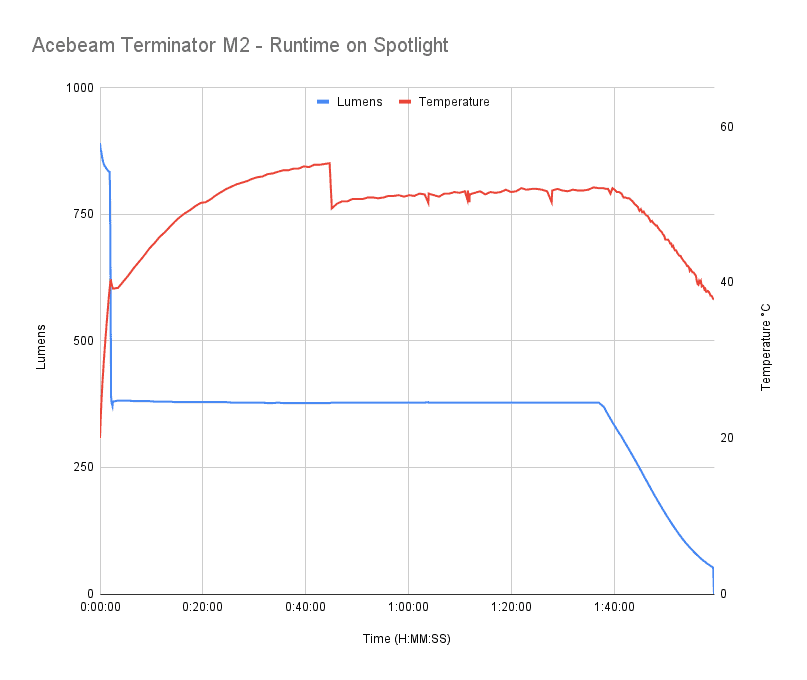
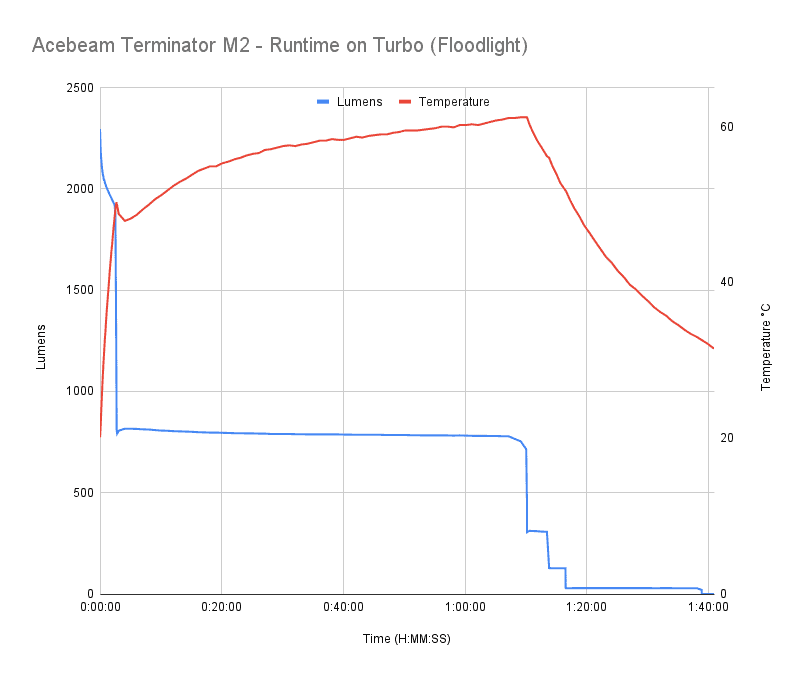
Acebeam Terminator M2 Battery Life: Runtime graphs
How Runtimes are Measured: Understanding ANSI FL1 Standards About ANSI FL1 runtime standards: The runtime is measured until the light drops to 10% of its initial output (30 seconds after turning on). This does not mean that the flashlight is not usable anymore. The last column shows how long the light actually works till it shuts off. If there is a + symbol, it means that the test was stopped at that particular point, but the light was actually still running. This happens on certain occasions, with certain drivers, firmware, or batteries.| Mode | Specified | Runtime (ANSI FL1) | Time till shut off |
|---|---|---|---|
| Moonlight | 38h | – | – |
| Low | 18h 30min | – | – |
| Med1 | 7h 25min | 7h 40min | 7h 40min |
| Med2 | 3h 25min | 3h 20min | 3h 43min |
| High | 1h 40min | 1h 25min | 1h 48min |
| Turbo | 1h 37min | 1h 13min | 1h 39min |
| Spotlight | 1h 51min | 1h 55min | 1h 59min |
| Spot+Flood | 1h 16min | 1h 14min | 1h 21min |
Just like the output numbers, my measurements line up really well with Acebeam’s specs. A few of my runtimes are just a hair short, but to be fair, Acebeam didn’t provide just a single runtime number. Their actual details for Turbo are 2000 lm (110sec) > 800 lm (1h 10min) > 35 lm (25min). So they actually describe when and how far down the output drops – I just added up the total runtime.
Peak beam intensity and beam distance measurements
About Peak beam intensity: Understanding ANSI FL1 Standards About peak beam intensity The calculated value of distance in meters at which the flashlight produces a light intensity of 0.25 lux. (0.25 lux is about the brightness of a full moon shining on an object). This means that the intensity has decreased so much, it becomes difficult to see darker objects, or objects that don’t reflect light. The columns ‘Meters’ and ‘Yards’ use rounded numbers.Intensity was measured at 5 meters after being turned on for 30 seconds. A UNI-T UT383 BT lux meter was used.
| Mode | Specified | Candela measured | Meters | Yards |
|---|---|---|---|---|
| Low | – | 200 cd | 28 m | 31 yd |
| Med1 | 576 cd | 450 cd | 42 m | 46 yd |
| Med2 | 1190 cd | 950 cd | 62 m | 67 yd |
| High | 2601 cd | 2150 cd | 93 m | 101 yd |
| Turbo | 6724 cd | 5500 cd | 148 m | 162 yd |
| Spotlight | 62500 cd | 62875 cd | 501 m | 548 yd |
| Spot+Flood | 52900 cd | 53000 cd | 460 m | 504 yd |
Ambient temperature:
- 20 °C
Once again, these numbers are right inline with spec… for the most part. My Flood measurements were hitting a bit low, but I’m not terribly concerned with the exact intensity of a floodlight. And the Spotlight was spot on.
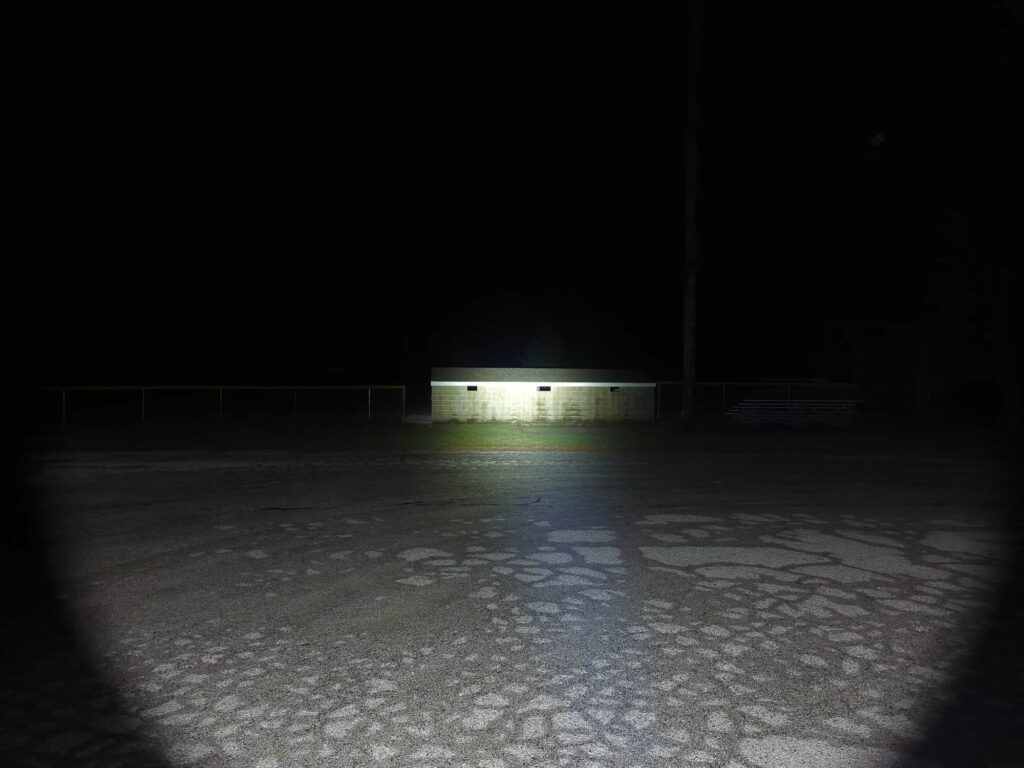
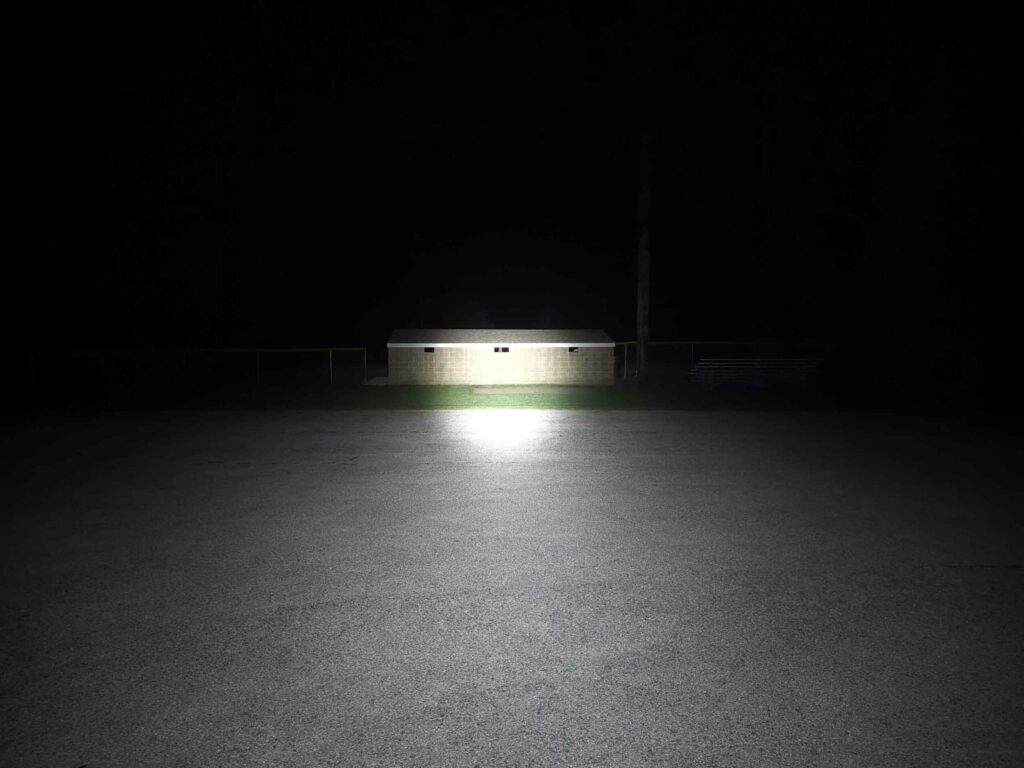
Beamshots
Camera settings and distance:
Beam shots of the building are taken at 30 m (33 yd) using a Pixel 7 set to ISO 800 with 1/10 second exposure time
Beamshots of the following flashlights compared:
- Acebeam Terminator M2 – Floodlight
- Acebeam Terminator M2 – Spotlight
- Acebeam Terminator M2 – Spot + Flood
- Nitecore EDC33 – LUMINSHIELD™
- Nitecore EDC33 – Search
- Acebeam-Maratac Defender P16
Please note that the following beamshots are mainly intended to showcase the beam pattern and beam quality, rather than overall performance. These images are typically taken directly after activation, and in different seasons or weather conditions, and therefore do not fully represent its overall performance. For accurate performance metrics, such as output, beam distance, and runtimes, you need to look at the performance section of this review.
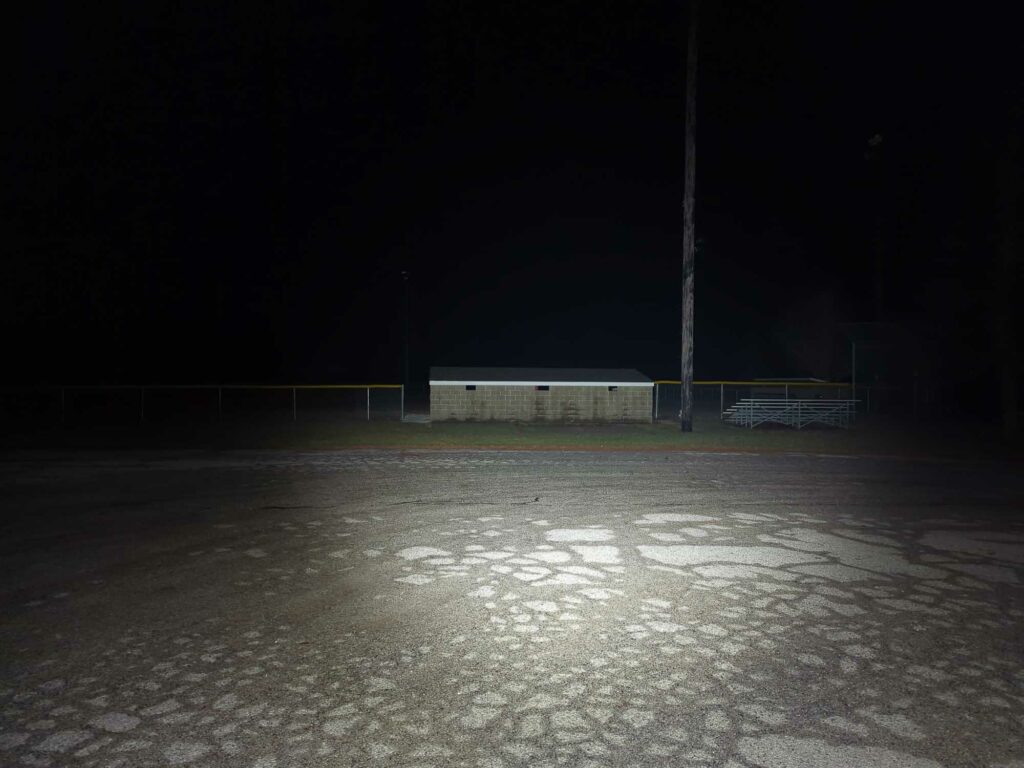
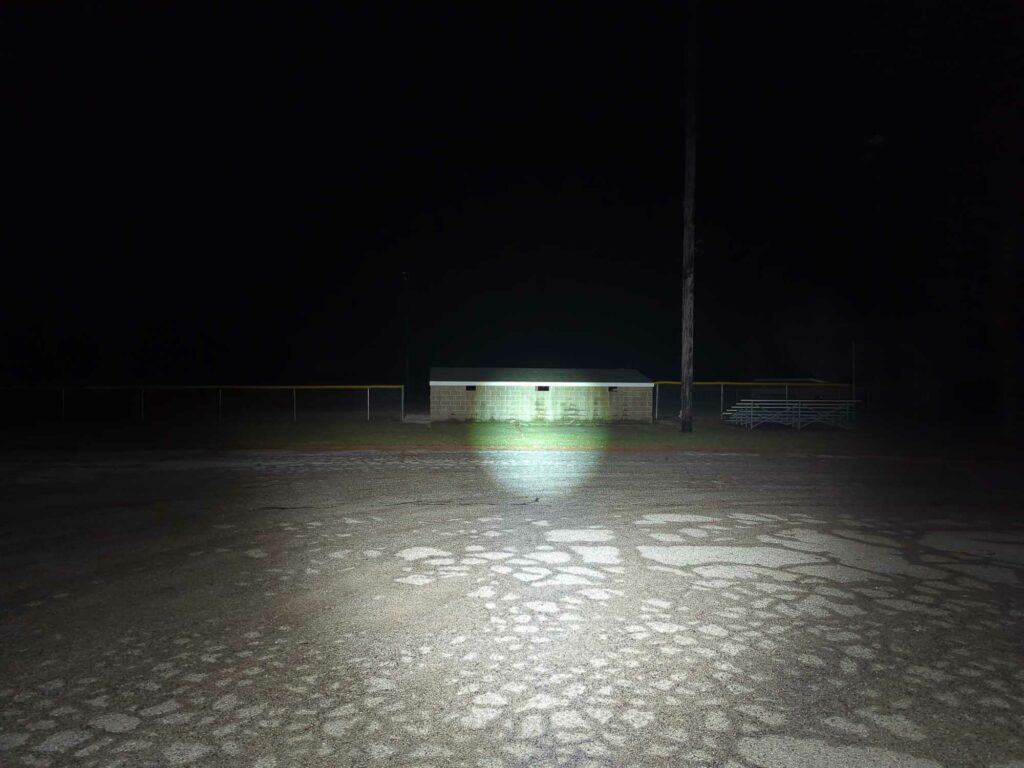
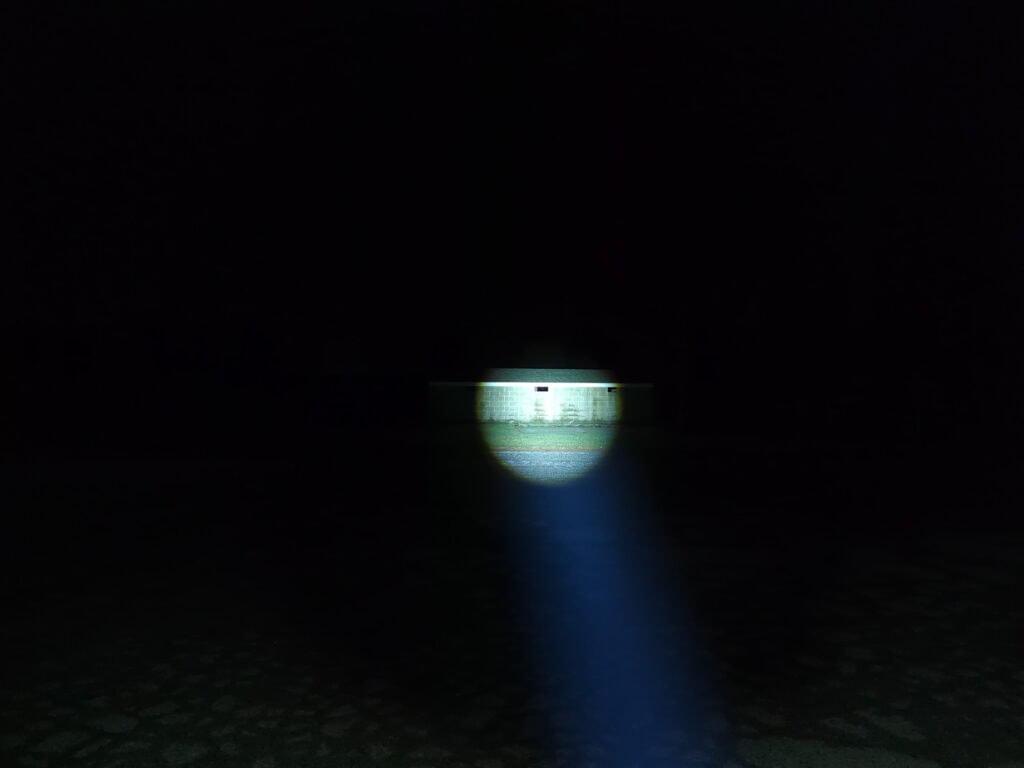
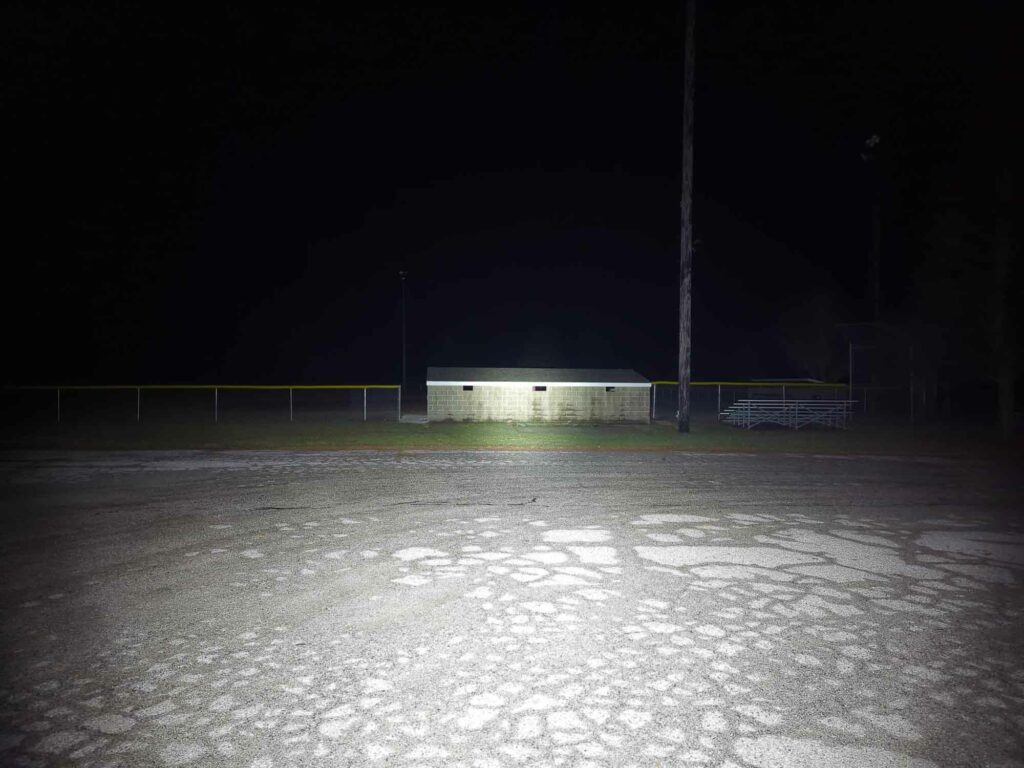
Disclaimer: This flashlight was sent to us for review at no cost by Acebeam. We have not been paid to review, nor have we been holding back on problems or defects.
Final Verdict
Pros
- Solidly built
- Aggressive design
- Fairly easy UI
- RGB Aux
- Great LEDs (Nichia 519A)
Cons
- A little bulky for EDC
- Easy accidental activation
- Spotlight has only one brightness level (fine for me, others might not agree)
- Aux is not memorized (must manually activate)
Explanation on star ratings:
1: Avoid: a match would be a better choice – 2: Poor: significant defect or issues; almost unusable – 3: Average: some defects or issues; but still usable 4: Good: recommended (minor issues) – 5: Great: highly recommended

4.5 stars: ★★★★⋆
While our star rating provides a reliable indicator, we encourage you to read the full review to make an informed decision based on your own needs and preferences.
The Acebeam Terminator M1 seemed to be a big hit – I saw a lot of chatter about it on the forums (BLF, Reddit, etc). For good reason; it had a cool design and dual output: triple LEDs plus an LEP. The downside? It was a bit large and pricey. Still a cool flashlight to own if you’re a collector. I think Acebeam did a great job with the follow-up model, the Terminator M2. Being based on a 18650 instead of 21700 helped decrease the size a bit. And swapping the LEP for a tightly-focused LED helped reduce the cost. The Terminator M2 is still on the pricey side of things, but boy does it have a “cool” factor. Dual output, beautiful Nichia 519A 5000K 90-CRI LEDs, RGB Aux, an aggressive design… the list goes on. While the M2 is dubbed an EDC flashlight, I do find it still to be a bit larger than what I’d like to carry on a daily basis, but that is personal preference. If you’re at all interested in the Acebeam Terminator M2, or just wanted a less expensive M1, I highly recommend that you check it out!
Buy your Acebeam Terminator M2 with a discount
Get a whopping 15% off your next order at Acebeam.com with the following discount coupon: AE15. Simply add the coupon code at your checkout.
1lumen selects and reviews products personally. We may earn affiliate commissions through our links, which help support our testing.