1lumen selects and reviews products personally. We may earn affiliate commissions through our links, which help support our testing.
Armytek Prime C1 Pro Magnet USB review
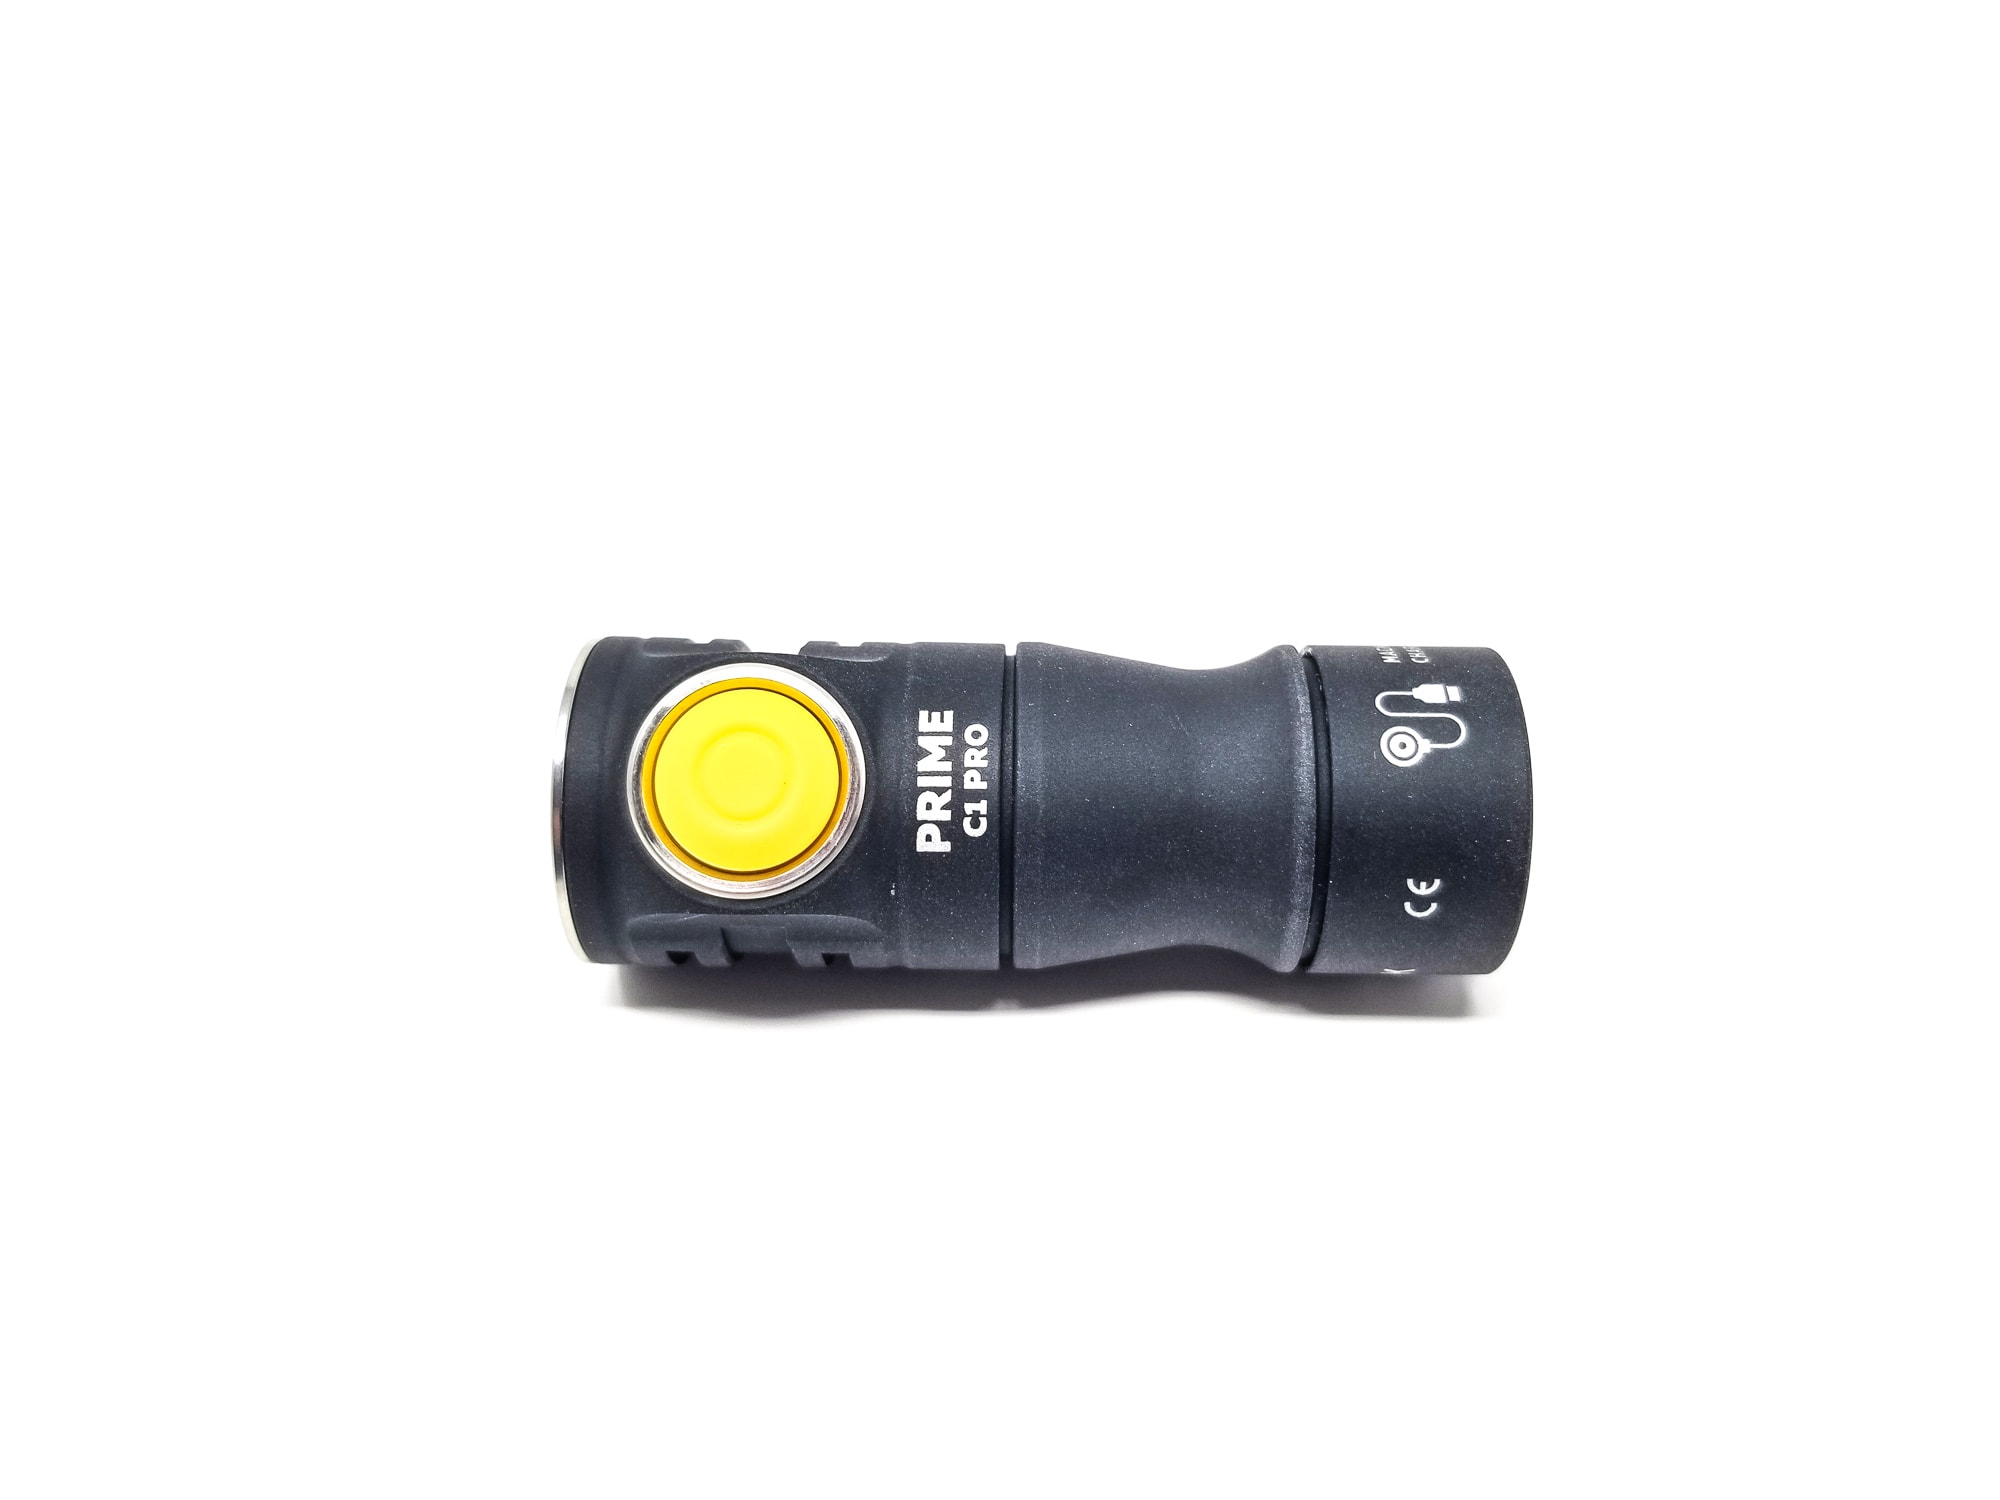
Armytek Prime C1 Pro Magnet USB specs
| Brand & Model | Armytek Prime C1 Pro Magnet USB |
|---|---|
| Flashlight category | Subcompact EDC flashlight |
| LED | ? |
| Max. output | 1,000 lumens |
| Max. beam distance | 114 meters |
| Max. beam intensity | 3250 cd |
| Battery config. | 1*18350 |
| Onboard charging | Proprietary Magnetic |
| Main modes | 11+6 (two mode groups) |
| Blinkies | Strobe |
| Waterproof | IP68 |
| Review publication date | November 2023 |
Review intro:
Fresh off the Prime C2 Pro Max Magnet (which was a good one!), I got another Armytek on deck! This is another light from the Prime lineup and part of the C1 series, which are smaller, more EDC-oriented flashlights for pocket carry or backup use.
Spoiler alert: It’s properly handy! A bit about Armytek: They’re based out of Germany and all design, R&D is done in-house, but have a presence in several countries globally. Armytek as a legit brand with their own manufacturing facility in China. Born in Germany, designed in Germany, built in China. Their catalog features 32 products and a lot of choices for portable illumination. The Prime C1 Pro Magnet USB features magnetic charging like the C2, and a very unique (read: complex and quirky) UI lifted from the C2. Let’s see how it goes.
Package quality.
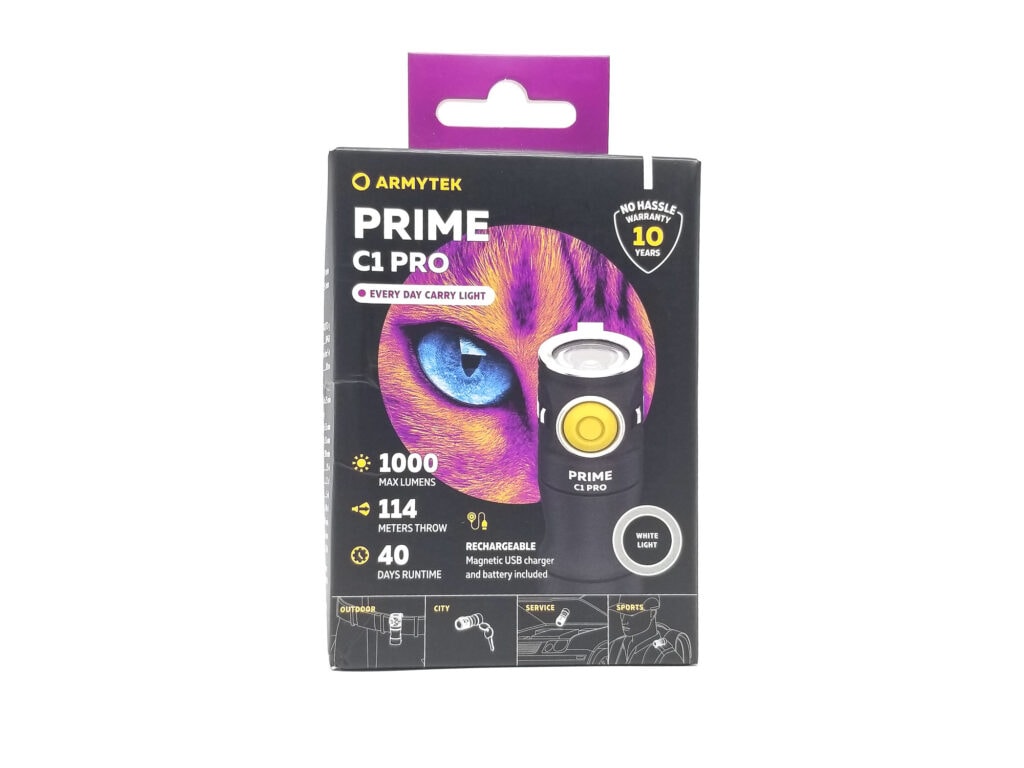
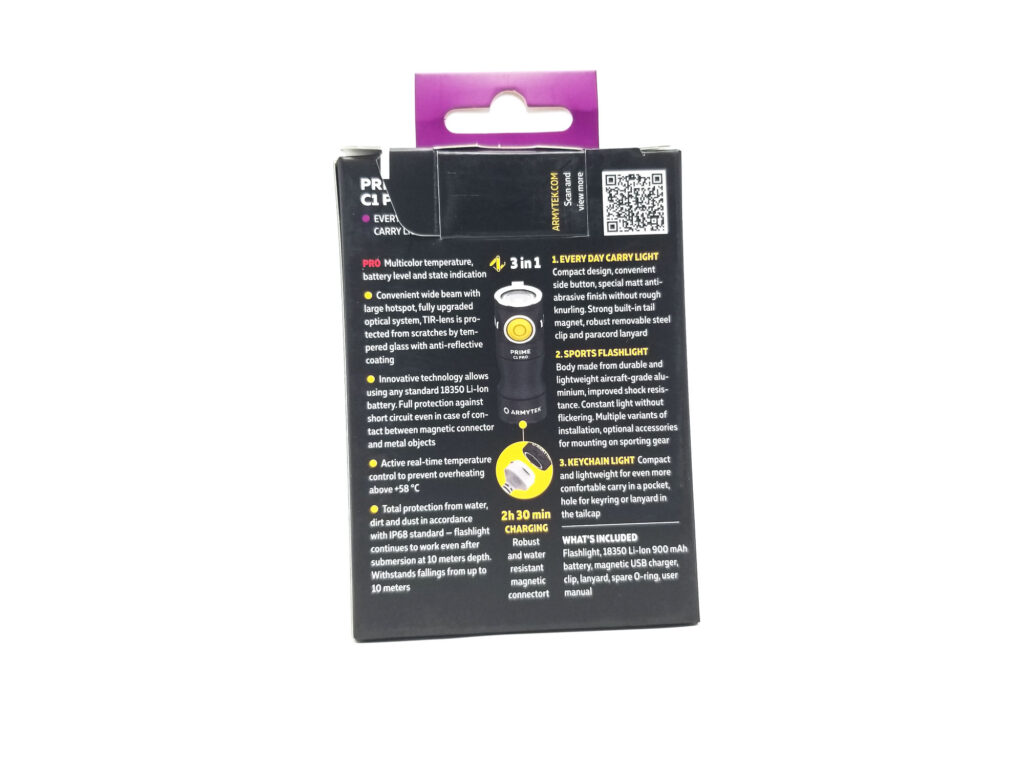
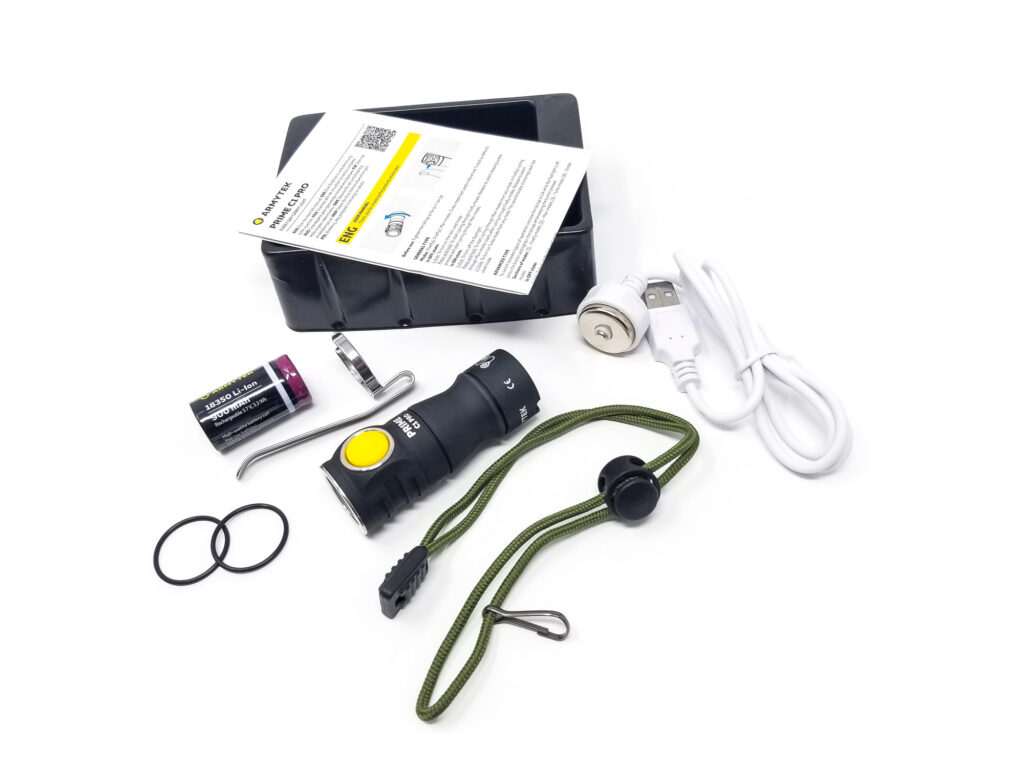
Armytek sells in retail and online outlets, so packaging is important, and Armytek gives you nice, retail-friendly packaging with lots of colorful graphics and feature blurbs. Inside is a molded plastic tray holding all the bits. Here’s what you get:
- Armytek Prime C1 Pro Magnet USB
- Proprietary charging cable
- 2 o-rings
- Armytek branded 900 mAh flat top 18350
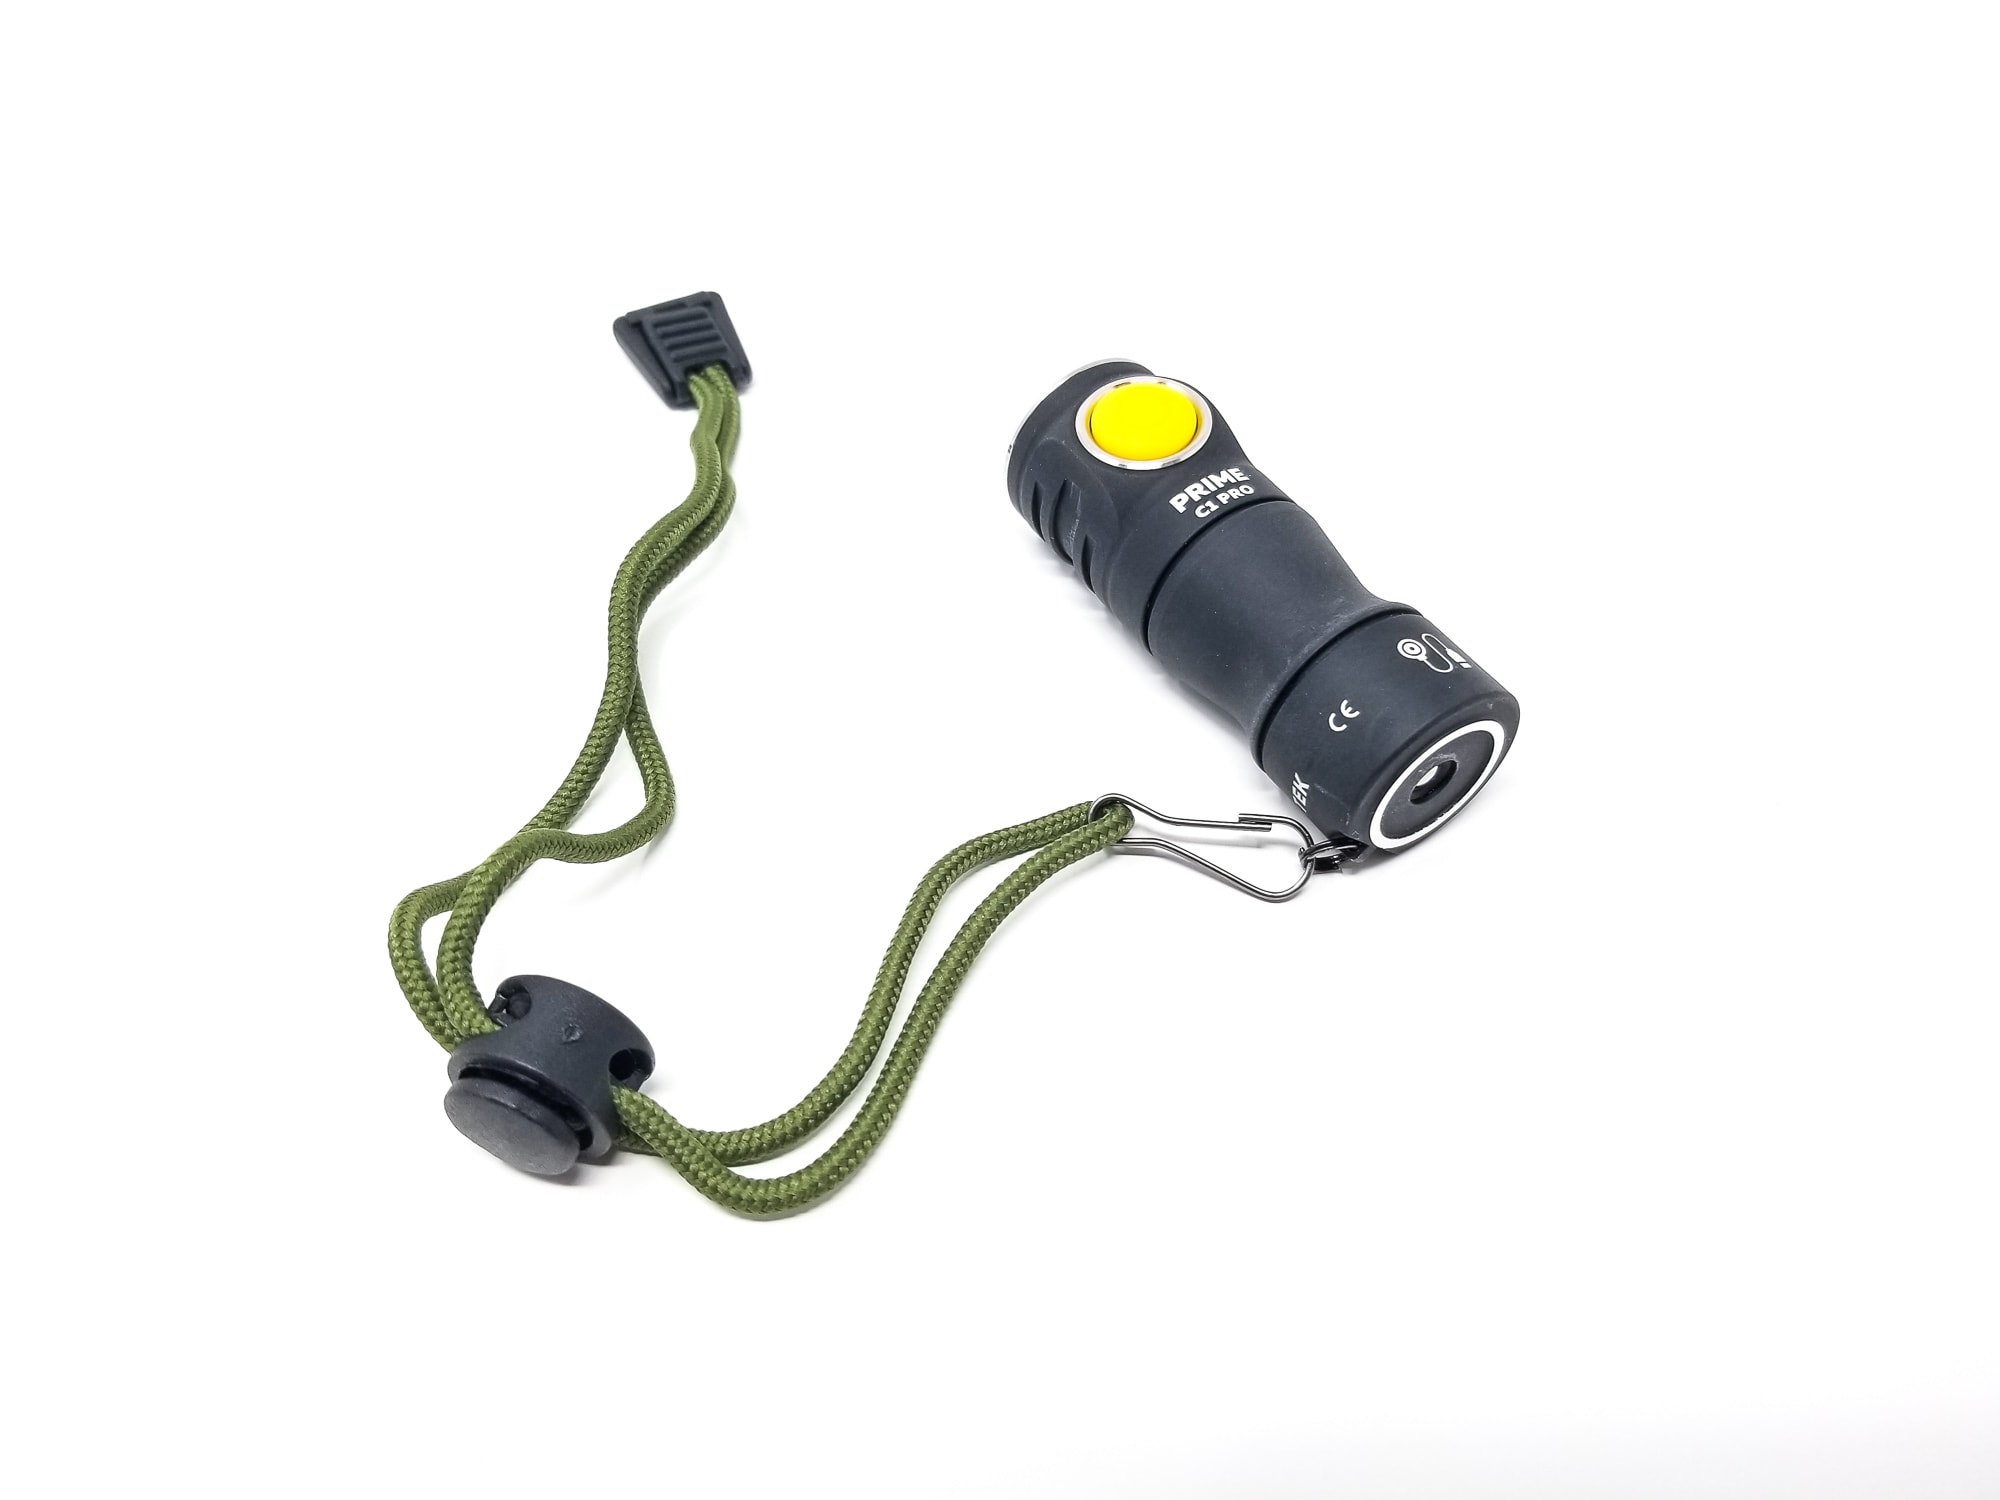
- Lanyard with quick release clasp and split ring attached
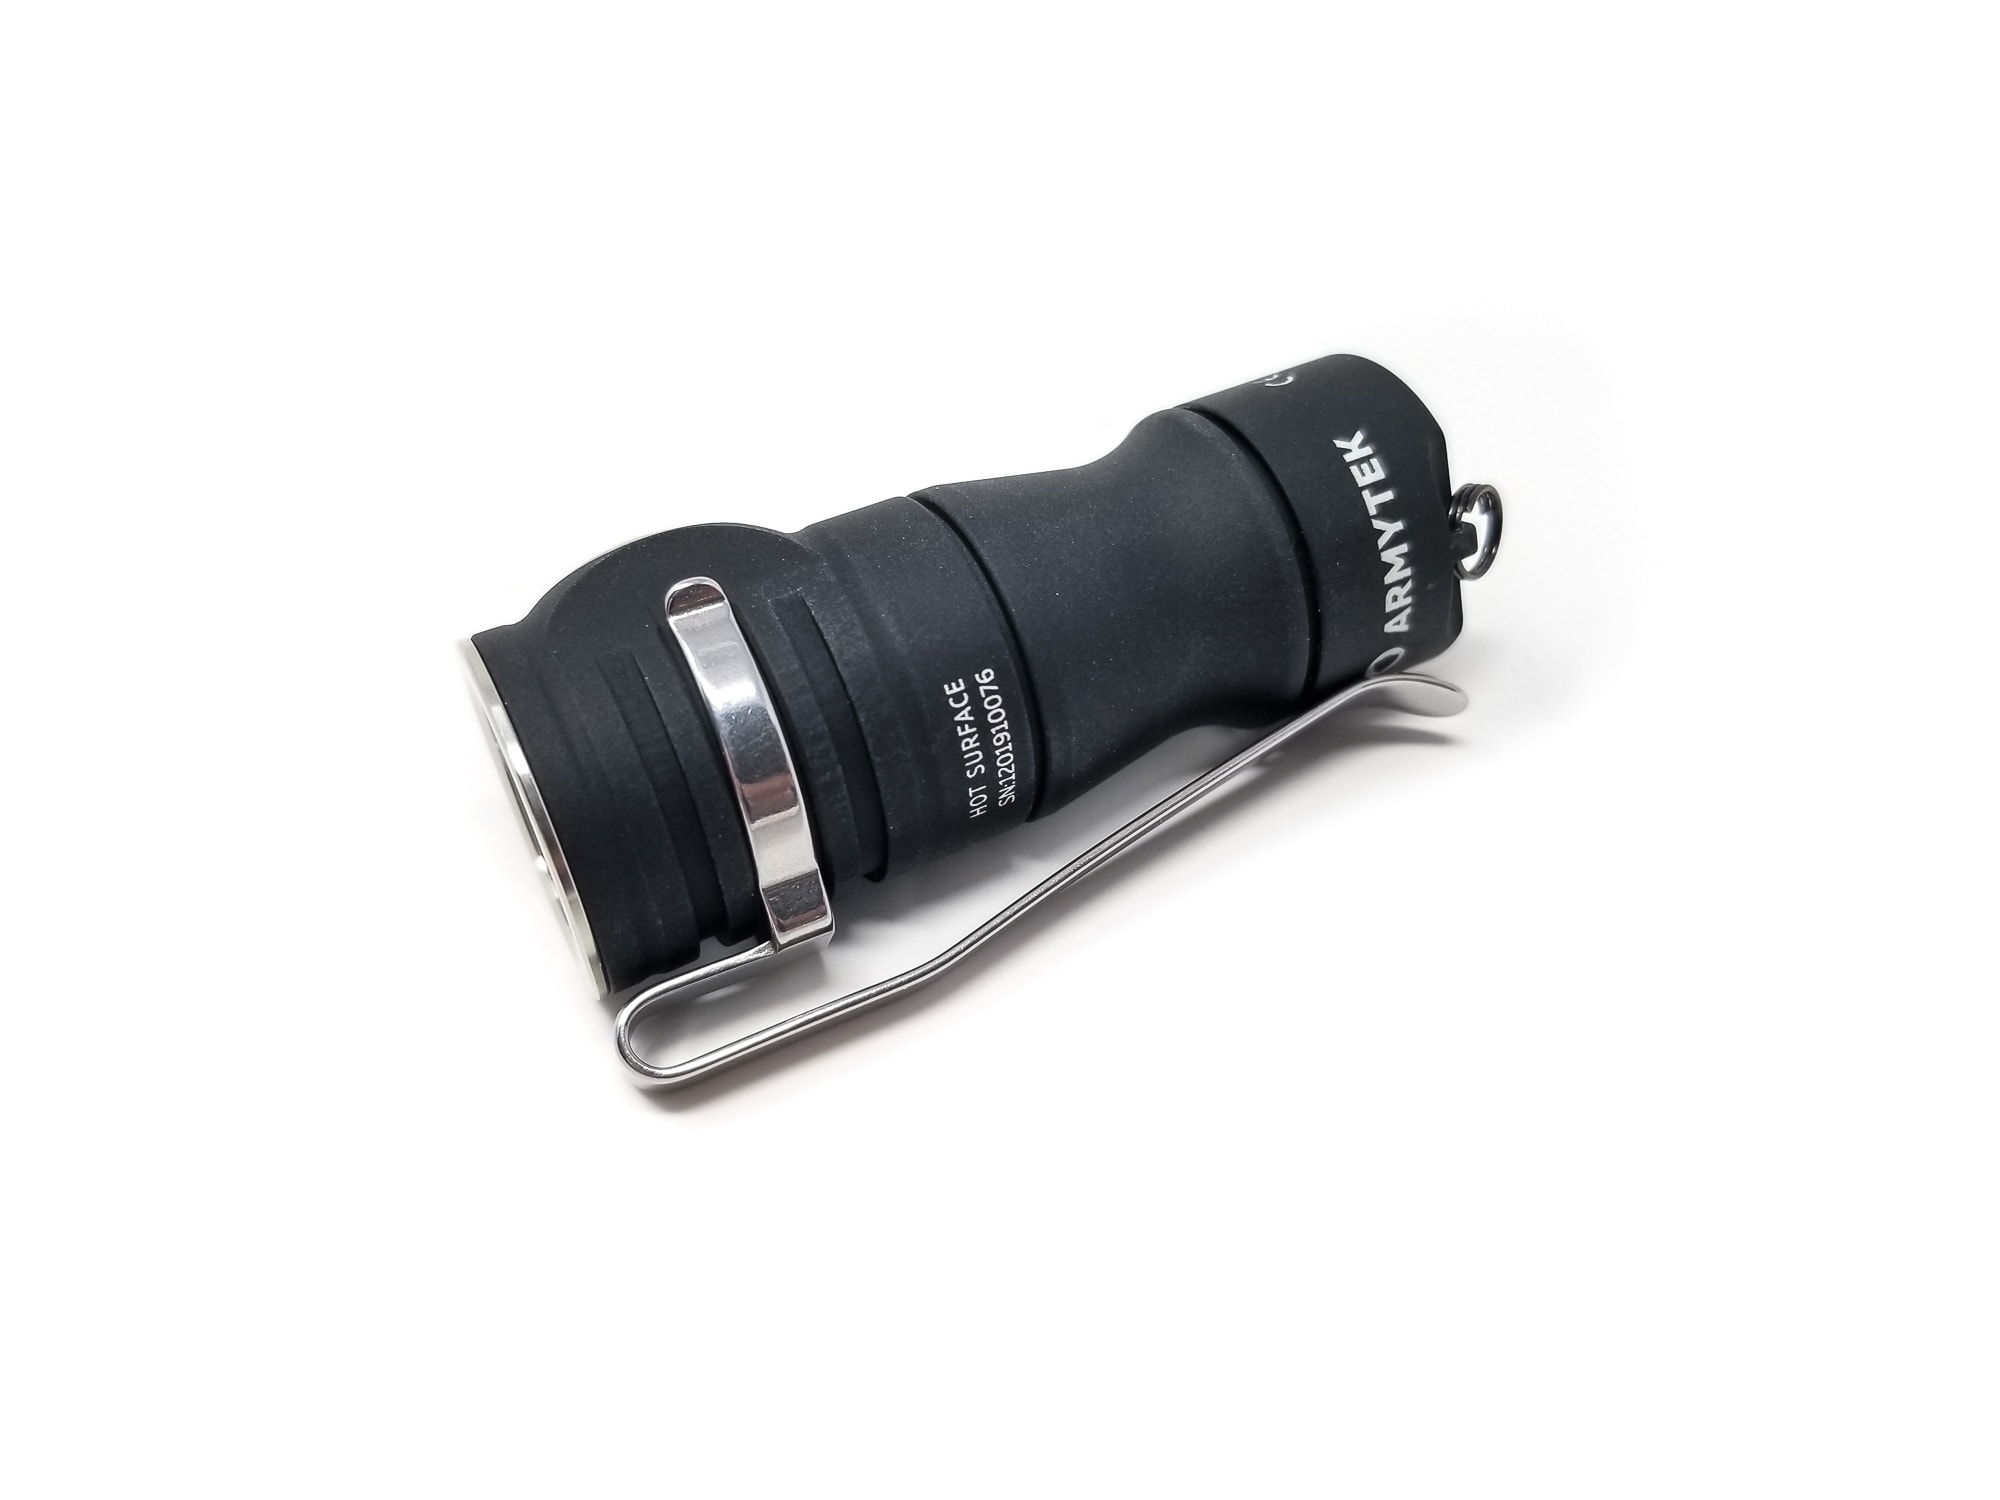
- Pocket clip
- User manual
This is a complete, ready to go kit with all you need to unlock the light and get to work, typical of the competition in this class. The included battery doesn’t seem protected in any way shape or form and is just a standard flat top. The manual is a bit sparse for operating instructions and the UI (which would have been nice since the UI’s a doozy).
Flashlight in use, Build Quality, and Warranty
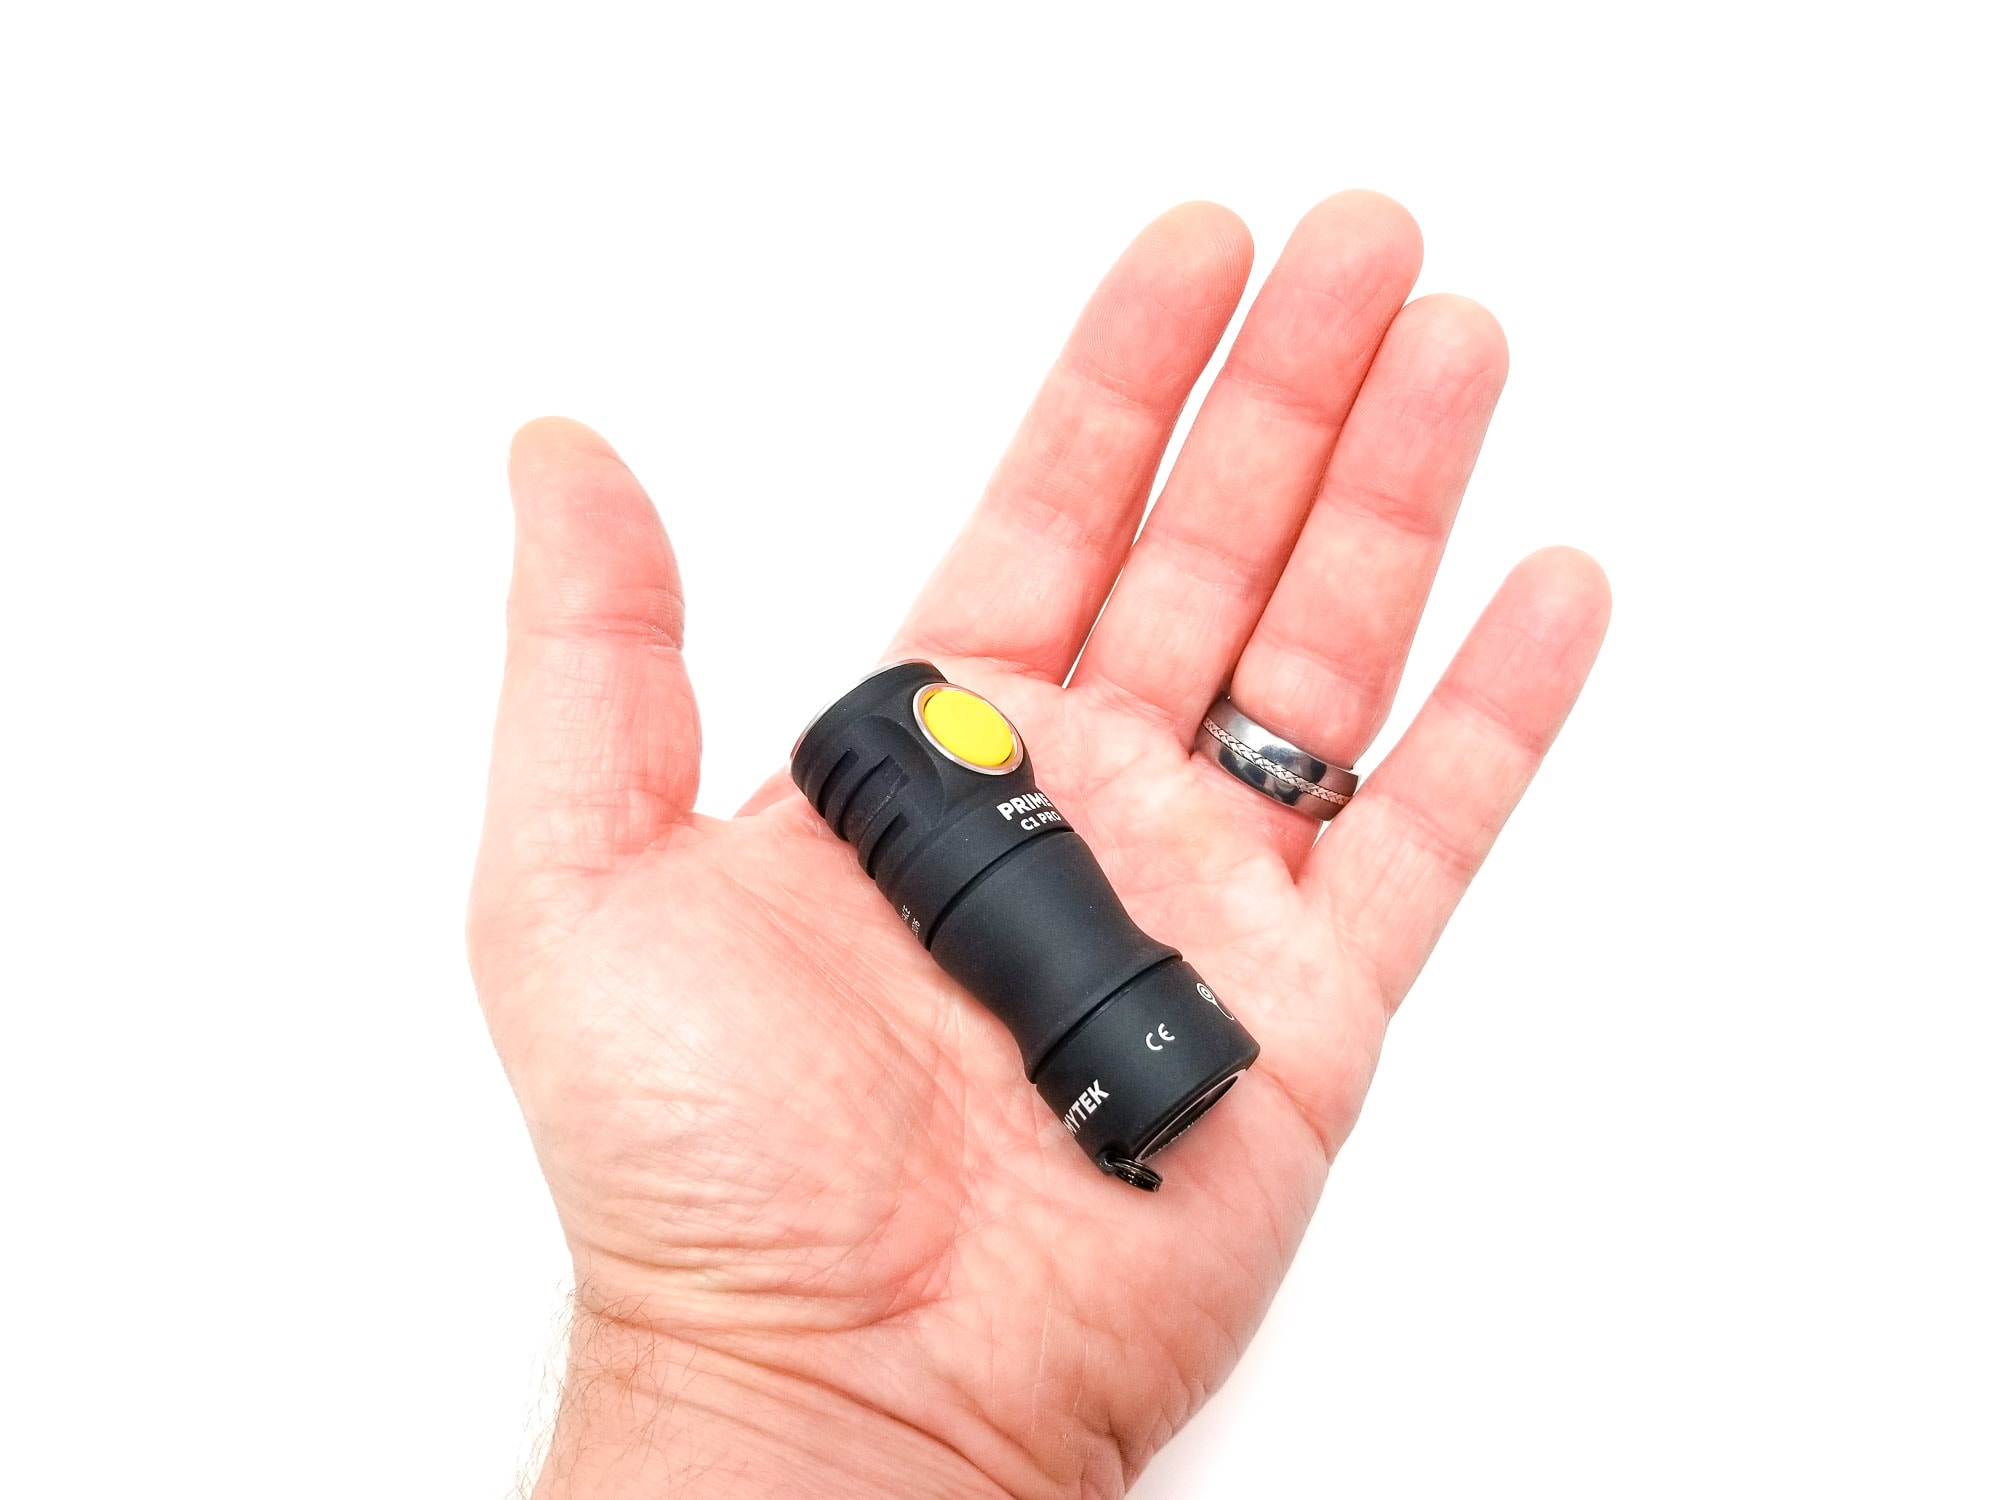
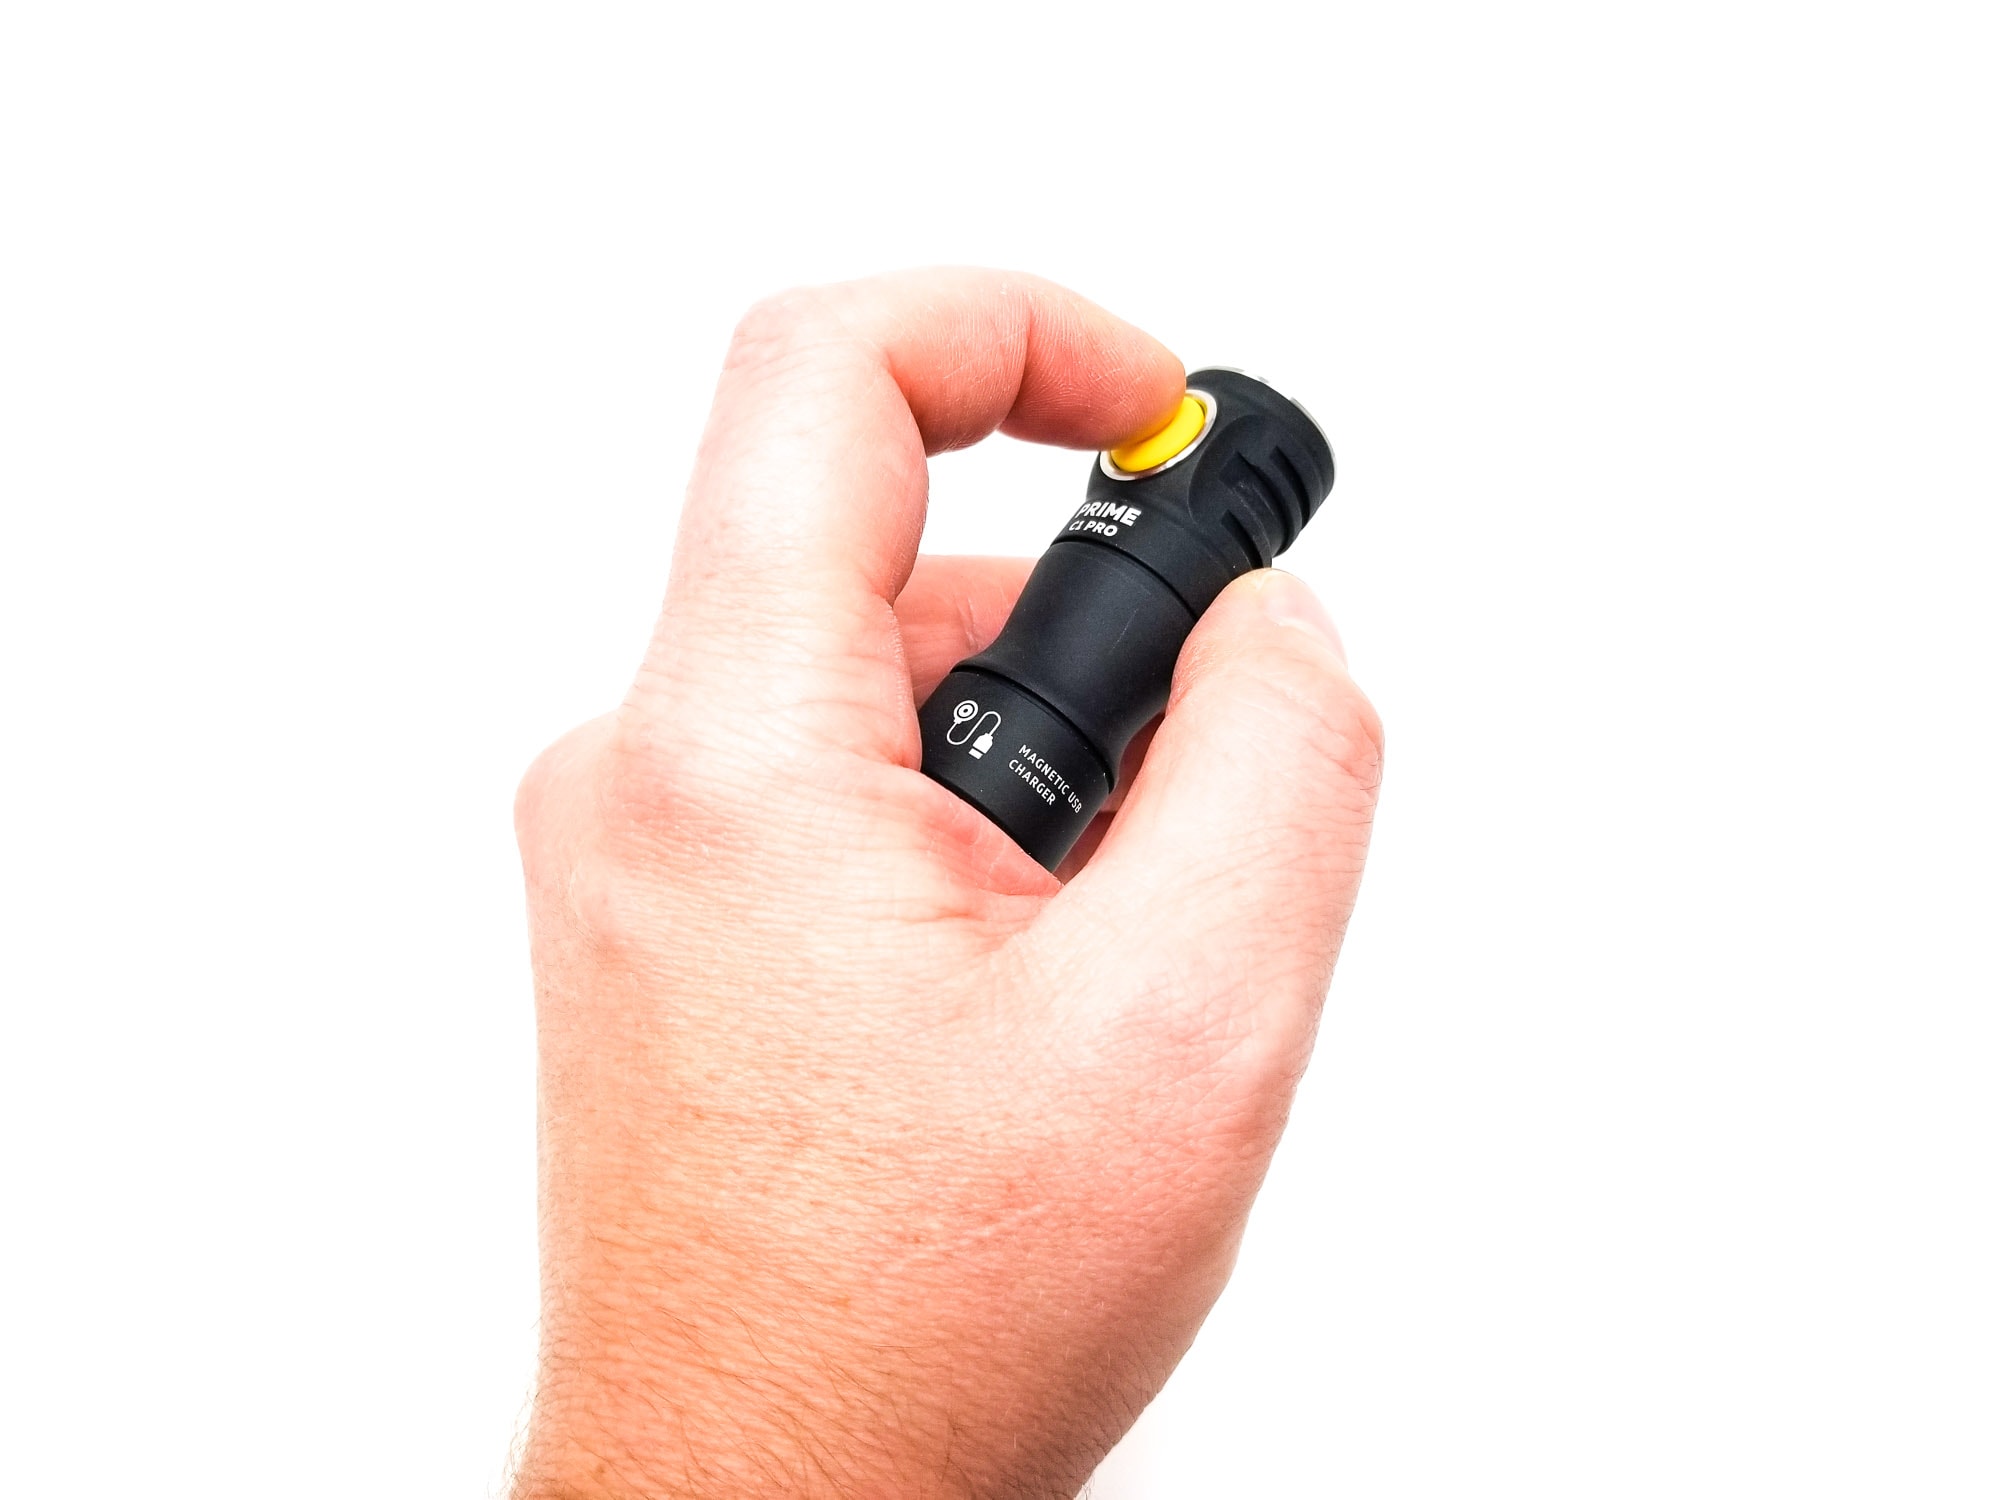
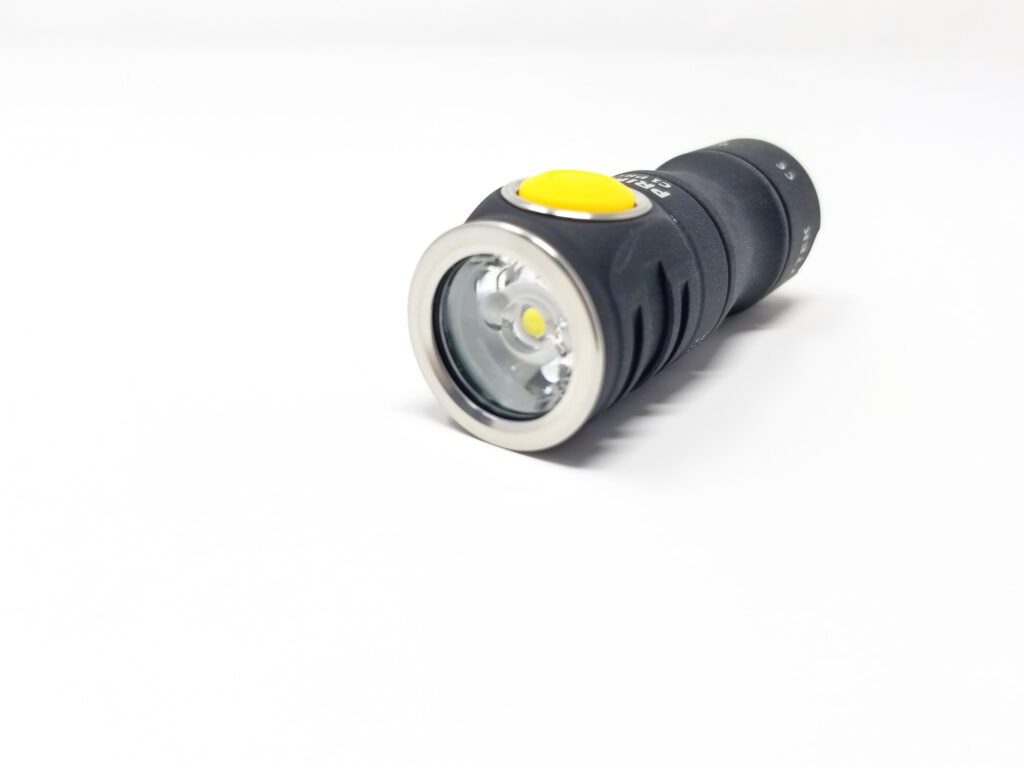
The Prime C1 Pro Magnet USB (moving forward we’ll call it the C1 Pro) is a subcompact EDC/utility light, so there’s a lot you can do with it. Chuck it in a glovebox, tool box, junk drawer, or sit it on your nightstand. It’s properly versatile and properly tiny, and almost disappeared in my hand. Pocketable? Yep. It’s an excellent pocket light, and the clip makes it even more useful. Clip it to your pocket, or clip it to your hat bill, collar, sleeve, or stick it to a metal surface for hands-free action.
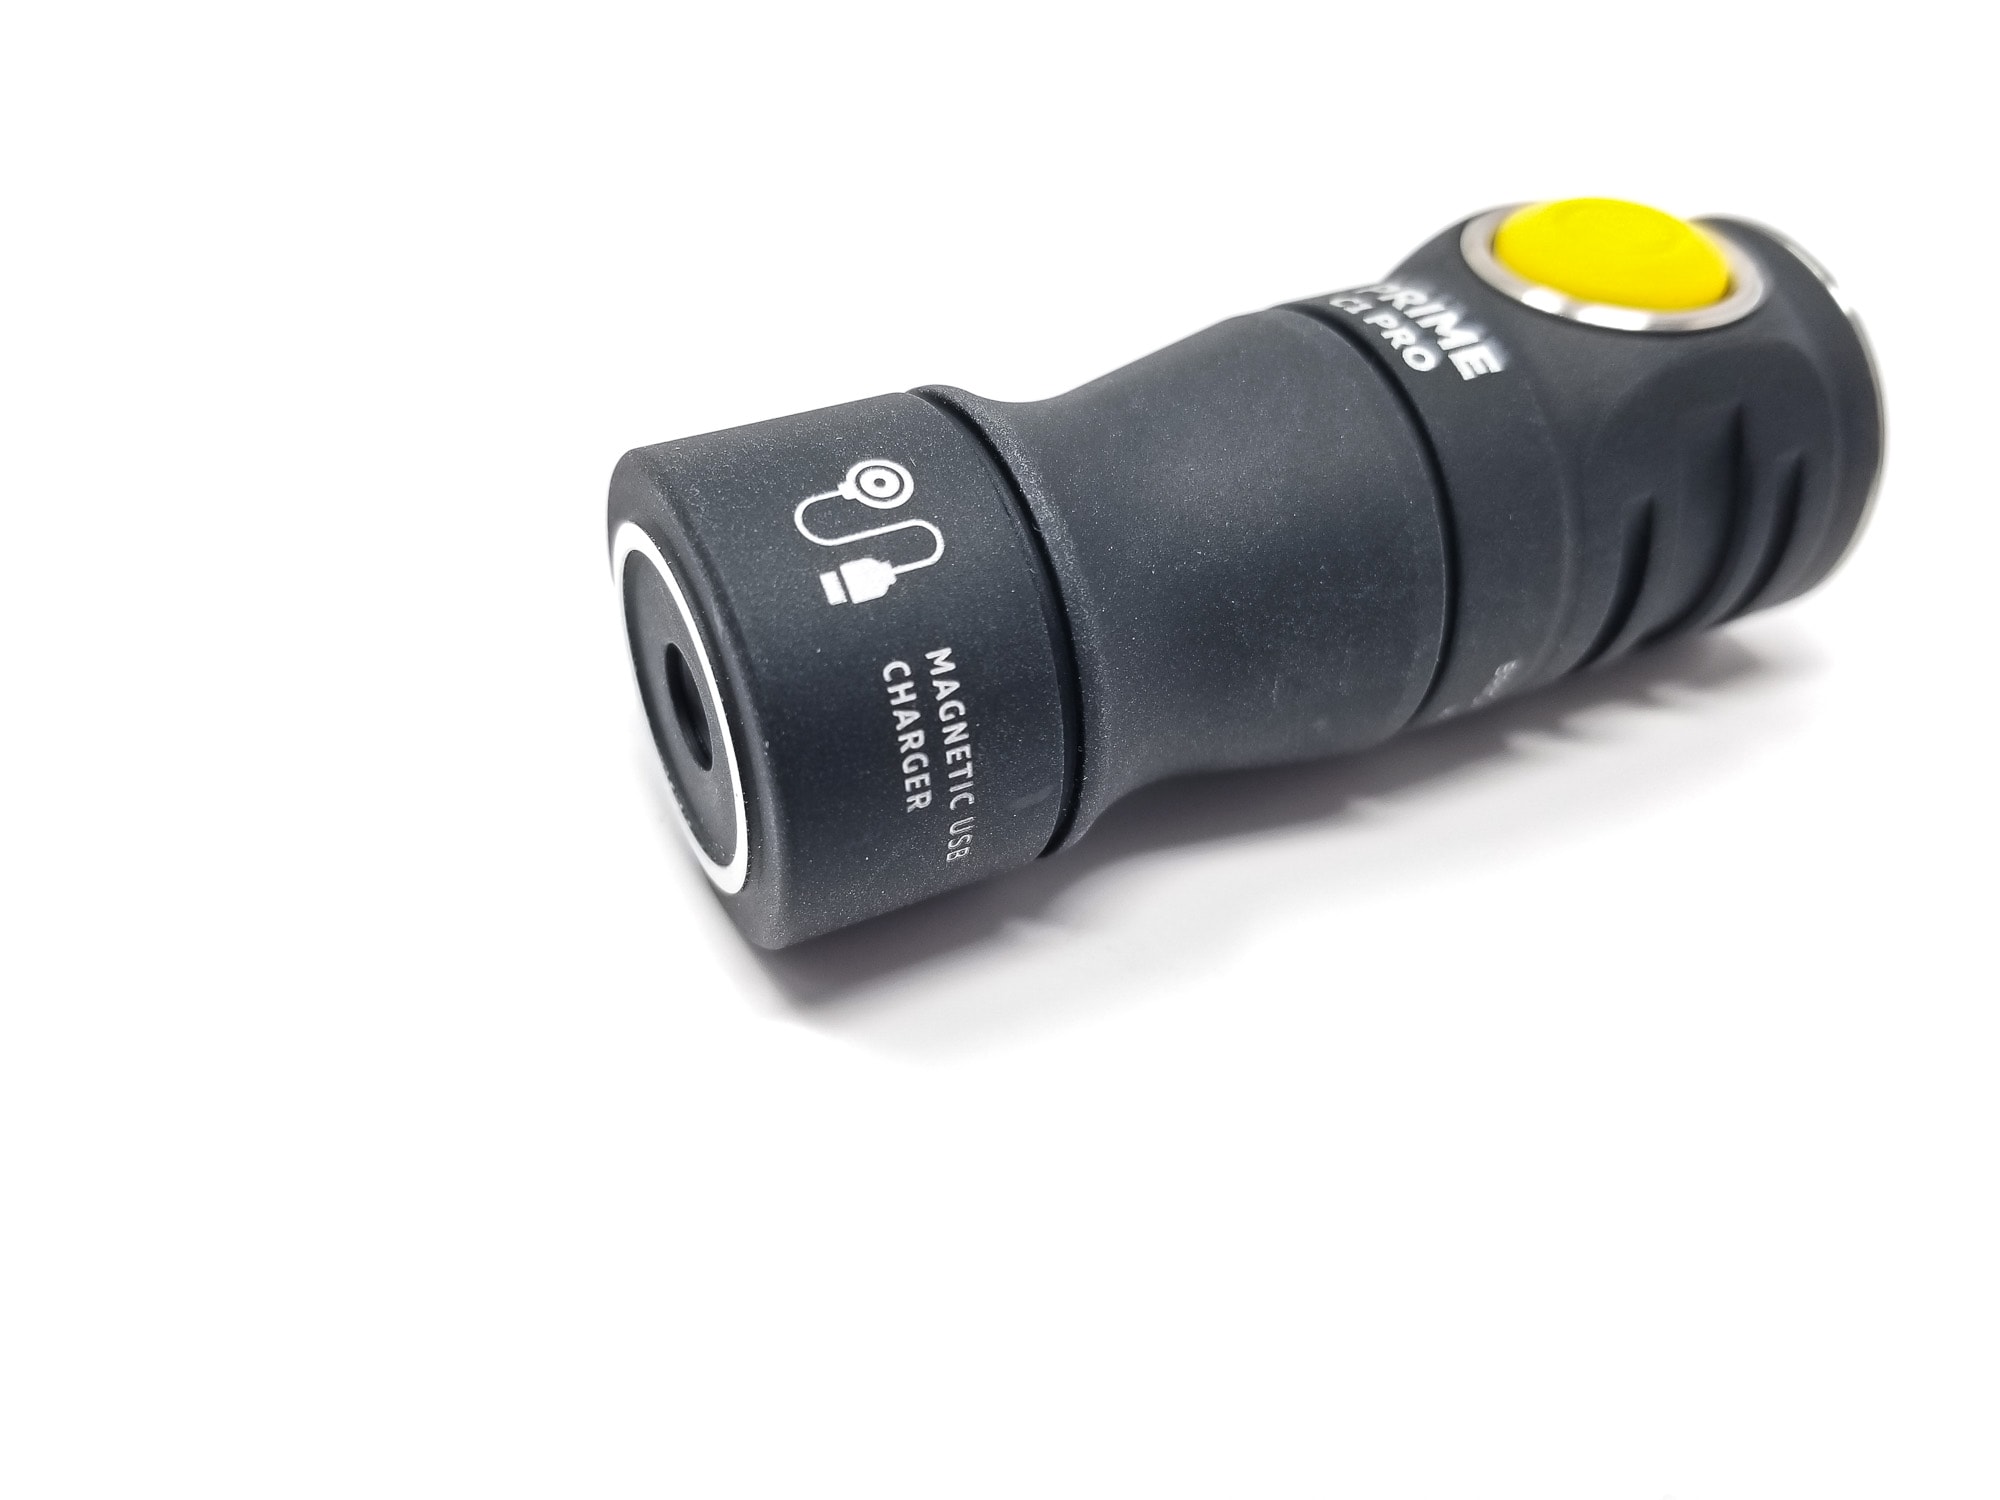
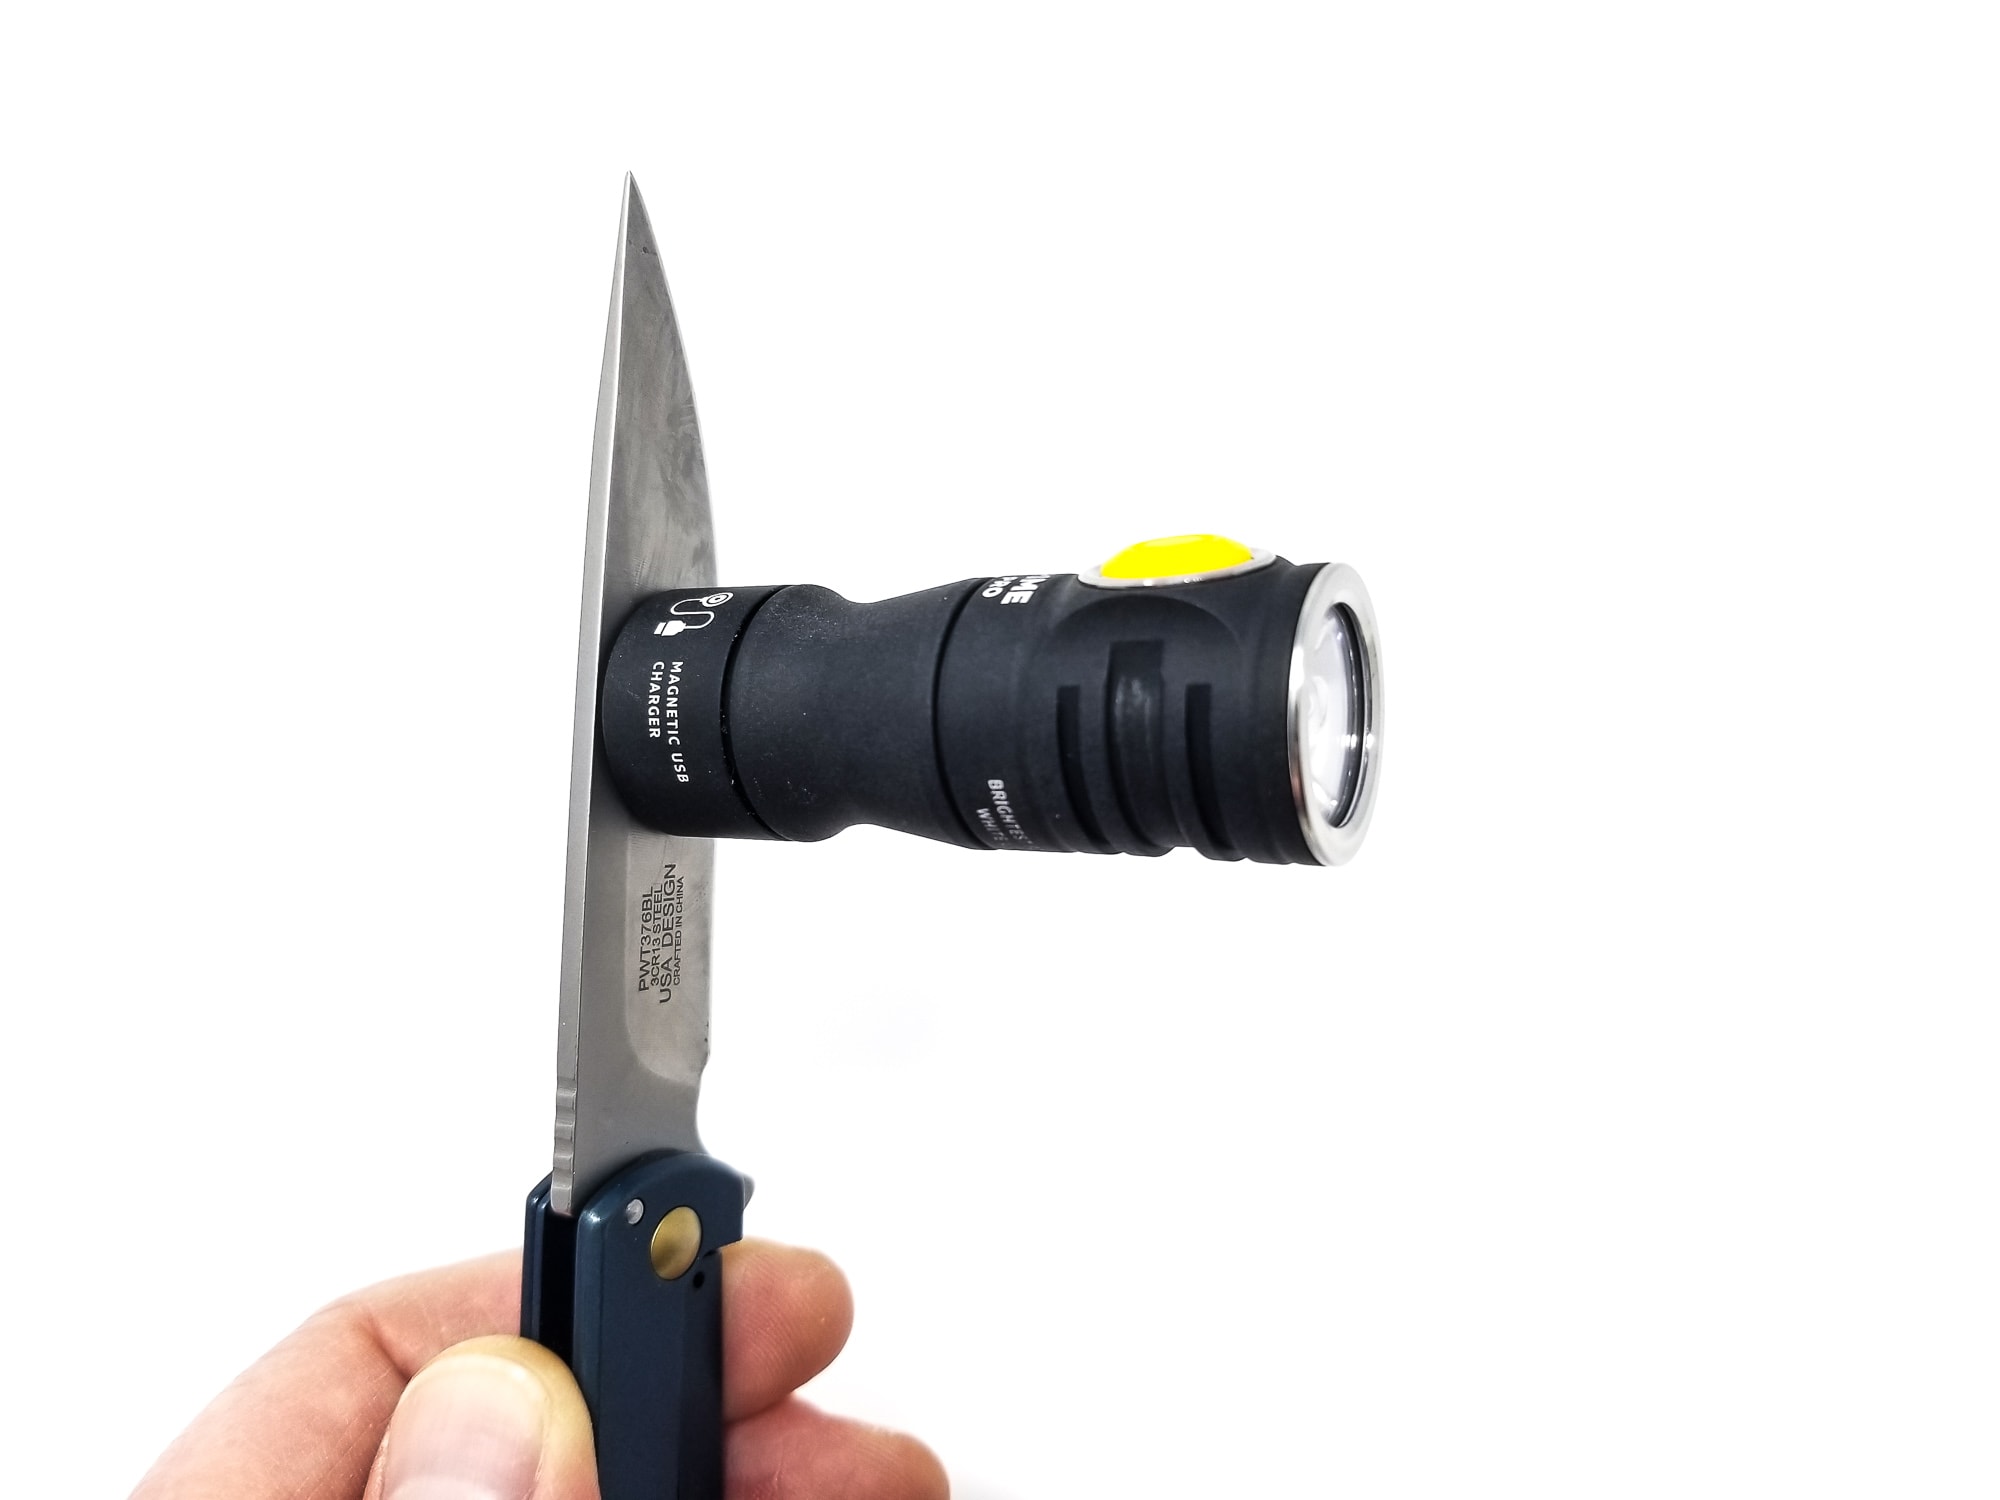
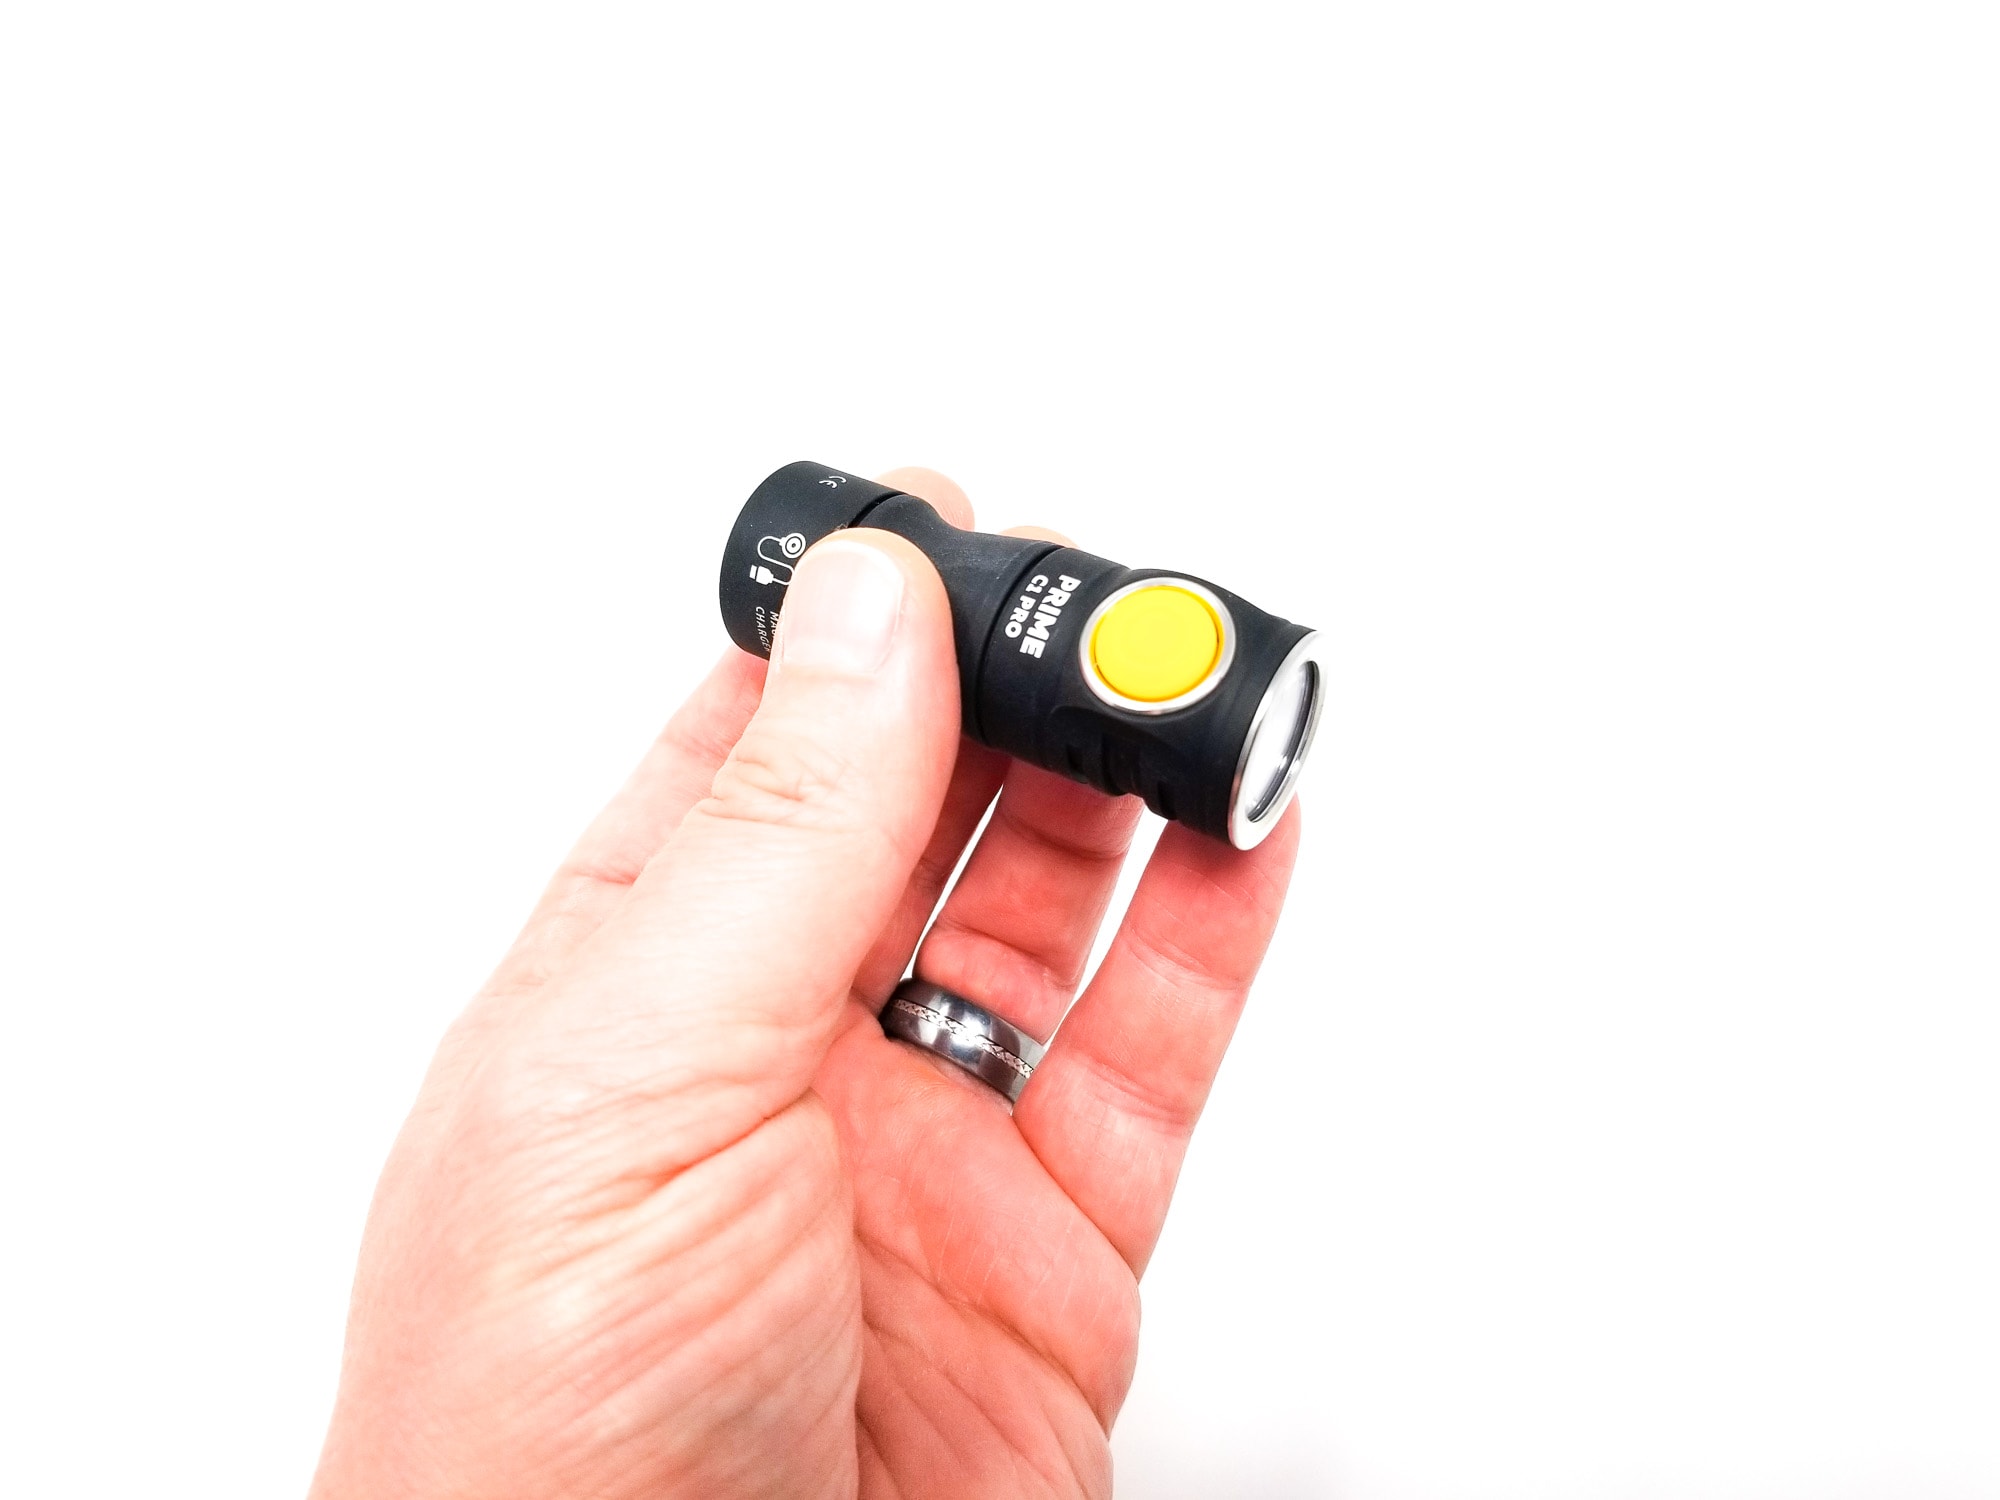
The battery tube tapers down towards the tailcap a bit like what Wurkkos did with the TS10. This helps the handling a bit, and I found myself mostly gripping it like a cigarette. The finish is delightfully grippy (same as the Prime C2) and afforded good control despite the absence of knurling or texturing. There’s a magnet in the tailcap, and it’s strong enough to hold the C1 Pro at a 90 degree angle from a flat surface. The switching is handled by a single e-switch up front set in a shiny bezel and the boot is Armytek yellow (of course). It’s proud and grippy, and has a great feel and click action. It was also easy to locate by feel. It is backlit, but that’s a bit mysterious since nothing’s mentioned in the manual about it. It blinks when clicked, and unlike the Prime C2 Pro Max, didn’t blink when on standby.
Quality-wise, Armytek positions themselves towards the upper end of the market (think Acebeam, Olight). No complaints with the built quality here, folks. It’s a finely-crafted light, and I can tell a lot of thought went into the design (it’s very German). For pricing, it’s right at around $65 US, and while a bit steep, you’re paying for quality and features not found on cheaper lights, so it’s worth it. The Prime C1 Pro is made from premium 6061-T aluminum, and the machining is perfect. There’s no sharp edges, no blemishes or tool marks anywhere, and it passed the maracas test. The reflector is flawless as well. The finish is type III HA hard anodizing, and like the Prime C2 Pro it’s done in this ultra-matte, super grippy chalkboard-like texture. While I really like the finish, it is prone to showing scratches and scrapes from abrasion, and will actually scratch off certain materials.
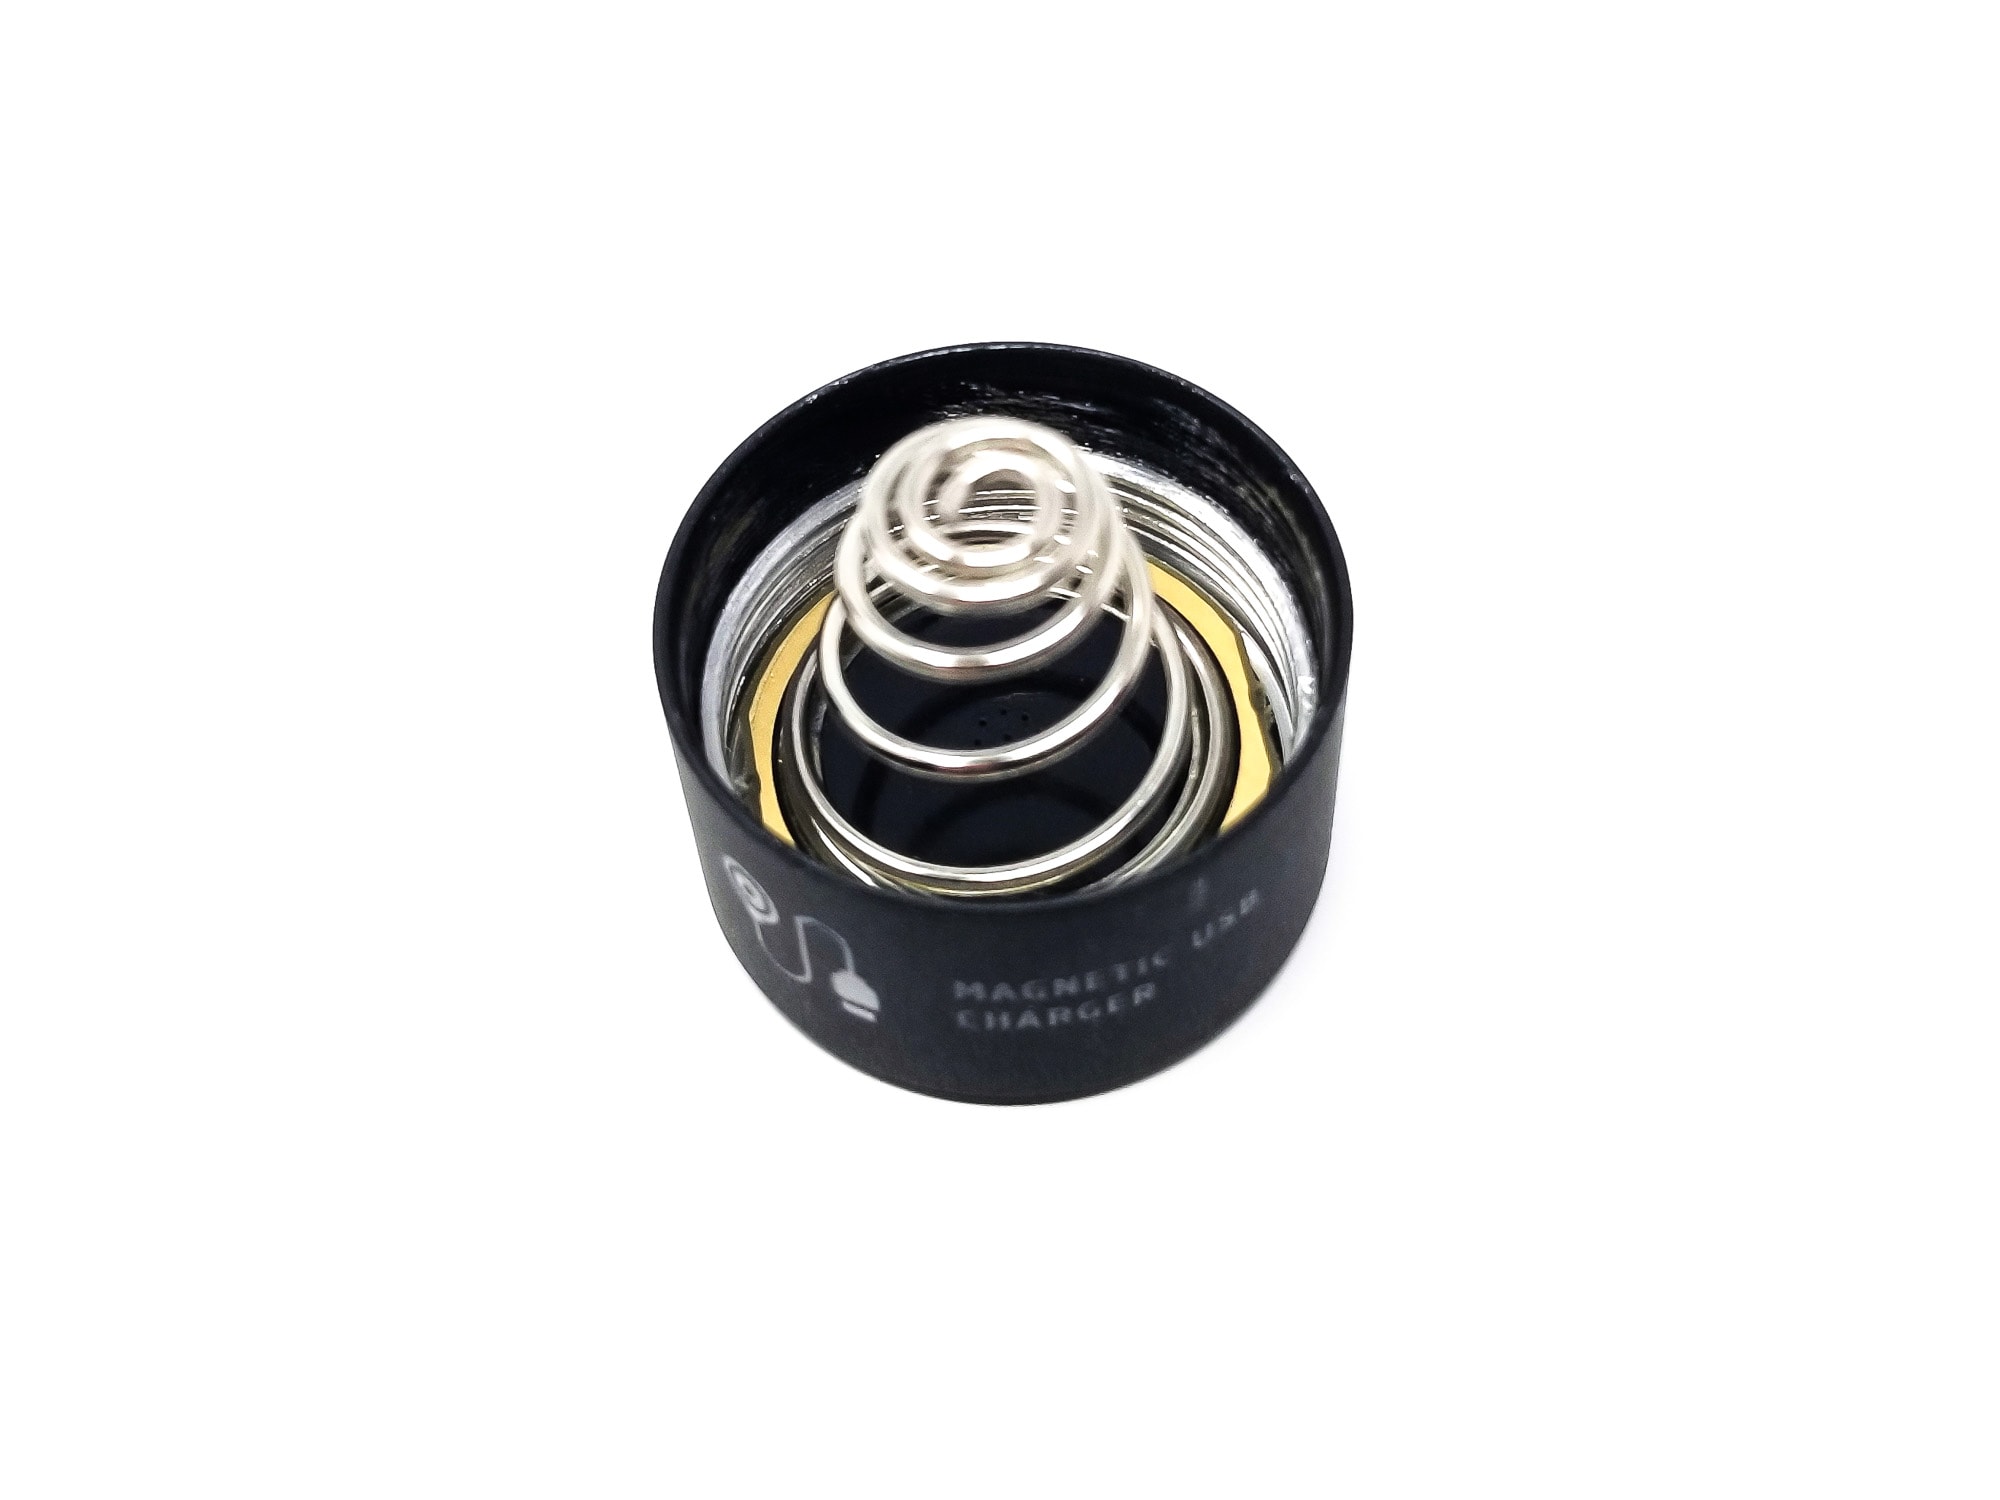
The battery tube is fixed to the tube, and the rest of the light is glued up. Only the tailcap unscrews. The rear threads are trapezoidal cut and plenty sturdy. They’re smooth with decent amounts of silicone goop. For springs, the tailcap has a silver, long tapered coil spring, and actually makes affixing and tightening the tailcap a bit tricky since it’s under a good deal of tension. The driver makes do with a brass contact. That’s fine to have here, but a spring is always preferable for durability. Even though the threads are bare, you can still mechanically lock the light out. The tailcap is sealed with an o-ring, Armytek gives it an IP68 rating so no worries about dunking your C1 Pro.
Warranty? Armytek is up there with the heavy hitters in the industry, with an extremely generous warranty program. From Armytek.com:
10 years — flashlights made of aircraft-grade aluminum.
5 years — flashlights made of polycarbonate and battery chargers.
2 years — mounts, remote switches, color filters, power supplies, interchangeable tailcap for diving, components for battery chargers, components for aircraft-grade aluminium flashlights (batteries, headmounts, bicycle mounts, Micro USB and Magnet USB charging cables, buttons and connectors).

LED, Lens, Bezel, Beam, and Reflector
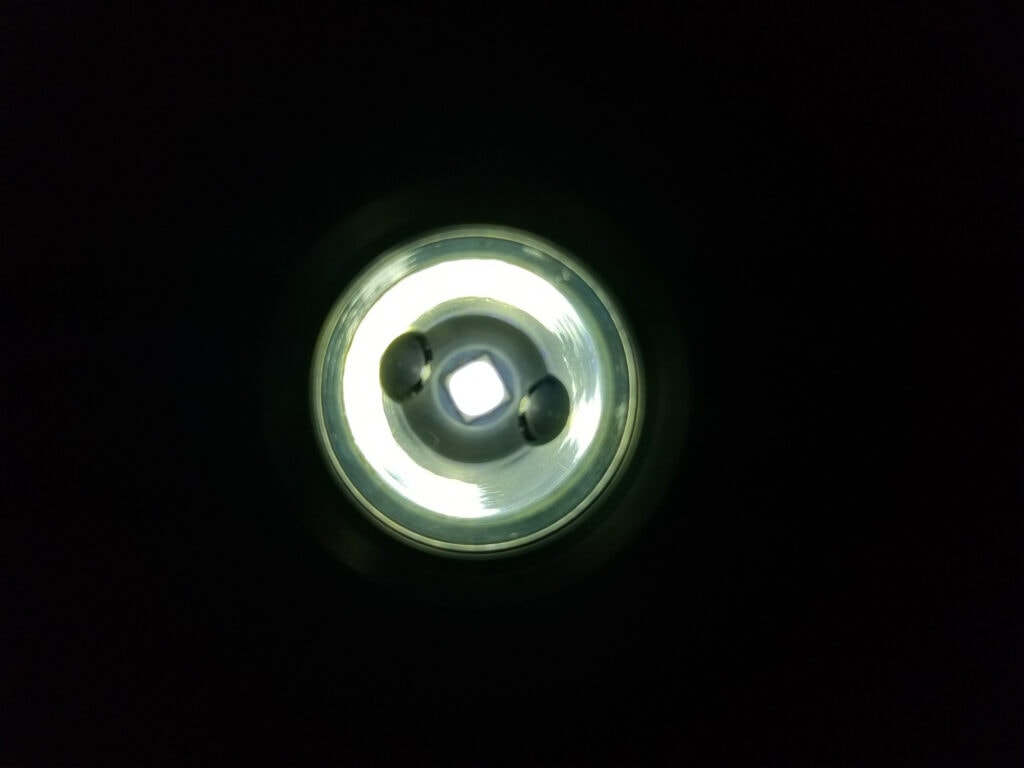
Armytek doesn’t give up the C1 Pro’s LED, but I took a peek down the TIR and saw something like an Osram P9 or maybe a Samsung LH351D. Hard to say, but I’m leaning towards the Samsung LED since it’s a CSP type LED (no visible bond wires).
The light comes in either a cool white or a warm white version. The test light came in the cool white version, which has 7% more output than the warm white version at the expense of a cooler tint (and the greens at low output…more on that later). As mentioned, the light has a TIR optic and it’s a unique one with a hollow center like Olight uses on some of their lights. It’s topped with an AR coated mineral glass lens, which is nice to see and adds extra protection since the bezel is shallow with thin edges and minimal protection for the lens. It is a shiny stainless or aluminum finish and looks great.
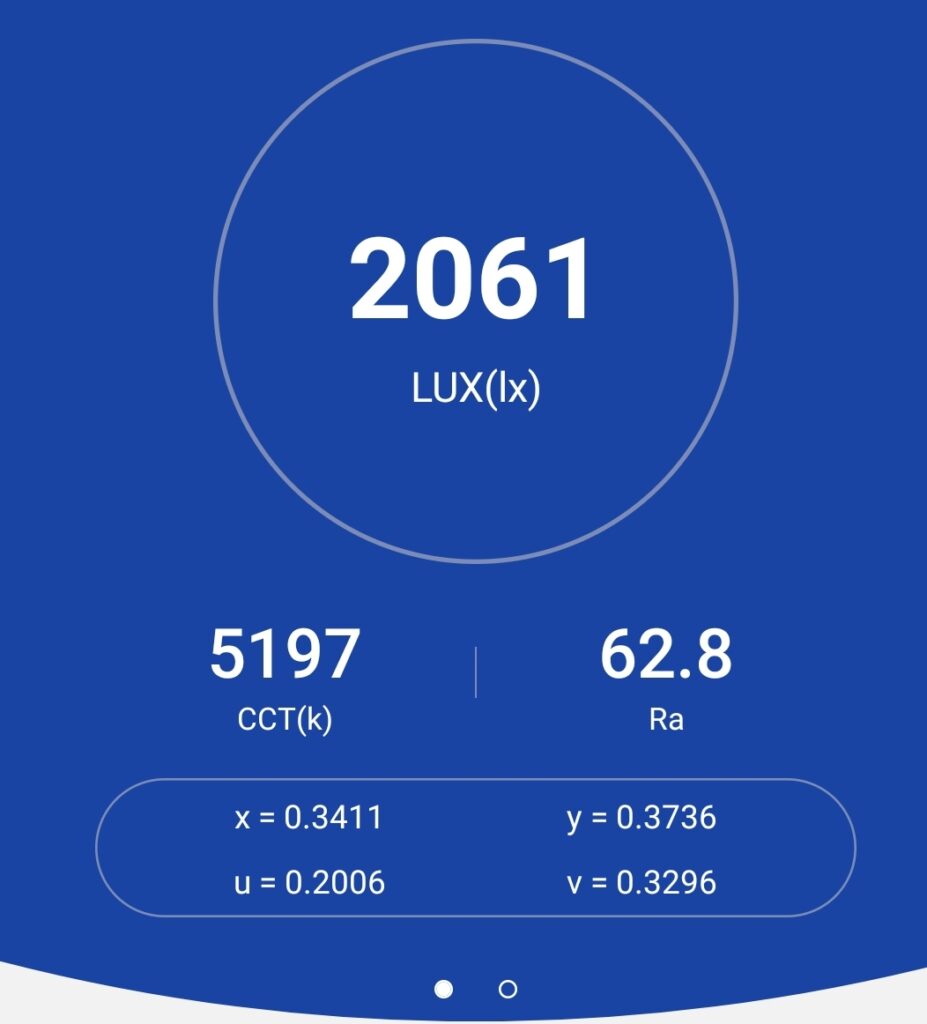
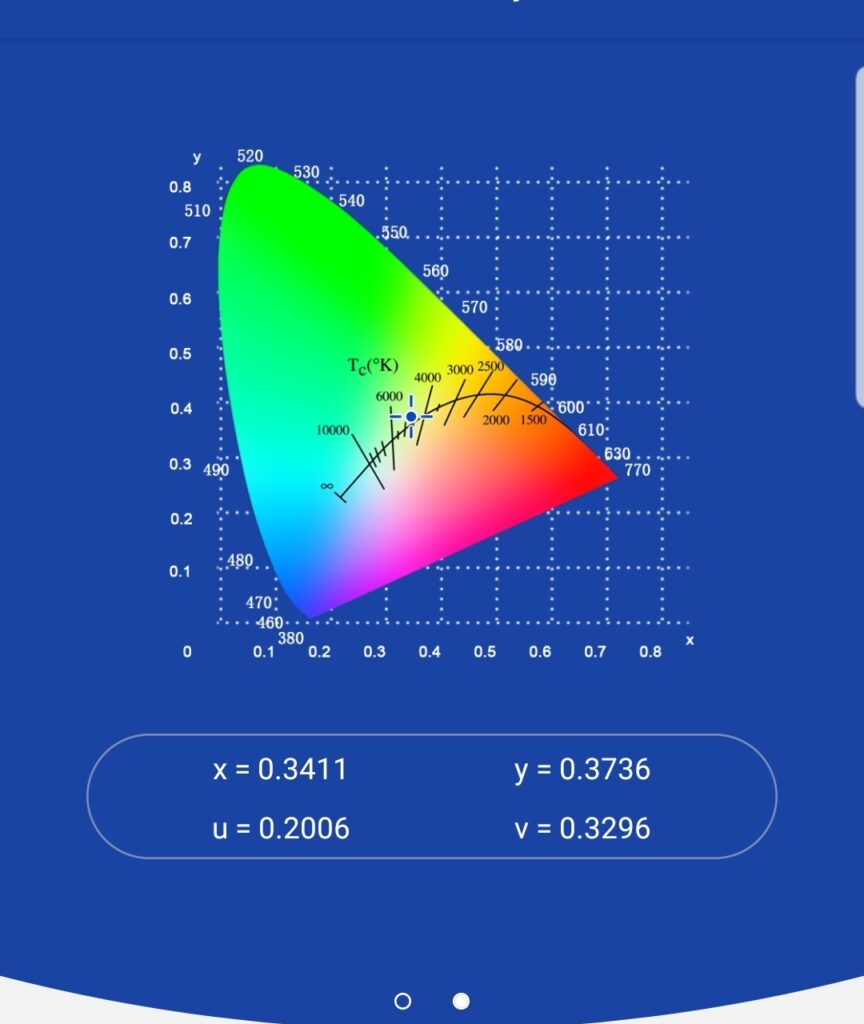
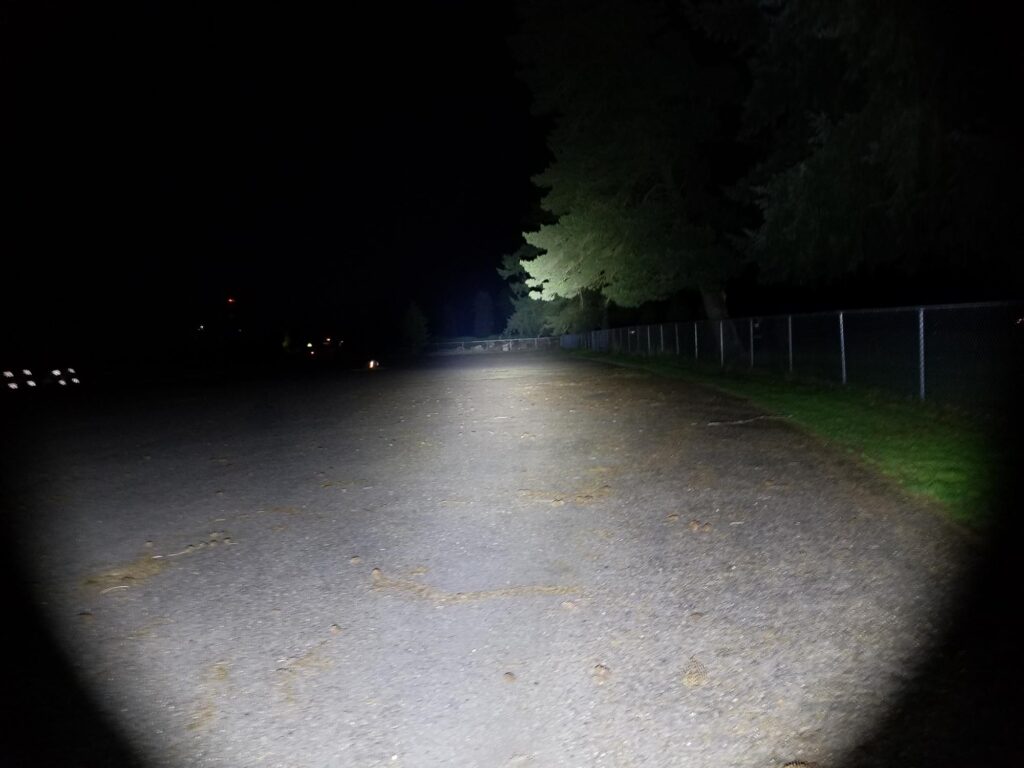
The beam is good and about what I expect from a light like this. There’s a good amount of soft spill with a big diffuse hotspot. It’s pretty balanced with an emphasis on flood rather than throw. Unfortunately, the tint is very green, and even on Turbo 2, the duv is very positive at 0.0122. I’m in no way shape or form a tint snob, but like the Nitecore MH40S I tested and the umpteen China-special LEDs, it’s enough to detract from the pleasantness of the beam. In an EDC light, that matters.
Spectral measurements:
I used the Opple Lightmaster Pro to measure the flashlight at 1 meter from the sensor.
| Mode: | CCT: | CRI Ra: | duv |
|---|---|---|---|
| Turbo 2 | 5197K | 62.8 | 0.0122 |

Dimensions and its competition
Dimensions:
| Armytek Prime C1 Pro | Millimeters | Inches |
|---|---|---|
| Length | 67 mm | 2.6 in |
| Head diameter | 24.5 mm | 0.97 in |
| Body diameter | 24.5 mm | 0.97 in |
Dimensions are rounded to the nearest millimeter, and to the nearest tenth of an Inch.
Weight:
| Armytek Prime C1 Pro | Weight in grams | Weight in oz |
|---|---|---|
| Without battery: | 47 g | 1.7 oz |
| With battery | 69 g | 2.4 oz |
Weight is rounded to the nearest gram, and to the nearest tenth of an Oz.
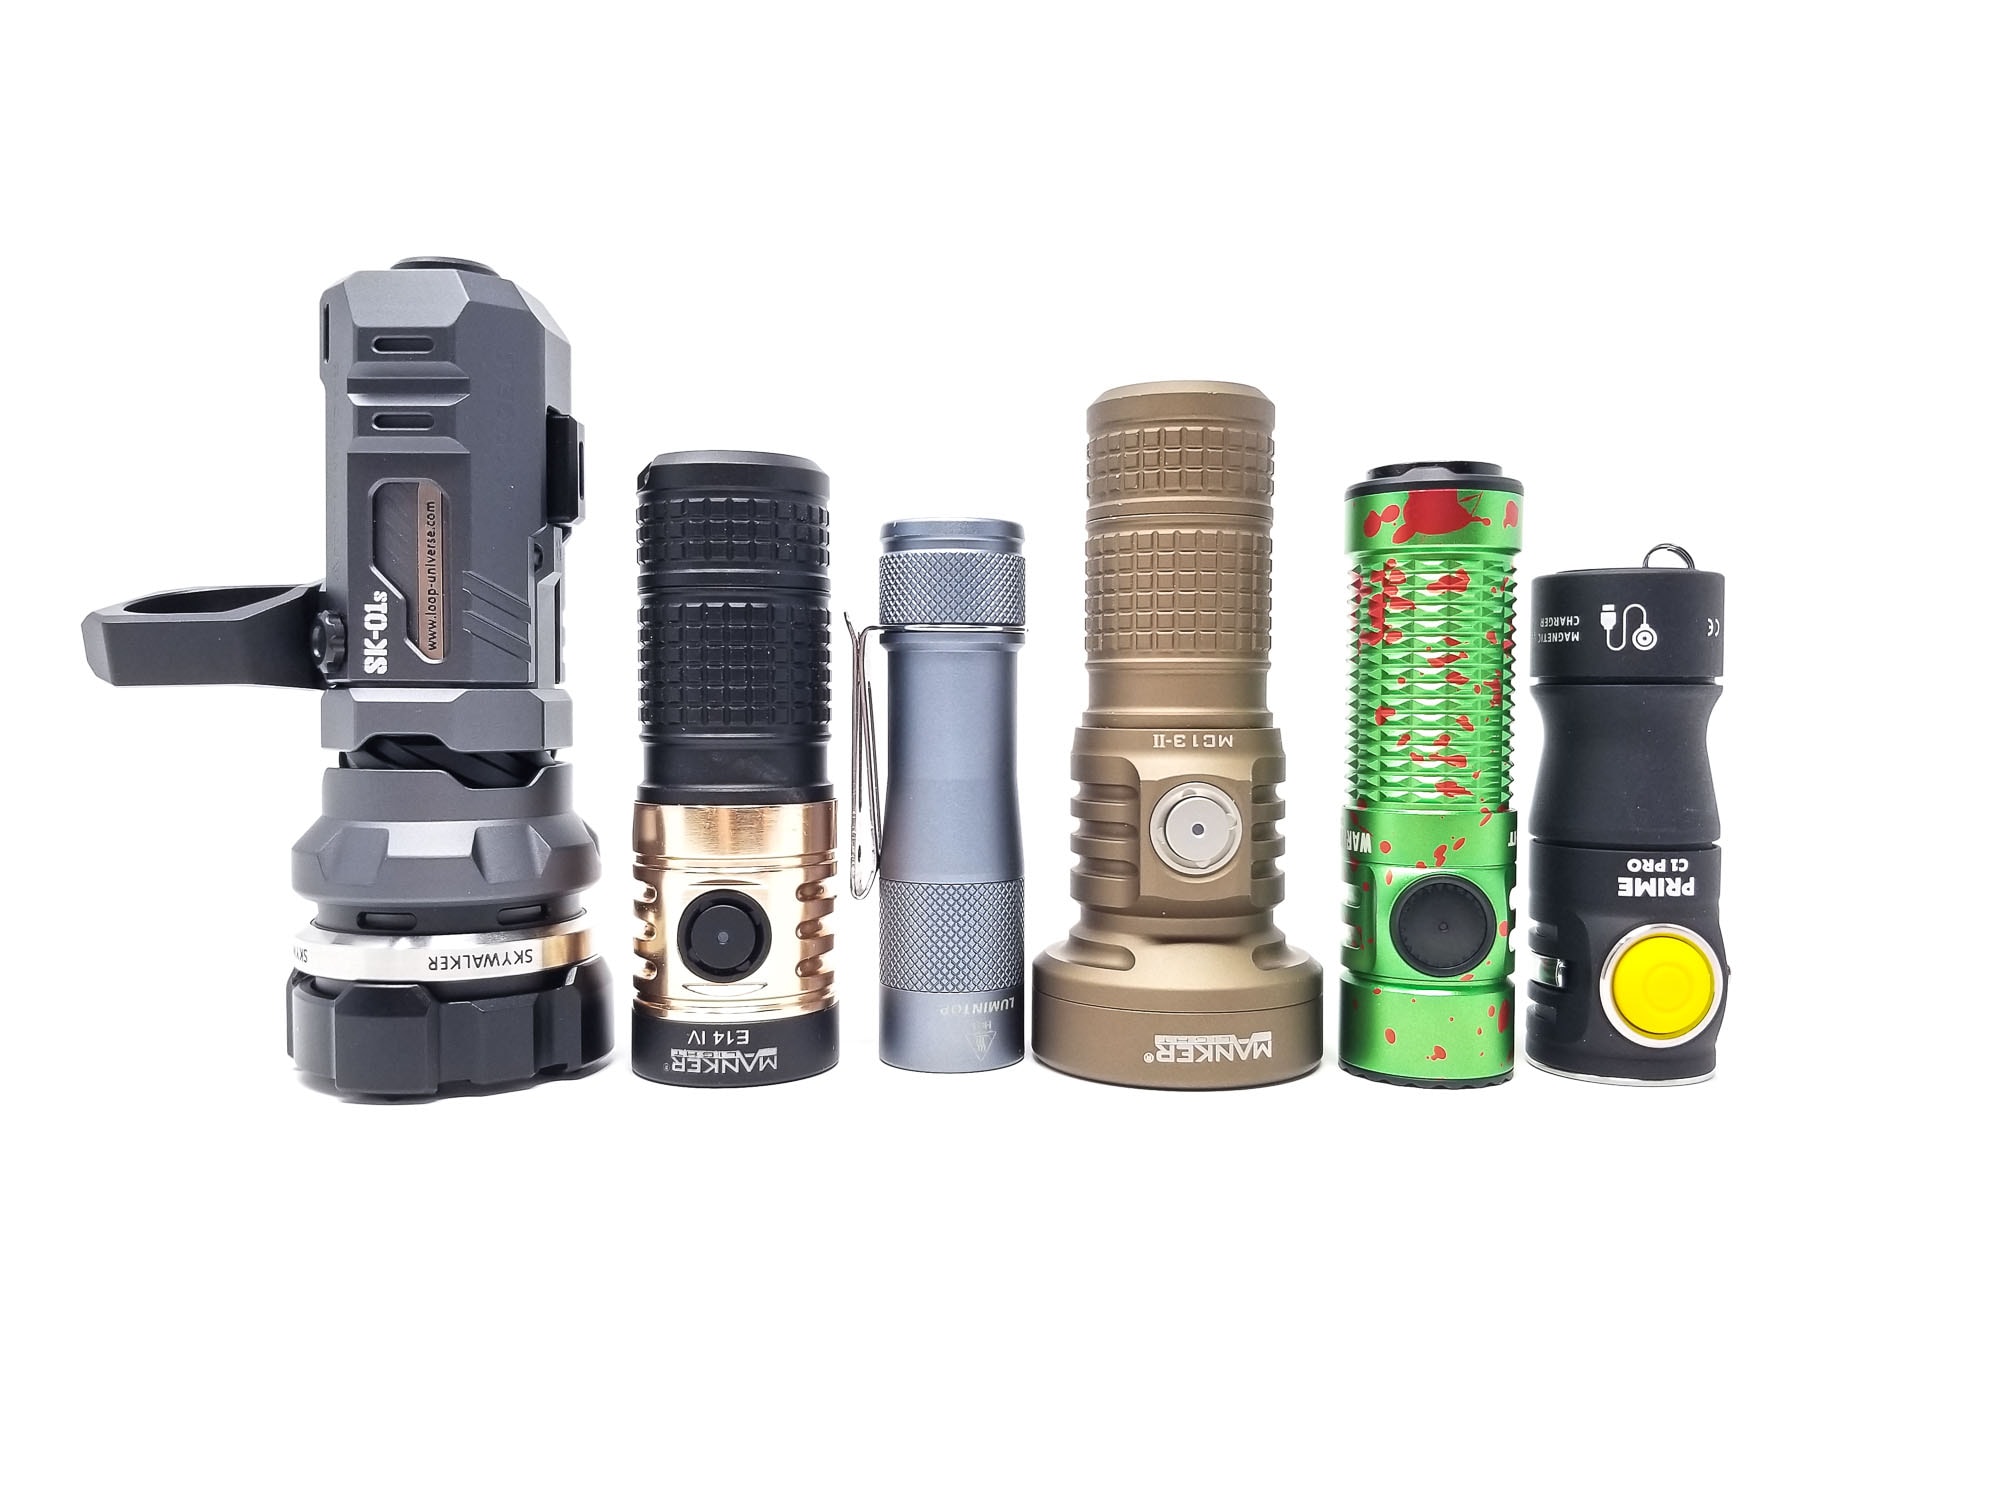
Flashlight size comparison with its competition:
Group 1 left to right: Loop SK01S LED, Manker E14 IV, Lumintop FWAA, Manker MC13 II, Olight Warrior Nano Limited Edition, Armytek Prime C1 Pro
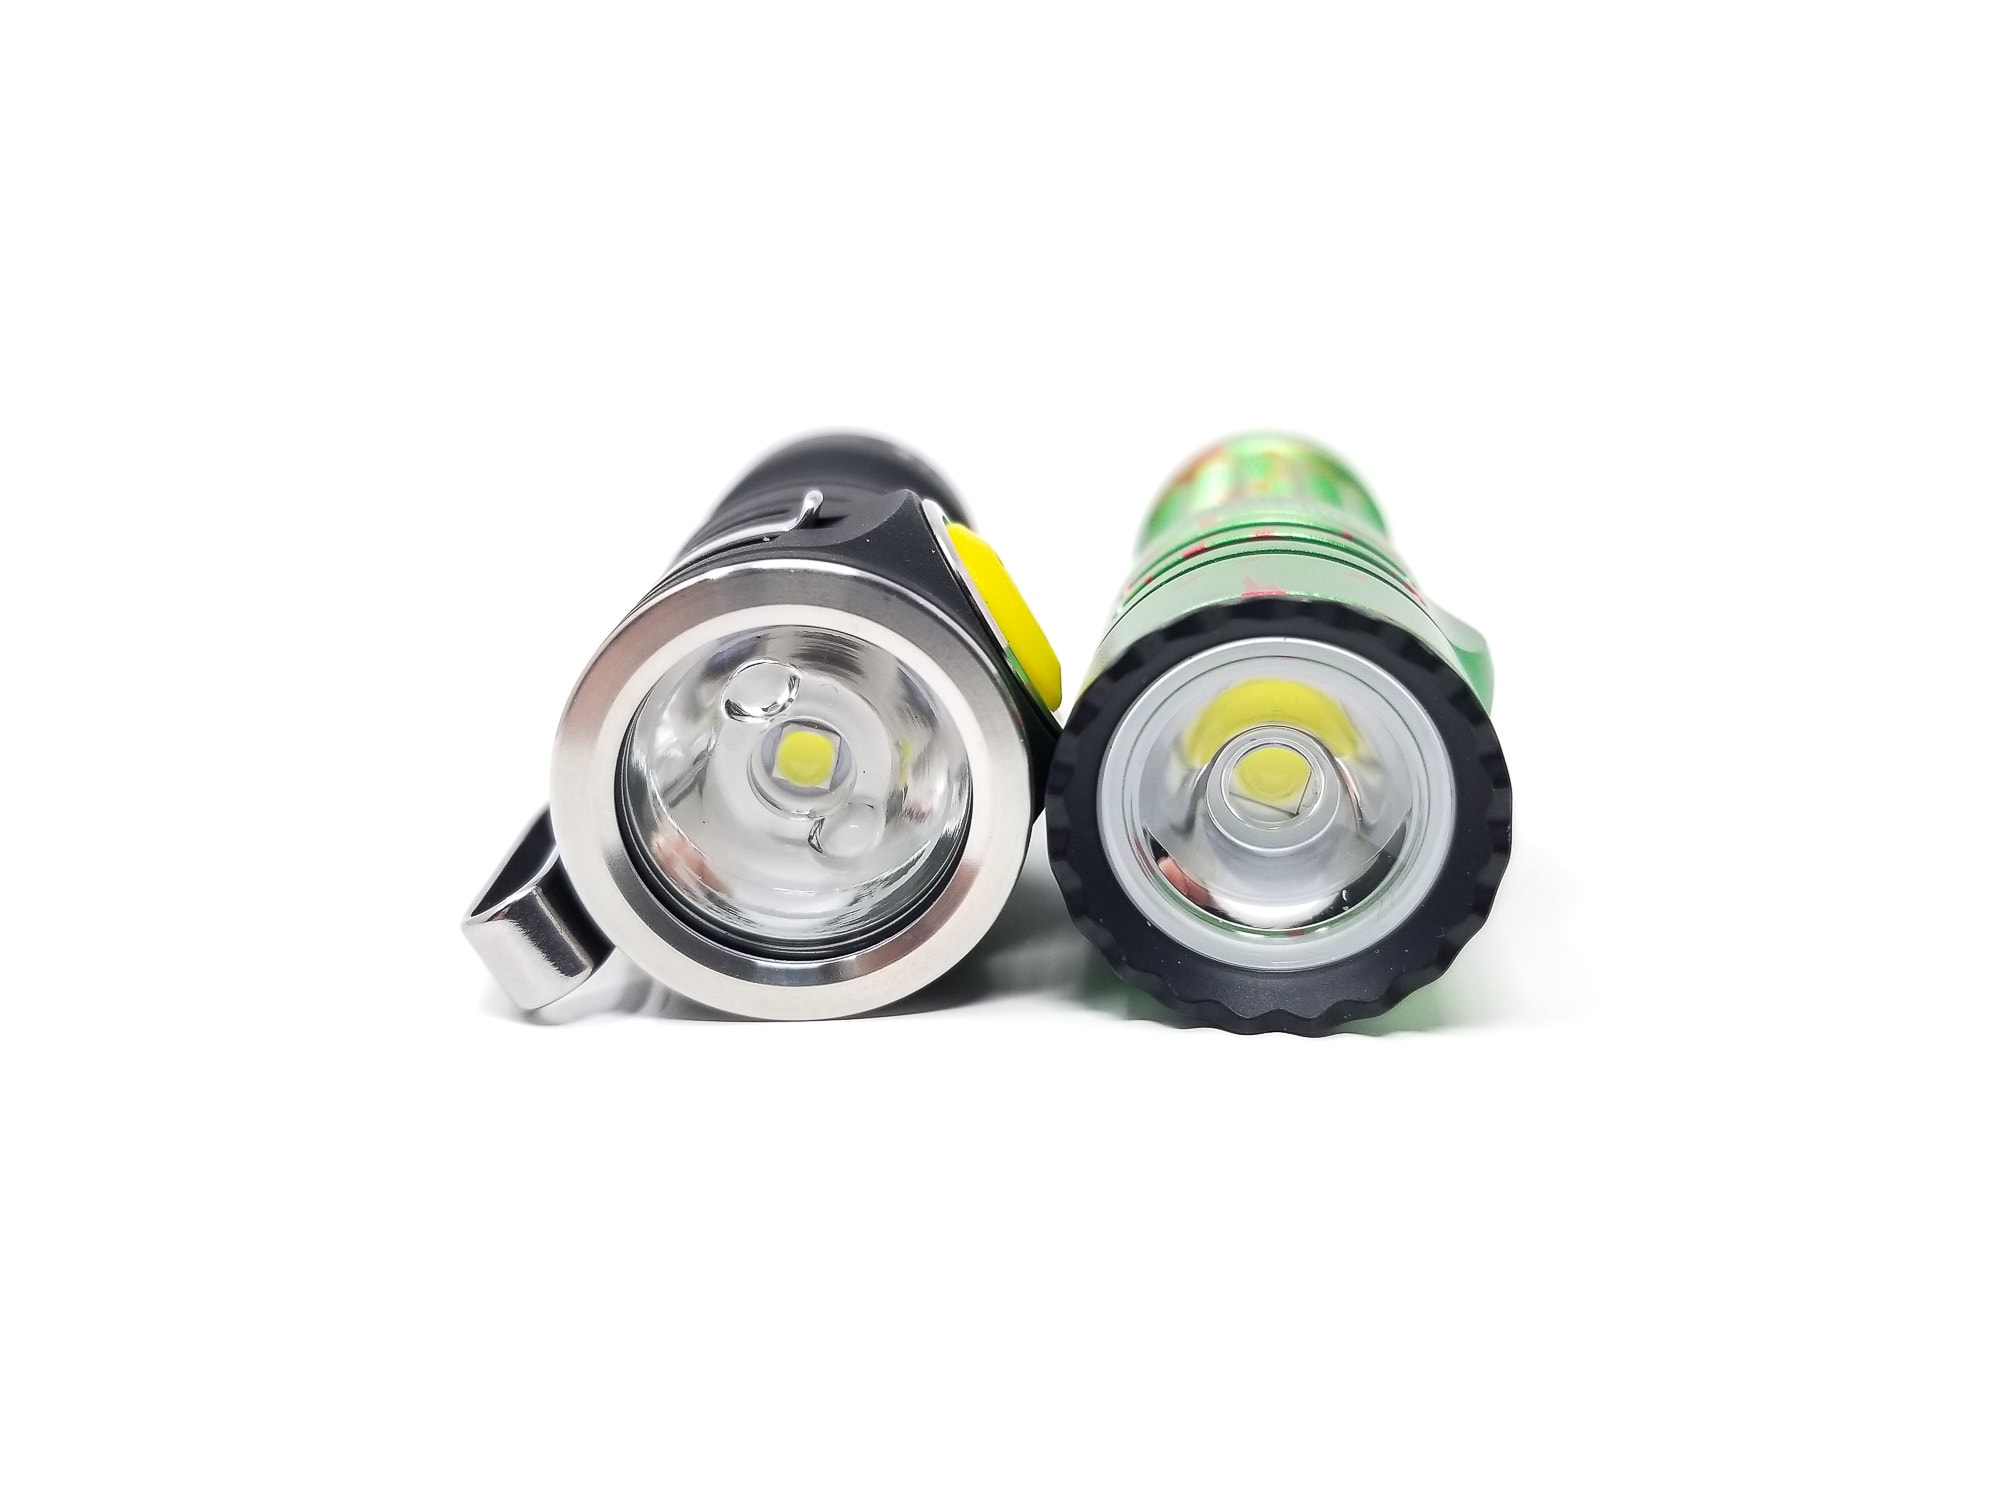
Group 2 left to right: Armytek Prime C1 Pro, Olight Warrior Nano Limited Edition
Armytek Prime C1 Pro UI: User Interface and Driver
The driver is going to be a buck driver for fully regulated output, which is great for constant brightness as the battery discharges. The UI is nearly identical to the Prime C2 Pro Max, and it’s a bit complicated, and a little unconventional, but nonetheless straightforward. It’s broken down into two groups: General and Advanced. General has 6 fairly standard modes, and Advanced opens up 5 additional modes for a total of 11 including an additional Firefly level, Turbo level and 3 Strobe modes. In General Mode, it’s all very simple.
In Advanced mode, it gets a bit quirky, and took me some figuring out to get it down since it’s really broken down into 4 mode groups accessed with a long press (to start in Firefly), two (for Main), three (for the two Turbos), or four clicks (for the three Strobe modes).
Available modes in General Mode:
- Firefly 1, Firefly 2, Main 1, Main 2, Main 3, Turbo 2
Available mode groups in Advanced Mode:
- Group 1: Firefly 1, Firefly 2, Firefly 3
- Group 2: Main 1, Main 2, Main 3
- Group 3: Turbo 1, Turbo 2
- Group 4: Strobe 1, Strobe 2, Strobe 3
Available blinky modes:
- Strobe 1 (full-brightness strobe), Strobe 2 (full brightness beacon), Strobe 3 (low brightness beacon)
From OFF in General Mode:
- Single click: Turns on in last memorized mode
- Press and hold: Turns on in Firefly 1. Continuing to press and hold cycles through Firefly 1-Firefly 2. Keeping the switch pressed will start on Main 1 and cycle to Main 2-Main 3
- Double click: Turbo 2
From ON in General Mode:
- Single click: Turns off
- Press and hold: Cycles through Main 1-Main 2-Main 3
- Double click: Turbo 2. Double click again to exit to last used mode
From OFF in Advanced Mode:
- Single click: Turns on in last memorized mode in the selected mode selection (Firefly, Main, Turbo, or Strobe)
- Press and hold: Turns on in Firefly 1. Keeping the switch pressed will continue to Firefly 2-Firefly 3-Main 1-Main 2-Main 3-Turbo 1. Releasing the switch will select the mode. Long-pressing again will cycle through the Main modes again: Main 1-Main 2-Main 3. If releasing on Tubo 1, long-pressing again cycles through Turbo 1-Turbo 2
- Double click: Turns on in the Main mode group (Main 1, Main 2, Main 3)
- 3 clicks: Turns on in the Turbo mode group (Turbo 1, Turbo 2)
- 4 clicks: Turns on in the Strobe mode group (Strobe 1, Strobe 2, Strobe 3)
From ON in Advanced Mode:
- Single click: Turns off
- Press and hold (depends on the currently selected mode group): Cycles through the modes in the selected mode group
- Double click: Turns on in the Main mode group. Long-pressing cycles through Main 1, Main 2, Main 3)
- 3 clicks: Turns on in the Turbo mode group. Long-pressing will cycle through Turbo 1, Turbo 2
- 4 clicks: Turns on in the Strobe mode group (Strobe 1, Strobe 2, Strobe 3)
Mode memory:
- Yes. Remembers all modes including Firefly, Turbo, and even Strobe
Shortcuts:
- To Firefly: Long press from off in any mode
- Double click: Turbo 1 in General Mode
- 4 Clicks: Strobe 1 in Advanced Mode
Low voltage warning/protection:
- None specified in the manual, but during testing the light drops to a very low output when the cell reaches about 3 volts
Strobe/blinkies
- Strobe 1, Strobe 2, Strobe 3
Lock-out mode:
- Mechanical lockout by unscrewing the tailcap ¼ turn
PWM
- None visible by eye
Additional/summary info on the UI:
- It took a lot of getting used to this UI, like with the Prime C2, but once I got familiar with it, it wasn’t so bad. You can easily set it to whichever mode you want and be done with it. I think a better user manual with a function diagram would be extremely helpful, since as-is, the manual is, well, lacking. There’s a lot of functionality here. You get mode memory for all of the Firefly, Turbo and Strobe modes, General mode and an Advanced mode with many mode sets. The same irking details from the C2 are carried forward here though, like two Turbo settings, a dim beacon flasher (Strobe 3), all of which I think is excessive, but that’s neither here nor there. All of the usual features are here like thermal regulation to 58 C and (I hope) LVP, but none was mentioned anywhere.
Armytek Prime C1 Pro Charging and batteries
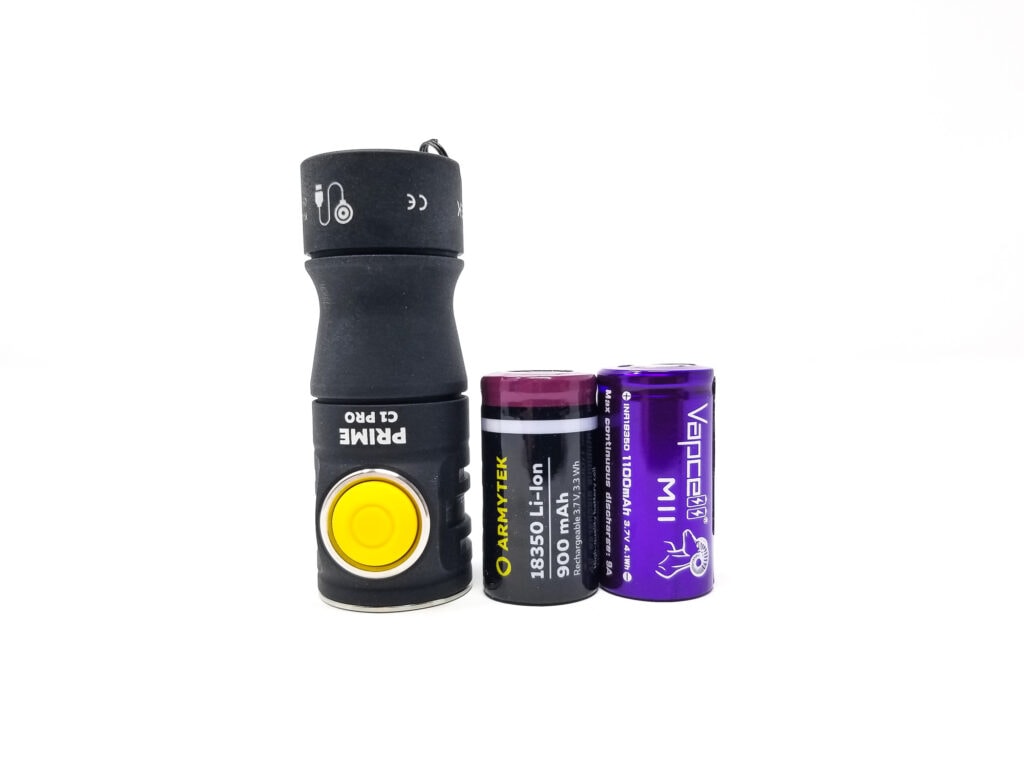
The Prime C1 Pro is an 18350 size light, and came with an Armytek-branded 900 mAh high current flat top 18350 cell. Unlike other mainstream brands this battery doesn’t have a protection board. The good news is you can use any 18350 you want here: Flat tops with PCBs, button tops, built-in charging are no problem. There’s no charge ports, but like the Prime C2, the C1 has the same Armytek-specific magnetic charging solution.
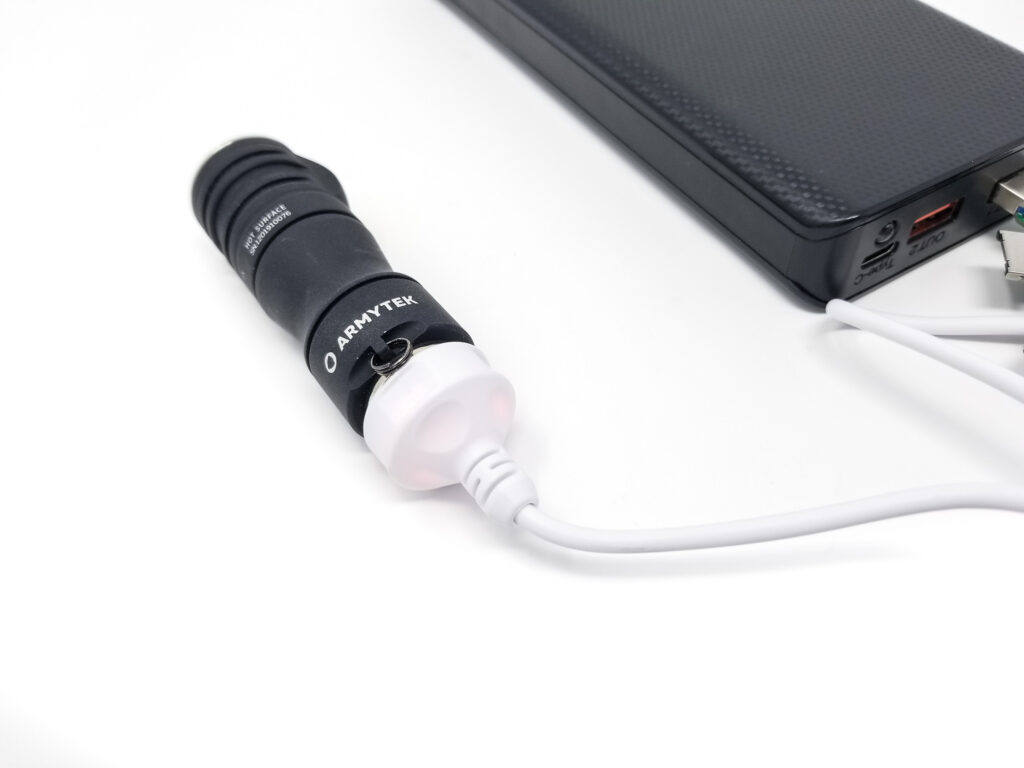
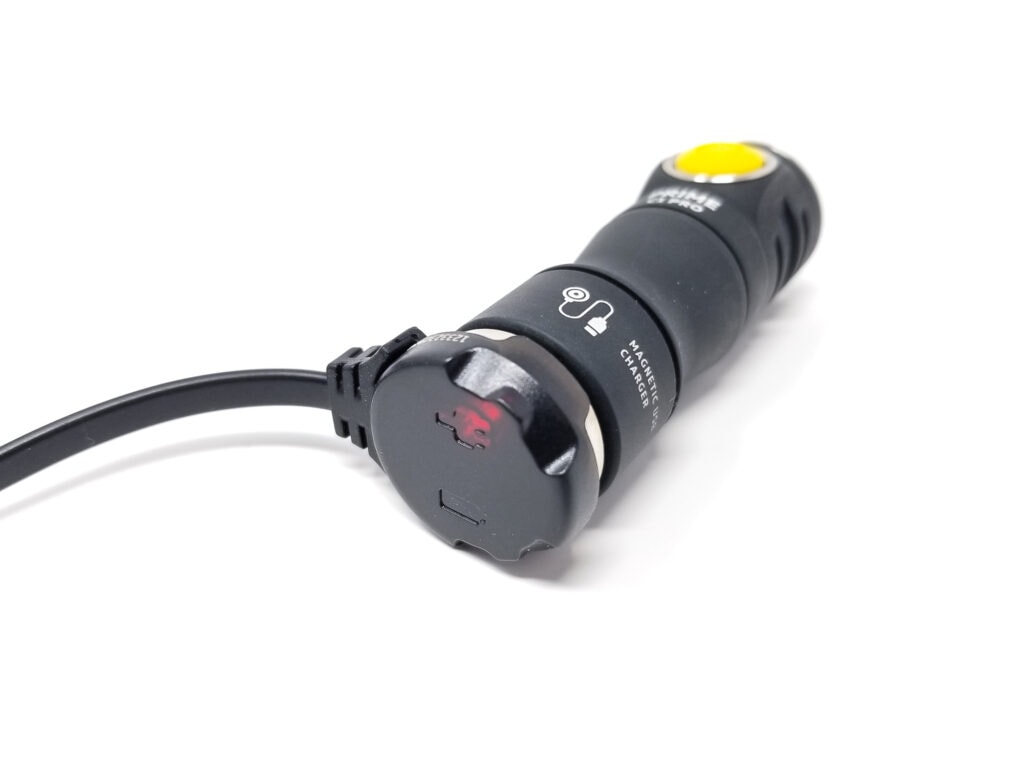
The kit included Armytek’s proprietary charging cable consisting of a USB A plug on one end and the magnetic contact/charging head on the other end of a roughly 12 inch lead. It’s a bit of a different design than the Prime C2’s cable. Besides being very white, it’s missing the external LED indicators, and this one’s a bit more geometric. The head has a flat metal bottom with a central pogo contact that magnetically attaches to an outer ring and a central contact on the tailcap.
No charging current is specified, but Armytek says the battery should be charged in 2 hours 30 minutes. To charge, you need to unscrew the tailcap ¼ turn. If you connect the charger without doing that, it won’t charge. The head for the Prime C1 Pro is a bit different than the C2 Pro Max, but it works the same way with charge status/battery state, as follows:
- Charger not connected
- Solid green light (standby)
- Charger connected
- Blinking green light indicates battery voltage check
- Blinking red: Battery needs charging, but the tailcap hasn’t been loosened ¼ turn
- Blinking orange: Fault (dirty threads, bad connection, power supply issue)
- Solid red: Normal charging
- Solid orange: Reduced charge current
- Solid green indicates charge completion
Armytek didn’t list charge output specifics, but my testing showed a max charge current of around 600 mA, which is totally appropriate for the 900 mAh battery. Total charge time from a runtime was 3 hours 29 minutes, but I had issues with the charging cutting in and out, so it added time. The total capacity added was 1045 mAh. The charging cable from the Prime C2 Pro Max worked on the C1 and charged at 990 mA.
| Charge type | Fits | No fit | Charge time |
|---|---|---|---|
| Proprietary magnetic | Standard flat top, protected, unprotected, button top, built-in charging | None that I had on hand! | 3h 29m |

Performance test
Lumen measurements
How Lumens are Measured: Understanding ANSI FL1 Standards How Lumens are Measured: Understanding ANSI FL1 Standards: The ANSI FL1 standards specify that output in lumens should be measured 30 seconds after turning on, as this is the standardized time for measuring brightness according to the industry standard. This is why we focus on this part in our measurements. The ANSI FL1 standards require an ambient temperature of 22 ± 3°C. We record the ambient the ambient temperature to identify potential reasons for any observed discrepancies.Lumens are measured in my 30 cm integrating sphere with a Digi-Sense 20250-00 data logging luxmeter. The sphere has been calibrated with a Convoy S2+ measured to 260 Lumens and the figures are within 10% of actual. I measured current using my Thsinde B18B+ digital multimeter with 14 gauge wires plugged into the meter and higher currents with my FY219 clamp meter using a 10 gauge wire in a loop. Measurements were taken using the included fully charged 900 mAh 18350.
| Mode | Amps at start | Specs | @turn on | @30 sec | @10 min |
|---|---|---|---|---|---|
| Firefly 1 | 2.75 mA | 0.15 | N/A | N/A | – |
| Firefly 2 | 6.74 mA | 2.5 | 0.9 lm | 0.9 lm | – |
| Firefly 3 | 17 mA | 8 | 7 lm | 7 lm | – |
| Main 1 | 62.8 mA | 40 | 49 lm | 49 lm | – |
| Main 2 | 165 mA | 100 | 117 lm | 117 lm | – |
| Main 3 | 418 mA | 210 | 239 lm | 239 lm | 237 lm |
| Turbo 1 | 550 mA | 350 | 369 lm | 369 lm | 360 lm |
| Turbo 2 | 2.5 A | 1000 | 1053 lm | 1053 lm | 351 lm |
Parasitic drain:
- 7 µA
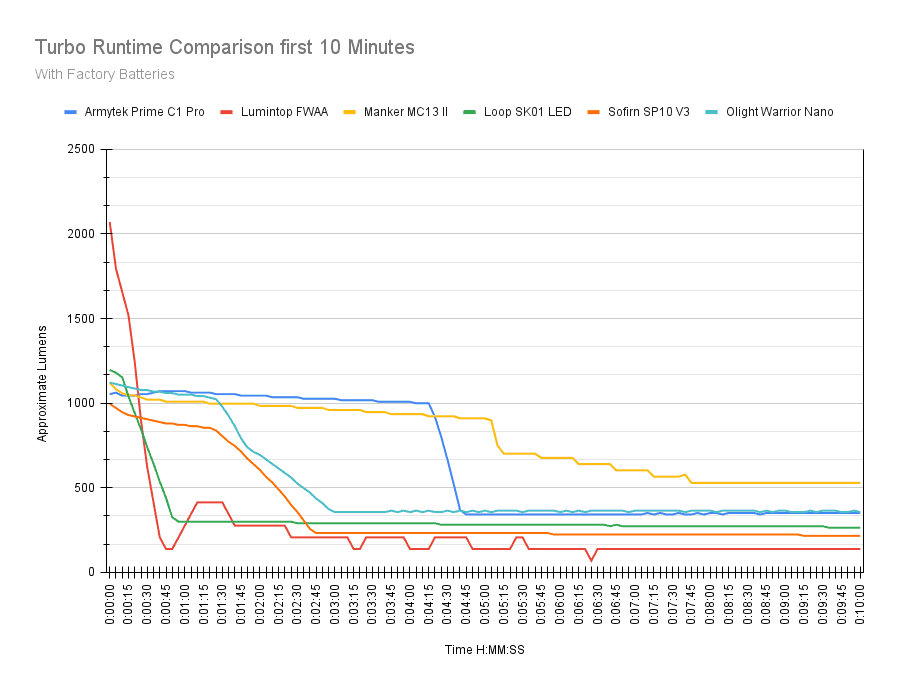
The parasitic drain is very low and I wouldn’t worry too much about keeping the light tucked away for a few months. The outputs look really good and track with Armytek’s figures. The step down on Turbo 2 for 10 minutes is pretty abrupt, about 60% of turn-on, but this is a small light with minimal heatsinking, so it’s expected.
Armytek Prime C1 Pro Battery Life: Runtime graphs
How Runtimes are Measured: Understanding ANSI FL1 Standards About ANSI FL1 runtime standards: The runtime is measured until the light drops to 10% of its initial output (30 seconds after turning on). This does not mean that the flashlight is not usable anymore. The last column shows how long the light actually works till it shuts off. If there is a + symbol, it means that the test was stopped at that particular point, but the light was actually still running. This happens on certain occasions, with certain drivers, firmware, or batteries.Lumens are measured in my 30 cm integrating sphere with a Digi-Sense 20250-00 data logging luxmeter. The sphere has been calibrated with a Convoy S2+ measured to 260 Lumens and the figures are within 10% of actual. I use a Digi-Sense 20250-92 data logging thermocouple for the temperature measurements. The probe is affixed to the head using kapton tape and uses the same 5 second sampling rate for logging. I used the included, fully charged 900 mAh 18350 and tested Main 3, Turbo 1 and Turbo 2.
| Mode | Specified runtime | Measured runtime ANSI | Time till shut off |
|---|---|---|---|
| Main 3 | 6h 25m | 2h 34m | 2h 34m |
| Turbo 1 | 3h | 1h 30m | 1h 38m |
| Turbo 2 | 3h 4m | 1h 19m | 1h 21m |
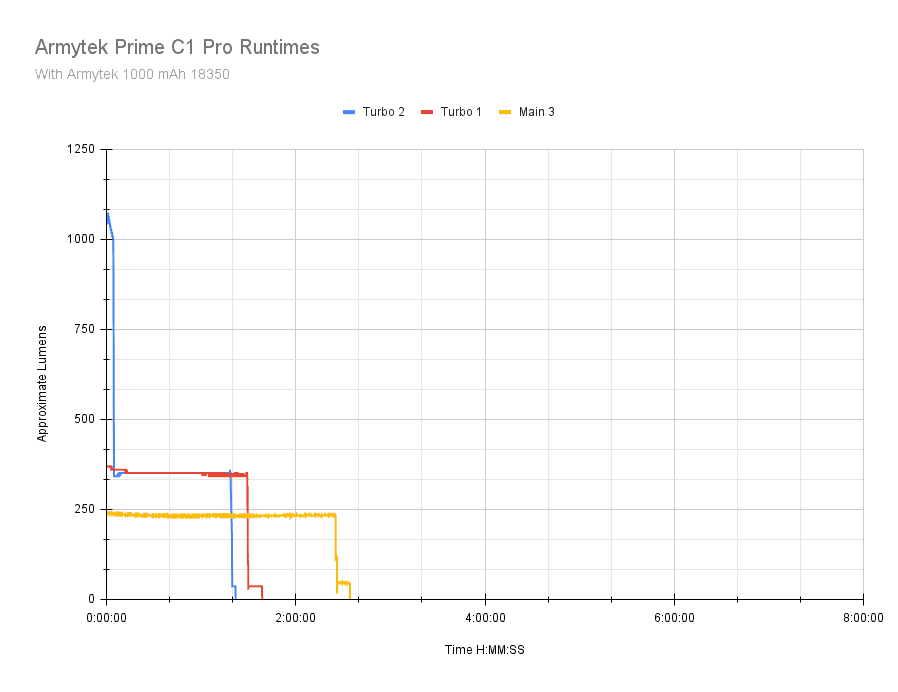
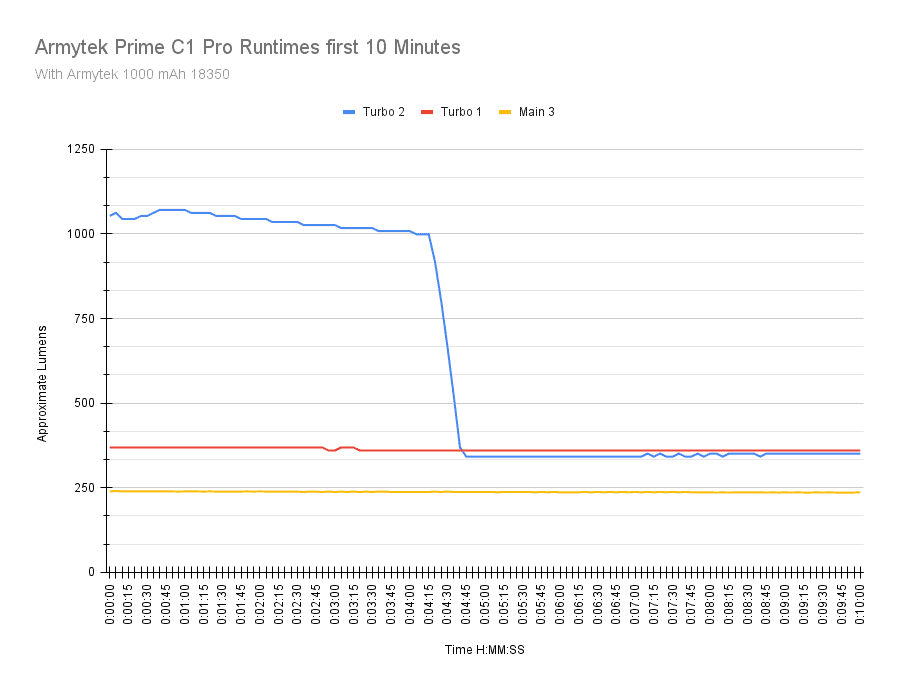
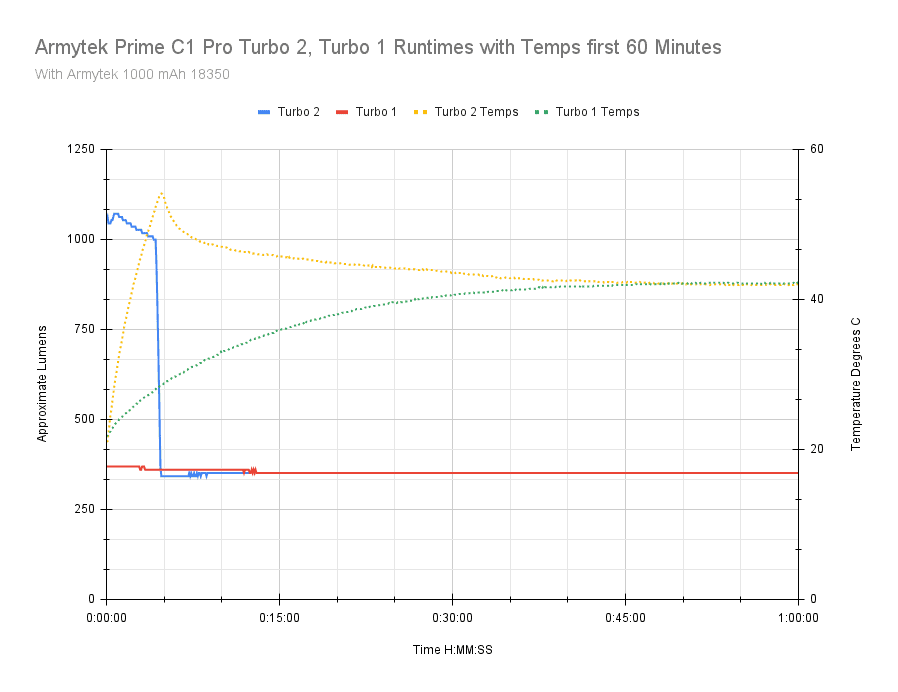
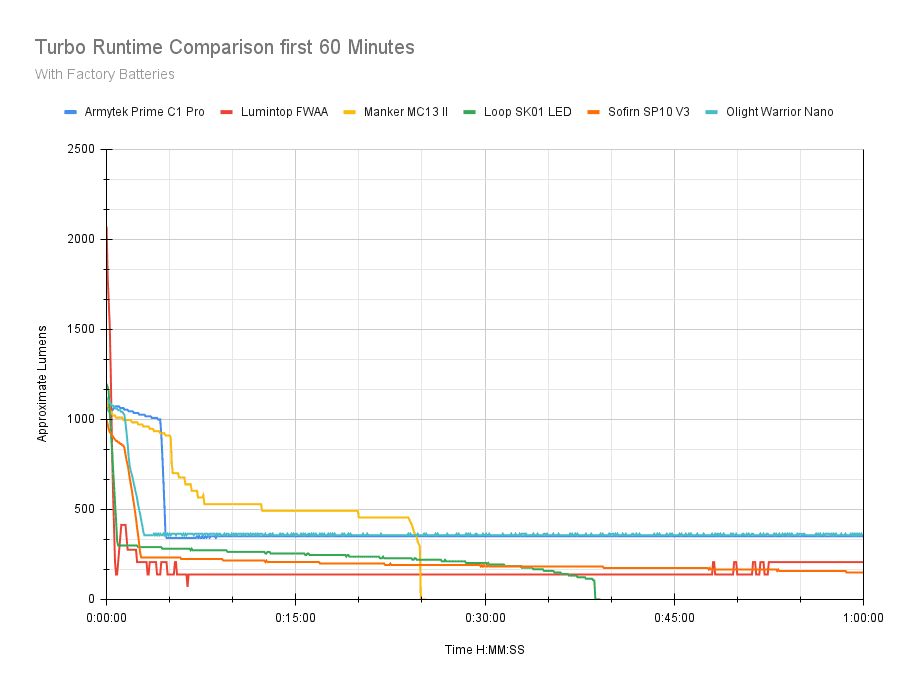
The runtimes look great! Armytek outfitted the Prime C1 Pro with a buck driver, so the output is fully regulated and doesn’t track with the battery’s discharge curve and remains laminar and consistent. Even for a 900 mAh battery, the runtimes are good. The light performs well thermally also, never getting too hot to handle, even during the Turbo 1 and Turbo 2 tests, and the thermal regulation is nonintrusive.
There is a timed step down for Turbo 2 at about the 4 minute, 30 second mark, when the head hits a bit over 50 C, and the output remains consistent until LVP pulls the plug. I didn’t notice any visual LVP indicators, and it was hard to tell if the switch LED gave notice like the Prime C2’s did.
After each test, the light was usable at low output, but will eventually shut off completely. The battery was discharged to around 2.8 volts after the tests. The sustained output is more than enough for most all EDC tasks, and having over 4 minutes of near 1000 Lumens is fantastic for a subcompact flashlight. Way to go Armytek!

And here is a comparison with other flashlights in this category:
- Armytek Prime C1 Pro
- Lumintop FWAA
- Manker MC13 II
- Loop SK01 LED
- Sofirn SP10 v3
- Olight Warrior Nano
Peak beam intensity and beam distance measurements
About Peak beam intensity: Understanding ANSI FL1 Standards About peak beam intensity The calculated value of distance in meters at which the flashlight produces a light intensity of 0.25 lux. (0.25 lux is about the brightness of a full moon shining on an object). This means that the intensity has decreased so much, it becomes difficult to see darker objects, or objects that don’t reflect light. The columns ‘Meters’ and ‘Yards’ use rounded numbers.Beam distances are measured using a Uni-T UT383S luxmeter measured indoors at 5 meters using the included fully charged 900mA 18350. Measurements taken at 30 seconds.
| Mode | Specs | Candela measured | Meters | Yards |
|---|---|---|---|---|
| Firefly 1 | ? | N/A | N/A | N/A |
| Firefly 2 | ? | N/A | N/A | N/A |
| Firefly 3 | ? | N/A | N/A | N/A |
| Main 1 | ? | 150 cd | 24.4 | 26.6 |
| Main 2 | ? | 475 cd | 43.5 | 47.5 |
| Main 3 | ? | 1000 cd | 63.2 | 69.1 |
| Turbo 1 | ? | 1800 cd | 84.8 | 92.3 |
| Turbo 2 | 3250 cd | 5150 cd | 143.5 | 156.9 |
The firefly modes were too dim at 5 meters to register on the luxmeter. The surprise here was Turbo 2. 143 meters out of this tiny light is petty amazing. I beat the factory spec by a lot. This is more than enough reach for EDC and general purpose in a subcompact flashlight like this and only adds to the usefulness.
Beamshots
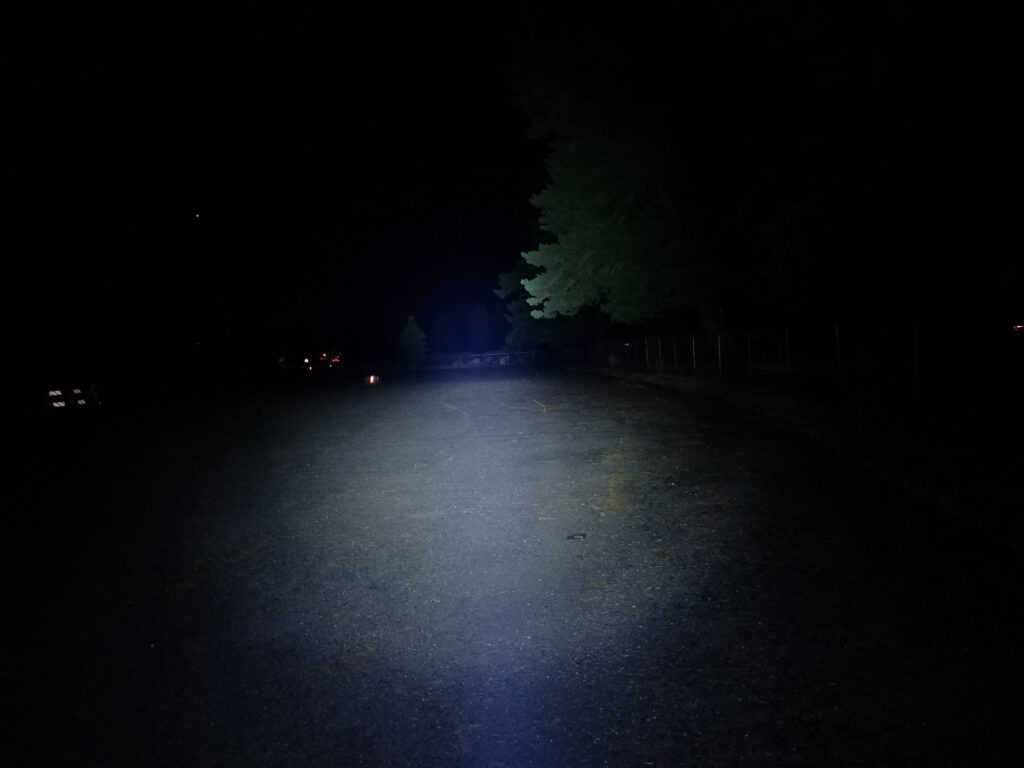
Camera settings and distance: Photos taken with my Samsung Galaxy Note 8 with the camera set to ISO 200, 0.3s, and 5000K WB. The fence is 40 meters distant.
Beamshots of the following general purpose-use LED flashlights compared:
- Armytek Prime C1 Pro
- Olight Warrior Nano
- Olight Odin Mini
- Manker MC13 II
- Look SK01S LED
Please note that beamshots are mainly intended to showcase the beam pattern and beam quality, rather than overall performance. These images are typically taken directly after activation, and do not fully represent its overall performance. For accurate performance metrics, such as output, beam distance, and runtimes, you need to look at the performance section of this review.



Disclaimer: This flashlight was sent to us for review at no cost by Armytek. We have not been paid to review, nor have we been holding back on problems or defects.
Final Verdict
Pros
- Very compact with good handling
- Excellent build quality, fit and finish
- Very good output
- Regulated output
- Non-proprietary battery
Cons
- UI is petty complex and the user manual doesn’t help much
- Tint is green
- Proprietary magnetic charging
Explanation on star ratings:
1: Avoid: a match would be a better choice – 2: Poor: significant defect or issues; almost unusable – 3: Average: some defects or issues; but still usable 4: Good: recommended (minor issues) – 5: Great: highly recommended

4 stars: ★★★★
While our star rating provides a reliable indicator, we encourage you to read the full review to make an informed decision based on your own needs and preferences.
Before I reviewed the Prime C2 Pro Max, Armytek was largely an unknown to me, but they make a pretty nice flashlight. The Prime C1 Pro carries what I like about the C2 forward as well: Great build quality, a functional design, good handling, and really impressive performance in a small package. The fact that I got nearly 1000 Lumens for over 4 minutes in a light the size of lipstick tube is pretty amazing.
The fact that you get pretty much 1000 Lumens for over 4 minutes in a lipstick-tube size light is pretty amazing, plus fully regulated output, makes the Prime C1 Pro a very versatile flashlight.
There’s not much I don’t like about this light, and it checks off a lot of boxes, but the glaring faults are well, glaring. The UI. Armytek carried the forgettable UI over from the Prime C2 Pro Max. I didn’t like it on that light and to no surprise…I don’t like it on the C1.There’s no need for two Turbo levels, and I’d venture to say 3 Firefly levels is excessive. The fact there’s two mode groups is also clunky and unnecessary, but I still give Armytek credit for being adventurous (German?) here. I probably wouldn’t be so annoyed about it IF the manual was more helpful, but I digress.
I wasn’t fond of the green LED tint, and while there’s nothing inherently wrong with magnetic charging, it’s proprietary and that creates other issues. Thankfully, the battery can be charged in any hobby charger and it’s fully swappable with standard, protected, button top, and even USB chargeable 18350s.
So, should you spend your hard-earned money on the C1 Pro Max Magnet USB, or solicit something from say, Thrunite (the T1S comes to mind), or Olight (the Warrior Nano)? You can’t go wrong with those, but there’s something about the Armytek that’s intriguing. If you can get past the wonky UI, proprietary onboard charging, and green tint LED (or just get the warm white version), then pick one up. It’s a solid subcompact EDC light. With some tweaking, this is a 5 star light, but as-is, 4 stars for the Prime C1 Pro Max Magnet USB (whew!).
Buy your Armytek Prime C1 Pro with a discount
Use our exclusive discount coupon at Armytek for 15% off. Coupon code: Lumen15
1lumen selects and reviews products personally. We may earn affiliate commissions through our links, which help support our testing.