1lumen selects and reviews products personally. We may earn affiliate commissions through our links, which help support our testing.
Emisar D2 review
Emisar D2 specs
| Brand & Model | Emisar D2 |
|---|---|
| Flashlight category | EDC flashlight / Right Angle/Headlamp |
| LED | Luminous SST-20 4000K and 2700K (as tested) |
| Max. output | Not rated |
| Max. beam distance | Not rated |
| Max. beam intensity | Not rated |
| Battery config. | 1*14500 |
| Onboard charging | N/A |
| Main modes | Anduril – Smooth and stepped ramping |
| Blinkies | Anduril – Too many to list |
| Waterproof | Not rated |
| Review publication date | November 2023 |
Review intro:
Hank Wang, owner and operator of the Emisar and Noctigon brands of highly customized enthusiast flashlights, has added the smallest light yet to his lineup, the D2. The idea of a 14500-sized Emisar (or Noctigon) was first floated in 2020, and there was much speculation. Most people expected a miniature version of the D4V2 or D1V2, but Hank builds what Hank wants to build, and so we were almost entirely taken by surprise when it was revealed that the 14500 light, named the D2, would not only be a right-angle light, but a dual-channel right angle light. So, does it live up to the hype? Let’s find out!
Package quality.
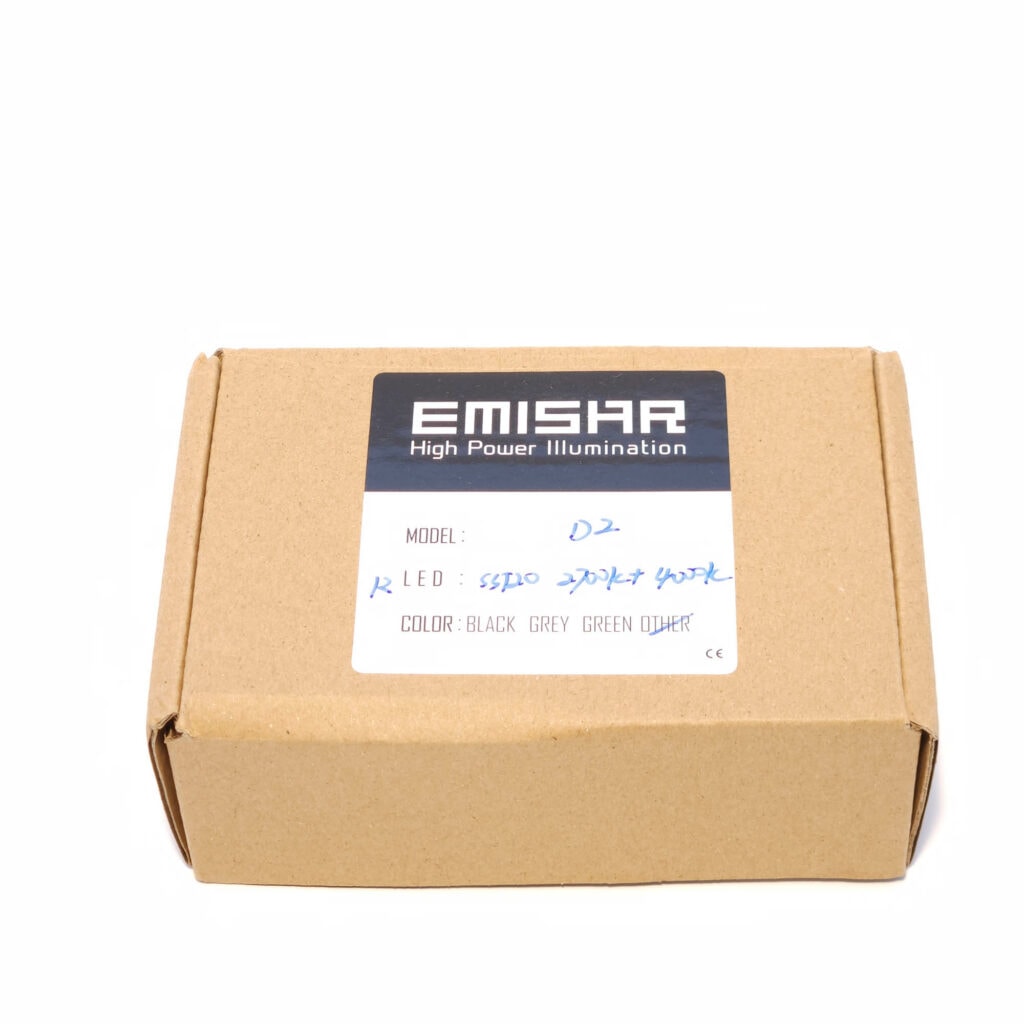
Hank doesn’t dwell on formality when it comes to packaging. The D2, like all Emisar lights, comes in a plain brown box with a sticker denoting the model, emitter(s), and body color, hand-written by Hank himself. This particular box is sized for the D2, which is cradled in a white foam insert, next to any accessories you order, all of which are listed on the product page. Emisar is definitely an enthusiast brand.
The contents of my box included:
- Emisar D2
- Plastic zip-top bag with spare o-rings
- Clip (optional)
Flashlight in use, Build Quality, and Warranty
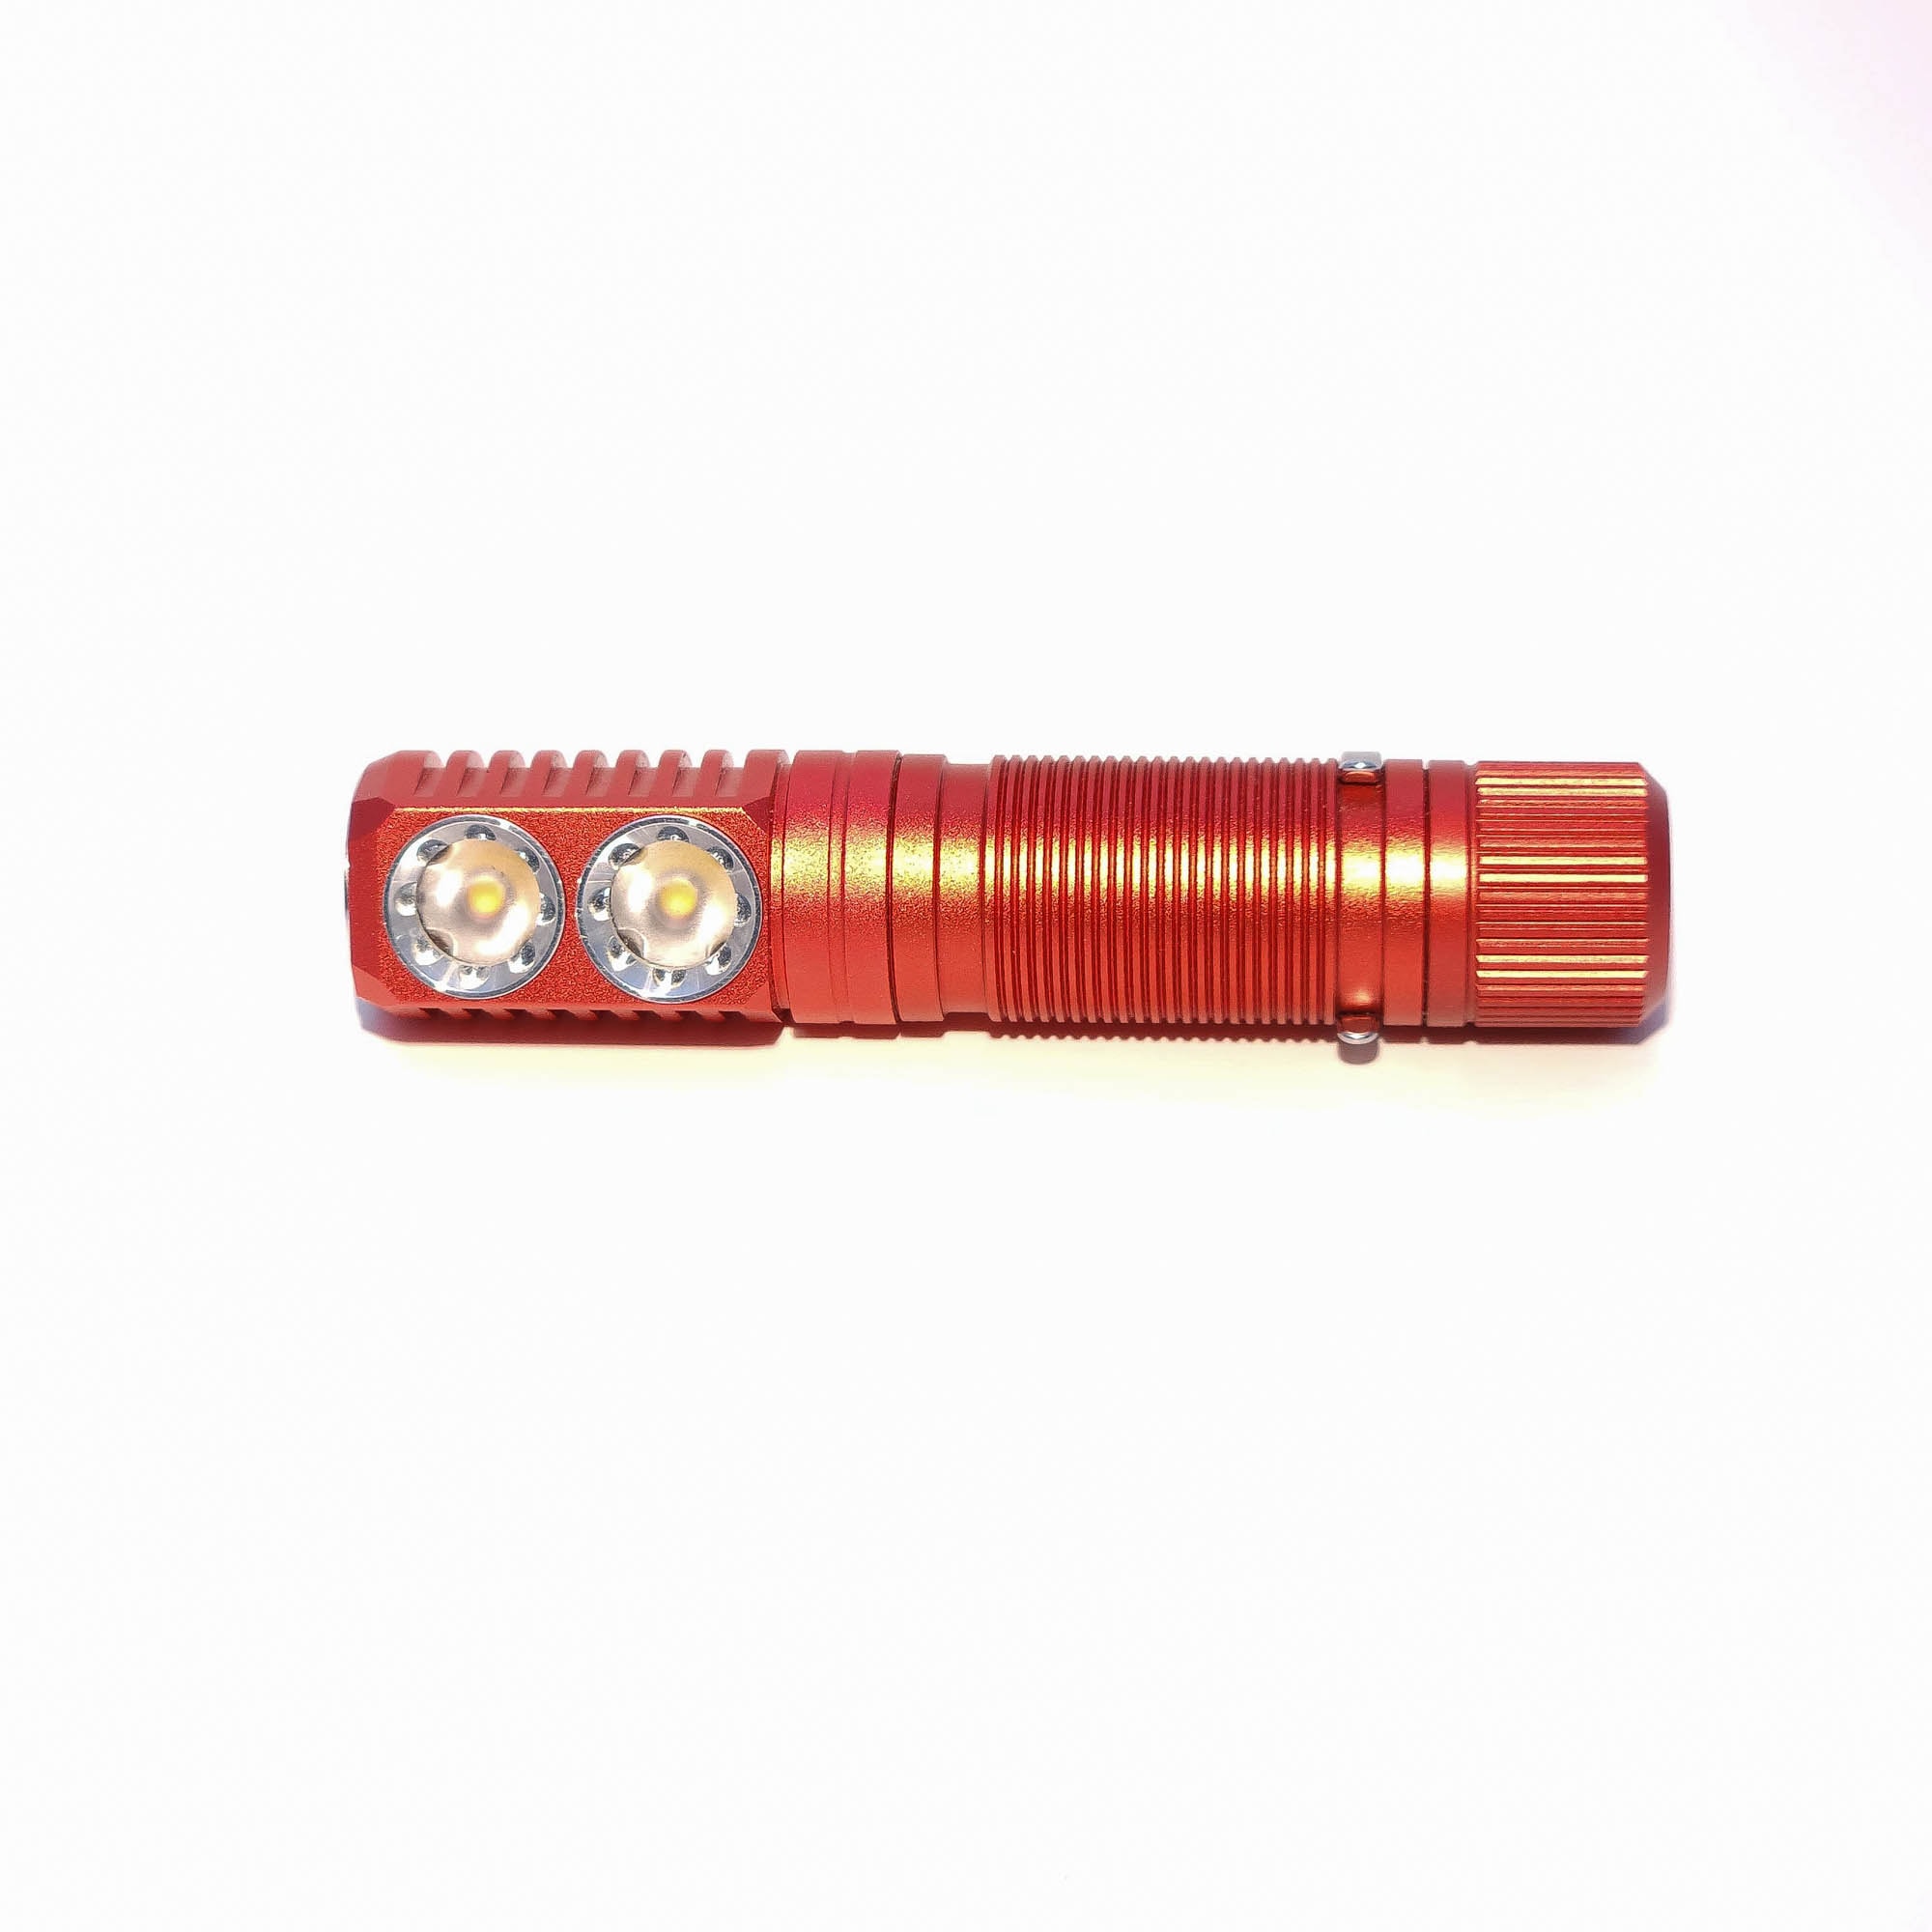
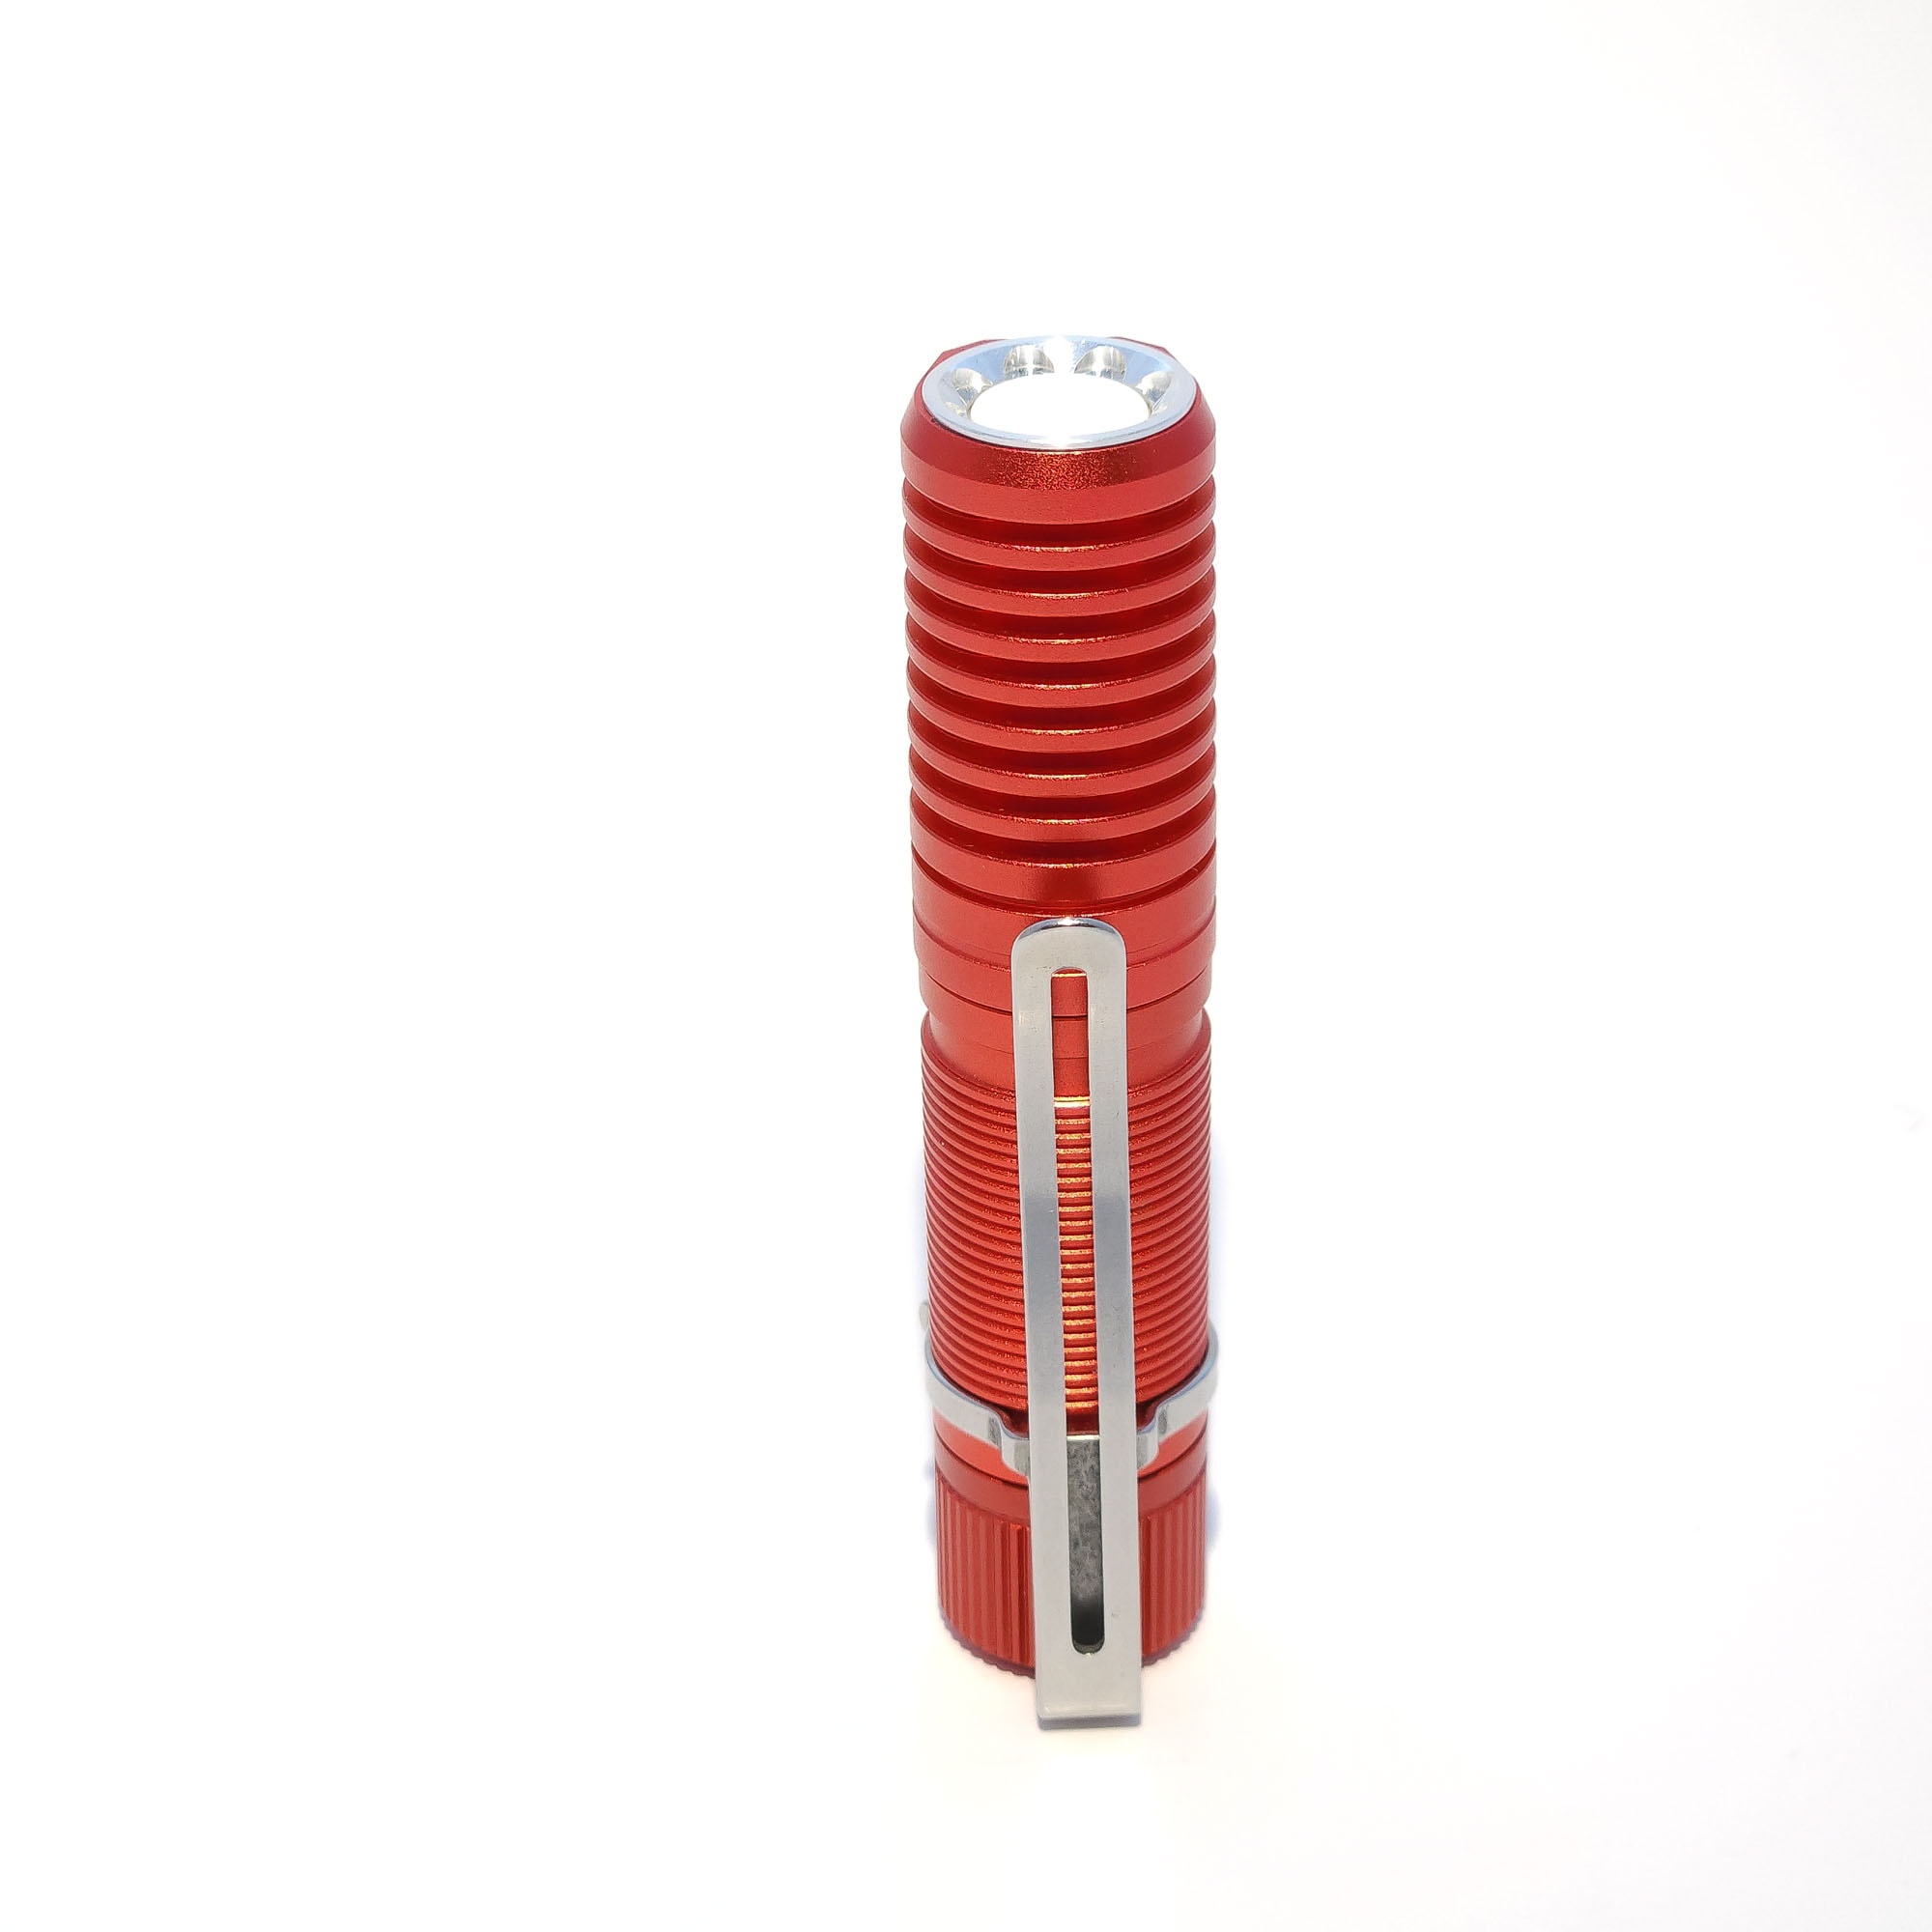
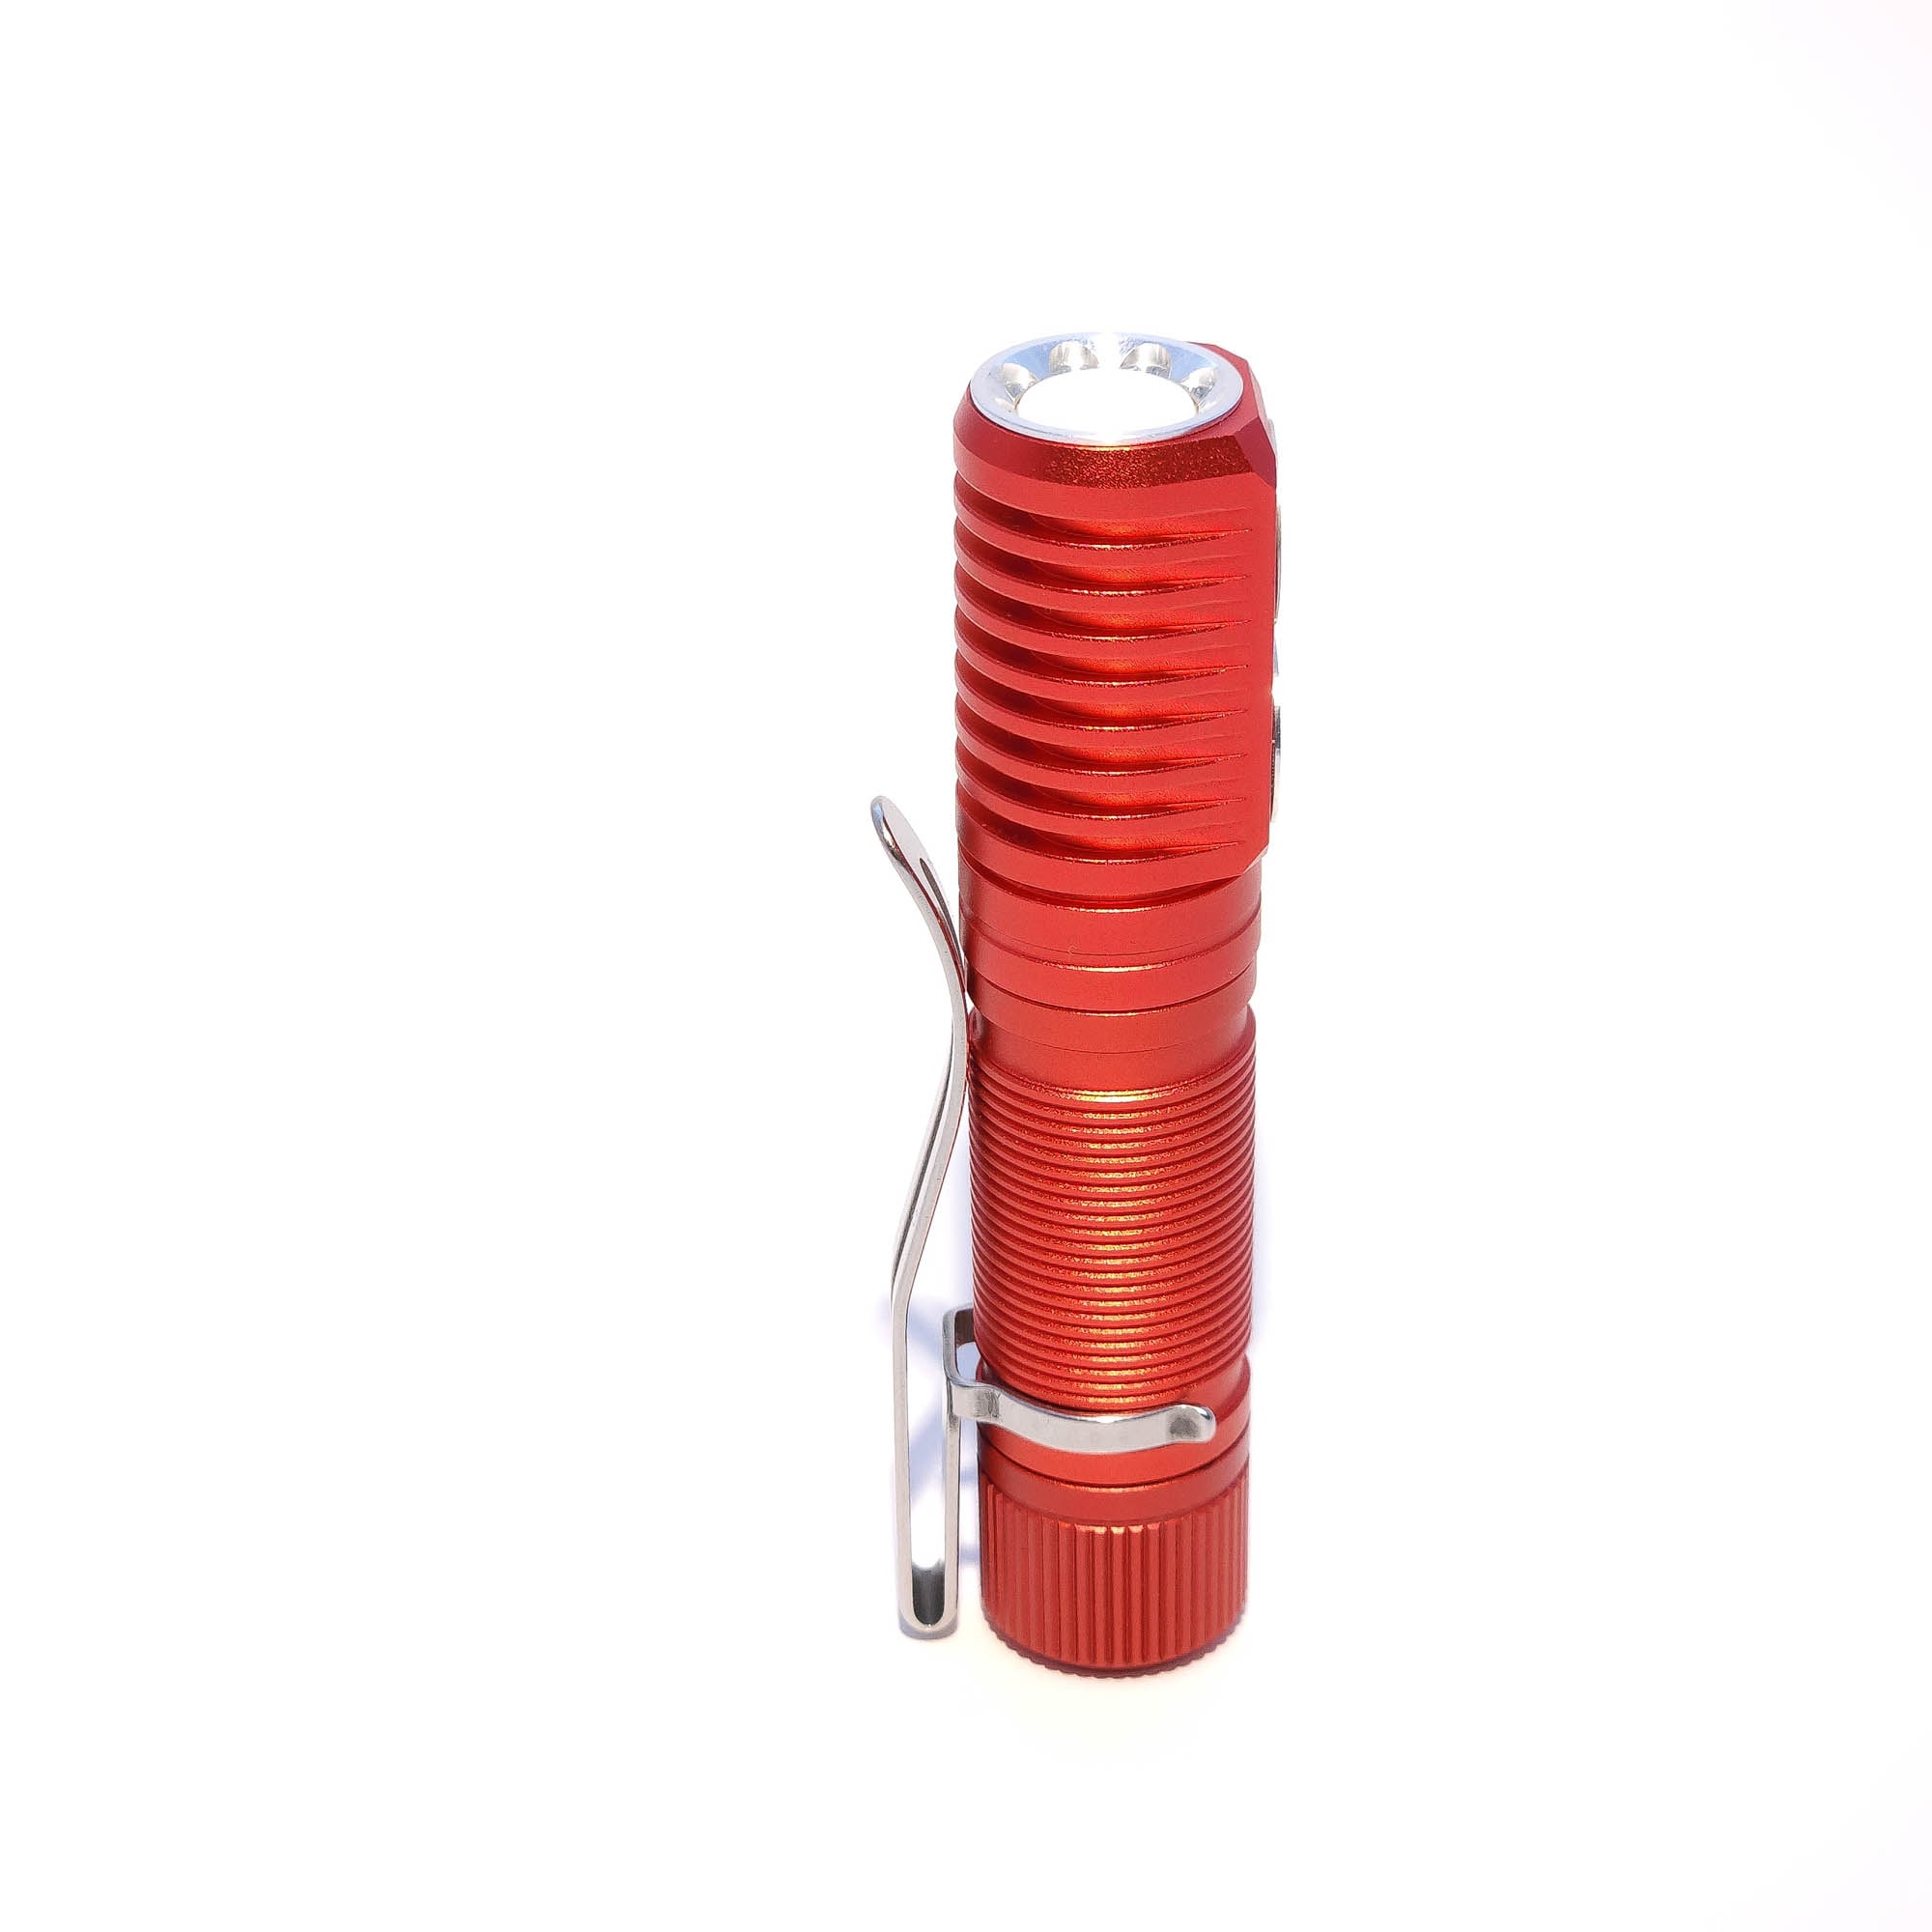
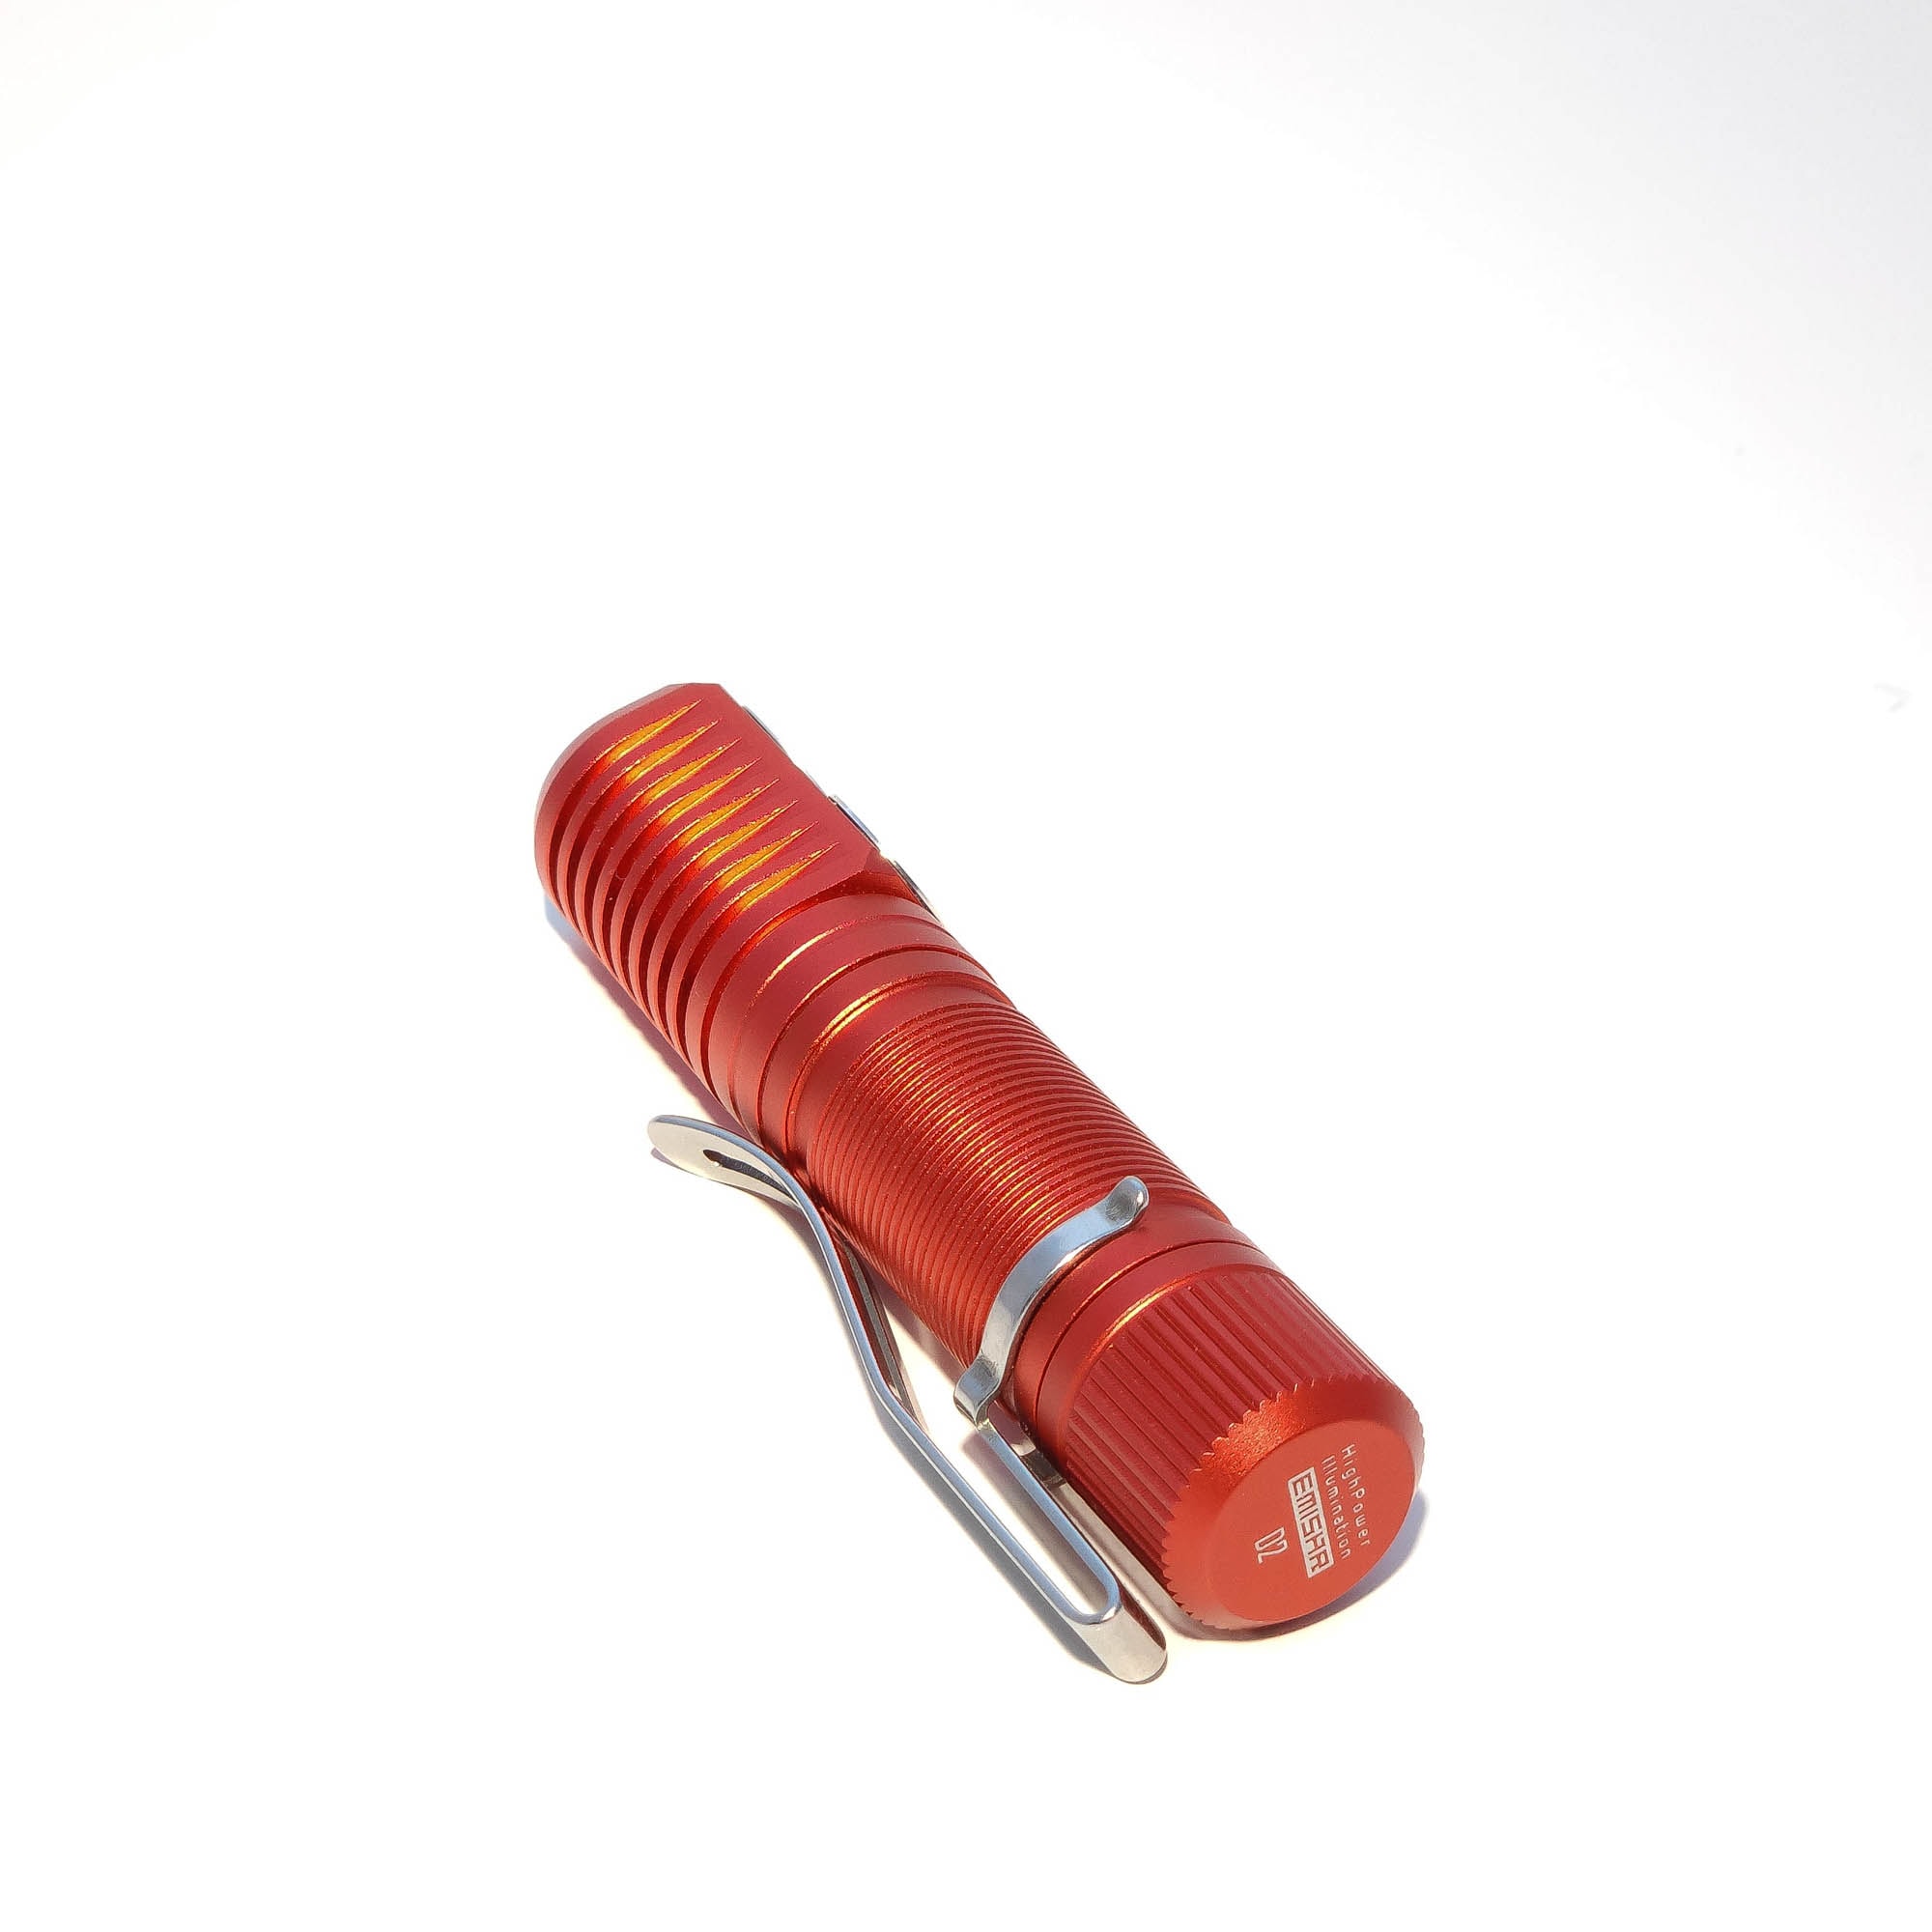
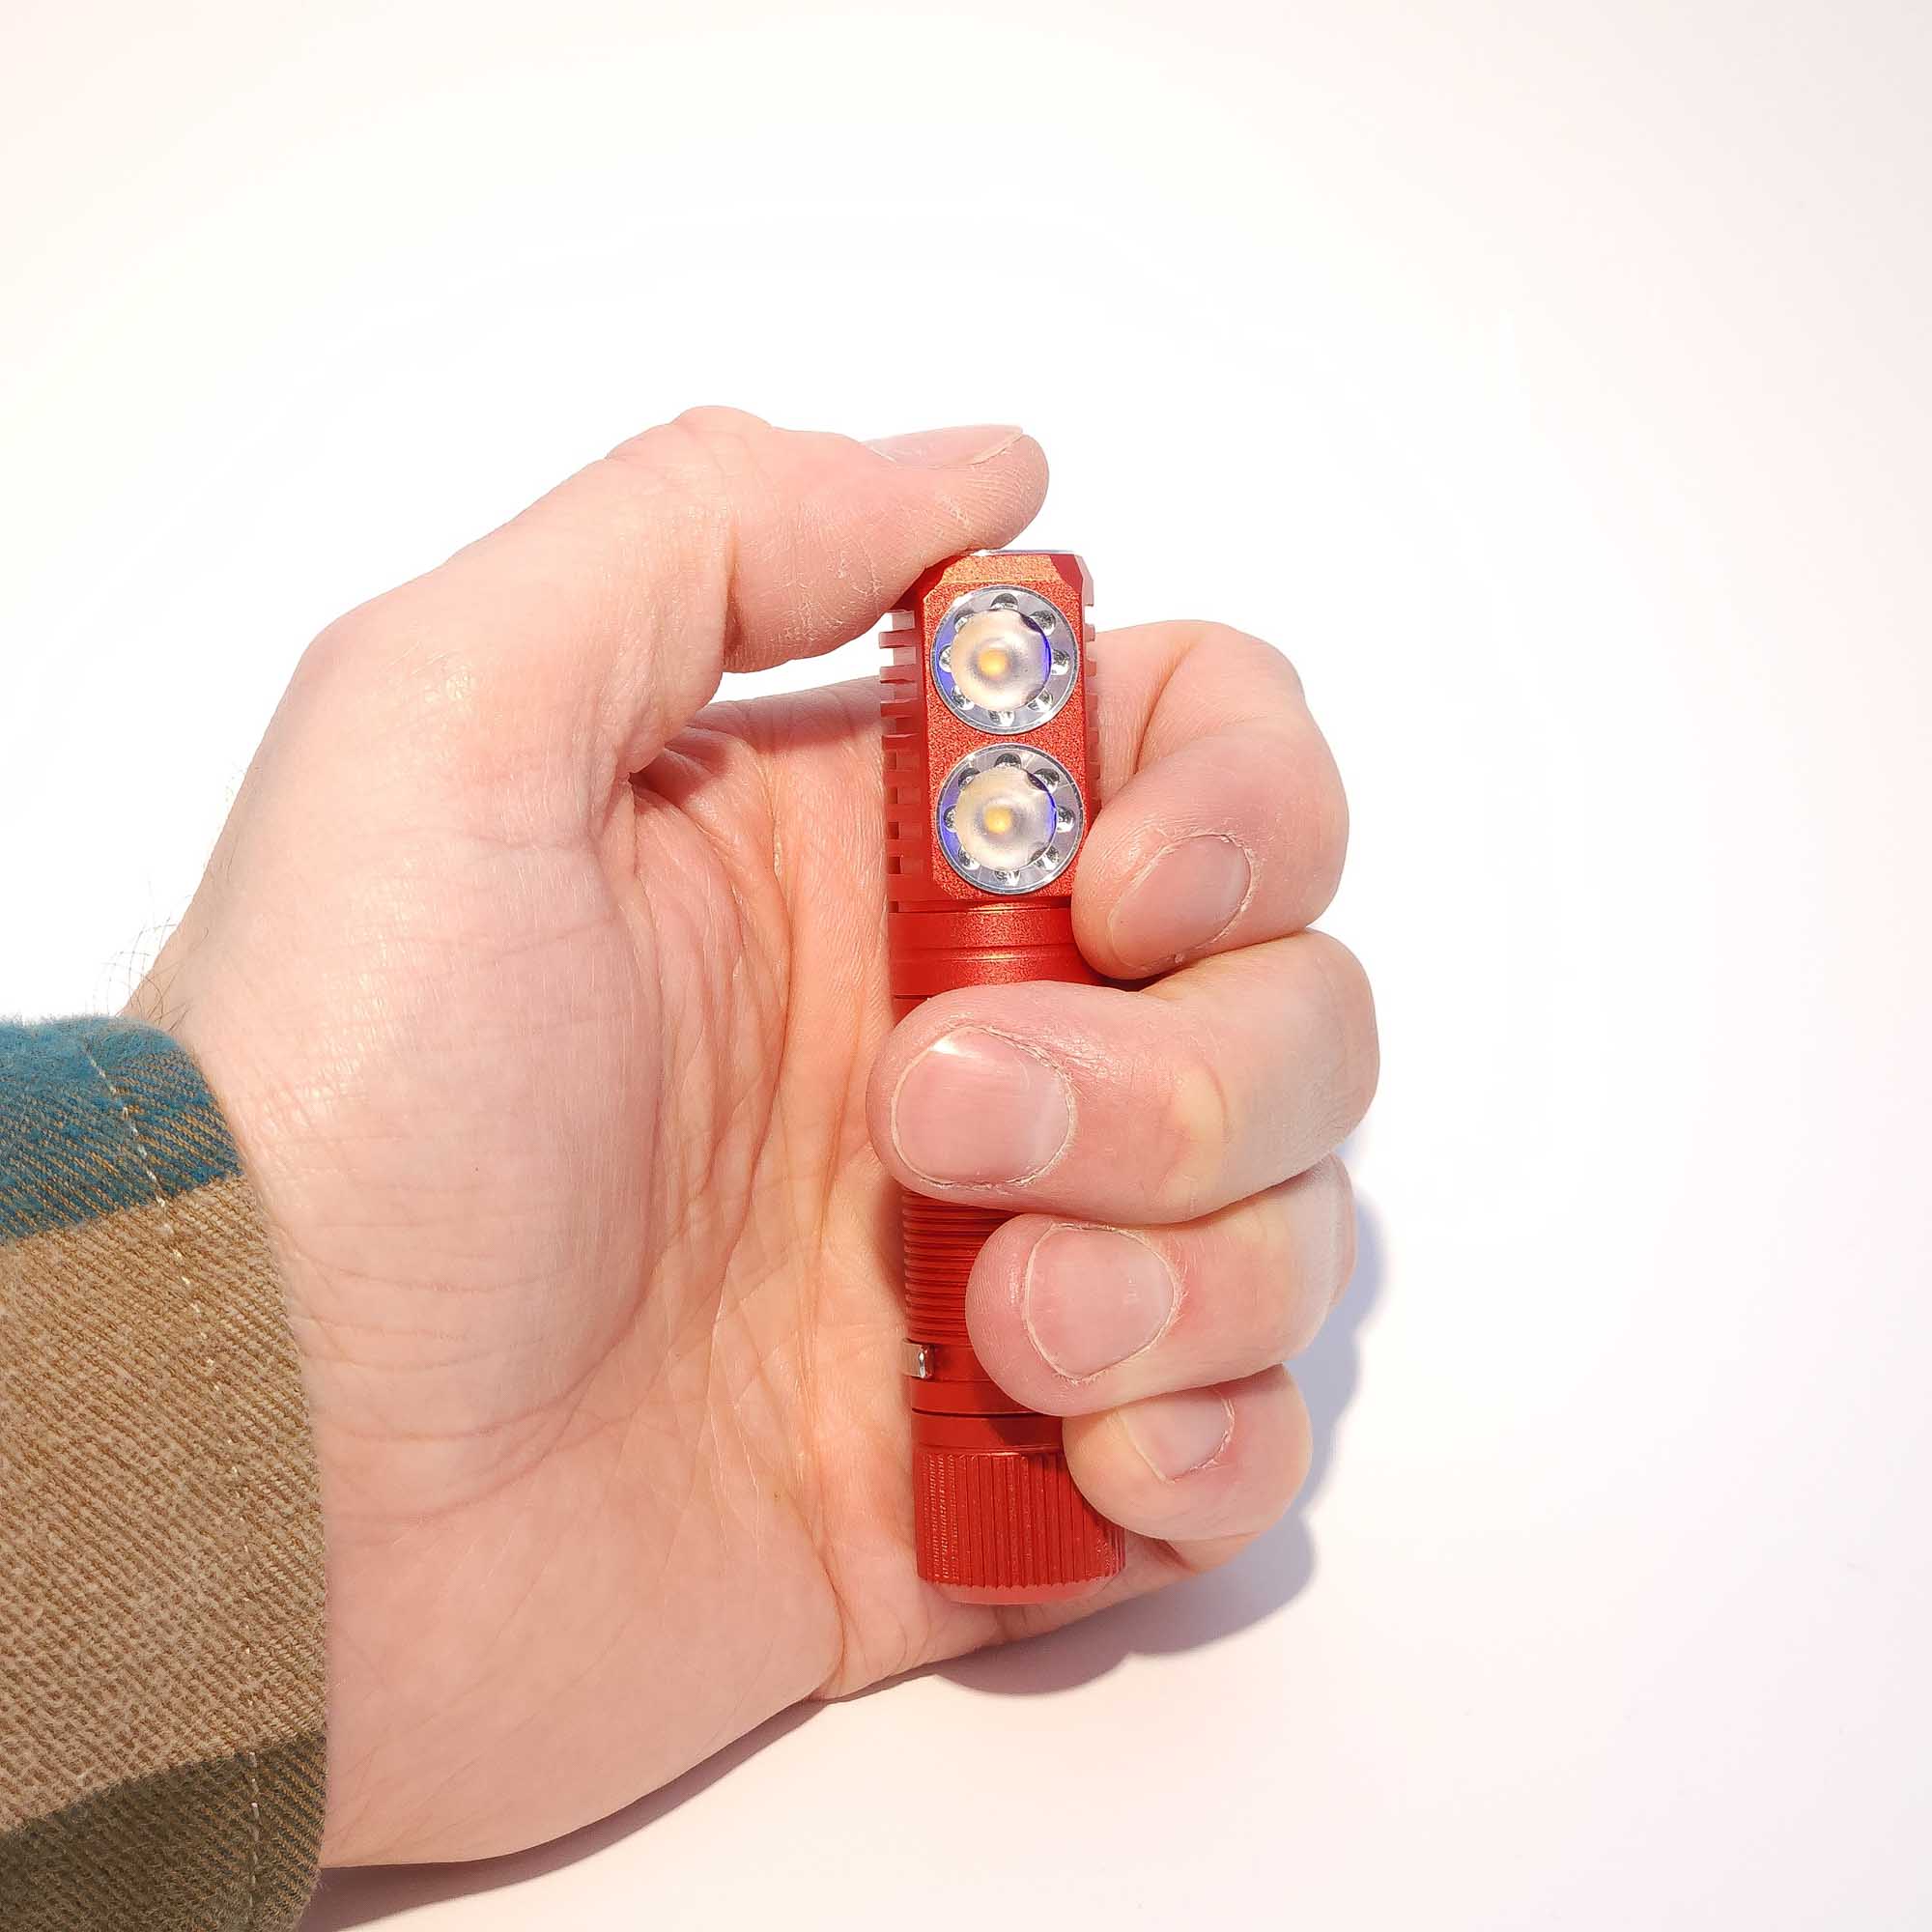
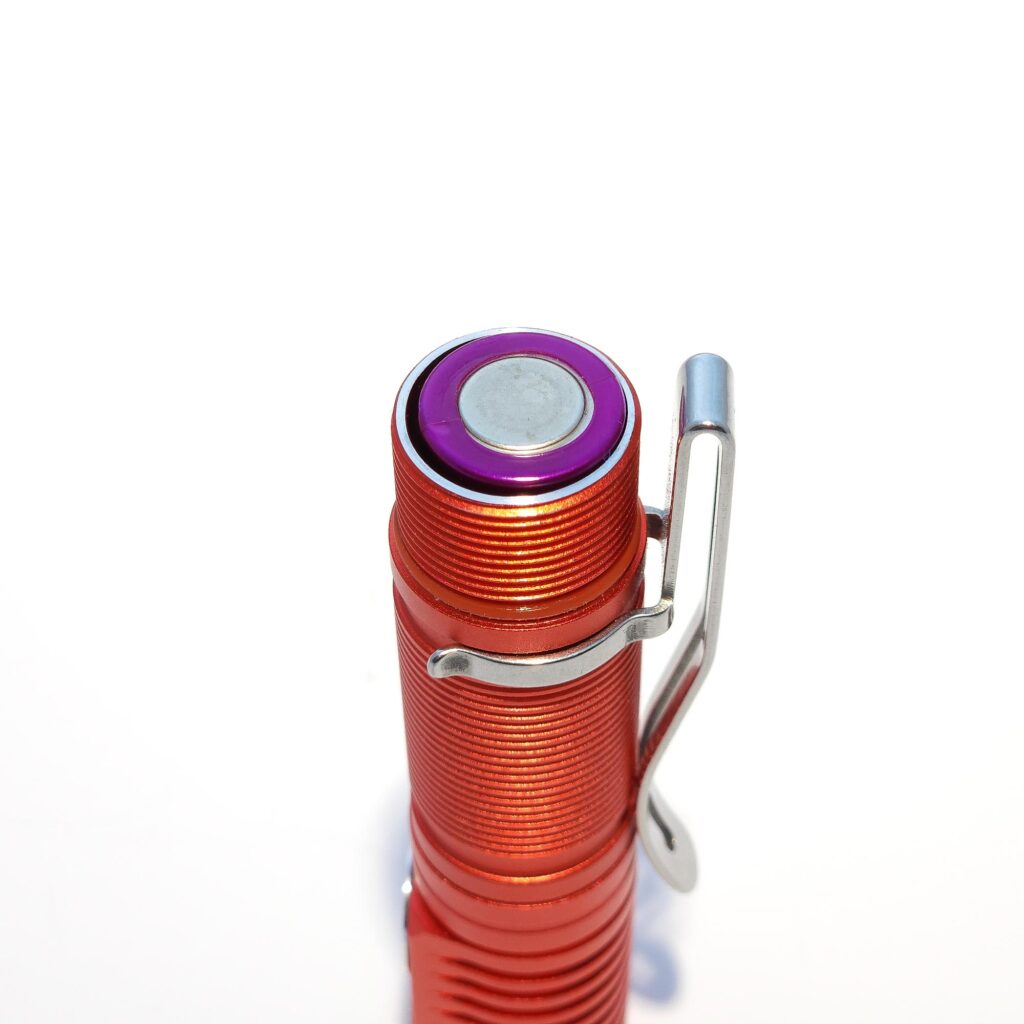
The D2 is actually a pretty versatile little light. I like my D4V2s, but the main thing that was keeping me from carrying them much is the size. The 18650 (in general) is often a little big for comfortable pocket carry, but the D2 fits right in nicely. The clip is one way, but you can attach to either end of the body and even allow for completely deep carry if you clip it to the bottom. You should definitely get it if you’re ordering one. The thin 14500 tube hides away nicely in your pocket, and you won’t even notice it’s there.
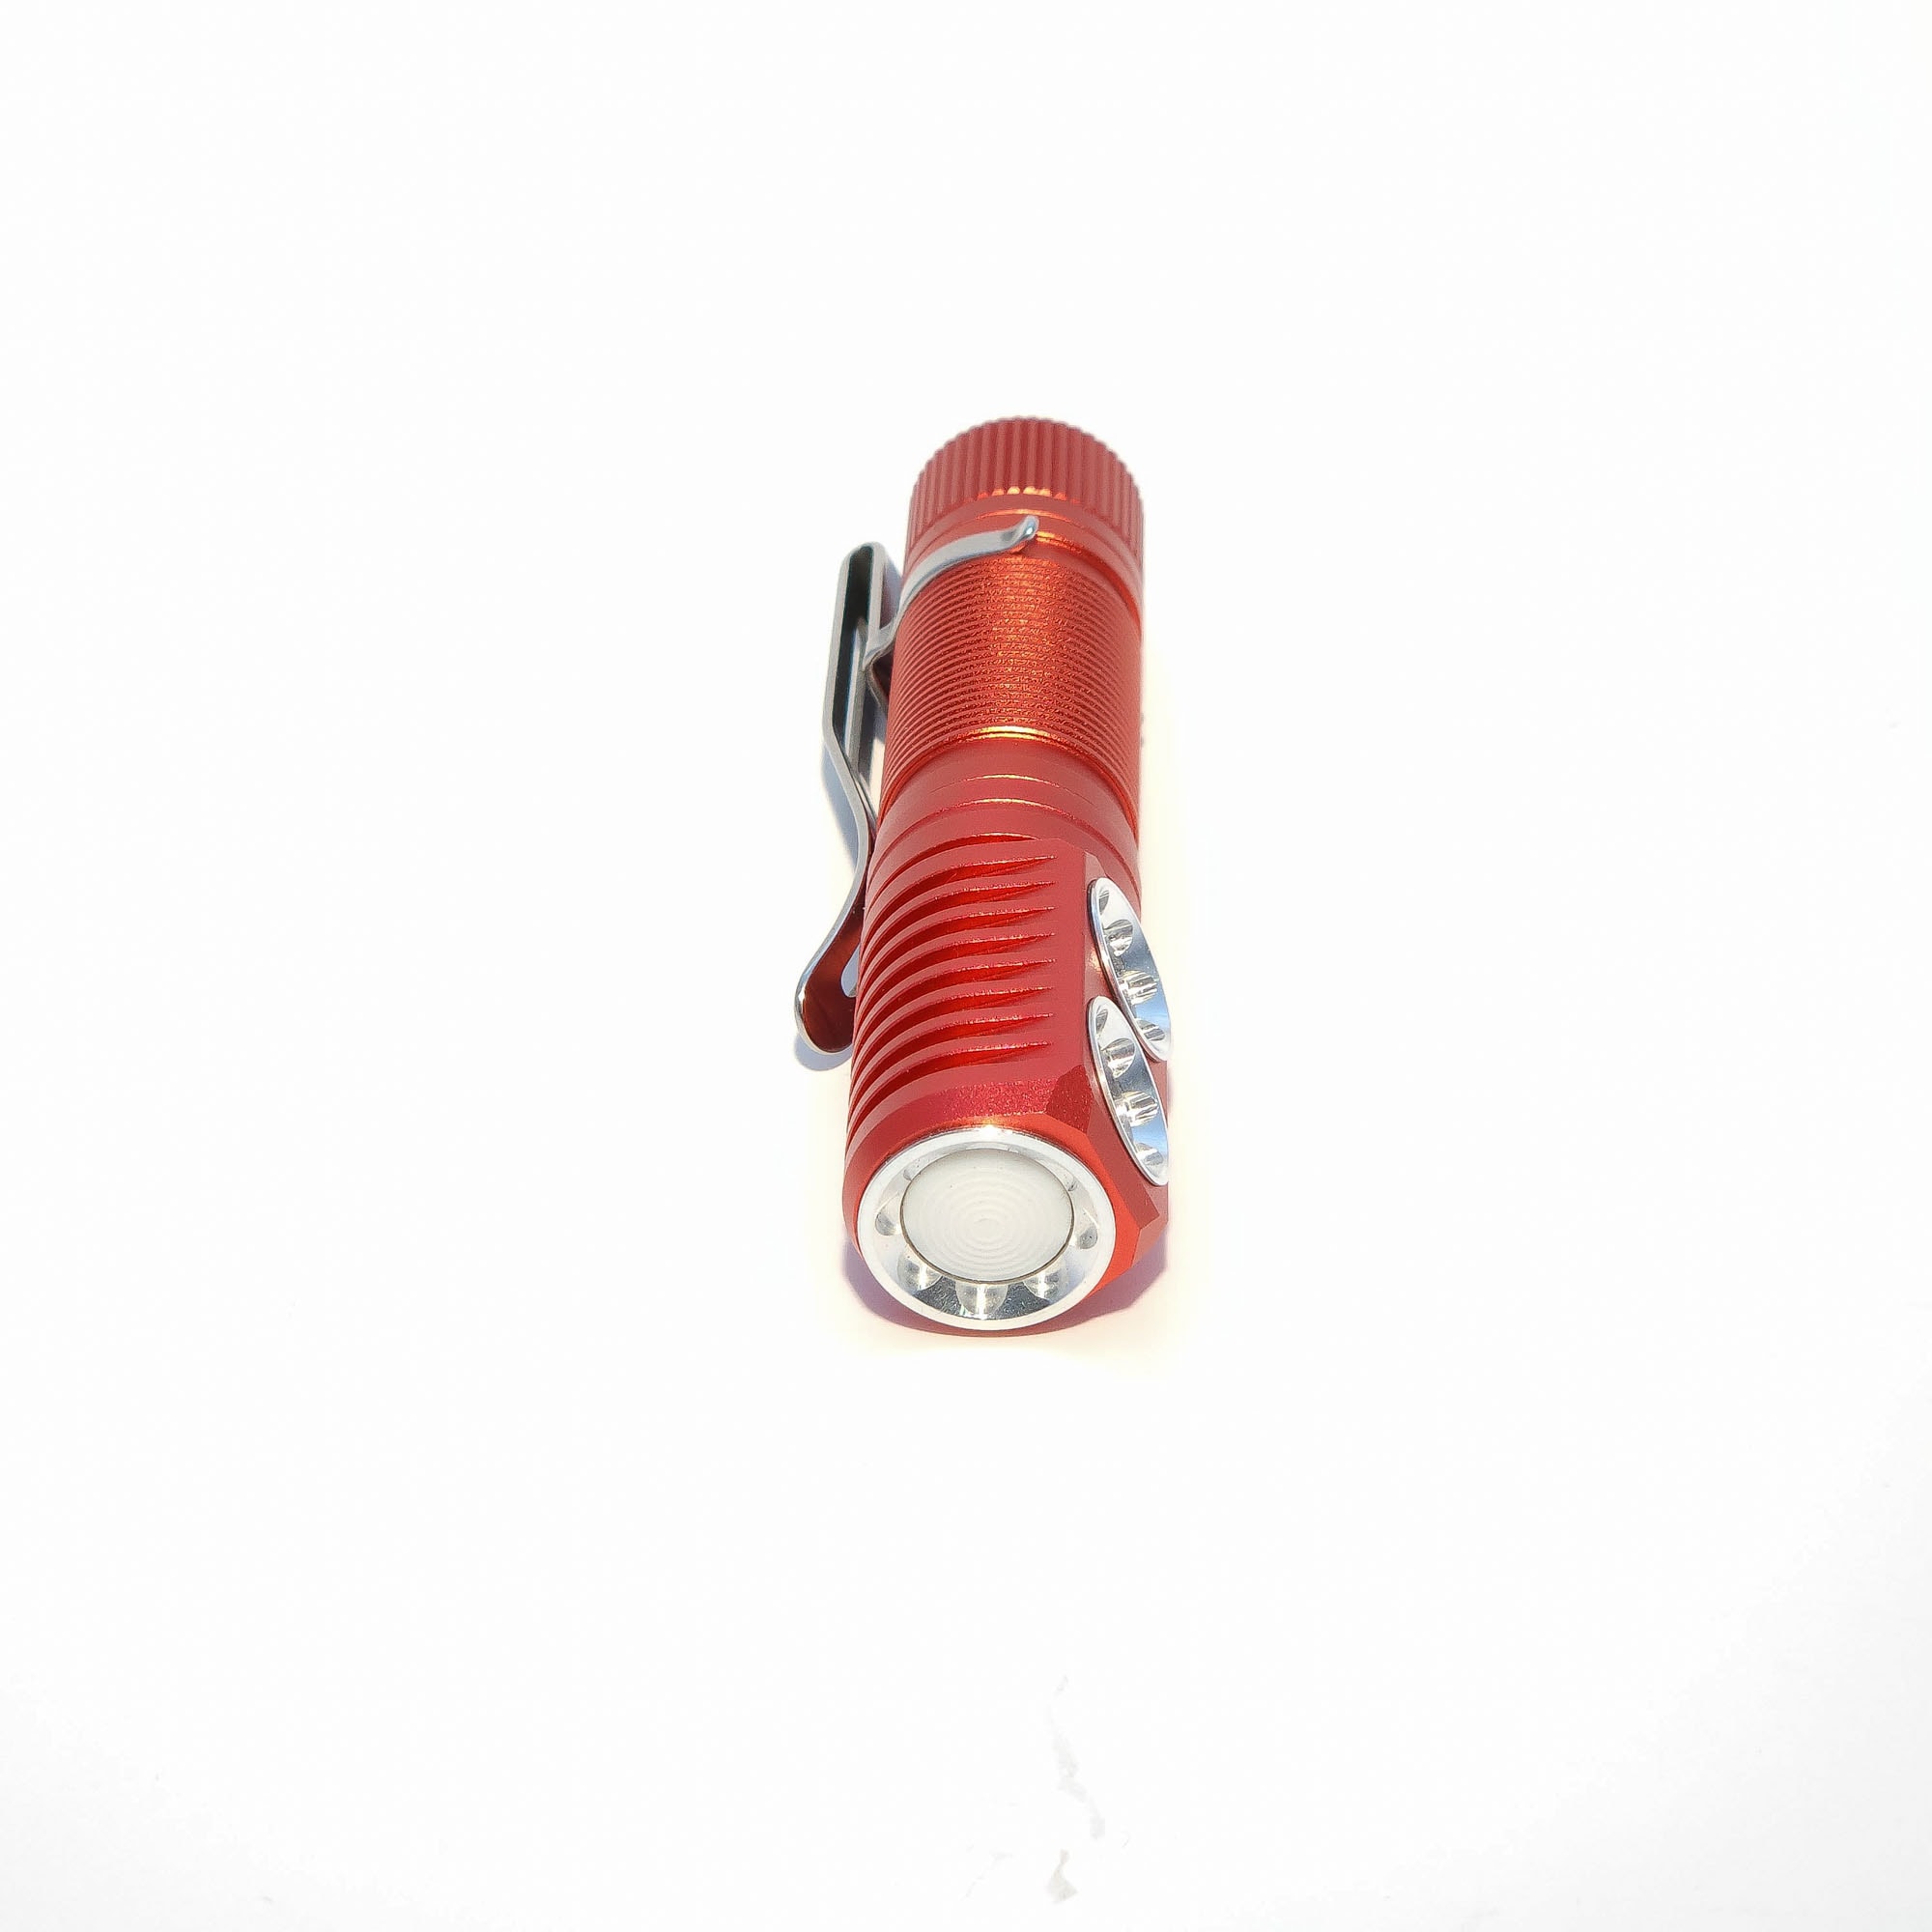
Like all current Emisar models, the D2 has an electronic switch with aux lights in it. This one is located on the top of the head; a de facto standard for right-angle lights. The switch is recessed below its screw-on bezel which helps prevent accidental clicks, but it does actually make it a little harder to press. It’s also pretty stiff, so you can even carry it unlocked if you so desire. However, because it’s hard to press, when I’m using momentary moonlight (while locked), the end of the clip jabs into the palm of my hand.
There’s a pretty strong magnet in the tailcap, allowing you to angle the light in any direction if you’ve got something to stick it to. You can also tail stand or headstand it, so the options for shining it on your work or whatever you’re using it for are nearly endless.
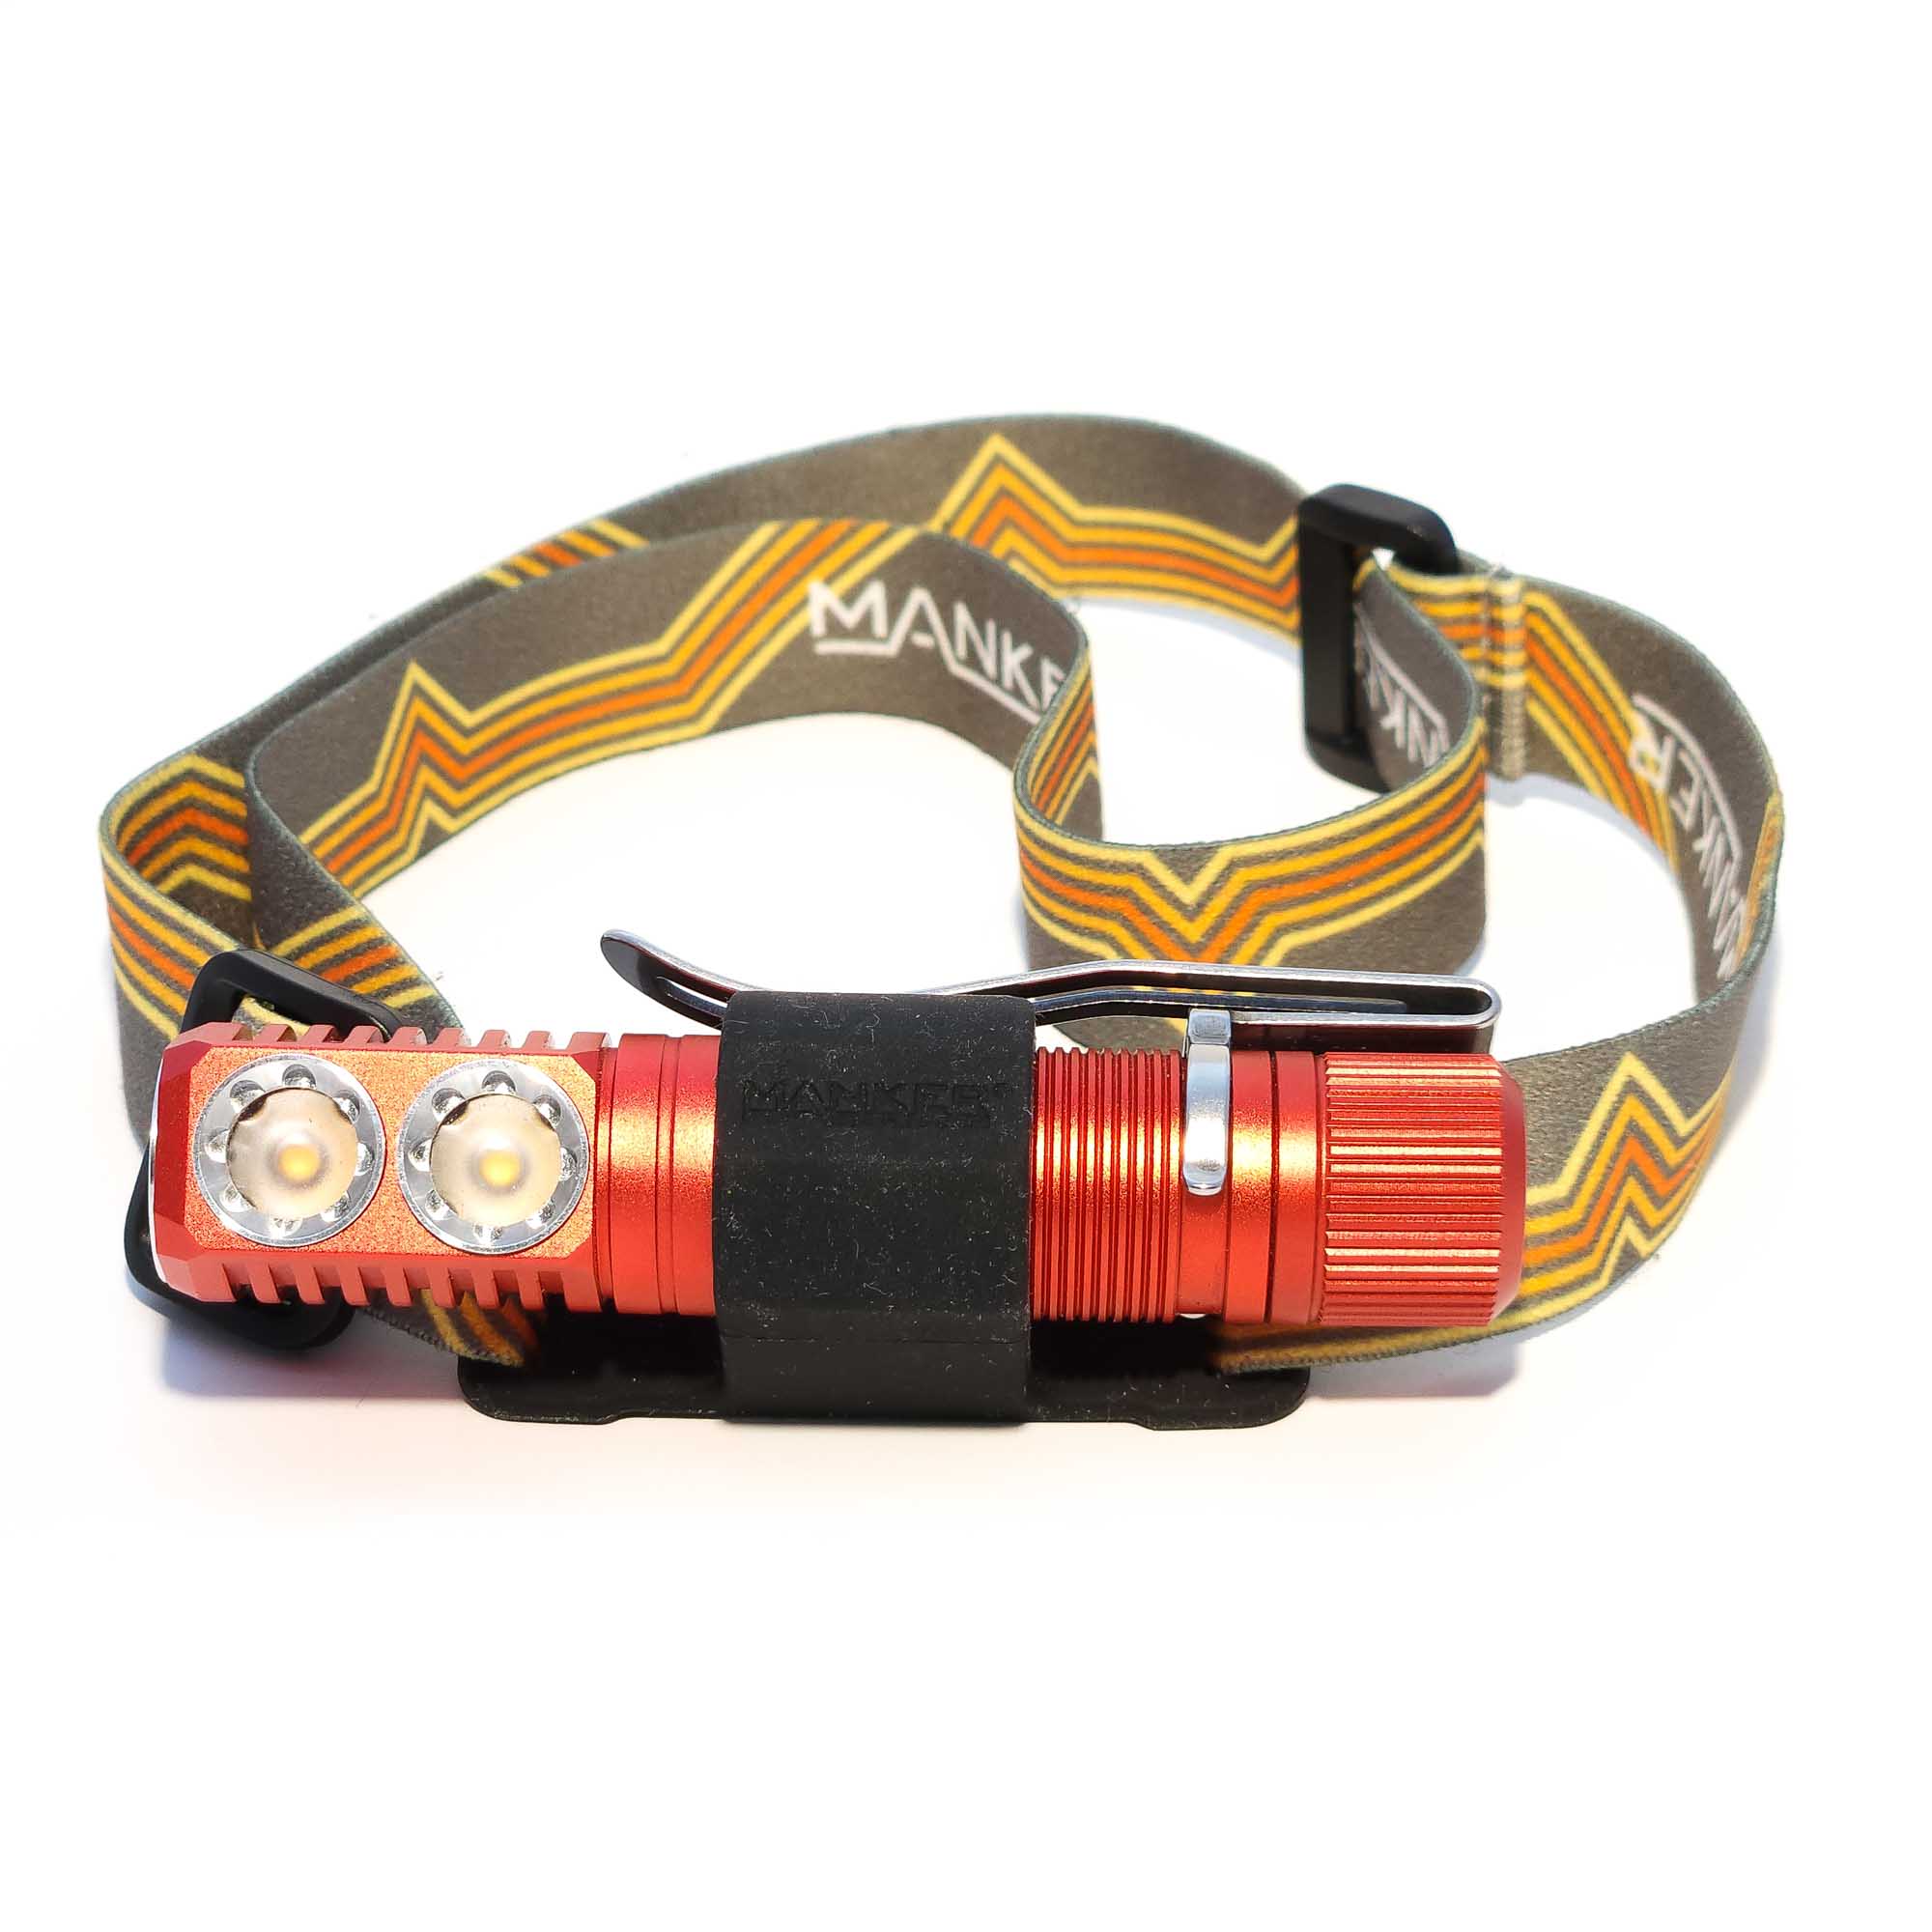
Hank offers a headband for the D2, but I did not get that. Instead, I like to use mine with my Manker E03H II headband. It fits perfectly, and can even be used without removing the clip (though you’ll have to rotate the clip in order to rotate the light). Most 14500 light headbands will probably work, and there are enthusiasts out there designing their own 3D printable headband attachments for it, so you have a lot of options here, too.
14500s have been my go-to EDC recently due to their smaller size, and the D2 has slotted firmly into the rotation. If you’re on the fence about carrying a right-angle light, you’d be surprised how useful it can be. Plus, being a dual channel Emisar, you have so many options for emitters and even optics that the D2 could easily be your all-purpose light, too
All of Hank’s lights are well put together, and the D2 is no exception. While other models come in different materials, the D2 is only available in aluminum right now, but can currently be had in a number of anodization colors; black, dark gray, red, green, and MAO (micro-arc oxidation) white. Keep checking Intl-Outdoor.com for what’s available, as what’s offered tends to change from time to time based on stock depletion and new batches.
One thing I really appreciate about this light is that on the back side of the head, there are deep cooling fins, but the edges on them are so smoothed out that you can’t even feel them. Oftentimes the edges of the cooling fins are left sharp and can scratch the skin, but your fingers just glide over these.
The switch and both emitters have screw-on bezels around them which are lined up symmetrically on my light, but are not quite flush with each other. Maybe that’s the price to pay for symmetry. Additionally, these do have edges on them; not sharp, but not as smooth as the cooling fins and other angles on the head.
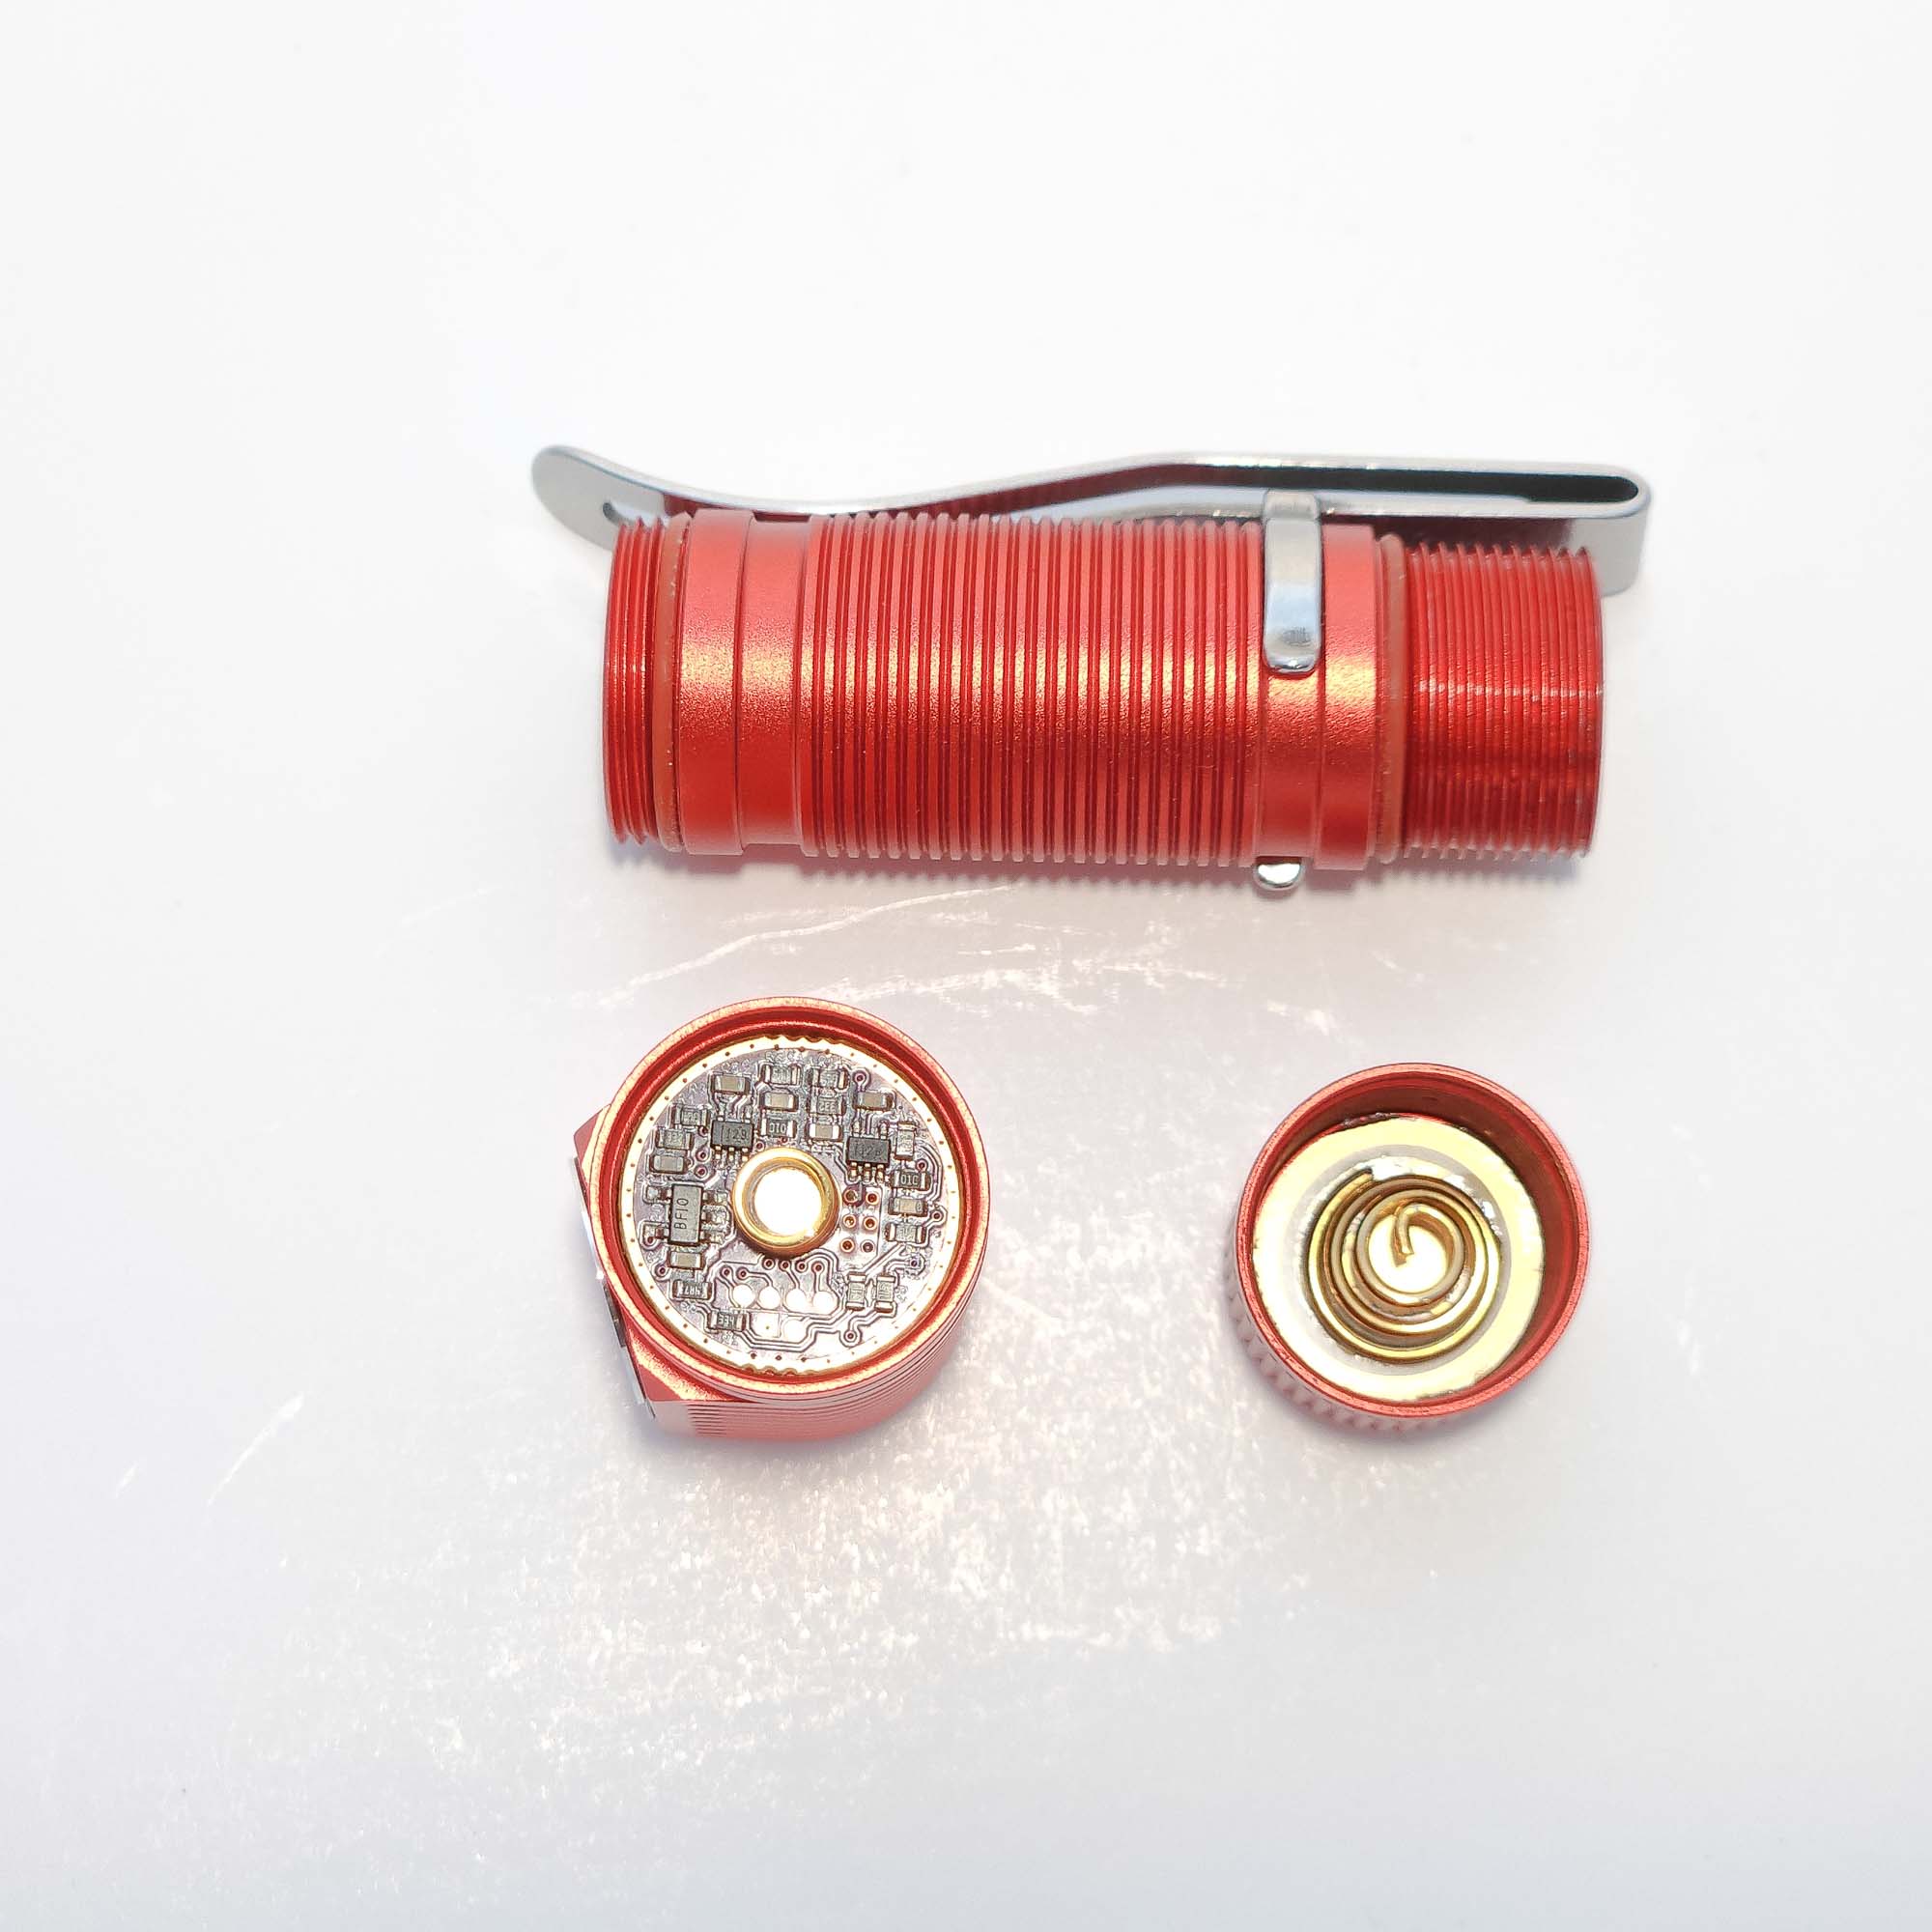
The body only sports rings for its knurling, which I find rather slippery. Thankfully, the light is big enough that my fingers can find grip elsewhere on the light. Hank does not glue his heads and bodies together, so you can unscrew it from either end. It’s a bit lopsided, though; on the head side, the threads are very short, but on the tail side, the threads are very long. Almost as long as the entire tail cap. And since there’s no onboard charging, you’ll find yourself turning the tailcap for a while whenever you need to swap or charge the battery. Not only that, but if you have the clip on the bottom of the body, that gets in the way of your fingers, so you’ll probably be making very short turns for a long time.
As opposed to the body’s perpendicular rings, the tail cap only has parallel lines for its knurling. This works nicely for grip, especially when twisting the tail cap.
As mentioned before, the clip is deep carry, if you attach it to the bottom of the body, so the end of the tail cap will be sticking up, showcasing the Emisar D2 branding on it. The clip does sit on top of the rings on the body, so you may experience some cheese grating of your pockets, and mine already has some wear on the anodization where the clip hits.
Note that on the product page, it specifically says not to disassemble the D2. Some enthusiasts like to swap emitters sometimes, but due to the size and shape of the components in the D2, it’s much more difficult to get everything back together again.
One thing you’ll notice is that Hank doesn’t offer a warranty, per se. There’s no guarantee on his website or anything, but if you have a problem with one of his lights, there’s plenty of anecdotal evidence that if you email him, he’ll make things right.
LED, Lens, Bezel, Beam, and Reflector
One of the hallmarks of Emisar and Noctigon lights is the vast number of choices you get when it comes to ordering. Many people find this daunting, especially if they’re trying to order their first or only modern flashlight (spoiler alert: They’ll end up with many more flashlights and the process will get easier), and someone on r/flashlight once calculated all the permutations of options for Hank’s lights, and it was in the millions. We’re not going to go over all of them here.
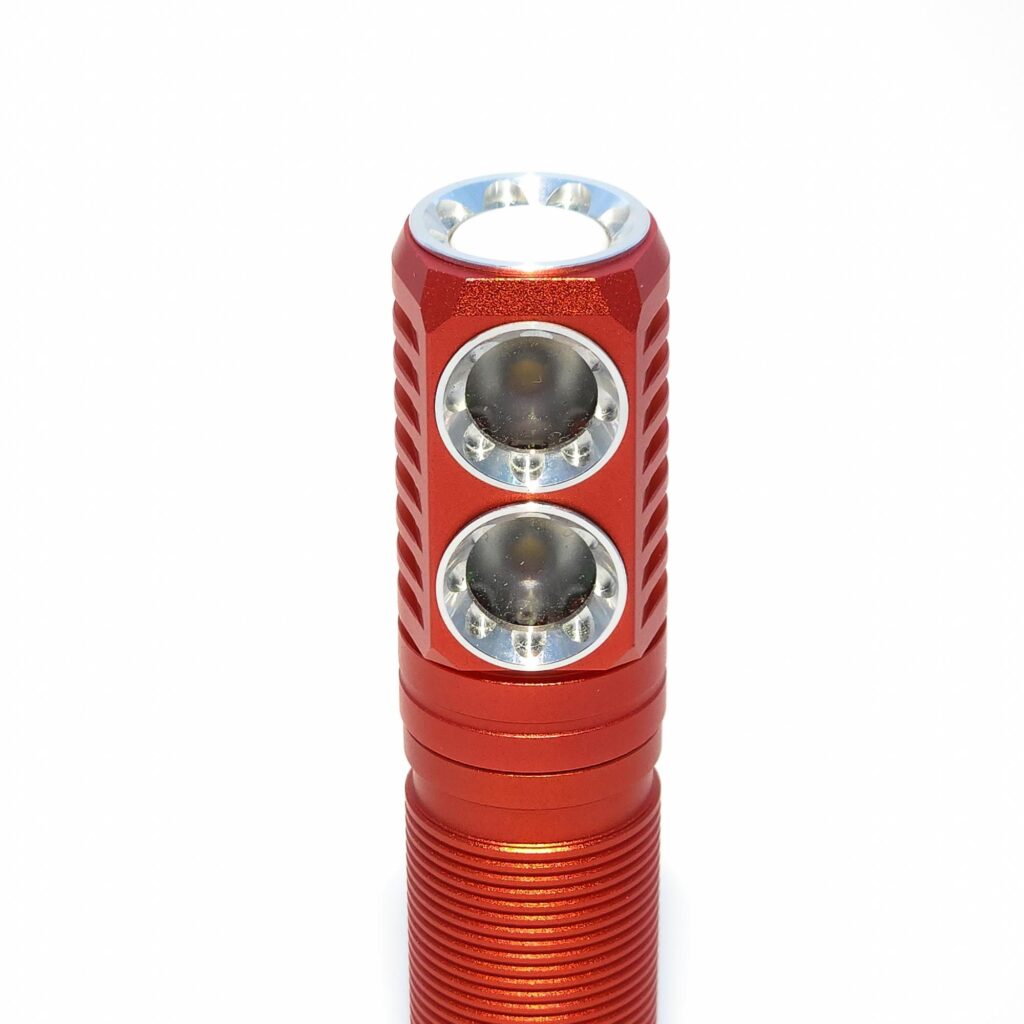
The D2 can be had with frosted (floody) or clear (spot) TIR optics for either emitter, and some people like to have one of each, but I went with frosted for both. I’m glad I did since after I ordered, it was revealed that the clear optics produce a square beam that a lot of people find distracting. The frosted optics are very floody, so it’s kind of an extreme of either flood or throw. But if you did select one of each, you could run both at once for an interesting combination beam. A frequent recommendation on r/flashlight is 519a/frosted and W1/clear to give you that two-in-one flood and throw package.
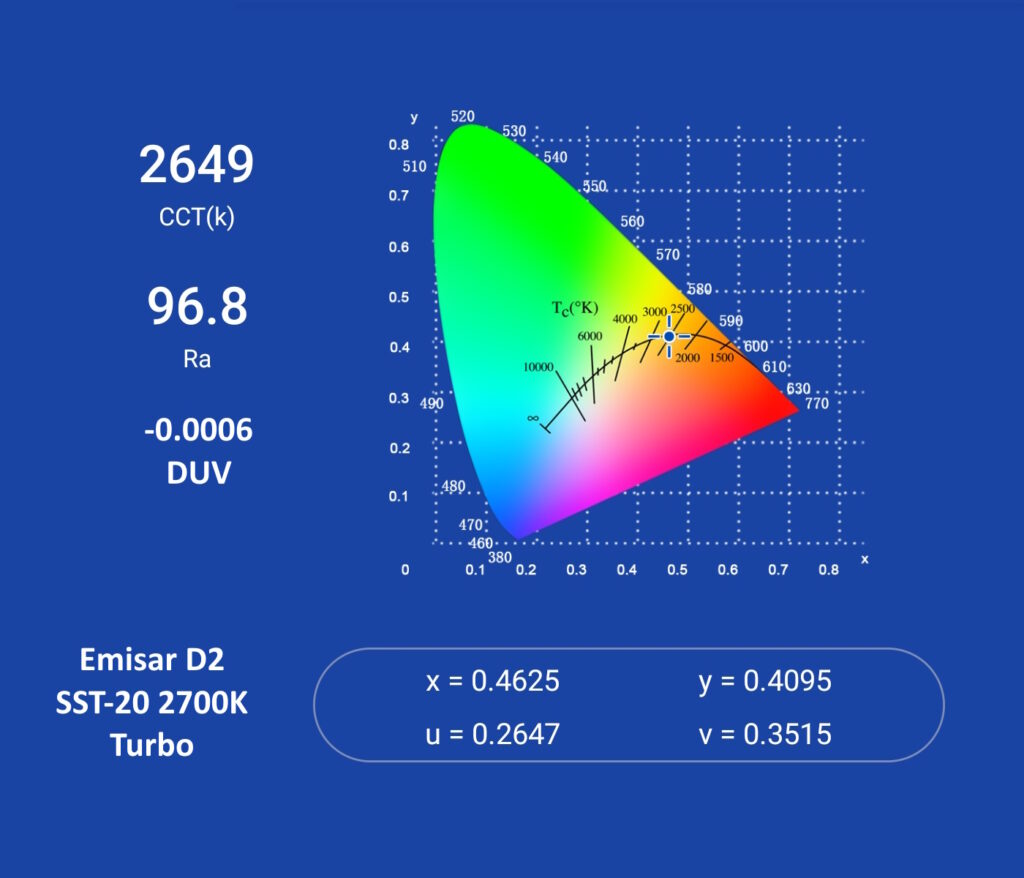
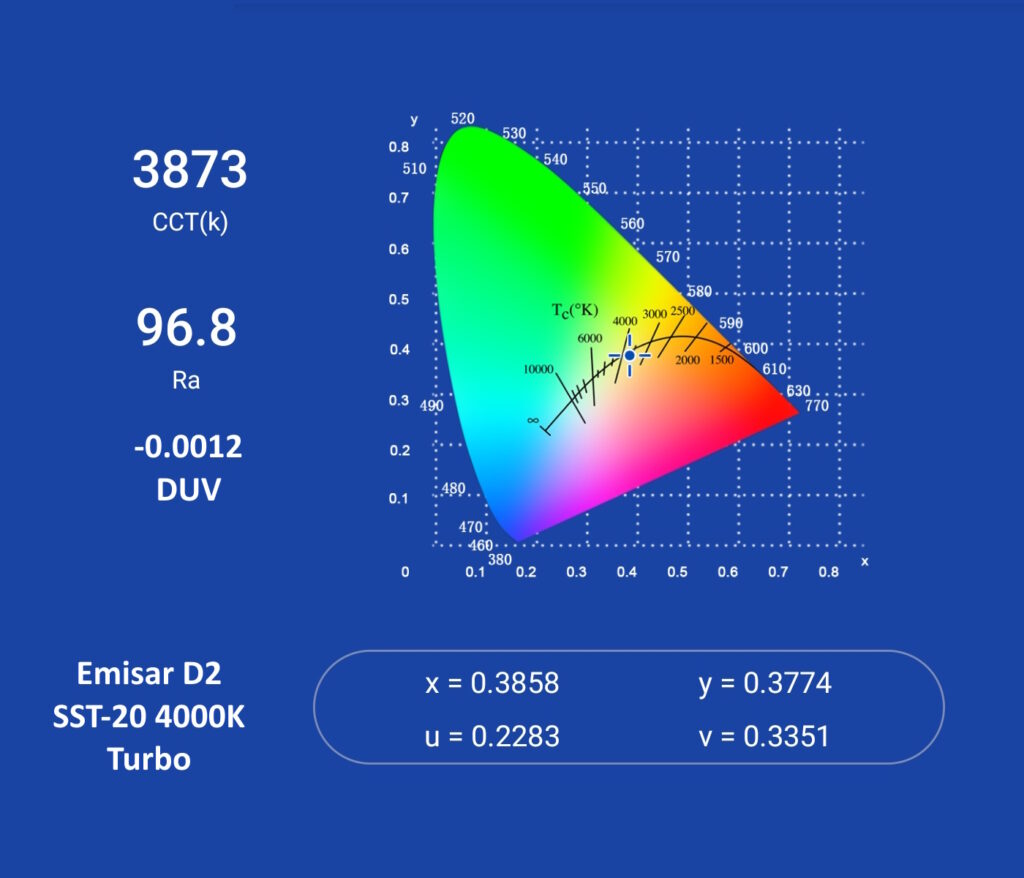
As for emitters, I went with 4000K and 2700K Luminus SST-20s because I like those in a small package. Both are high CRI, and the bin of 4000K SST-20 that Hank uses is widely considered the nicest bin available. I find the light to be very nice with either or both emitters at once.
The emitters and optics are covered by green anti-reflective coated glass and held in place with screw-in bezels. While that makes it easy to remove them, as mentioned before, you don’t want to.
Another feature of the D2, common on all of Hank’s TIR lights, is the inclusion of aux lighting. On the D2 in particular, there are two RGB aux LEDs on either side of each emitter and since this is an Anduril light, you can set them to any one of the 7 light combinations (red (R), yellow (RG), green (G), cyan (GB), blue (B), magenta (RB), or “white” (RGB)), battery voltage readout (magenta = high, red = low, and everything in between), slow rotation through the colors (not including “white”), or disco mode, which quickly and randomly changes colors. Additionally, you can set the brightness on the aux to low, high, low/high flash, or off. I like to have low disco mode when the light is locked and high battery voltage when unlocked.
Dimensions and its competition
Dimensions:
| Emisar D2 | Millimeters | Inches |
|---|---|---|
| Length | 92 mm | 3.6 in |
| Head diameter | 20 mm | 0.8 in |
| Body diameter | 18 mm | 0.7 in |
Dimensions are rounded to the nearest millimeter, and to the nearest tenth of an Inch.
Weight:
| Emisar D2 | Weight in grams | Weight in oz |
|---|---|---|
| Without battery: | 39 g | 1.4 oz |
| With battery (Vapcell H10) | 61 g | 2.2 oz |
Weight is rounded to the nearest gram, and to the nearest tenth of an Oz.
Flashlight size comparison with its competition:
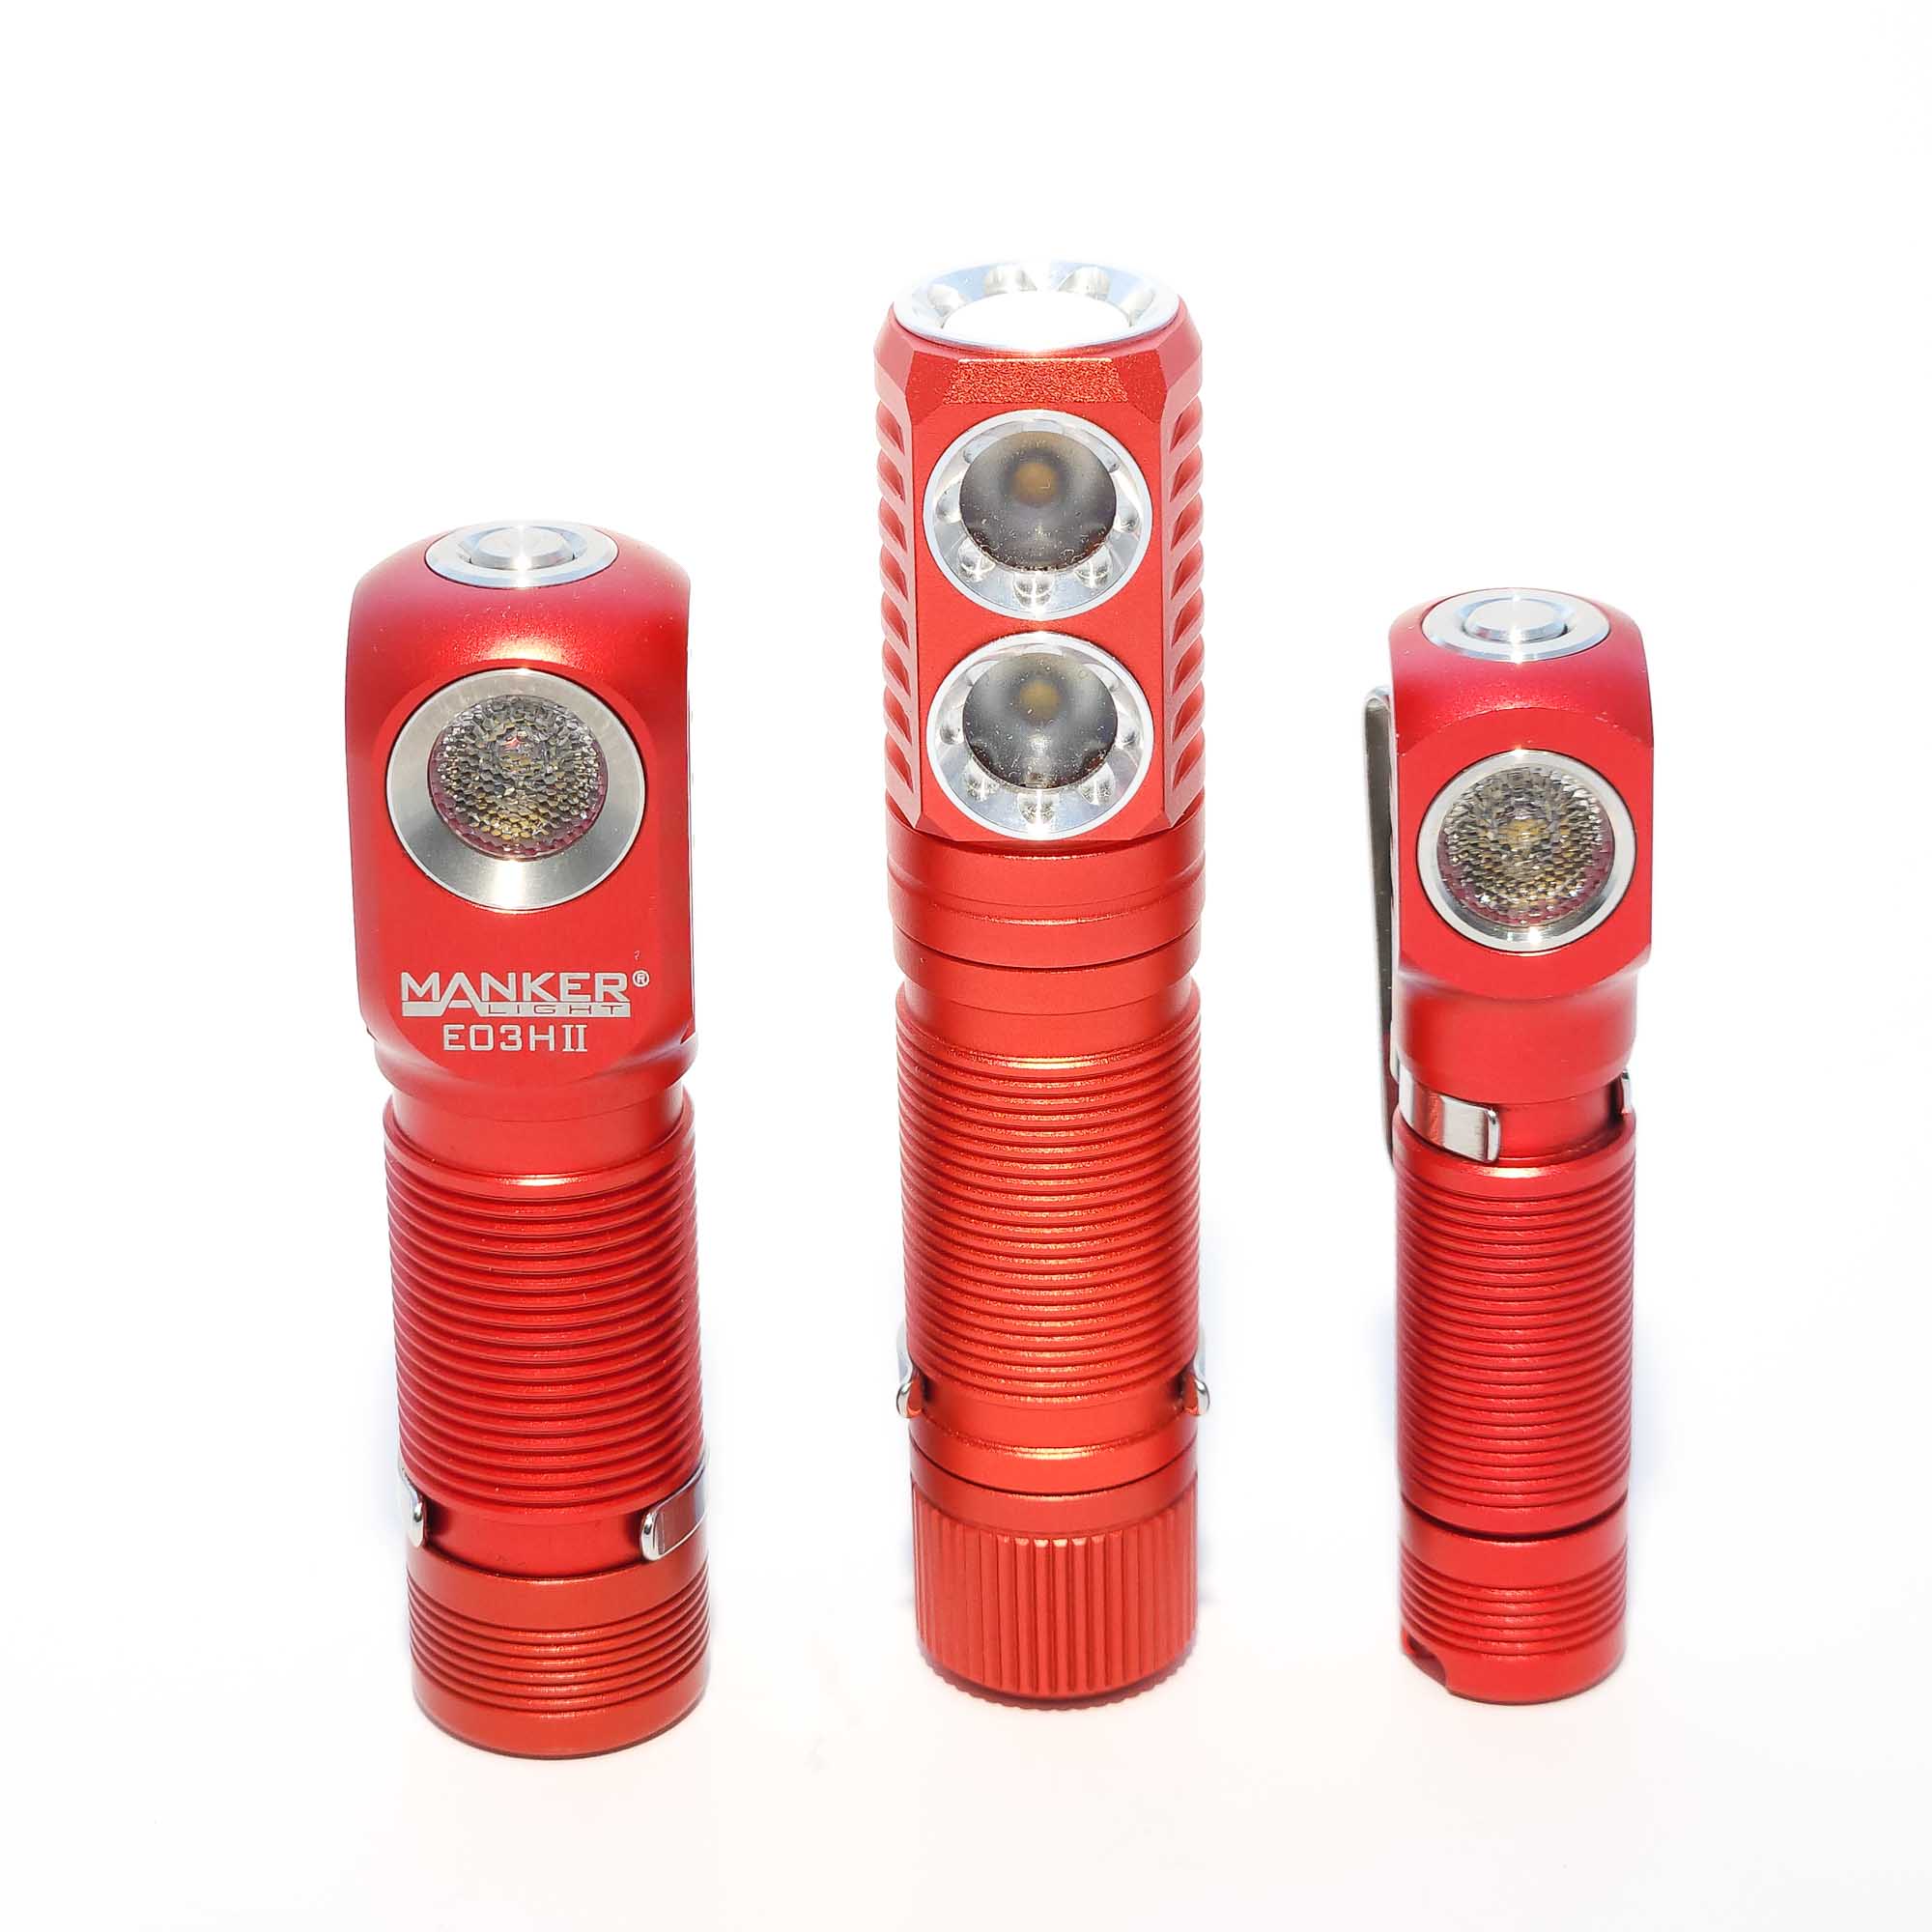
Group 1: Manker E03H II, Emisar D2, Manker E02 II
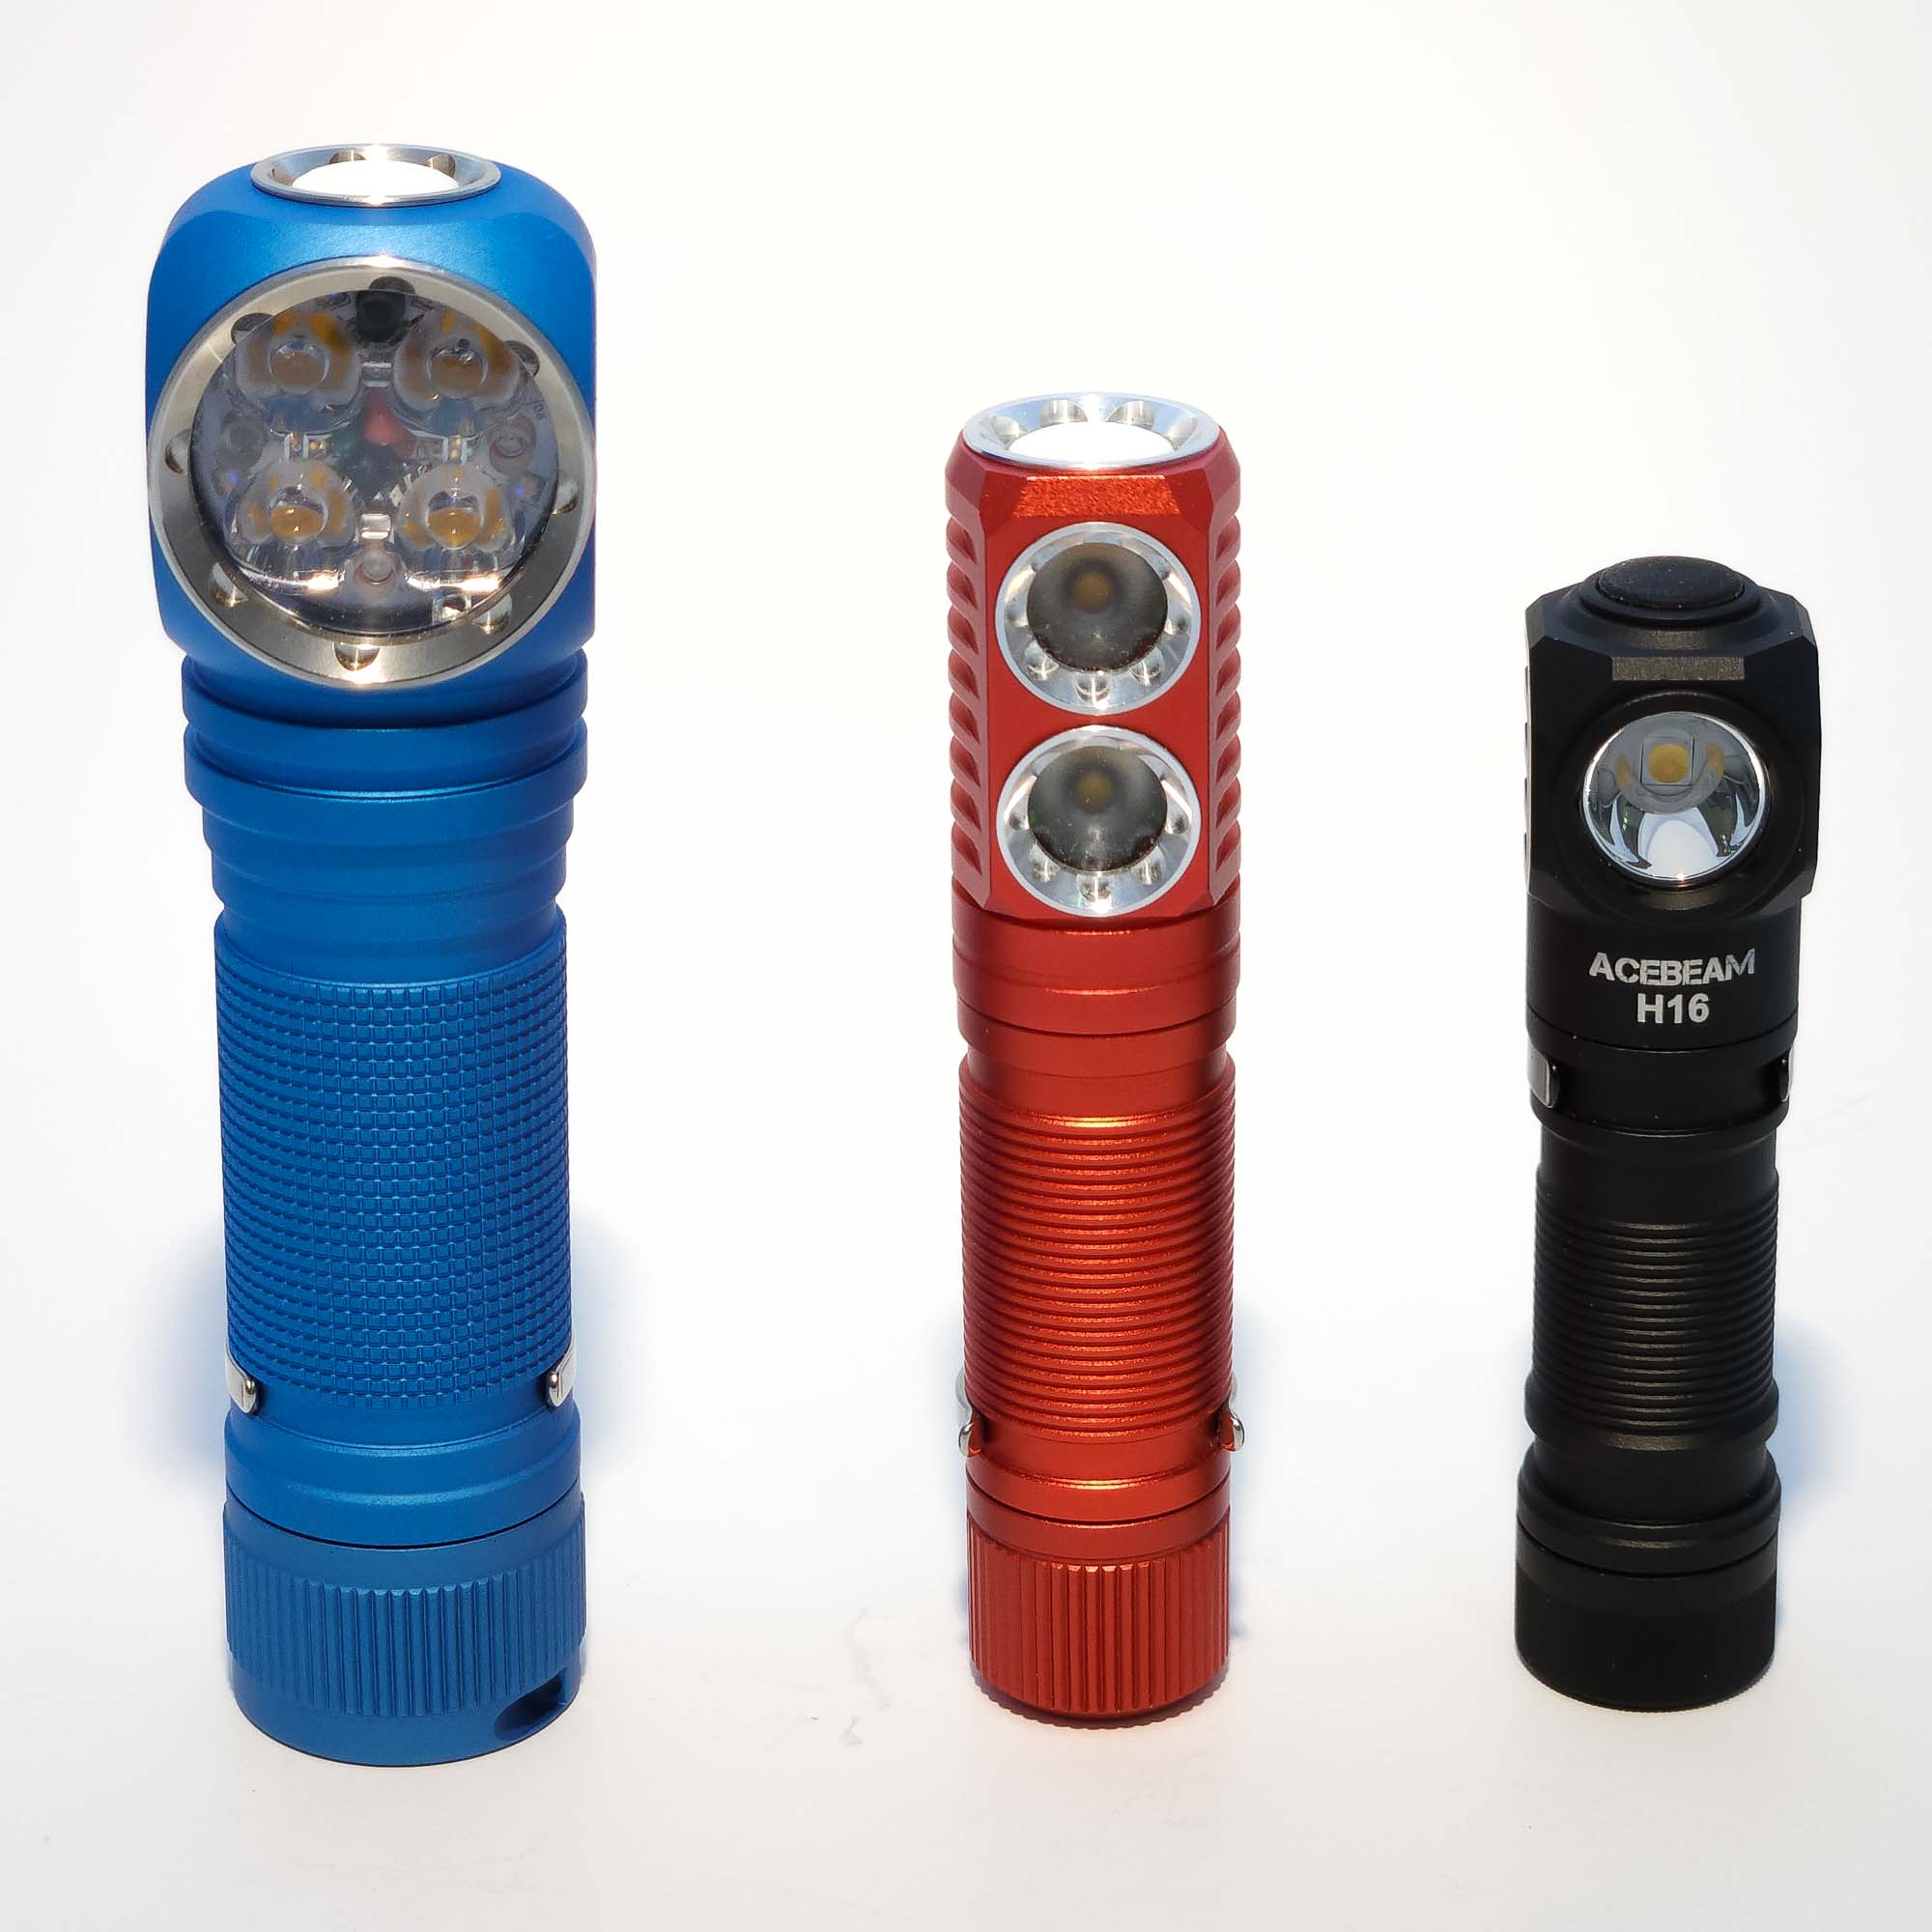
Group 2: Emisar DW4, Emisar D2, Acebeam H16
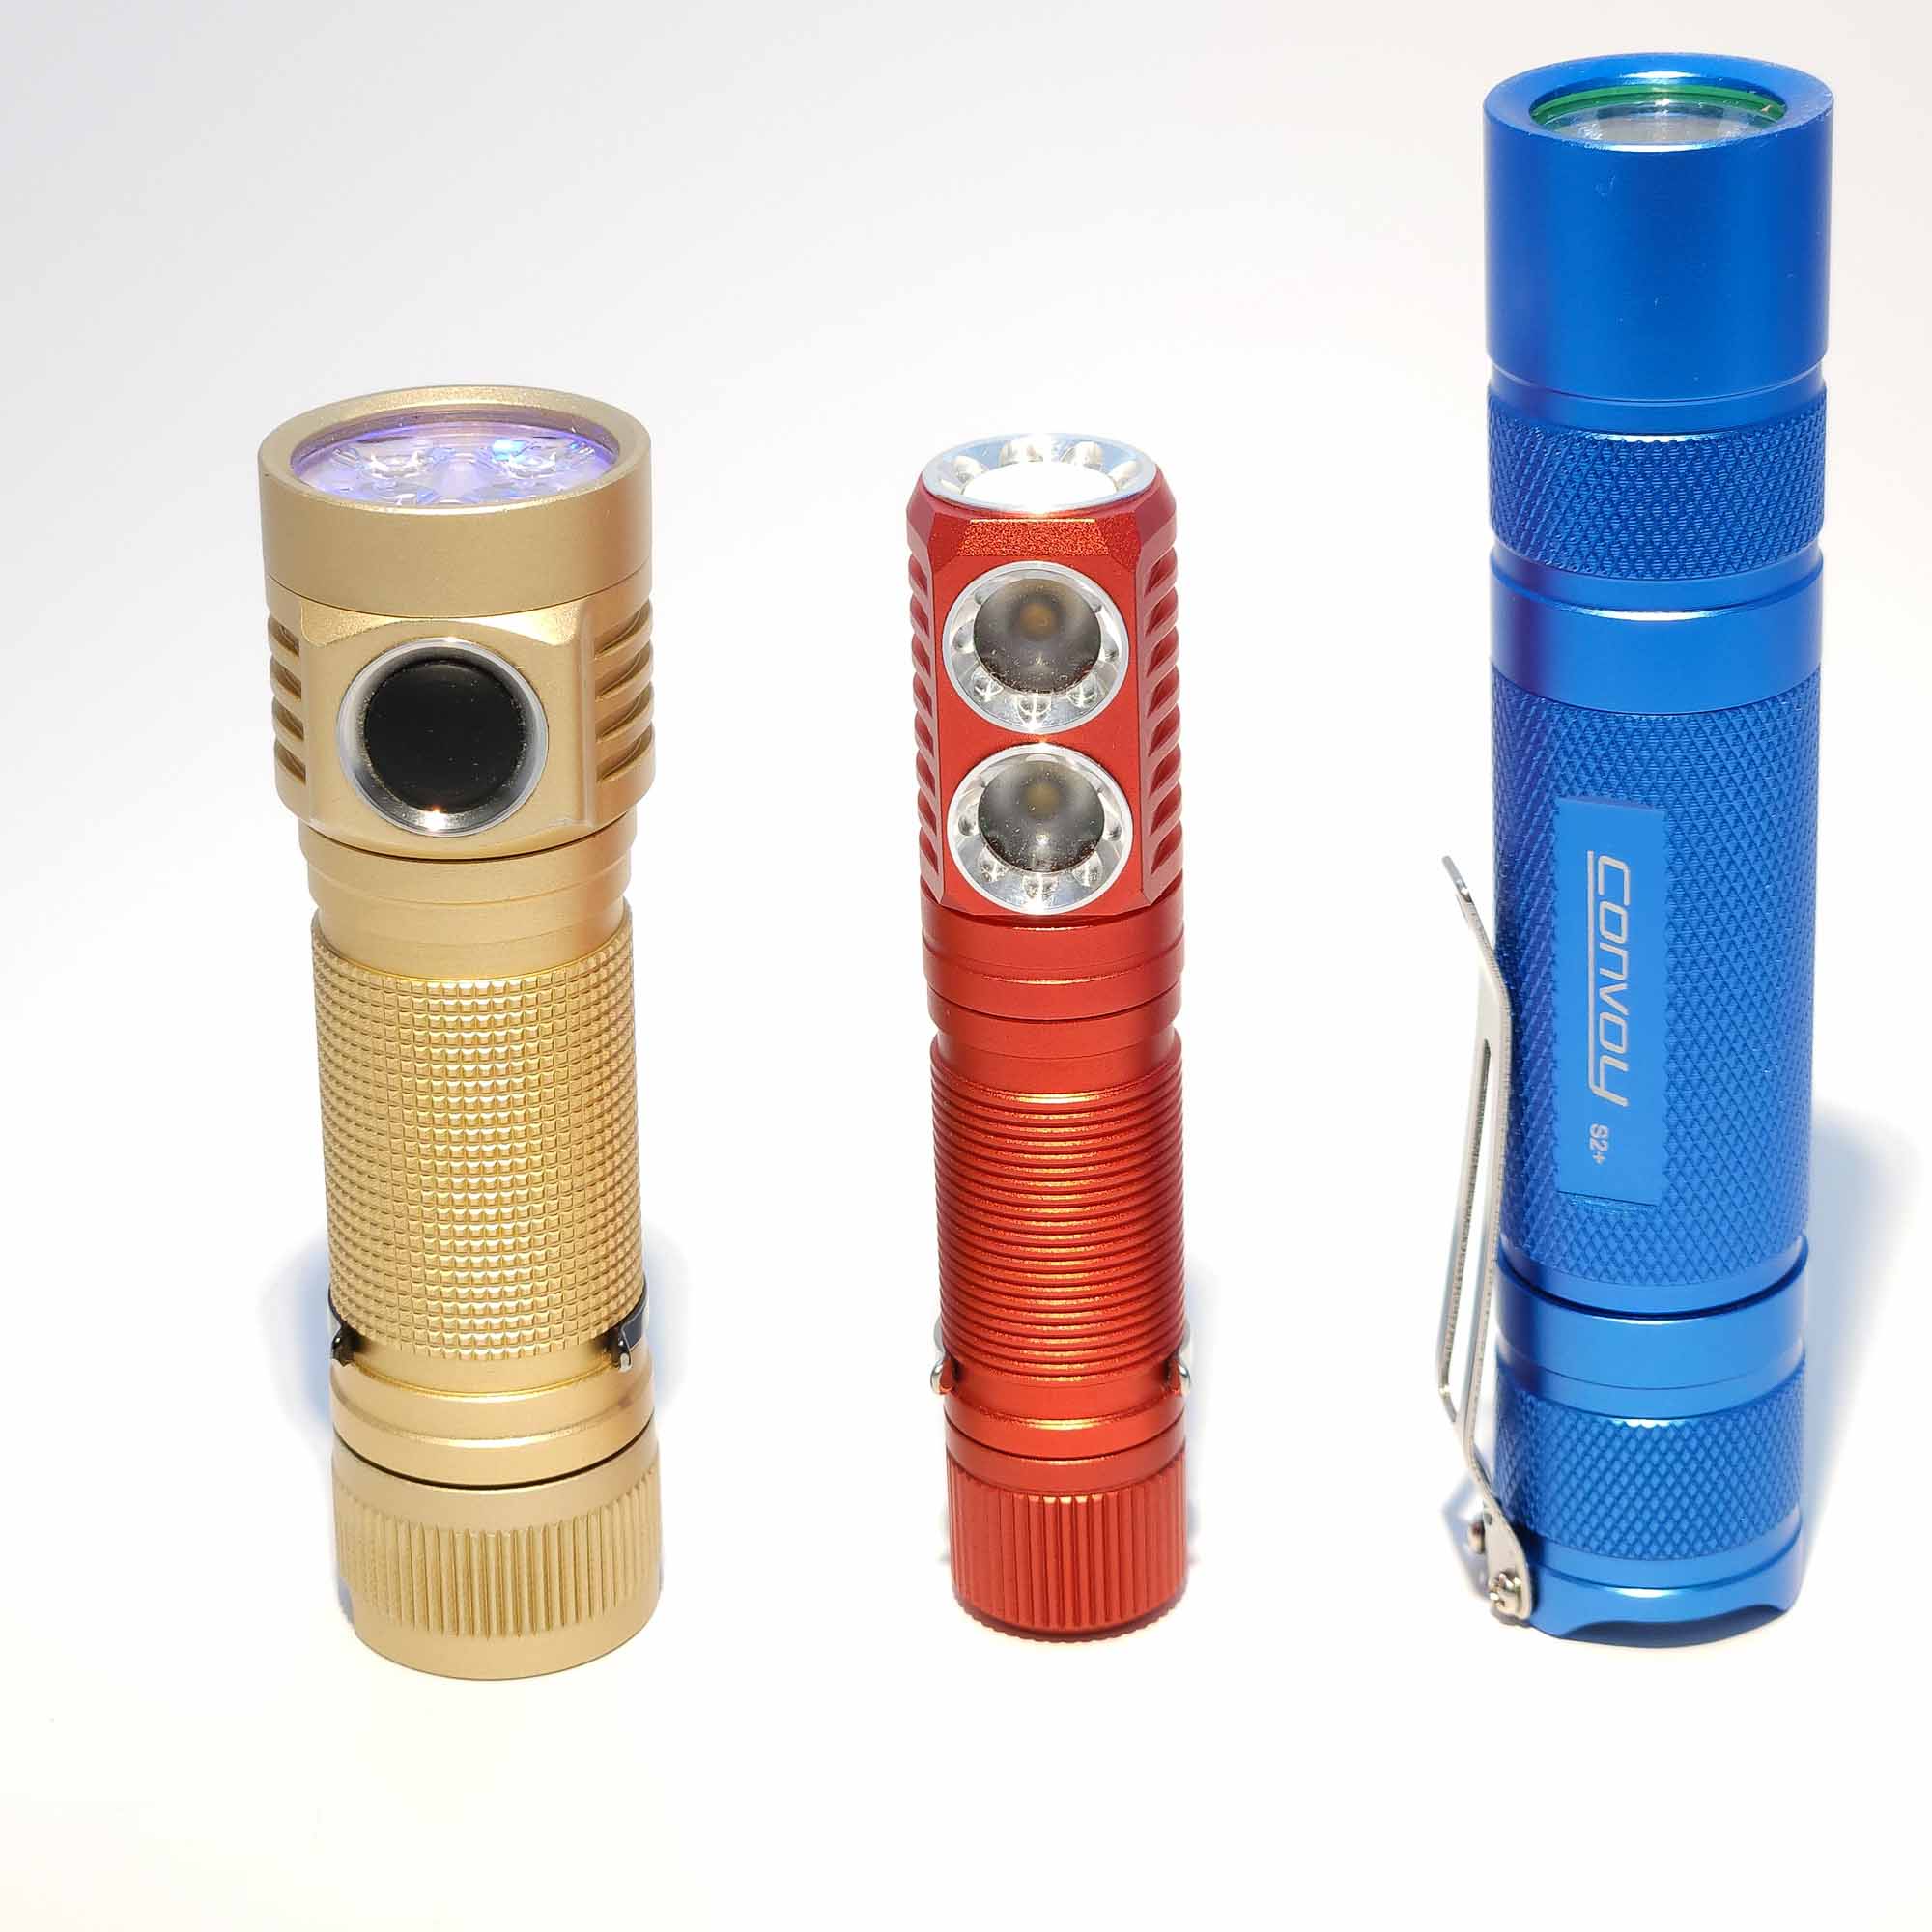
Group 3: Emisar D4V2, Emisar D2, Convoy S2+
Emisar D2 UI: User Interface and Driver
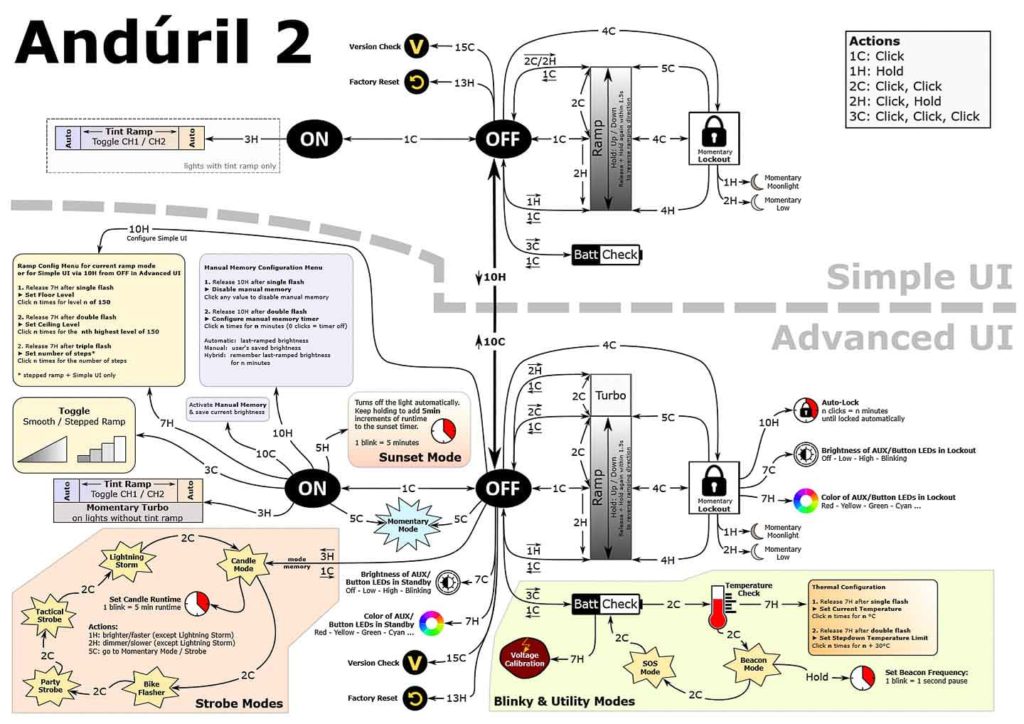
The D2, like all of Hank’s lights, runs Anduril 2.
Anduril 2 User Interface
Here is another Anduril 2 image.
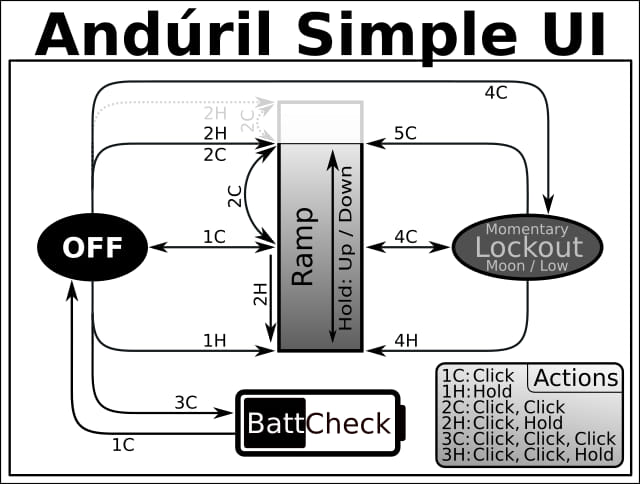
And by default, it uses the Simple UI… and here is the UI diagram:
Anduril2 has two UI’s available: Simple and Advanced. The light came with the Simple UI enabled, and I think it’s kind of a misnomer because it’s still a little complicated for a first-time user. However, those familiar with the original will pick it up pretty quickly. Simple UI is missing some of the familiar features present in the original, namely the special blinky modes, temp check, and thermal configuration (those are present in the Advanced UI), and there’s no “muggle” mode either. You still get access to smooth ramping (stepped is, you guessed it, only available in Advanced UI), lockout, momentary high, battery check, and some useful lock/unlock modes.
The Advanced UI is appropriately named because it’s, well, advanced and there’s a plethora of options and configurations available. There’s probably way more features than the average user would ever dip into, but it’s nice to know you can tweak things like the voltage sensor calibration for batt check, AUX LED settings, and even configure the auto-lock. I found this to be a pretty useful feature that enables the light to automatically turn off after a certain amount of time if the light is accidentally activated.
Modes: Simple and Advanced UI both have many standard and blinky modes available, but the main modes are stepped and smooth ramping, but stepped ramping is only available in Advanced UI, and smooth is enabled in both Simple and Advanced.
Switch to Advanced UI from Simple: 10 clicks, but hold on the 10th click
From OFF:
- Press and hold: Turns on in either smooth or stepped ramp (depending on which mode is enabled)
- Single click: Turn on in last mode (step or ramp state-again depends on which mode)
- Double click: Ramp ceiling/turbo
- Triple click: Battery check (in Simple and Advanced UI)
- Triple click and hold: Special strobe modes-remembers last used (in Advanced UI)
- Quad click: Lockout mode. In lockout mode you have different options available:
- 1 click: momentary moon (bottom of ramp)
- 2 clicks: momentary (higher floor)
- 4 clicks: turns on in ramp mode
- 4 clicks with a hold: on in ramp mode, lowest/floor
- 5 clicks with a hold: on in ramp mode, highest/ceiling
- 10 clicks with a hold: configure the lock timeout threshold (in Advanced UI only). This is a new feature for Anduril2, it allows you to set a timeout to the lock, where the light will lock after a pre-set elapsed time.
From ON:
- Press and hold: Ramp up (depending on the mode)
- Single click: Turn off
- Double click: Ramp ceiling/turbo
- Double click and hold: Ramp down
- Triple click: Toggle between smooth and stepped ramping (in Advanced UI only)
- Quad click: Lockout mode (see above for the lockout options)
Mode memory:
- Yes, memorizes last on state setting either smooth or stepped ramping, but does not remember blinkies
Low voltage warning:
- Yes, when in operation, the light steps down brightness gradually until turning off when the cell is around 2.9 volts.
Strobe/blinkies
- Yes, many! The blinkies are accessible from off with 3H (click click click-hold) in ADVANCED UI only. You switch between strobe modes with 2 clicks:
- Candle mode
- Bike flasher
- Party strobe
- Tactical strobe
- Lightning storm
Lock-out mode:
- Yes. In Simple or Advanced UI, lockout is accessed by 4 clicks from on or off. 4 clicks to unlock. The lockout enables momentary operation in the moon mode, however, 2H (click click-hold) enables low mode. There are other lockout modes available (see the diagram).
Temp check and thermal calibration mode
- In the first version, you could do both the ambient temperature sensor calibration and thermal ceiling at the same time, but in Anduril2, it’s a little different. When in temp check, click 7 times and hold on the 7th to enter the thermal configuration. To configure the ambient temp, wait for the first flash and then set the ambient, but once you’ve done that, you need to go back to the temp check and click 7 times, hold on the 7th, this time, don’t let off the button. Wait for the 2nd blink, and then you can set the thermal ceiling.
Emisar D2 Charging and batteries
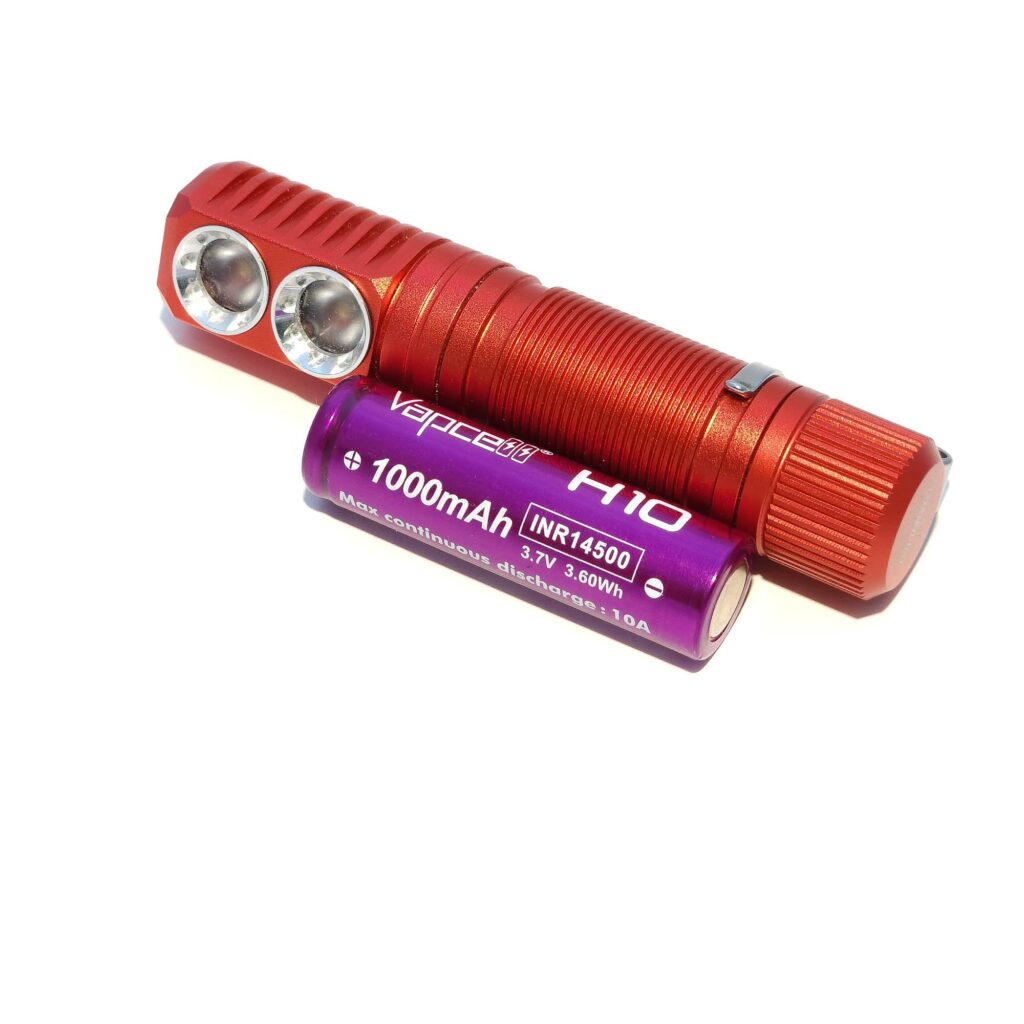
Hank does not offer batteries with his lights, and almost none of them have onboard charging, so you’ll need to buy your own batteries and charger. The D2 requires a flat top, unprotected 14500 due to very tight specifications. Batteries with a button top, protection circuitry, or built in USB charging won’t fit.
The Vapcell H10 is a popular choice, due to its high discharge rate, though depending on your emitter configuration, you may not be able to take advantage of it. Another option is the Vapcell F12. This battery has a lower continuous discharge rate (3A vs 10A), but increased capacity (1250mAh vs 1000mAh).
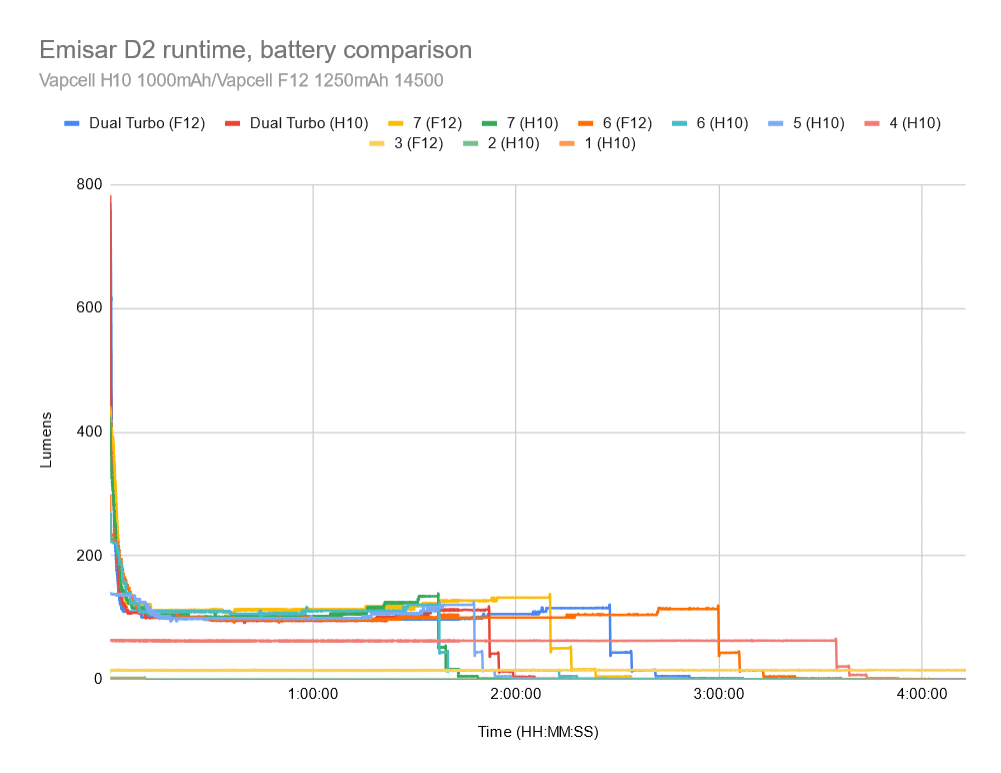
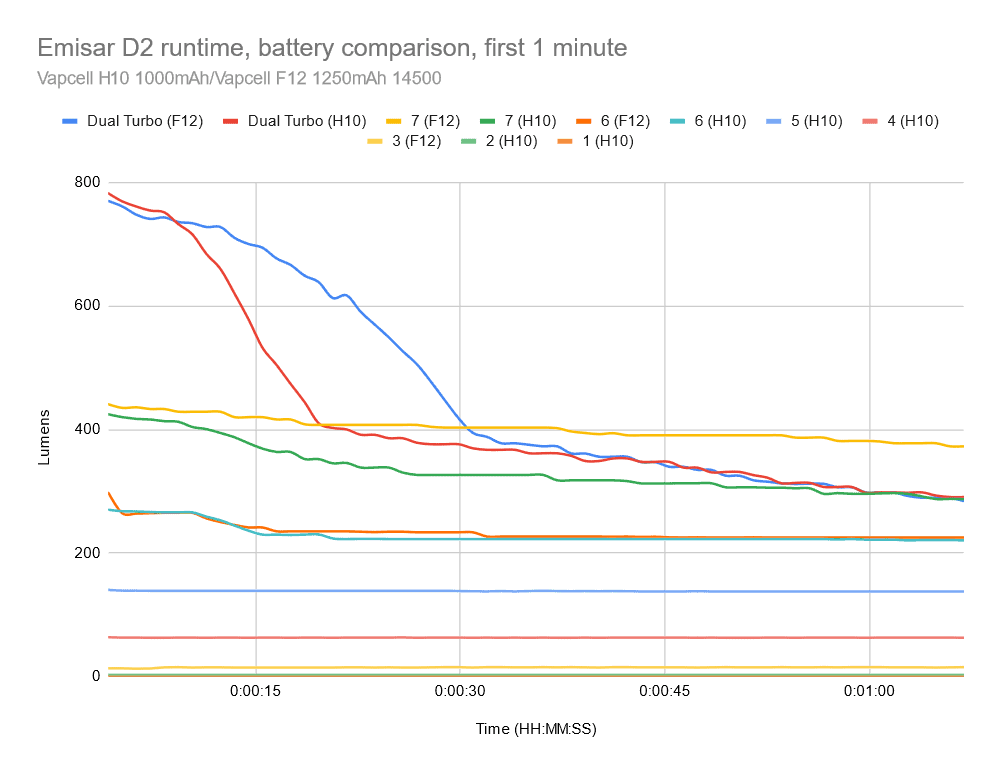
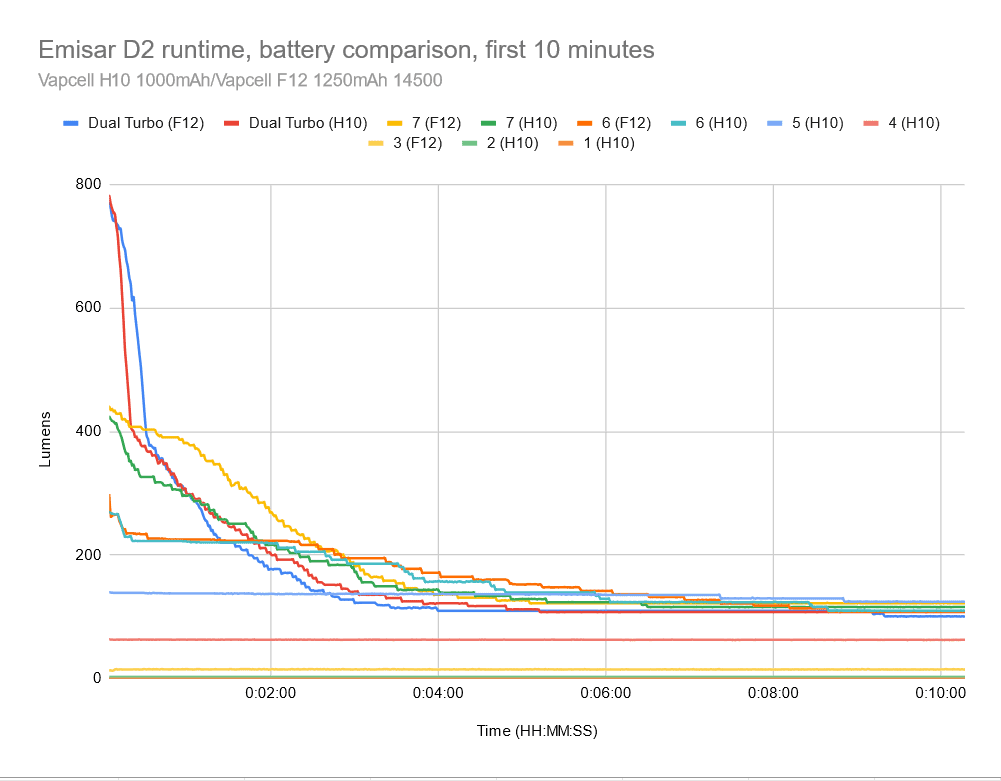
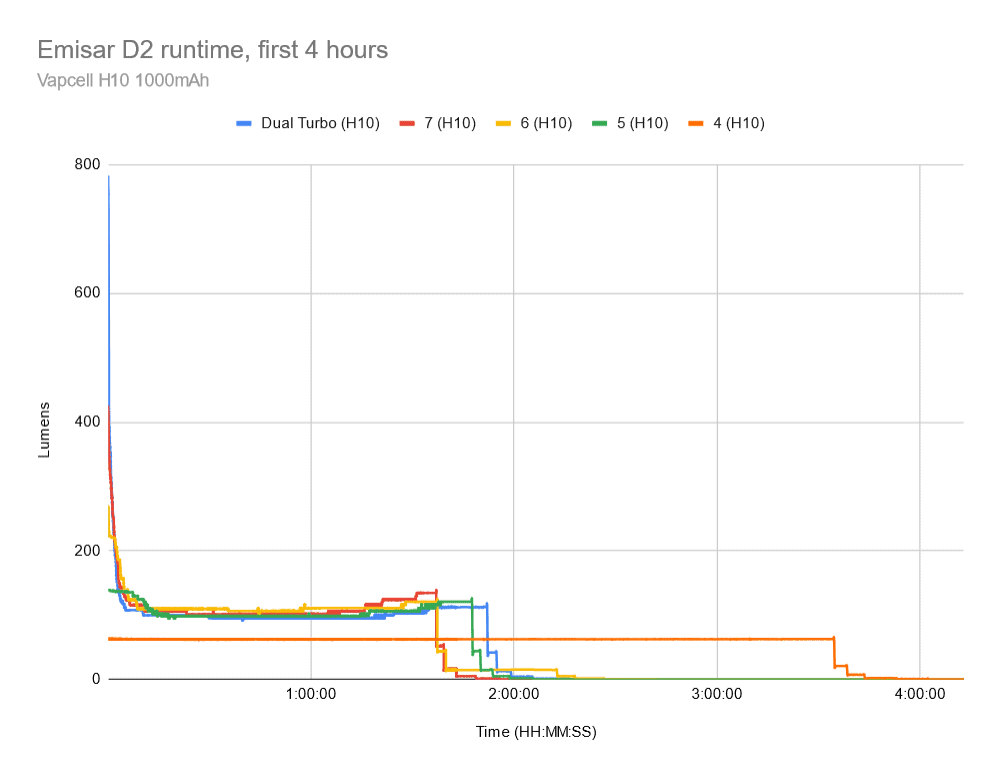
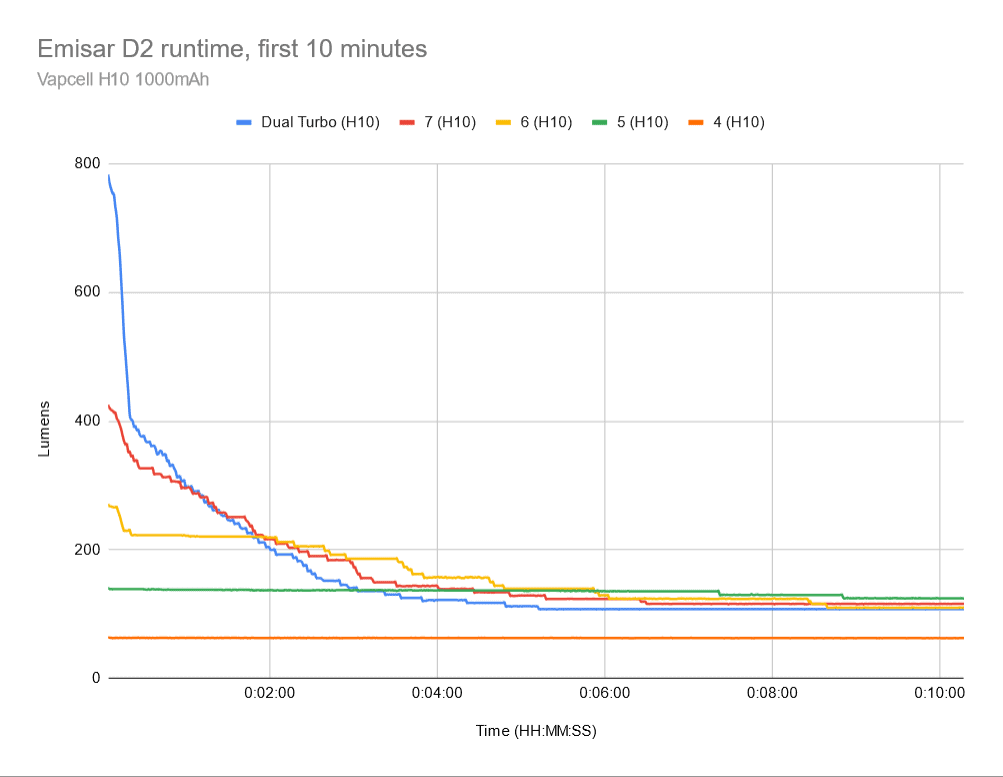
Since this is a small light with an aluminum MCPCB, it won’t be able to handle much heat and as you can see in the runtime graphs, steps down from turbo very quickly. The max continuous current is 2.5A per channel, but it won’t even be sustaining that for long, so unless you plan on repeatedly hitting turbo, you might prefer a higher capacity battery for longer runtimes.
Take a look at the runtime graphs below. There’s actually not a lot of performance difference between the two (in this emitter configuration), but the F12 has much longer runtimes.
Even though the D2 uses a 14500, which is the same size as a standard AA battery, it will not run with a AA battery. That’s a shame, because it would make the D2 more versatile if it did.
Performance test
Lumen measurements
How Lumens are Measured: Understanding ANSI FL1 Standards How Lumens are Measured: Understanding ANSI FL1 Standards: The ANSI FL1 standards specify that output in lumens should be measured 30 seconds after turning on, as this is the standardized time for measuring brightness according to the industry standard. This is why we focus on this part in our measurements. The ANSI FL1 standards require an ambient temperature of 22 ± 3°C. We record the ambient the ambient temperature to identify potential reasons for any observed discrepancies.To obtain these numbers, I used a very rudimentary integrated shoebox and ceilingbounce on my Samsung Galaxy S10. Measurements have been calibrated using a standardized calibration light provided by 1Lumen.
These tests were performed with a Vapcell H10 battery unless otherwise specified.
Since this light runs Anduril, I’ve done my performance tests with the default 7-stepped mode as opposed to smooth ramping so there’s an easy frame of reference.
On the product page, it lists the SST-20 4000K or 2700K should have 1200 out the front lumens at startup. When hitting turbo with both emitters, I only hit a max of 782 lumens with my amateur setup. 1200 sounds a little optimistic for one low CCT, high CRI emitter in a 14500 package, but really with the way it (or any 14500 light) steps down so fast, it’s not really an issue. See more below…
| Mode | Specs | turn on | 30 sec | 10 minutes |
|---|---|---|---|---|
| 1 | – | 0 | 0 | 0 |
| 2 | – | 3 | 3 | 3 |
| 3 (F12) | – | 14 | 16 | 15 |
| 4 | – | 64 | 63 | 63 |
| 5 | – | 141 | 139 | 125 |
| 6 | – | 270 | 223 | 110 |
| 7 | – | 425 | 327 | 116 |
| Turbo | 1200 lm | 782 lm | 376 lm | 108 |
| Turbo at 3.6V | – | 752 | 417 | 93 |
I was unable to measure amperage from the battery.
Emisar D2 Battery Life: Runtime graphs
How Runtimes are Measured: Understanding ANSI FL1 Standards About ANSI FL1 runtime standards: The runtime is measured until the light drops to 10% of its initial output (30 seconds after turning on). This does not mean that the flashlight is not usable anymore. The last column shows how long the light actually works till it shuts off. If there is a + symbol, it means that the test was stopped at that particular point, but the light was actually still running. This happens on certain occasions, with certain drivers, firmware, or batteries.One thing to note while looking at these runtime graphs is that, like other Anduril lights, the D2 will step down as voltage drops until it gets to sub-lumen levels, which my setup has some trouble capturing. Depending on the level it started off at, sub-lumen can last for hours.
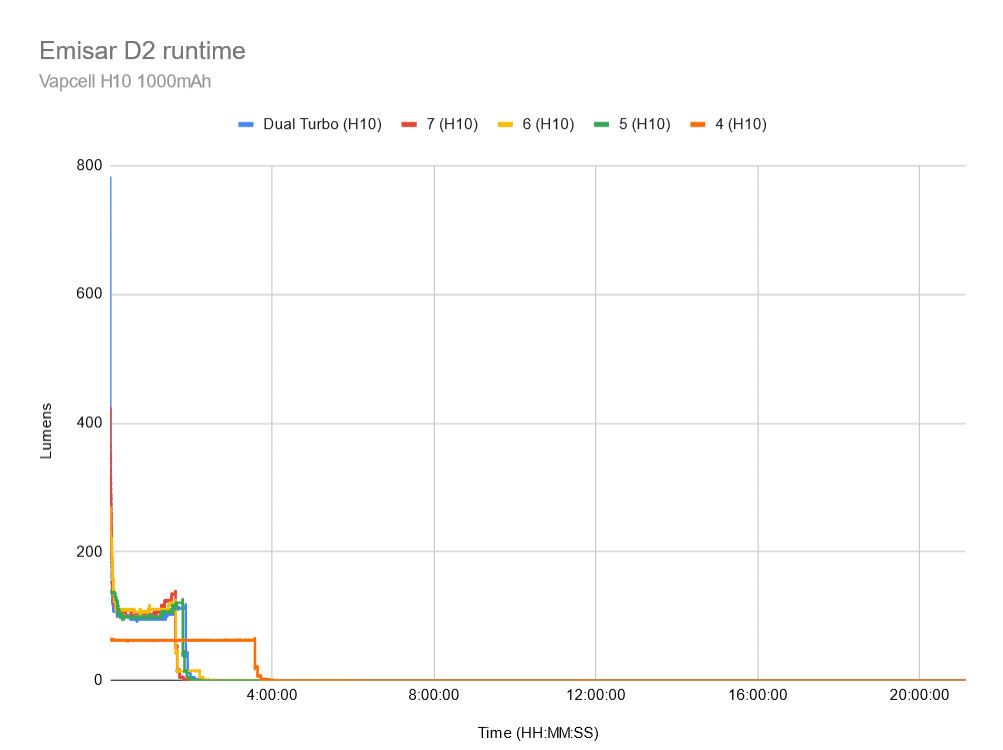
Level 4 is the highest fully regulated mode with a flat line of output for 3 hours and 34 minutes before stepping down to sub-lumen by 4 hours 15 minutes.
All of the levels above that converge around 100 lumens within 6 minutes of turn on, and drop off before two hours with the H10. With the F12 battery, you’ll get 2-3 hours of that 100-lumen level.
If you need to run it for a long time, level 3 provided 63 steady lumens for over 17 hours!
| Mode | Specified runtime | Measured runtime ANSI | Time until sub-lumen | Time till shut off |
|---|---|---|---|---|
| 1 | – | – | – | – |
| 2 | – | – | – | – |
| 3 | – | 17h 25min | – | – |
| 4 | – | 3h 34min | 4h 15min | – |
| 5 | – | 1h 54min | 2h 17min | 9h 22min |
| 6 | – | 1h 40min | 2h 42min | 6h 07min |
| 7 | – | 1h 39min | 2h 08min | 5h 46min |
| Turbo | – | 1h 52min | 2h 30min | 9h 33 min |
Peak beam intensity and beam distance measurements
About Peak beam intensity: Understanding ANSI FL1 Standards About peak beam intensity The calculated value of distance in meters at which the flashlight produces a light intensity of 0.25 lux. (0.25 lux is about the brightness of a full moon shining on an object). This means that the intensity has decreased so much, it becomes difficult to see darker objects, or objects that don’t reflect light. The columns ‘Meters’ and ‘Yards’ use rounded numbers.The numbers for candela were obtained with a UNI-T UT383S luxmeter at 5 and 15 meters, then averaged.
| Mode | Specs | Candela measured | Meters | Yards |
|---|---|---|---|---|
| 1 | – | – | – | – |
| 2 | – | – | – | – |
| 3 | – | 71 cd | 17 m | 19 yd |
| 4 | – | 141 cd | 24 m | 26 yd |
| 5 | – | 306 cd | 35 m | 38 yd |
| 6 | – | 541 cd | 47 m | 51 yd |
| 7 | – | 846 cd | 58 m | 63 yd |
| Turbo | – | 1892 cd | 87 m | 95 yd |
Not a whole lot of throw, but also not unexpected. These are domed emitters behind floody optics, after all.
Beamshots
Beamshots:
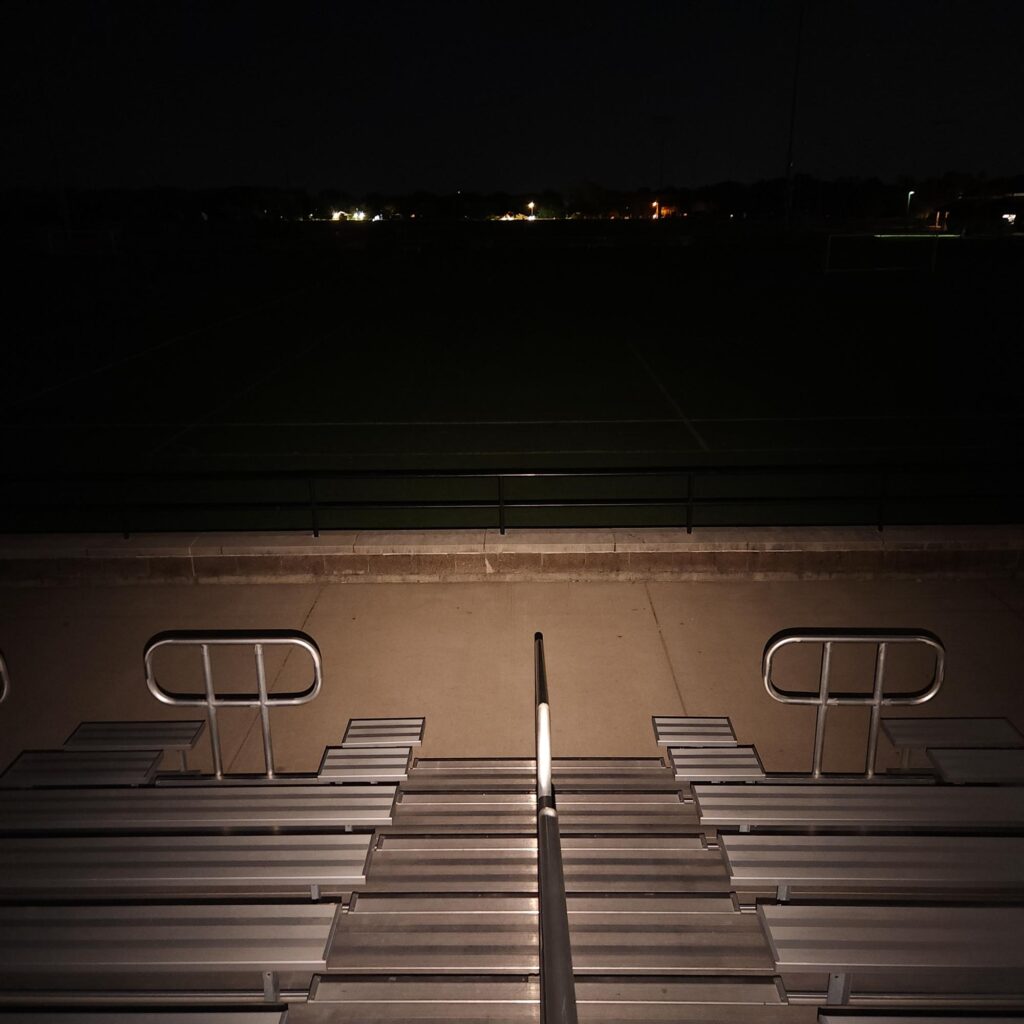
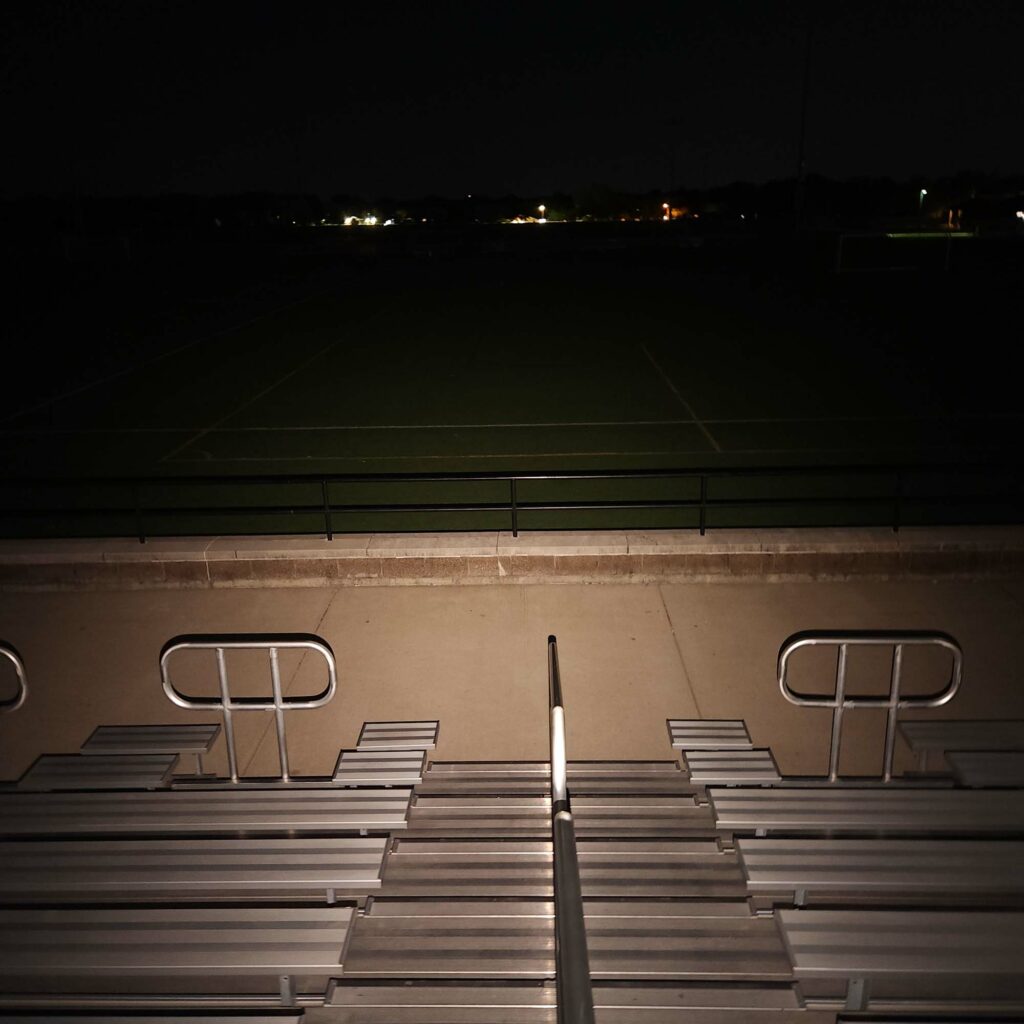
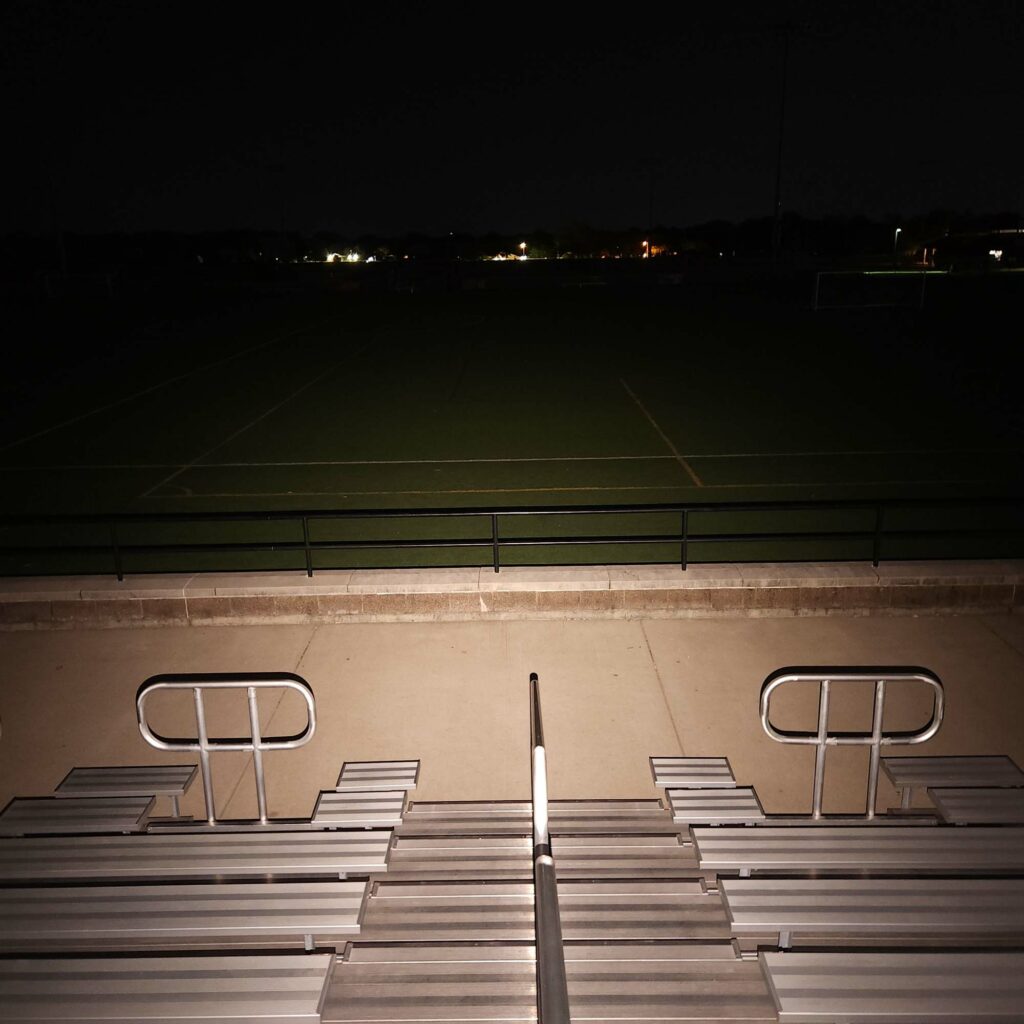
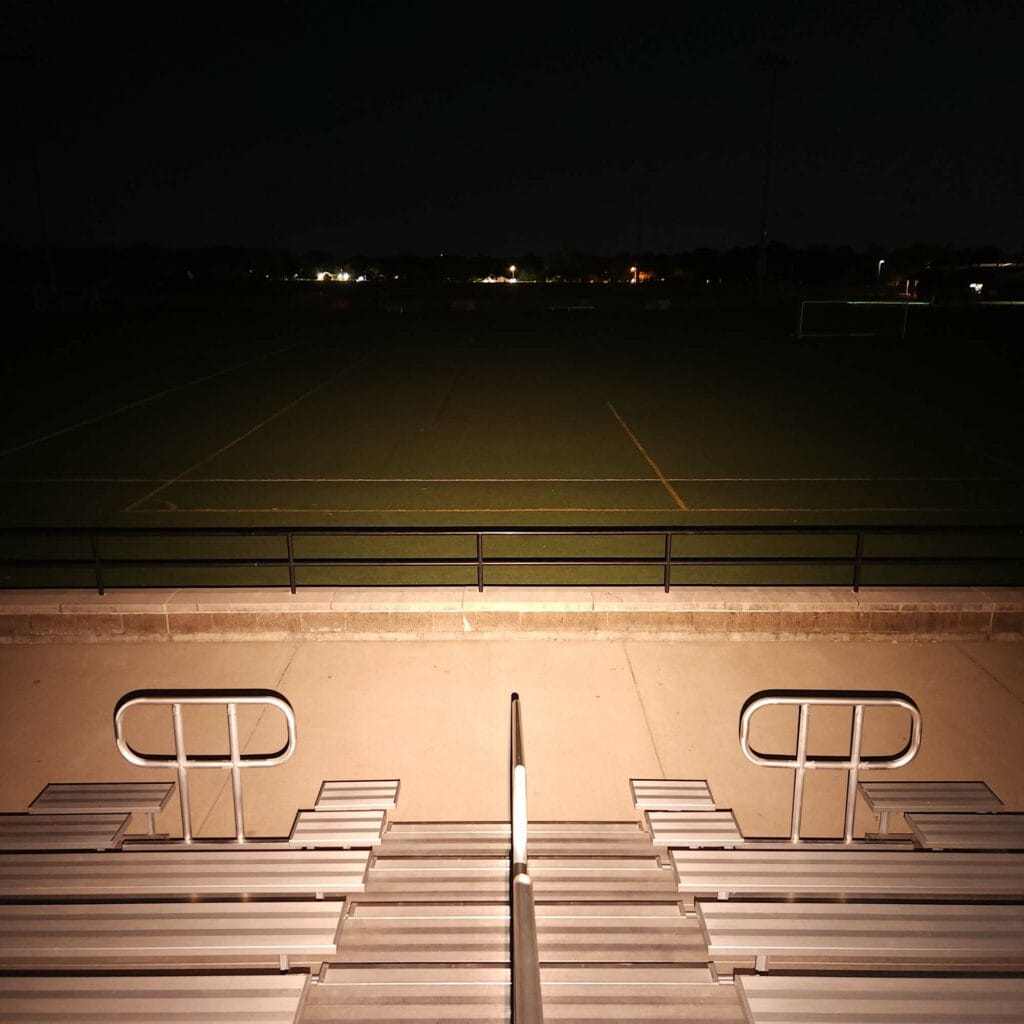
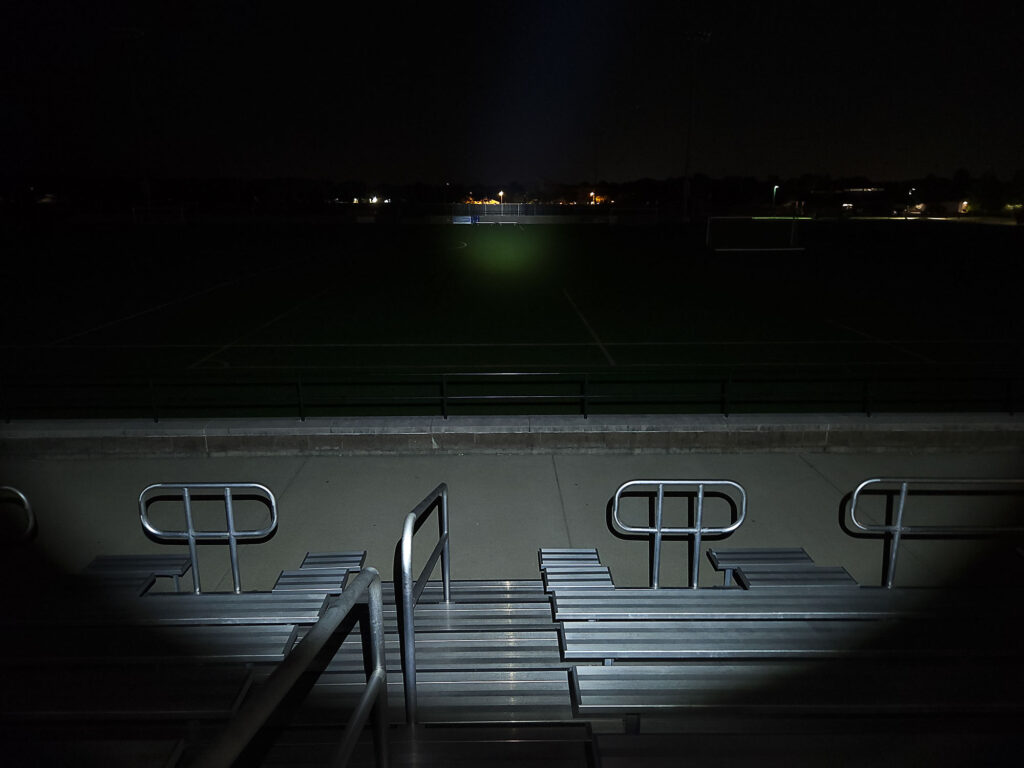
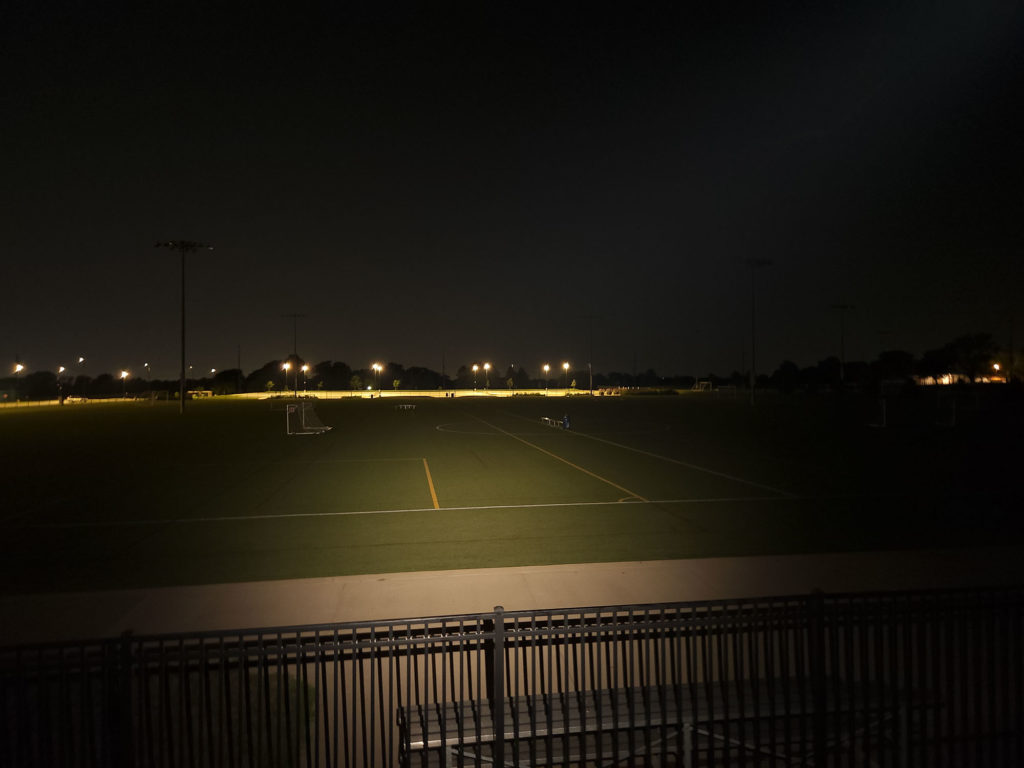
These were taken with a Samsung Galaxy S22+ using pro mode and the following settings:
- WB 5000K
- ISO 200
- Speed 0.5
Distance to the other end of the playing field is 100 meters.
Beamshots of the following flashlights compared:
- Emisar D2
- Lumintop FW1AA
- Lumintop GT Nano Pro
Please note that beamshots are mainly intended to showcase the beam pattern and beam quality, rather than overall performance. These images are typically taken directly after activation, and do not fully represent its overall performance. For accurate performance metrics, such as output, beam distance, and runtimes, you need to look at the performance section of this review.
Disclaimer: we bought this flashlight with our own money. Nobody paid us to review this flashlight, nor have we been holding back on problems or defects.
Final Verdict
Pros
- Hank’s smallest light yet!
- Dual channel
- Anduril
- Tiny pocket rocket
Cons
- Dual channel driver has higher moonlight
- Stiff switch
- Clip digs into palm when holding switch
- Square beam with clear optics
- No AA support
- Very low throw with floody optics
Explanation on star ratings:
1: Avoid: a match would be a better choice – 2: Poor: significant defect or issues; almost unusable – 3: Average: some defects or issues; but still usable 4: Good: recommended (minor issues) – 5: Great: highly recommended
4 stars: ★★★★
While our star rating provides a reliable indicator, we encourage you to read the full review to make an informed decision based on your own needs and preferences.
The Emisar D2 fills a niche segment of the flashlight market: Dual channel, right angle, Anduril, 14500-sized light. I say “light” because it’s the only one! That’s not to say that you have to need all of those requirements to own and enjoy the D2; you should consider it if you’re looking for any of those features. It’s backed by Hank’s famous quality and service, and if you know anything about that, you should already be interested.
That said, it’s not for everyone. Not everyone likes Anduril or needs a right angle light, maybe you need ultra low moonlight, or 14500 is too small for your needs. It has some ergonomics problems like the stiff switch (which may just be the switch on my model) and clip placement against your hand; there’s the problem with the squarish beam if you request the clear optics, and it would’ve been nice if the light could take AA batteries, too.
All in all, I give the Emisar D2 4 stars for being small, versatile, and powerful, even if there are some drawbacks.
Buy your Emisar D2 here:
1lumen selects and reviews products personally. We may earn affiliate commissions through our links, which help support our testing.
