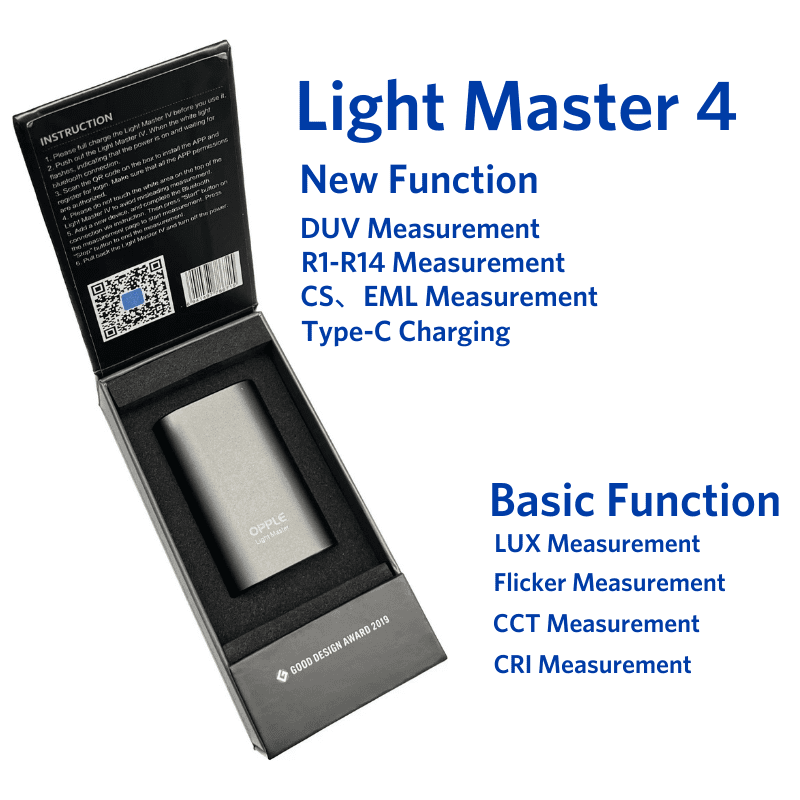
Opple Light Master 4
1lumen selects and reviews products personally. We may earn affiliate commissions through our links, which help support our testing.
Opple Light Master 4 review
Opple Light Master 4 specifications
| Brand/model | Opple Light Master 4 |
|---|---|
| Measures CCT (color temperature in Kelvin) | Yes |
| Measures CRI (color rendering indexing) | Yes, CRI Ra including R1-R14 |
| Measured DUV | Yes |
| Measures LUX | Yes, ~5% difference, up to 50,000 lx |
| Measures flicker | Yes |
| Charge | USB-C |
| Connectivity | Bluetooth |
| PC Connection | No |
| Logging | No, just saves 1 time |
| Android APP | Yes |
| IOS APP | Yes |
Opple Light Master intro
NOTE: this page will be rewritten when the Opple Light master 4 has arrived.
The Opple Light Master has arrived, but there are some issues with the measurements.
Opple will look into this, and hopefully improve them in the short term.
So, for now, I’d recommend to wait before buying one!
This will likely be in May 2023, until then, here is some basic info, taken from the Opple Light Master Pro review.
Since I started this site, I have always missed a device that could measure the color temperature and CRI of a certain LED. Because most manufacturers don’t tell what LED they used or what color temperature the LED is. After some research, I found these devices were called portable spectrometers, spectrophotometers, or colorimeters.
After searching for an affordable spectrometer for a while, I had given up hope to find anything good below $600. Even the cheapest Spectrophotometers from China are $650 (made by Hopoocolor), while other well-known spectrometers from Sekonic are $1500 and beyond.
So, I started looking at the used market for a Sekonic Spectromaster, but to no avail.
Then I came across the Opple Light Master III; a device that costs a fraction of the ones mentioned earlier, but measures the color temperatures, and even CRI. It’s a standalone device with a built-in battery that can be charged with a Micro-USB cable, and uses Bluetooth to connect to your phone. I then looked into buying options in the Netherlands and found out who Opple actually was.
“Opple Lighting is a Dutch company with 23-years of experience and operating in over 70 countries”. Even though I am Dutch, I had never heard of the name before, and I had no idea it was this large.
But now, 2 years after finding the Opple Light Master 3, the Opple Light Master 4 is available.
This is not the same as the Opple Light Master, 2 or even 3. It’s a new device!
Opple Light Master 4 vs real Spectrophotometer
Reddit member Cheule did a wonderful comparison video between the Opple Light Master and a high end Asensetek Lighting Passport Pro Standard. This is a $2500 device.
I will be sharing more info here when I receive the Light Master 4
App & connectivity
An Android phone or iPhone with a Bluetooth connection and the Opple Light Master PRO APP. That’s what you need to use the Light Master.
- Download the App with the following logo
- Link to Android App: https://play.google.com/store/apps/details?id=com.opple.lightmasterpro
- Link to iOS App: https://apps.apple.com/app/light-master/id1077969059 (not recommended)
- Link to iOS App Pro version: https://apps.apple.com/app/light-master-pro/id1481752643
Once you installed the App, you need to turn on your Bluetooth on your phone, and your Location setting. (Don’t ask me why, but without using my location setting, the Android App doesn’t work).
Connecting is pretty straightforward! Just click the + sign at the right top of the screen, and follow the instructions.
If you get an error: Device not found. Please check:
- The device is open and the indicator is blinking
- The [Location] is enabled for this App
- The device is Gen2 or Gen 3 product (Use BLE for connection)
If you get this error, you probably haven’t turned on your Location/GPS setting.
How to measure the flashlight Color temperature (CCT) and CRI
Most flashlight manufacturers use LEDs with a cool color temperature. The higher the number (for example: 6500K), the cooler the beam. The lower the number (for example: 2700K), the warmer the beam. This device will tell you how cold or warm your light source is.
BTW. you can also use this for measuring your home lighting.
- Open the Opple Light Master App
- Turn on your Bluetooth connection
- Turn on your Location/GPS setting
- Slide the Opple Light Master from its case, so the white sensor screen is visible, and the indicator LED is blinking
Now press Start.
It will start measuring the light it receives. And please make sure to turn off all other lights, so the device will only receive light from the light source you are trying to measure. If you can’t turn the lights off, put the device in a dark spot without any direct light hitting the sensor.
Press Stop.
See CCT(k) for correlated color temperature
At the bottom left of the large Lux measurement, it shows CCT (k). In the following example, it’s 4074K
That’s the CCT of your flashlight. You can swipe the screen to the left, to show the approximate spot on the color spectrum.
See Ra for CRI
On the bottom right of the large circle: Ra. This means the CRI or color render indexing. In the following example, that’s 83.9
In an older ad, Opple shows an R9 reading (which is for the color red in the color spectrum), but the actual app doesn’t show the R9 readings but only the normal Ra (CRI) reading. So it tells you the CRI value, but the doesn’t tell what the R9 is. For some people, this is a pity, but you need to keep in mind that we are talking about a $50 device, and not a $1500 device.
I used a frosted lens to reduce the shift in tint inside a beam, but this is not recommended for the best measurements.
How to measure DUV
With the information you have on your screen, you can now calculate the DUV.
DUV stands for “Delta u,v” and describes the distance of a light color point from the BBL (black body locus) in the color spectrum. You can see the color spectrum if you swipe the Opple App screen to the left. Here you can see how far the point is from the BBL line.
If the DUV number is negative, the color of the beam has more red/magenta, while a positive DUV number has more green/yellow. The closer to the BBL, the least tint shift there is towards green or red.
Just in case you want to measure DUV, you can use the following link.
You need the X data, and Y data to do the DUV measurement:
https://www.waveformlighting.com/tech/calculate-duv-from-cie-1931-xy-coordinates
How to measure flicker (little bit similar to PWM/Hz)
I would have gladly paid the price for the Opple just to measure color temperature. And I was very happy to learn that it also included CRI measurements.
But to top it off, the Light Master G3 also measures flicker/PWM/Hz. And I have to admit I don’t really use that, but in case you want to see whether a light bulb in your home or flashlight has any flicker in it.. you can use this too.
- Select Flicker in the bottom bar of the app
- Press Start
These measurements take a few seconds.
Once it’s done, you get 2 screens. (toggle between them by tapping on the 2 option on top) The first one shows the Risk Assessment, and the next tab shows the Raw Data. Both very cool to use.
Final Verdict
Pros
- Can be used to measure Lux, CCT, and CRI, Duv
- Very affordable
- Measures R1-R14
- Very small
- Very light weight
- Rechargeable battery built-in
- USB-C charging
Cons
- Nothing to complain at this price point
Explanation on star ratings:
1: Avoid: my phone flashlight would be a better choice – 2: Poor: significant defect or issues; almost unusable – 3: Average: some defects or issues; but still usable 4: Good: recommended (minor issues) – 5: Great: highly recommended
500 stars: ★★★★★★★★★★★★★★★ 🙂
yes… 500 stars 😉
More info coming when the light master 4 arrives:
For now, I’d recommend to wait before buying one! There are some issues with this one, so please wait for the updated version. Hopefully available somewhere between June and August.
Buy your Opple Light Master 4 here?
If you still want to buy the 4th generation, you can get it here:
I would recommend waiting till the problems with measurements are solved first though.
1lumen selects and reviews products personally. We may earn affiliate commissions through our links, which help support our testing.