
1lumen selects and reviews products personally. We may earn affiliate commissions through our links, which help support our testing.
Fenix HM75R review

Fenix HM75R Specifications & measurements
| Brand & Model | Fenix HM75R |
|---|---|
| Flashlight category | Headlamp / Worklight |
| LED | (1) Luminus SST40 cold white LED(2) Luminus SST20 neutral white LEDs(1) OSRAM GR QSSPA1.23 red light LED |
| Max. output | 1,600 lumens |
| Max. beam distance | 223 meters |
| Max. beam intensity | 12,448 cd |
| Battery config. | 18650 battery in headlamp21700 battery in external battery pack |
| Onboard charging | Yes, both headlamp and powerbank have usb-c |
| Main modes | 12 |
| Blinkies | Strobe (Red LED) |
| Waterproof | IP68 |
| Review publication date | July 2024 |
Review intro:
Headlamps are a perfect lighting solution for a variety of tasks ranging from camping and caving, to hunting and jogging. Since 2001, Fenix has been creating quality lights that you can depend on. I have always heard many good things about the Fenix line Headlamps. They must be doing something right as there are, at the time of this review, currently 18 different models to choose from on their website!
I was extremely excited to get the opportunity to give the HM75R a good look-over after hearing about it being an upgraded version of the Fenix HM65R. I already see higher output and more candela just at a glance!
There is even a larger battery noted as I quickly compare the two. Are these the only upgrades? Are there any other features with the new HM75R? I am quickly learning that this Fenix HM75R has tons of options, features and settings galore. The instruction manual is quite thick! There is going to be a lot to look over here. First things first, let’s remove that insulator and turn this flashlight on – let’s get into it!
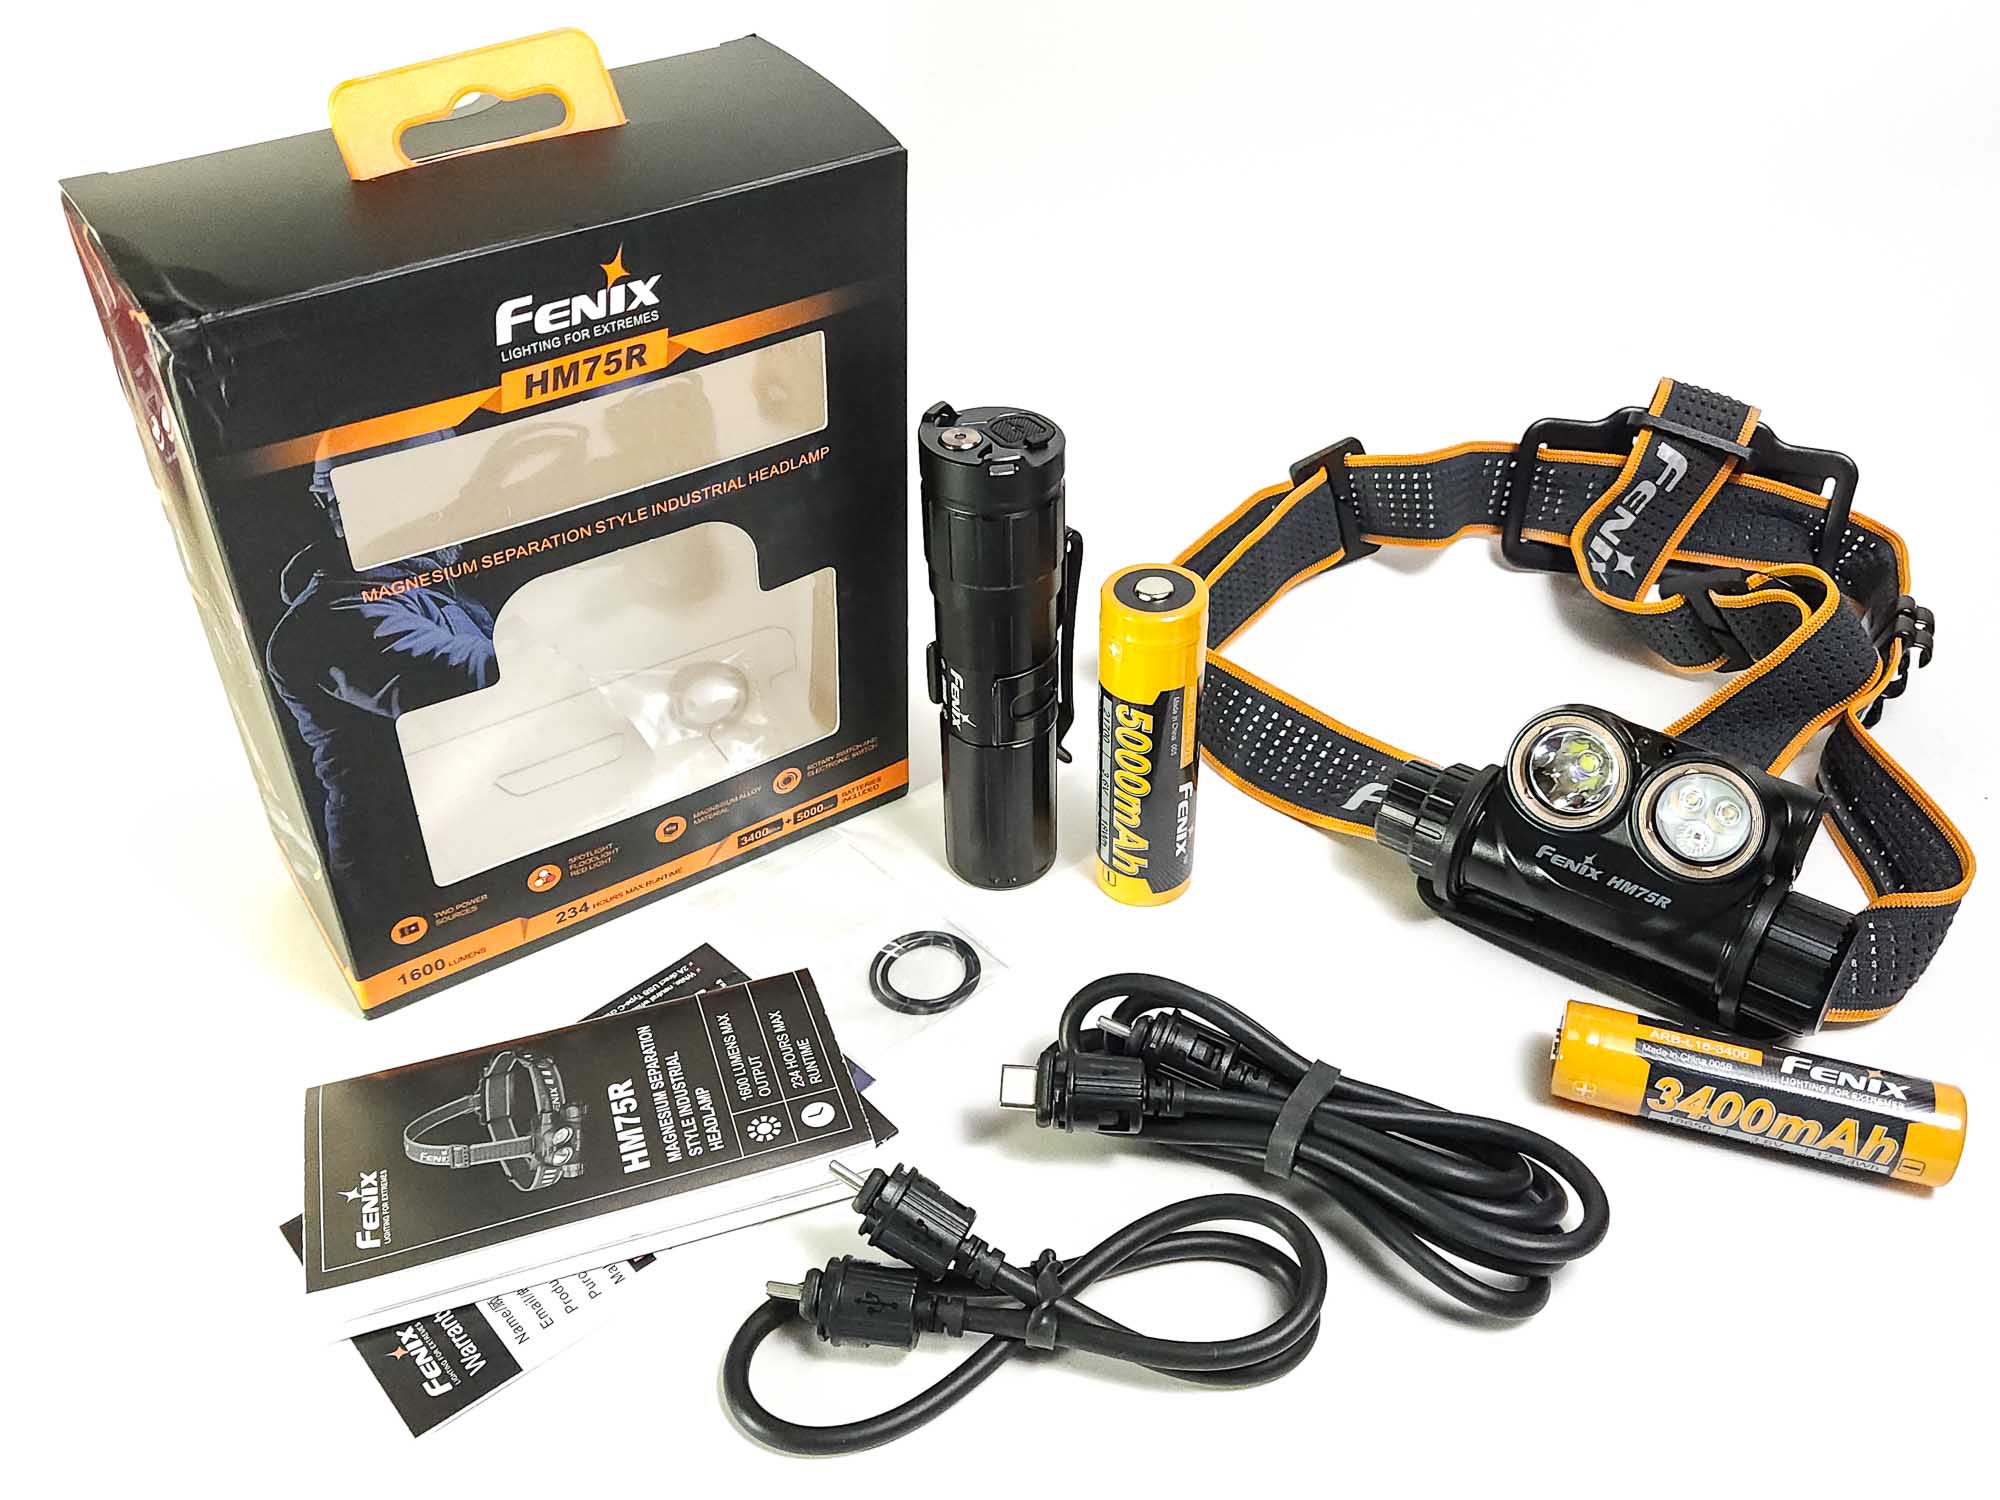
What’s in the package
Fenix always delivers with nice looking, informative retail packaging that has the flashlight, or headlamp in this case, packaged safely and securely. The typical orange and black box has all the specs and relative information presented nicely on the outside and there is a clear window into my heart, I mean the box, on the front. Everything you need to run this HM75R at its best is here, packed well inside. There is even a longer, extra cable for the external battery pack so you can re-locate it from the back of your head. Perhaps on a belt or in a pack? Well, it is up to you where to put it – there’s a cable!
- Fenix HM75R
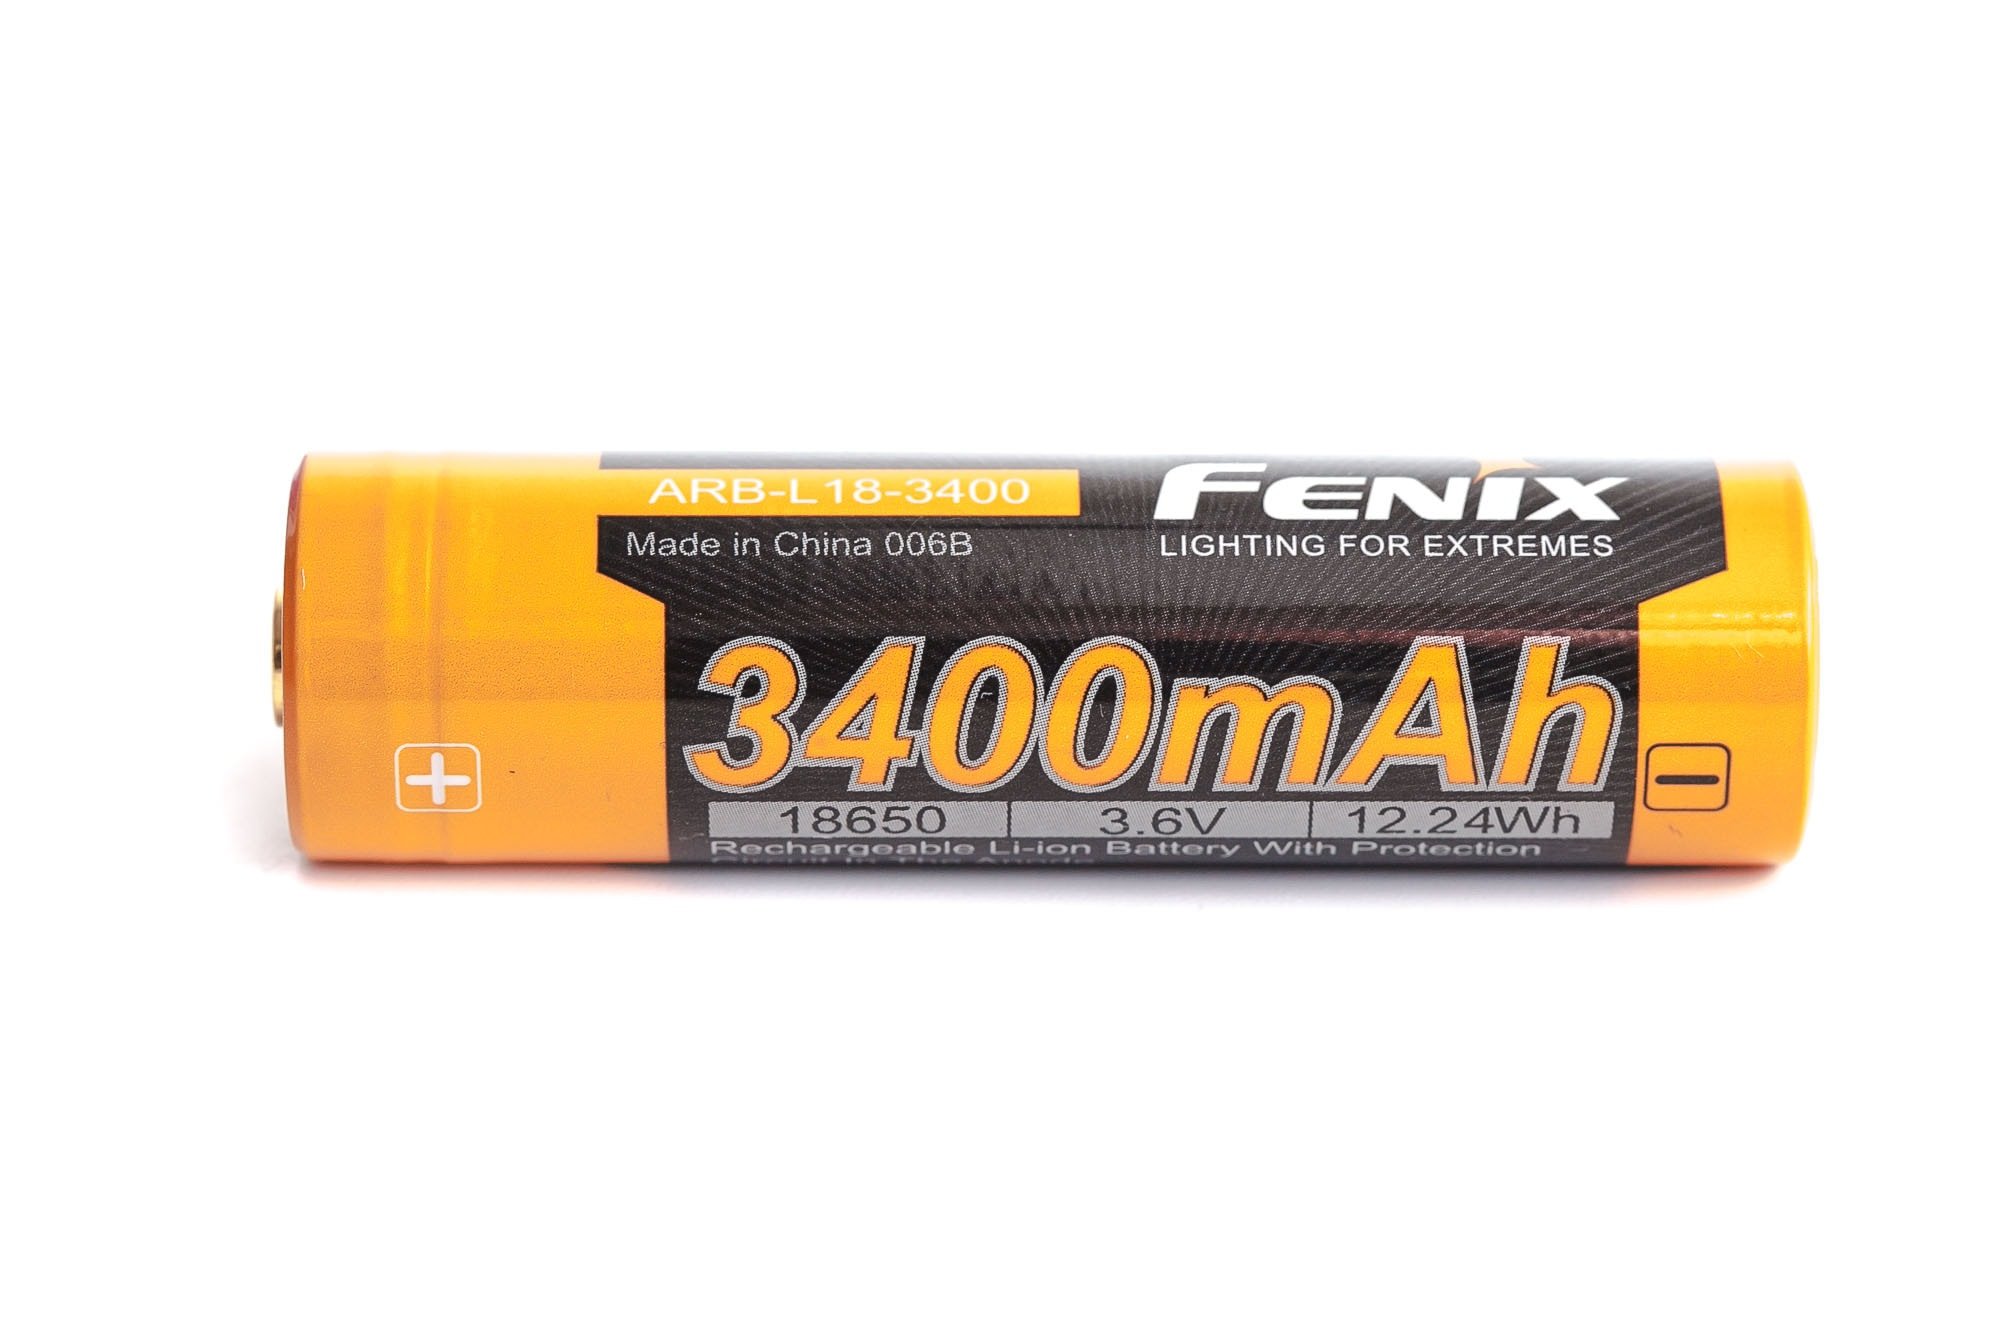
- ARB-L18-3400 battery (high capacity 18650-pre-installed)
- ARB-L21-5000 V2.0 battery (high capacity 21700-pre-installed)
- .4 meter (16”) usb-c cable
- 1 meter (40”) usb-c extension cable
- 2-spare o-rings
- Manual
- Warranty card


Flashlight in use, Build Quality, and Warranty
The Fenix HM75R feels solid and well made. It has a slight bit of a chunky feeling in hand, (but it is a Headlamp!) and does have a little mass/ weight to it. This is completely understandable with the multiple leds and the onboard power of an 18650 resting directly behind the pair of led bezels. An easily manipulated rotary-dial on the right side (with headlamp on) quickly changes the led selection.
Rotate said dial slightly forward to take the headlamp from off to spot to flood or rotate it again from there to get to red. All with a distinct resting point at each led choice location. The center of the rotary dial is the mode-changing button. Once you have arrived at spot (or flood or red), you can then press the button in the center to get to eco, low, medium, high and turbo. This method is a very easy way to manipulate the led choice and modes.
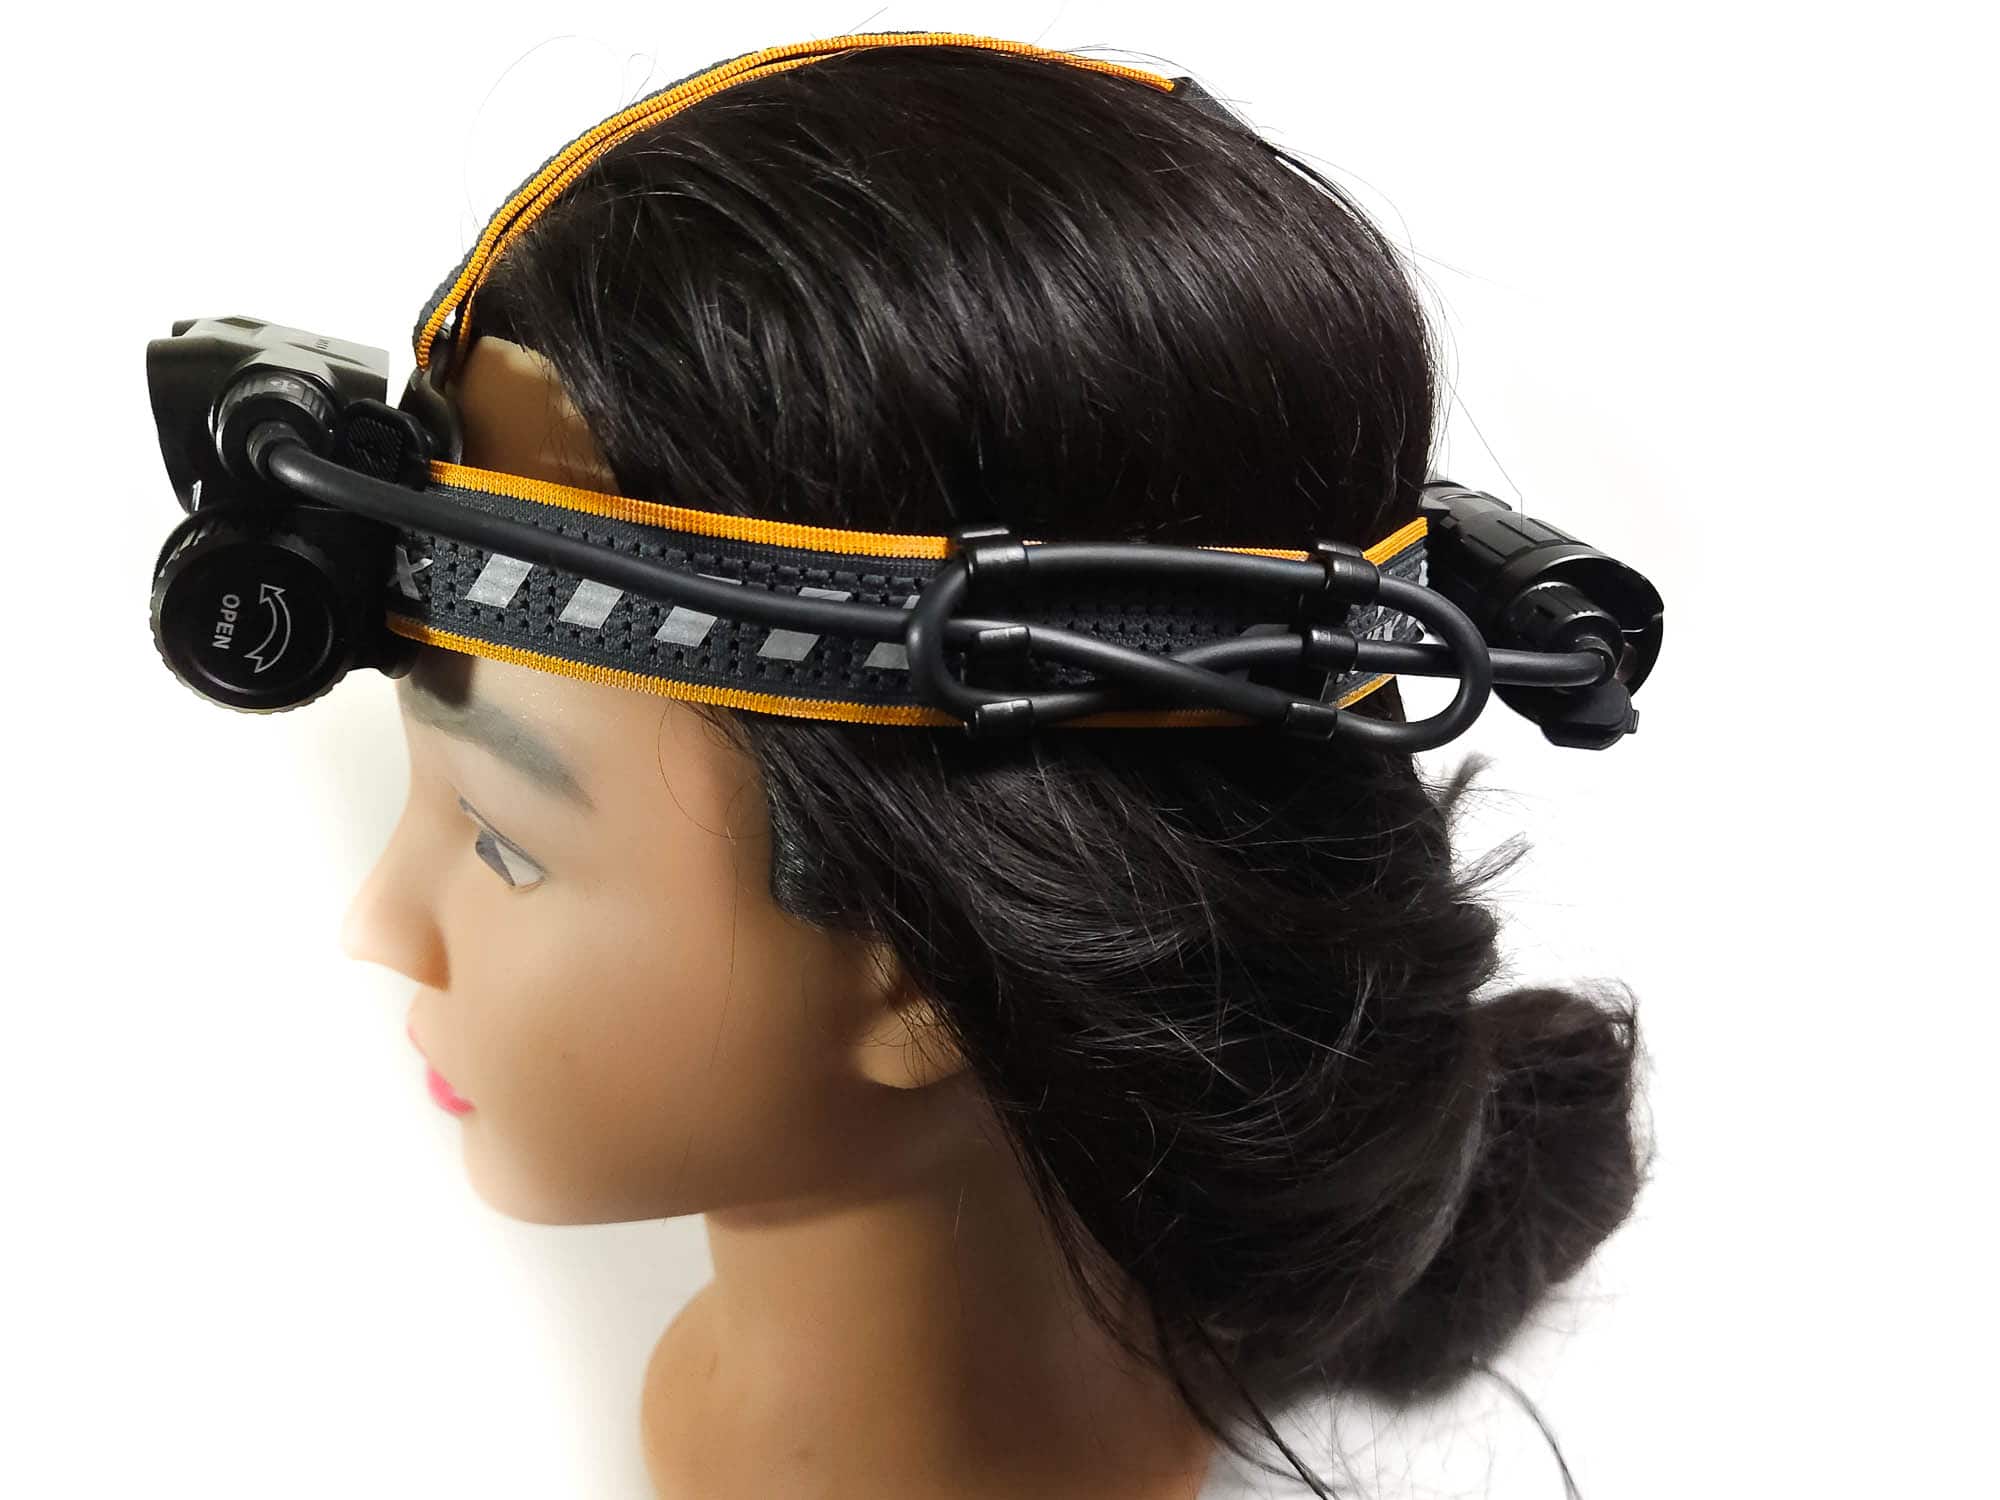
Solidly built, the HM75R would make a great headlamp for caving, hiking, search and rescue, or any task that needs good output with a looooong runtime. The included battery power pack, aka ”Power Xtend System” by Fenix, essentially adds a second, more powerful battery (a 21700 at that!) for even more ridiculous runtimes. There is a pocket clip on the battery pack that attaches it to the rear of the headband. This removable clip (and the included 1-meter usb-c cable) also allows for the off-head carrying of the PXS pack on a belt or clipped to a backpack etc.
This is very convenient and can also be used as a power bank to power-up your electronic devices. I’ll mention here that the included USB-C cables have a twist-lock type end to them that keeps them plugged in even in the most strenuous situations. No accidental snagging and unplugging of your cable! This is a really nice feature and gets extra points from me!
As you will notice later in the review photos, the HM75R headbands are gray and orange with reflective Fenix branding and a few small reflective stripes on each band. I can appreciate the safety aspect Fenix has included with their headlamp as there is often times a working task involved when using a headlamp and safety is always #1. It has the typical, around-the-head type band, plus one more strap over the top of the head. These are both completely adjustable for the best fit to get the most comfortable, custom fit to the end user. This top band is great for stability and added comfort. Fenix also sells a “Blackout” version of the band itself (AFH-02) if you would rather be non-reflective and not go with the gray and orange.
Even with the included 21700 ”Power Xtend System” attached to the back of the headband, the HM75R rides well on the noggin and the weight balances out evenly from front to back. It is a great addition to the headlamp to achieve crazy long runtimes. The added weight is generally not noticed once wearing the headlamp. There is very little movement of the HM75R when adjusted correctly and I have worn it for hours without feeling like my head was being squeezed. It is actually quite comfortable.
The controls are very intuitive and easy to manipulate with one hand. I did have some slight lateral movement when selecting the modes, since you are pressing the button from right to left (while wearing). Nothing major here, just a mention. You do get used to being able to give some resistance with other fingers while pressing the button to change modes. Accidental led selection isn’t as much of a concern with the rotary-dial type operation and the modes are easily selectable once the led is chosen.
Made of high-quality magnesium alloy material, the HM75R lends itself to being somewhat lightweight and still very durable. The threads at the headlamp are a little rough and do lack anodization, but this isn’t really a concern as you will more than likely always be keeping this closed and charging the battery with the USB-C cable. The same goes for charging the battery pack, but the threads here are much nicer and anodized. Both sets of threads house an o-ring to keep it sealed water tight.
Fenix Lighting stands behind their products and they do offer a warranty. Some things to take note of “Under the Terms of Service”. These may vary depending on where you purchased your Fenix light from – you may have to go through the seller it was purchased from to acquire service.
- 15 day replacement – Fenix will replace a new product within 15 days of purchase for any manufacturing defects if problems arise during normal use. (They will replace it with the same model unless it has been discontinued, then customers will receive a similar or improved model).
- 5 years free repairs – Fenix will offer free repair within 5 years for lights from the date of purchase if problems develop with normal use. (there are different warranty periods for different products)
- Limited Lifetime Guarantee: For lights past the free repair warranty period, Fenix will provide lifetime repairs but will charge for parts.
As most warranties go, Fenix says the free warranty does not cover any damages or failure caused by:
- Normal wear
- Rough operation
- Battery leakage
- Any defects or damages caused by the improper operations


LED/LEP/HID, Lens, Bezel, Reflector, and Beam
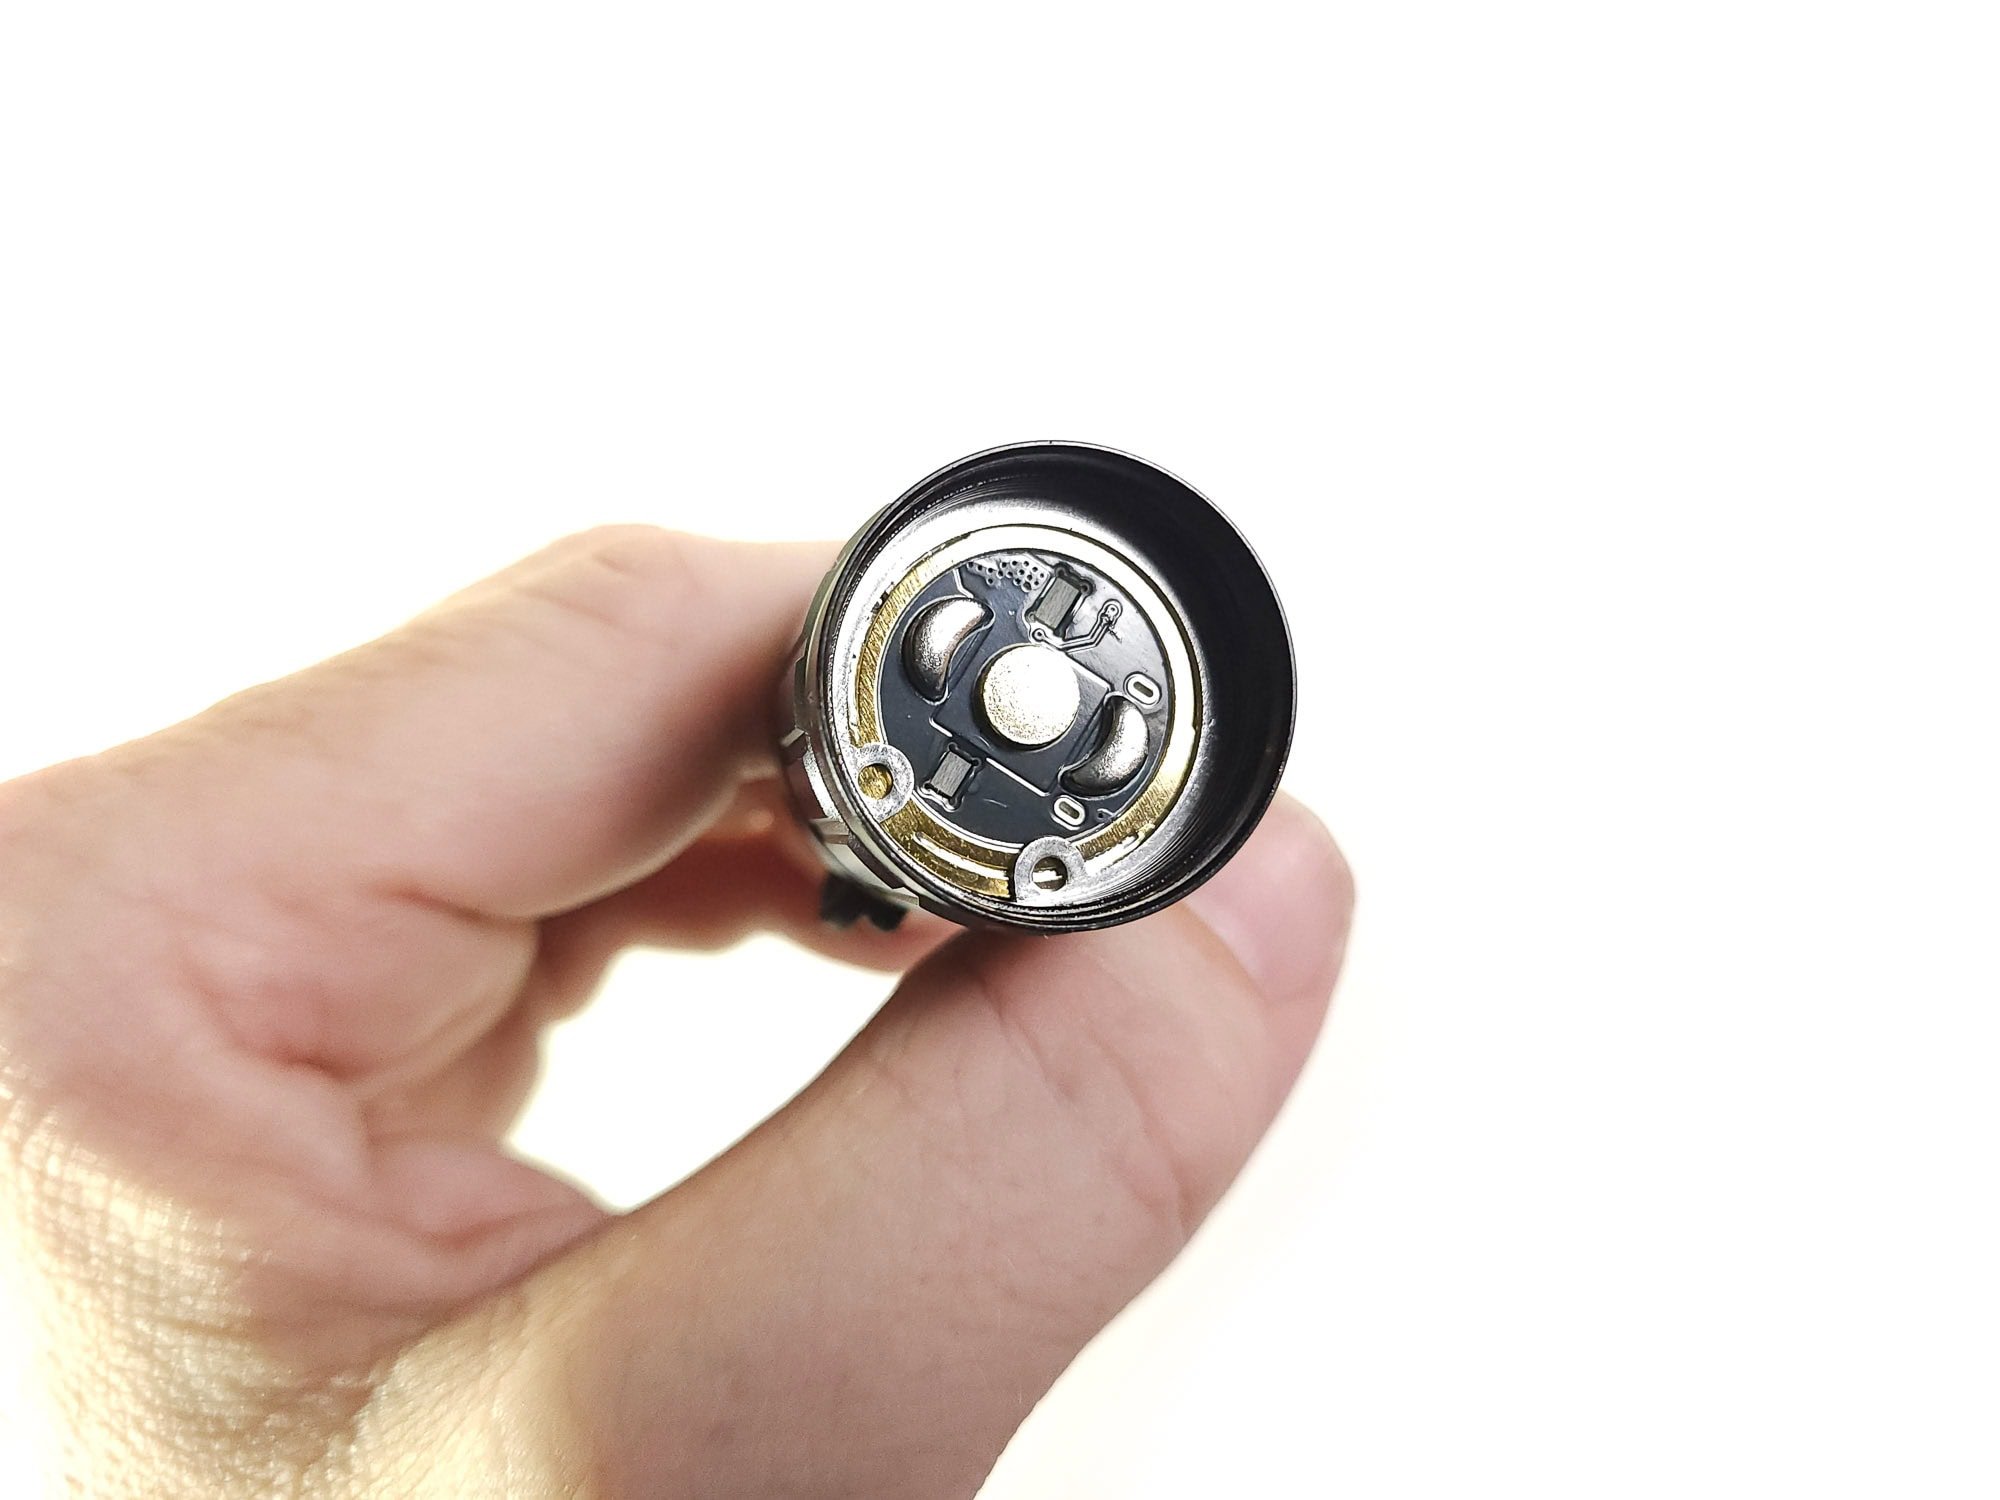
With two separate led bezels side by side, a single SST40 is in one and then the (2)SST20’s and the single OSRAM GR QSSPA1.23 red led are in the other. Fenix quotes the single SST40 CCT as coming in at 6500K for spot mode and 4000k for the floodlight mode utilizing (2) SST20’s. The temperature doesn’t quite come out that cold to my eyes or my Opple Light meter either. I measured just under 6000K for the spot which is still a great color temperature for a brighter “spot” type of light output. It has a good sized hot-spot and a nice even spill from there to the edge, that is very usable for a spot-type light output.
I really enjoy the warmer flood mode, coming in closer to 3800K for general-use bright light. The red Osram puts out such a nice, clean and crisp colored beam. It is actually very fun to see with your own eyes and use, even if you are not hunting or trying to preserve night vision. The modes for the red Osram led include a flashing mode but not turbo. Flash, low, medium and high are the available modes for the red Osram and the low and flash put out the same amount of lumens. Both the flood and the red outputs have smooth, even beams from edge to edge. No specific hotspot perse, just a flood of pretty light.
In this perfect setup, Fenix has the SST40 sitting a somewhat deep smooth reflector for its size. This is what gives you the higher candela, aka “throw”. The (2) SST20’s and the red Osram are housed in the 2nd bezel next to the first one, under a TIR-style lens made specifically for this triple led setup. The lenses are not glass, but made of a transparent and Weather Resistant grade Polycarbonate Resin. Both bezels are set into the main housing and are flush with the front of the housing. No place or even the need for crenulations on these bezels with this being a headlamp.
Spectral measurements:
Measurements were taken using an Opple Light Master IV to measure the flashlight in complete darkness at 10 meters away. Freshly charged batteries and allowing the leds to cool between measurements are the standard for testing here. Note that the red couldn’t register on the Opple meter. Overall, the kelvin temps were slightly lower than quoted to be by Fenix, but still very acceptable.
| Mode: | CCT: | CRI Ra: | duv |
|---|---|---|---|
| Spot 18650 only | |||
| low | 5422K | – | 0.0152 |
| turbo | 5756K | – | 0.0035 |
| Flood 18650 only | |||
| low | 3860K | 97.1 | .0019 |
| turbo | 3812K | 96.8 | .0019 |
| Spot 18650 + 21700 pack | |||
| low | 5158K | – | .0158 |
| turbo | 5683K | – | |
| Flood 18650 + 21700 pack | |||
| low | doesn’t register | doesn’t register | doesn’t register |
| turbo | 3801K | 95.9 | .0082 |
| Red doesn’t register | – | – | – |


Dimensions and its competition
Dimensions:
| Headlamp | Millimeters | Inches |
|---|---|---|
| Overall width | 91 mm | 3.6 in |
| Width at bezel | 56.2 mm | 2.2 in |
| Depth at bezel | 35.7 mm | 1.4 in |
| Height at bezel | 41.9 mm | 1.6 in |
| Battery Pack | ||
| Overall width | 107.8 mm | 4.2 in |
| Diameter at threads | 27.4 mm | 1.1 in |
| Diameter at body | 29.2 mm | 1.1 in |
Dimensions are rounded to the nearest millimeter and the nearest tenth of an Inch.
Weight:
| Headlamp (w/ headband) | Weight in grams | Weight in oz |
|---|---|---|
| With battery | 223 g | 7.9 oz |
| Without battery: | 173 g | 6.1 oz |
| Battery Pack | ||
| Without battery: | 64 g | 2.3 oz |
| With battery | 137 g | 4.8 oz |
| Headlamp w/ Battery Pack & cable | 324.3 g | 11.4 oz |
Weight is rounded to the nearest gram and tenth of an Oz.
Flashlight size comparison with its competition:
Group 1: Fenix HM75R, Energizer Vision HD LED Headlamp (300lm)


UI : User interface and driver
No need to unlock the headlamp upon arrival. Just remove the insulator from the battery and charge this thing up! A pretty simple UI and the rotary switch gets you access to 12 different lighting modes. While wearing the HM75R headlamp, you will rotate the dial forward (clockwise) to get from off to that super-bright SST40 spot. Rotate again to that yummy warm flood and once more to get to that juicy red Osram. It is just so pretty to see in person.
Fenix has upgraded their led selection for the red leds in their recent headlamps, changing from a 2835 SMD LED to the Osram. Speaking of Osram, here are some brightness specs for the OSRAM GR QSSPA1.23:
luminous flux: 90.3 lm / candela: 27.1 cd / electric flux: 440 mW / radiant intensity: 132 mW/sr.
After arriving at your led output of choice with the rotary-dial, press the center of said dial to activate the mode button and switch from low to medium to high etc. This is the method for each of the three output methods (Spot, Flood, Red). As mentioned before, red doesn’t get a turbo but is still sufficiently bright and enjoyable to use on its highest setting.
The HM75R does have what Fenix calls Intelligent Memory Circuit. That sounds way cooler than mode memory. This just means that the headlamp automatically memorizes the last selected output of each mode. So when you turn the headlamp back on from off, the last selected mode will be used, unless it was turbo, then it will come on at high output.
Available modes:
Spotlight
- Low, medium, high, turbo
Floodlight
- Low, medium, high, turbo
Red Light
- Flash, low, medium, high
Available blinky modes:
- Only Red output has Flash
From OFF:
Turn the rotary switch to cycle through: OFF ⇄ Spotlight ⇄ Floodlight ⇄ Red light
- Spotlight mode:
With the lamp switched on, a single press of the button cycles through:
Low→Med→High→Turbo.
- Floodlight mode:
With the lamp switched on, a single press of the button cycles through:
Low→Med→High→Turbo.
- Red light mode:
With the lamp switched on, a single press of the button cycles through:
Low→Med→High→Flash.
Mode memory:
- Yes – Fenix’s “Intelligent Memory Circuit”
The headlamp automatically memorizes the last selected output of each mode. *When turned on again the previously used output of the last selected mode will be recalled.
*The lamp will enter High output if it was previously switched off in Turbo mode.
Strobe/blinkies
- You only get a flash mode in the Red light output
With the lamp switched on in Red light mode, a single press of the button will cycle through Low→Med→High→Flash.
Lock-out mode:
- None
PWM
- None visible
Additional/summary info on the UI:
Intelligent Brightness Downshifting Function
Another great feature of the Fenix HM75R headlamp is what Fenix calls Intelligent Brightness Downshifting Function. The headlamp will automatically downshift the brightness level to Low output to avoid potential burns caused by high temperatures when the lamp head is close to an object (about 2.36”/60 mm) for more than 1.5 seconds. When the lamp head is moved away from the illuminated object for more than 0.8 seconds, the headlamp will automatically recall the previously used output level. You can turn this feature on and off and here is how:
- To turn On IBDF: With the light switched off, press and hold the mode button for 6 seconds, and the headlamp will flash twice at the Low output of Floodlight mode, indicating that the function is enabled.
To turn Off IBDF: With the light switched off, press and hold mode button for 6 seconds, and the headlamp will flash eight times at the Low output of Floodlight mode, indicating that the function is disabled.
Charging and batteries
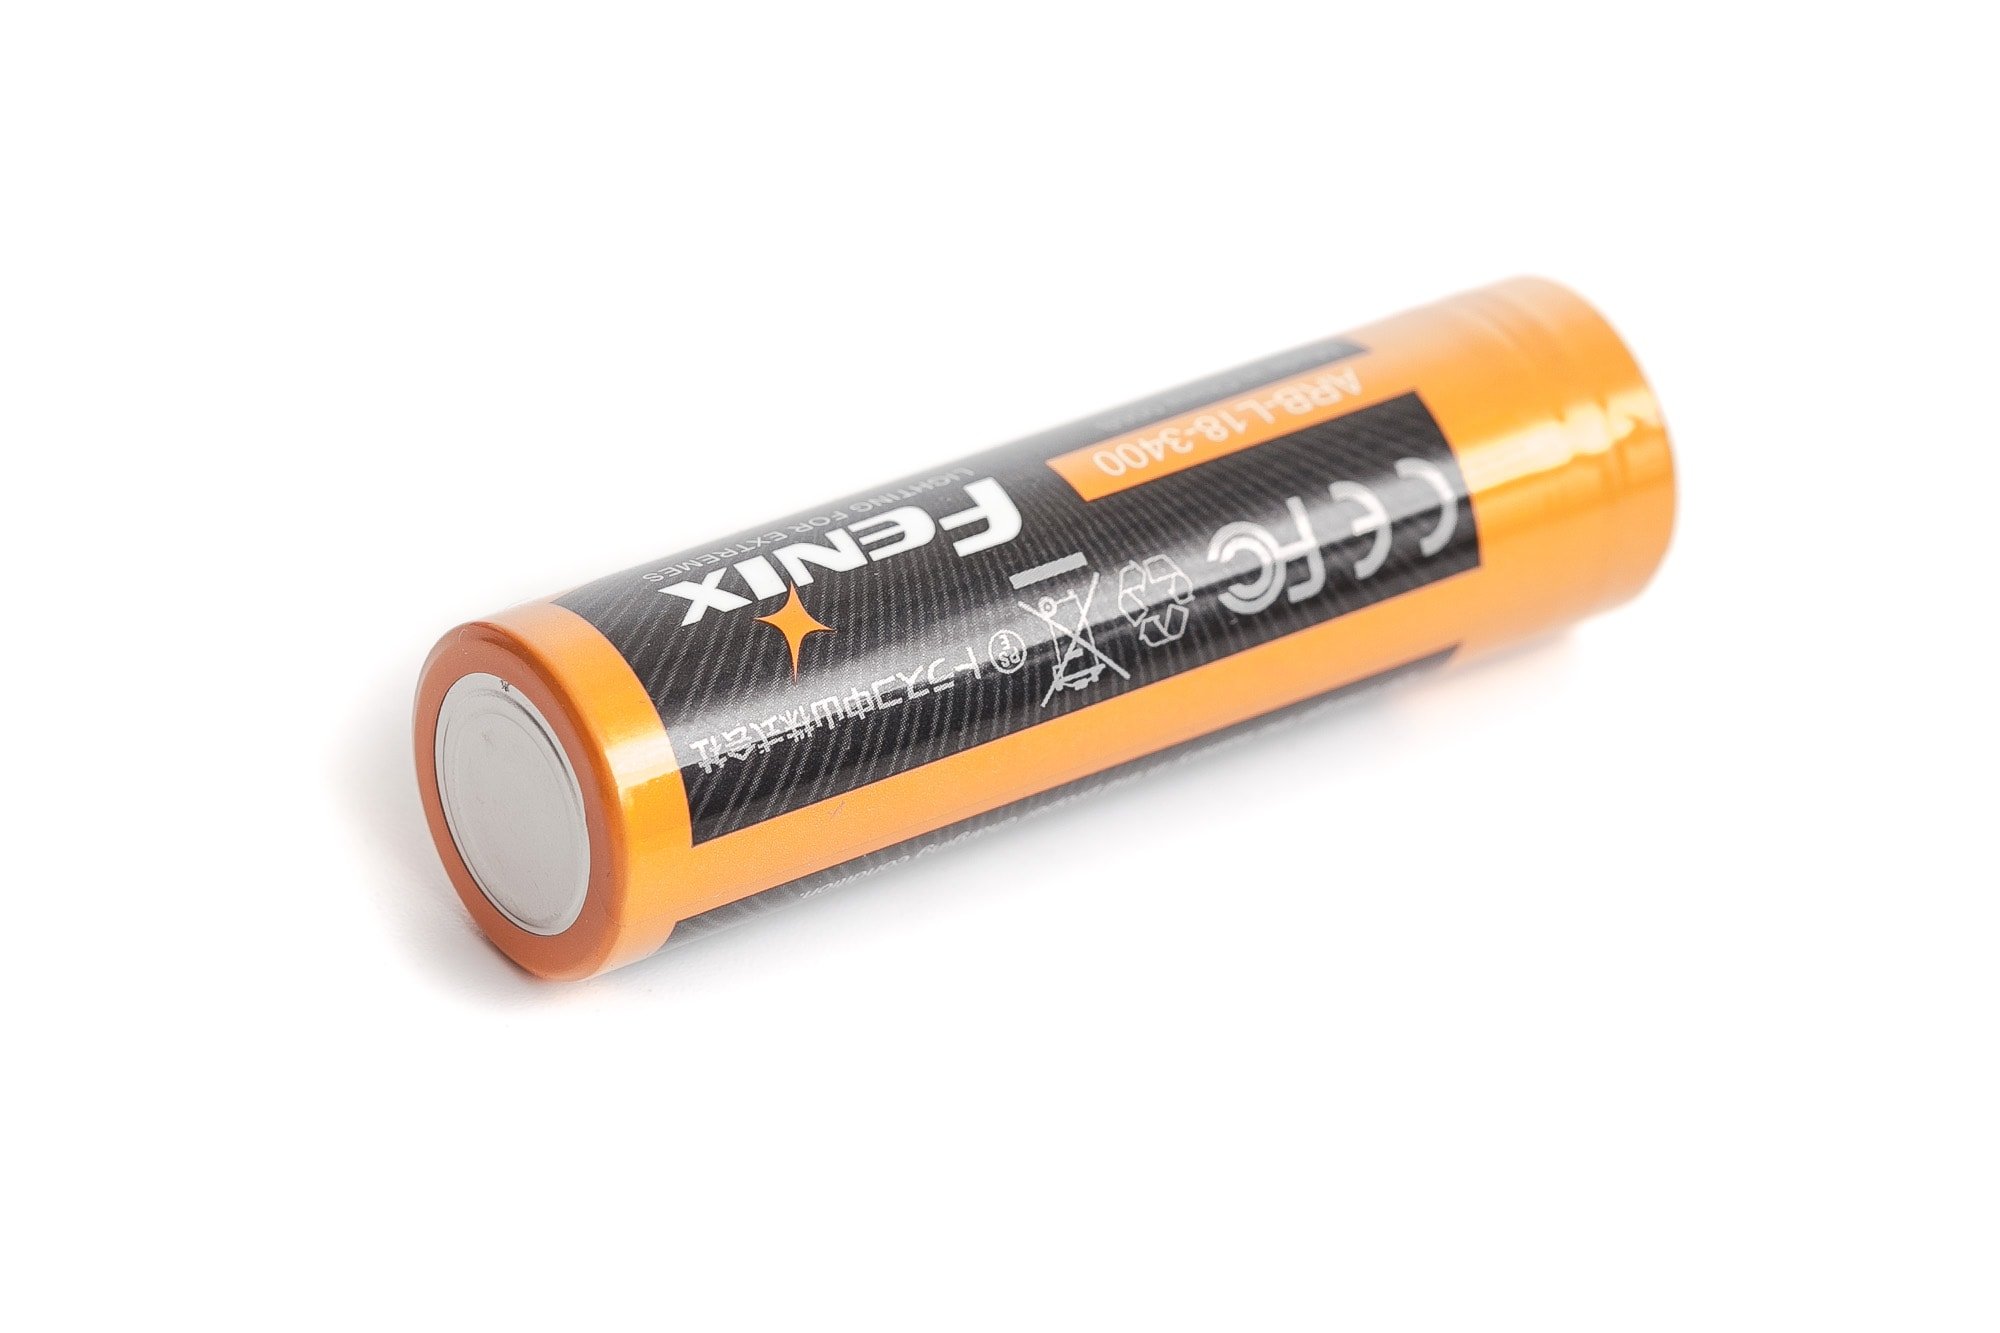
There is a lot to unpack and go over with regard to charging all these goodies. My Fenix HM75R was shipped with the batteries located inside the housing for both the headlamp and the battery pack. There is an insulation tab in the battery pack that will need to be removed before use. Oddly enough. there was not an insulator in the headlamp portion. Hmmm. In the headlamp, a 18650 cell known by Fenix as the “ARB-L18-3400”, arrived with a voltage of 2.62v as per the norm for shipping requirements. The power bank holds the 21700 battery from Fenix, titled the “ARB-L21-5000 V2.0”. It arrived at 3.18v. Another hmmm.
For the HM75R headlamp, the included Fenix ARB-L18-3400 battery is recommended. For the power bank, the included ARB-L21-5000 V2.0 battery is recommended. Other Li-ion batteries are not recommended as High output can fail due to current and voltage limitations.
Charging of Headlamp
The included USB-C with the awesome “twist-lock” water protection plugs will charge your headlamp and or the battery pack. With the headlamp off, the typical charging time for the Fenix ARB-L18-3400 battery is about 4 hours from depleted to fully charged with a 5v/2.5A or above charging adapter. When charging, the LED indicators will flash from left to right to display the charging status. The four indicators will be constant-on after charging is completed.
A couple things to take note of here:
Keep an eye on the flashes after connecting a power source. The headlamp will flash twice (at a 5v charging voltage) or four times (at a 9v charging voltage), before it recalls the previously used output. It does this on low mode in the last used output.
The HM75R can be operated while charging. Turbo output is 1200 lumens in Spot and 700 lumens in Flood at a 9v charging voltage. Only the Low output and the medium output in each mode can be operated at a 5v charging voltage. (This means no turbo!)
*The above descriptions still apply when the headlamp is charged by the battery pack, even if the headlamp battery is inserted backward or not inserted at all. Wait, what? That’s right, you don’t even have to have the 18650 battery in the headlamp to be able to use it. You can plug in your HM75R into your phone charger and it will light up! Because that phone charger is charging at 5v you only get the low and medium as mentioned above. But how cool is that, that if in an emergency, no battery type situation, you can still get light. This is the same for plugging in the battery pack to the headset. You get the four flashes indicating a 9v charging voltage and even without the 18650 in the headpiece, you can still get access to all of your modes including turbo!
Charging of battery pack
Use the included USB-C to USB-C charging cable with a charger that has a USB Type C port, or use your own USB-A to USB-C cable. While charging, the led power button on the battery pack will display red and then will turn green when completely charged.
Power bank function of battery pack
That’s right, you can use your 21700 battery pack as a powerbank to be able to charge your electronic devices like your phone or tablet. Just plug in your device and click the led power button on your battery pack to start putting out the juice.
Light Load Detection Function
There may be a case where you might want to charge a device that requires a “low current mode” such as smartwatches, fitness trackers, Bluetooth earphones, and other wearables. To ensure these devices are charged safely and efficiently without overloading their batteries, you can use your battery pack turned powerbank! This is Fenix’s Light Load Detection Function. The name is a little confusing, but this function is disabled by default which allows the powerbank to safely provide a smaller current output, aka “trickle-charge”, to these devices without fear.
Turning on/off the light load detection function of battery case:
On: With the powerbank function switched on, press and hold the led power button for 3 seconds, the battery level indicator in the button will blink red three times. This indicates the function is enabled.
Off: With the powerbank function switched on, press and hold the led power button for 3 seconds, the battery level indicator in the button will blink red eight times. This indicates the function is disabled.
Note:
1. With the light load detection function switched on, the battery pack will automatically stop discharging when the headlamp is fully charged. Re-insert the Type-C plug and press the led button or re-insert the battery to restart discharging.
2. With the light load detection function switched off, turn off the powerbank function of the battery pack when the headlamp is fully charged to prevent unnecessary battery consumption of the power extender.
Battery level indicator:
Headlamp (18650)
There are four led “level indicators” on the top of the main body housing. Any turn-on of the headlamp will show the battery level status* and last for 3 seconds.
The levels are as follows:
- (4) leds on = 100% – 80%
- (3) leds on = 80% – 60%
- (2) leds on = 60% – 40%
- (1) led on = 40% – 20%
- (1) led flashing = 20% – 1%
*Note that if the headlamp is on while charging, these battery level indicators will not function.
Battery Case (21700)
With the power bank function turned off, a single press of the led power button to check the battery status. Single press of the button once again and the indicator in the button switch will go out immediately, or without any operation it will last for 3 seconds.
- Green led on = 100% – 85%
- Green led flashing = 85% – 50%
- Red light on = 50% – 25%
- Red light flashing = 25% – 1%
*Note: Fenix states that this only works with the Fenix ARB-L21 Series battery (the included 217000 cell).
Battery Level Indication of Power Bank Function
With the light load detection function switched off: The battery level indicator in the led button blinks green once a second. If the battery voltage is under 3.2 V, the battery level indicator will blink red.
With the light load detection function switched on: The battery level indicator in the led button blinks green once every 4 seconds. If the battery voltage is under 3.2 V, the battery level indicator will blink red.
*The battery pack will stop discharging if the battery voltage is under 3.0 V.
Low voltage warning/protection:
When the voltage level drops below the factory preset level, the headlamp is programmed to downshift to a lower brightness level until low output is reached. When this happens in low output, one of the battery level indicators blinks to remind you to recharge or replace the battery. That is correct, the HM75R even reminds you – Hey, don’t forget to charge me!
Intelligent Overheat Protection
Just like all newer, higher-power leds, the headlamp can accumulate a lot of heat when used at high output levels for extended periods of time. When it reaches a temperature of 60°C/140°F or above, it will automatically step down a few lumens to reduce the temperature. When the temperature drops below 60°C/140°F, the lamp will gradually recall the preset output level.
| Charge type | Fits | No fit | Avg. charge time |
|---|---|---|---|
| Headlamp with onboard USB-C | All 18650 sizes** | **Protected | 4h 15 min |
| Battery Pack (21700) onboard USB-C | All 21700 sizes** | **Protected | 2h 40 min |
**Other Li-ion batteries are not recommended as High output can fail due to current and voltage limitations.**


Performance test
Lumen measurements
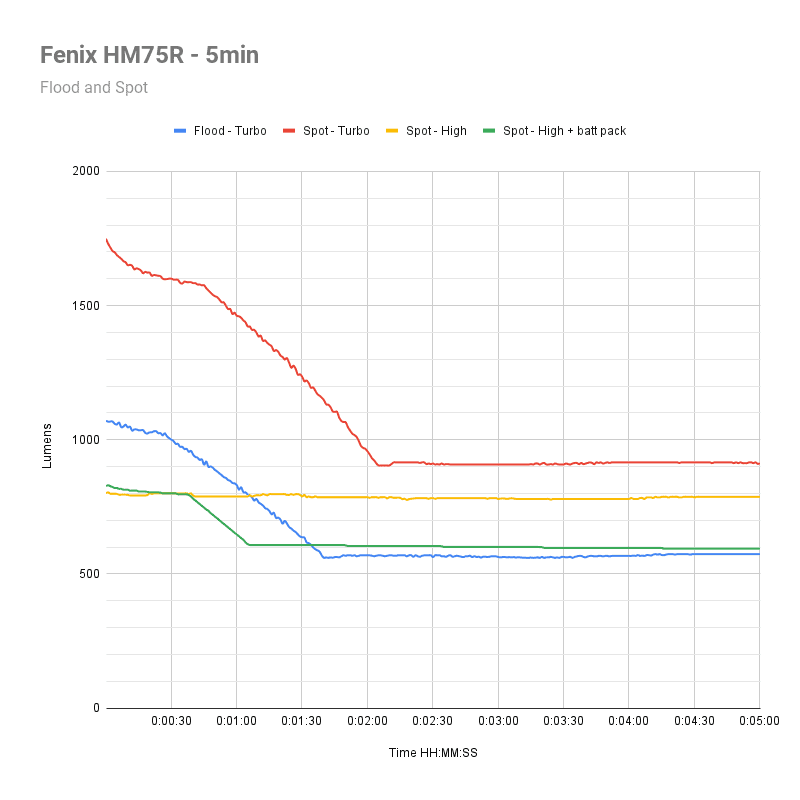
How Lumens are Measured: Understanding ANSI FL1 Standards How Lumens are Measured: Understanding ANSI FL1 Standards: The ANSI FL1 standards specify that output in lumens should be measured 30 seconds after turning on, as this is the standardized time for measuring brightness according to the industry standard. This is why we focus on this part in our measurements. The ANSI FL1 standards require an ambient temperature of 22 ± 3°C. We record the ambient the ambient temperature to identify potential reasons for any observed discrepancies.Lumen measurements were taken using my 33cm homemade integrating sphere (IS) and a Dr. Meter LX1330B Digital Illuminance Light Meter, with a 0-200,000 measurement range. The IS has been calibrated using an Olight Warrior X pro and 1lumen.com’s testing as comparable reference sources. Measurements were taken with the included, fully charged FenixARB-L18-3400 (18650) cell and the light was allowed to cool in between measurements.
| Mode | Specified | Turn on | 30 sec. | 10 min. |
|---|---|---|---|---|
| Spot 18650 only | ||||
| low | 50 lm | 57 lm | 53 lm | 51 lm |
| medium | 350 lm | 378 lm | 356 lm | 349 lm |
| high | 800 lm | 1,072 lm | 826 lm | 794 lm |
| turbo | 1600 lm | 1,742 lm | 1,561 lm | 873 lm |
| Flood 18650 only | ||||
| low | 5 lm | 7 lm | 7 lm | 7 lm |
| medium | 150 lm | 167 lm | 157 lm | 145 lm |
| high | 400 lm | 442 lm | 415 lm | 402 lm |
| turbo | 1000 lm | 1,072 lm | 998 lm | 602 lm |
| Red 18650 only | ||||
| flash | 5 lm | 6 lm | 6 lm | 6 lm |
| low | 5 lm | 6 lm | 6 lm | 6 lm |
| medium | 30 lm | 42 lm | 40 lm | 40 lm |
| high | 120 lm | 162 lm | 150 lm | 157 lm |
| Spot 18650 + 21700 pack | ||||
| low | 50 lm | 56 lm | 56 lm | 52 lm |
| medium | 350 lm | 369 lm | 363 lm | 360 lm |
| high | 800 lm | 910 lm | 824 lm | 519 lm |
| turbo | 1200 lm | 1,308 lm | 1,190 lm | 653 lm |
| Flood 18650 + 21700 pack | ||||
| low | 5 lm | 7 lm | 7 lm | 7 lm |
| medium | 150 lm | 197 lm | 164 lm | 155 lm |
| high | 400 lm | 441 lm | 435 lm | 432 lm |
| turbo | 700 lm | 757 lm | 643 lm | 640 lm |
| Red 18650 + 21700 pack | ||||
| flash | 5 lm | 6 lm | 6 lm | 6 lm |
| low | 5 lm | 6 lm | 6 lm | 6 lm |
| medium | 30 lm | 42 lm | 41 lm | 40 lm |
| high | 120 lm | 145 lm | 143 lm | 143 lm |
Ambient temperature during testing:
- 20.5 °C
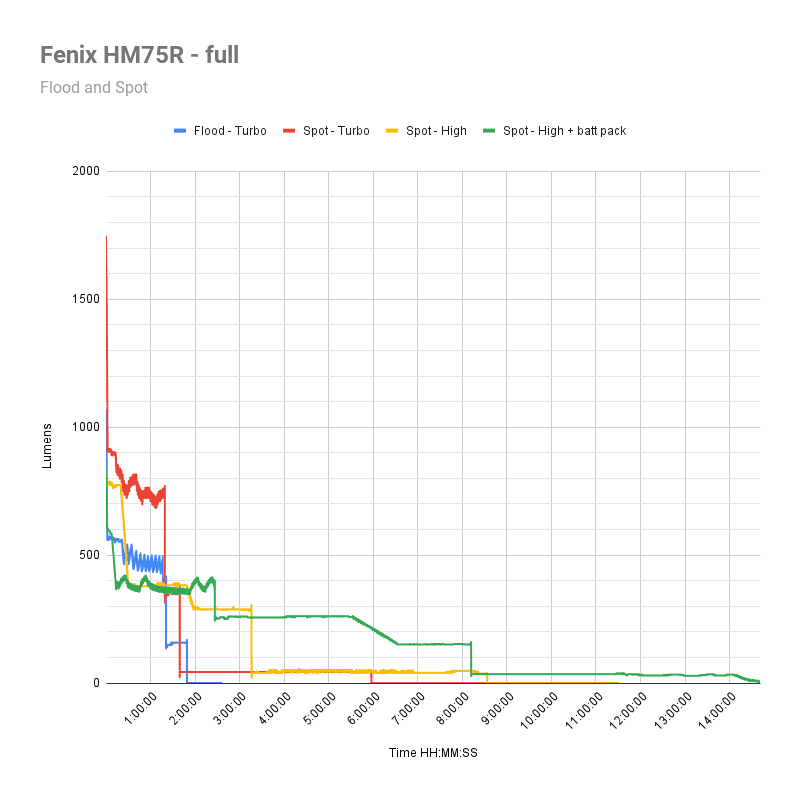
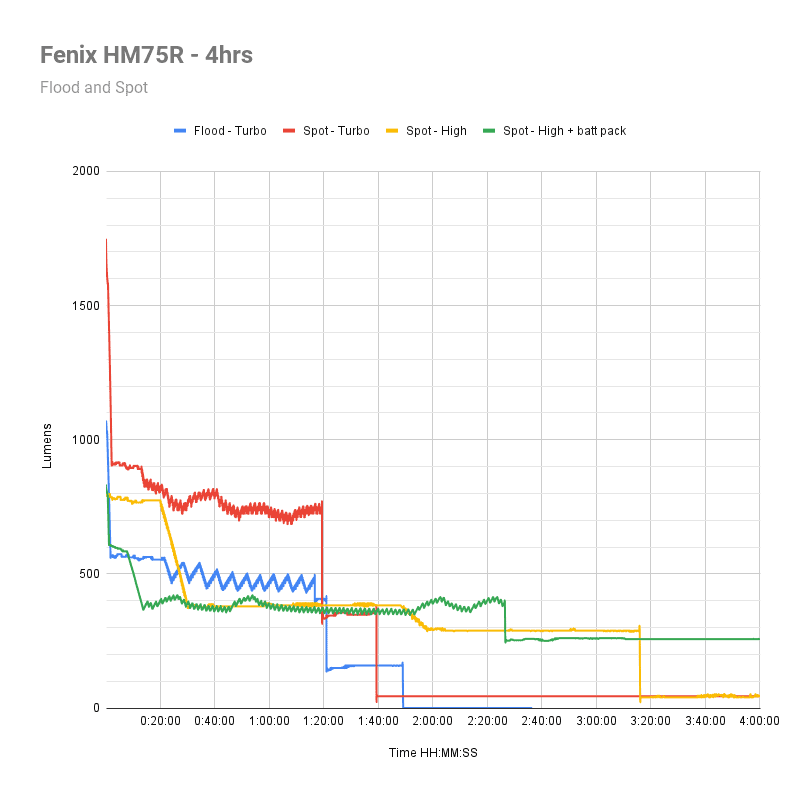
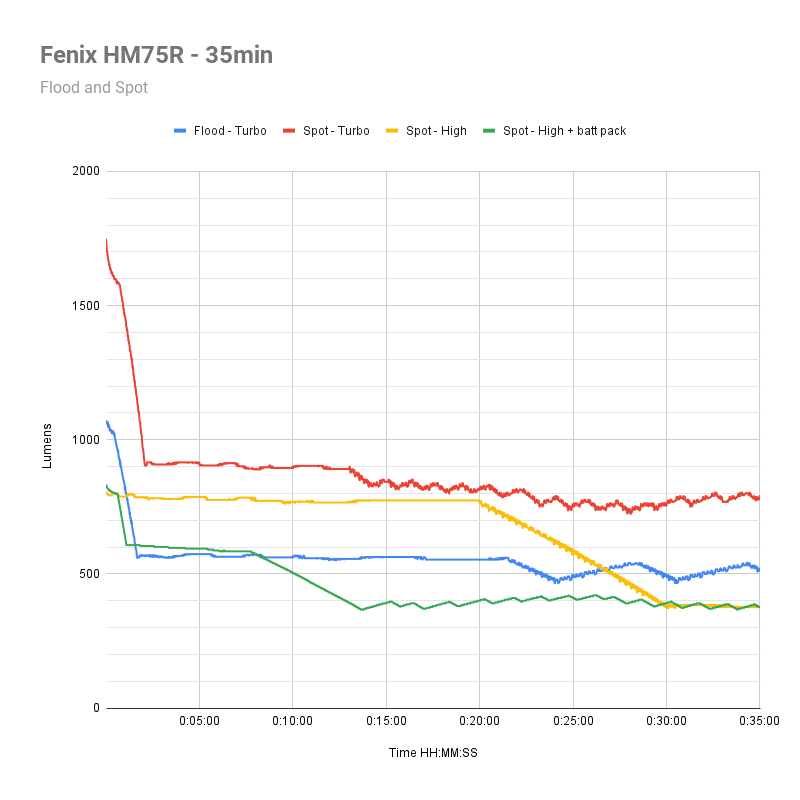
Battery Life: Runtime graphs
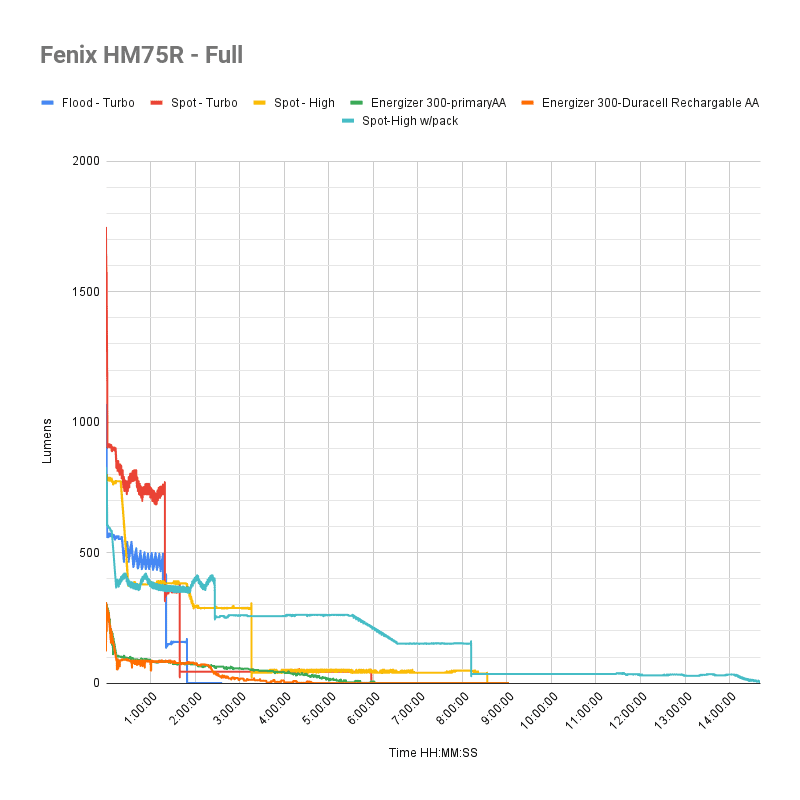
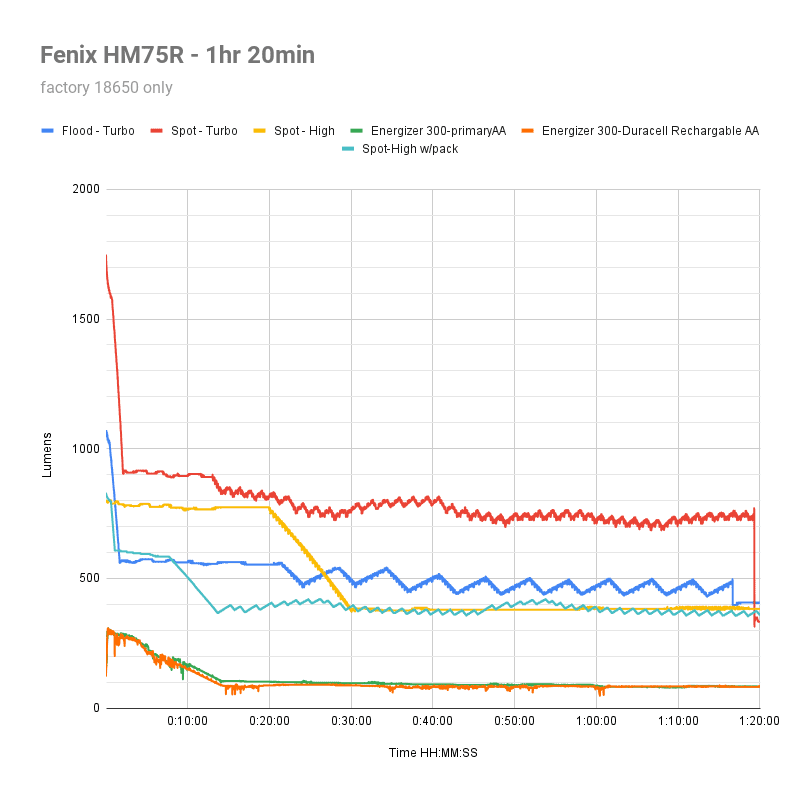
How Runtimes are Measured: Understanding ANSI FL1 Standards About ANSI FL1 runtime standards: The runtime is measured until the light drops to 10% of its initial output (30 seconds after turning on). This does not mean that the flashlight is not usable anymore. The last column shows how long the light actually works till it shuts off. If there is a + symbol, it means that the test was stopped at that particular point, but the light was actually still running. This happens on certain occasions, with certain drivers, firmware, or batteries.Runtimes were measured using the CeillingBounce Android app and the included fully charged ARB-L18-3400 battery. I have completed the runtime test without the included battery pack as I didn’t really have 15 days to run/ test a single mode! I did include the numbers in the graph below just to show how absurd these runtimes can be – I love it!
| Mode | Specified | Runtime (ANSI FL1) | Time till shut off |
|---|---|---|---|
| Spot 18650 only | |||
| low | 50h 50min | 20h+ | 20h+ |
| medium | 11h 00min | 10h+ | 10h+ |
| high | 3h 30min | 3h 16mins | 8h 33min |
| turbo | 1h 30min | 1h 39min | 5h 56min |
| Flood 18650 only | |||
| low | 100h 00min | 20h+ | 20h+ |
| medium | 8h 00min | 7h 27min | 8h+ |
| high | 4h 00min | 4h 15min | 6h+ |
| turbo | 1h 50min | 1hr 49min | 1hr 49min |
| Red 18650 only | |||
| flash | 220h 00min | – | – |
| low | 110h 00min | – | – |
| medium | 32h 00min | – | – |
| high | 5h 20min | – | – |
| Spot 18650 + 21700 pack | |||
| low | 88h 40min | – | – |
| medium | 18h 20min | – | – |
| high | 10h 30min | – | – |
| turbo | 9h 00min | – | – |
| Flood 18650 + 21700 pack | |||
| low | 234h 00min | – | – |
| medium | 18h 00min | – | – |
| high | 14h 00min | – | – |
| turbo | 13h 00min | – | – |
| Red 18650 + 21700 pack | |||
| flash | 530h 00min | – | – |
| low | 365h 00min | – | – |
| medium | 46h 20min | – | – |
| high | 19h 40min | – | – |
These runtimes are amazing and so far, even with only testing the included 18650, all times have come very close to or have succeeded the specifications without any trouble. The battery pack has more than doubled runtimes in most cases. For example the high mode flood output is quoted to last 14 hours versus the 4 hours without the battery pack! This should give some relief to know you are not going to run out of power anytime soon.
And a comparison
Peak beam intensity and beam distance measurements
About Peak beam intensity: Understanding ANSI FL1 Standards About peak beam intensity The calculated value of distance in meters at which the flashlight produces a light intensity of 0.25 lux. (0.25 lux is about the brightness of a full moon shining on an object). This means that the intensity has decreased so much, it becomes difficult to see darker objects, or objects that don’t reflect light. The columns ‘Meters’ and ‘Yards’ use rounded numbers.Throw measurements were taken outdoors at night in complete darkness at 10 meters using the Dr. Meter LX1330B Digital Illuminance Light Meter. All measurements were taken at 30 seconds with freshly charged batteries, allowing the headlamp to cool between tests.
| Mode | Specified | Candela measured | Meters | Yards |
|---|---|---|---|---|
| Spot 18650 only | ||||
| low | 383 cd | 397.5 cd | 40 m | 44 yd |
| medium | 2,559 cd | 2,725 cd | 104 m | 114 yd |
| high | 6,262 cd | 6,525 cd | 162 m | 177 yd |
| turbo | 12,448 cd | 12,250 cd | 221 m | 242 yd |
| Flood 18650 only | ||||
| low | 10 cd | 7.5 cd | 5 m | 6 yd |
| medium | 163 cd | 205 cd | 29 m | 32 yd |
| high | 432 cd | 535 cd | 46 m | 50 yd |
| turbo | 1,071 cd | 1,298 cd | 72 m | 79 yd |
| Red 18650 only | ||||
| low | 4 cd | 2.5 cd | 3 m | 3 yd |
| medium | 20 cd | 30 cd | 11 m | 12 yd |
| high | 70 cd | 112.5 cd | 21 m | 23 yd |
| Spot 18650 + 21700 pack | ||||
| low | 383 cd | 400 cd | 190 m | 208 yd |
| medium | 2,559 cd | 2,775 cd | 160 m | 175 yd |
| high | 6,262 cd | 6,375 cd | 150 m | 164 yd |
| turbo | 9,025 cd | 9,050 cd | 40 m | 44 yd |
| Flood 18650 + 21700 pack | ||||
| low | 10 cd | 10 cd | 2 m | 2 yd |
| medium | 163 cd | 210 cd | 29 m | 32 yd |
| high | 432 cd | 540 cd | 46 m | 50 yd |
| turbo | 588 cd | 775 cd | 56 m | 61 yd |
| Red 18650 + 21700 pack | ||||
| low | 4 cd | 7.5 cd | 5 m | 6 yd |
| medium | 20 cd | 30 cd | 11 m | 12 yd |
| high | 70 cd | 113 cd | 21 m | 23 yd |
Ambient temperature during testing:
- 20.5 °C
The performance of the HM75R is fantastic. All specifications were met easily and most of them even measured higher than quoted. Way to go Fenix! No fluff here on the specs as usual.
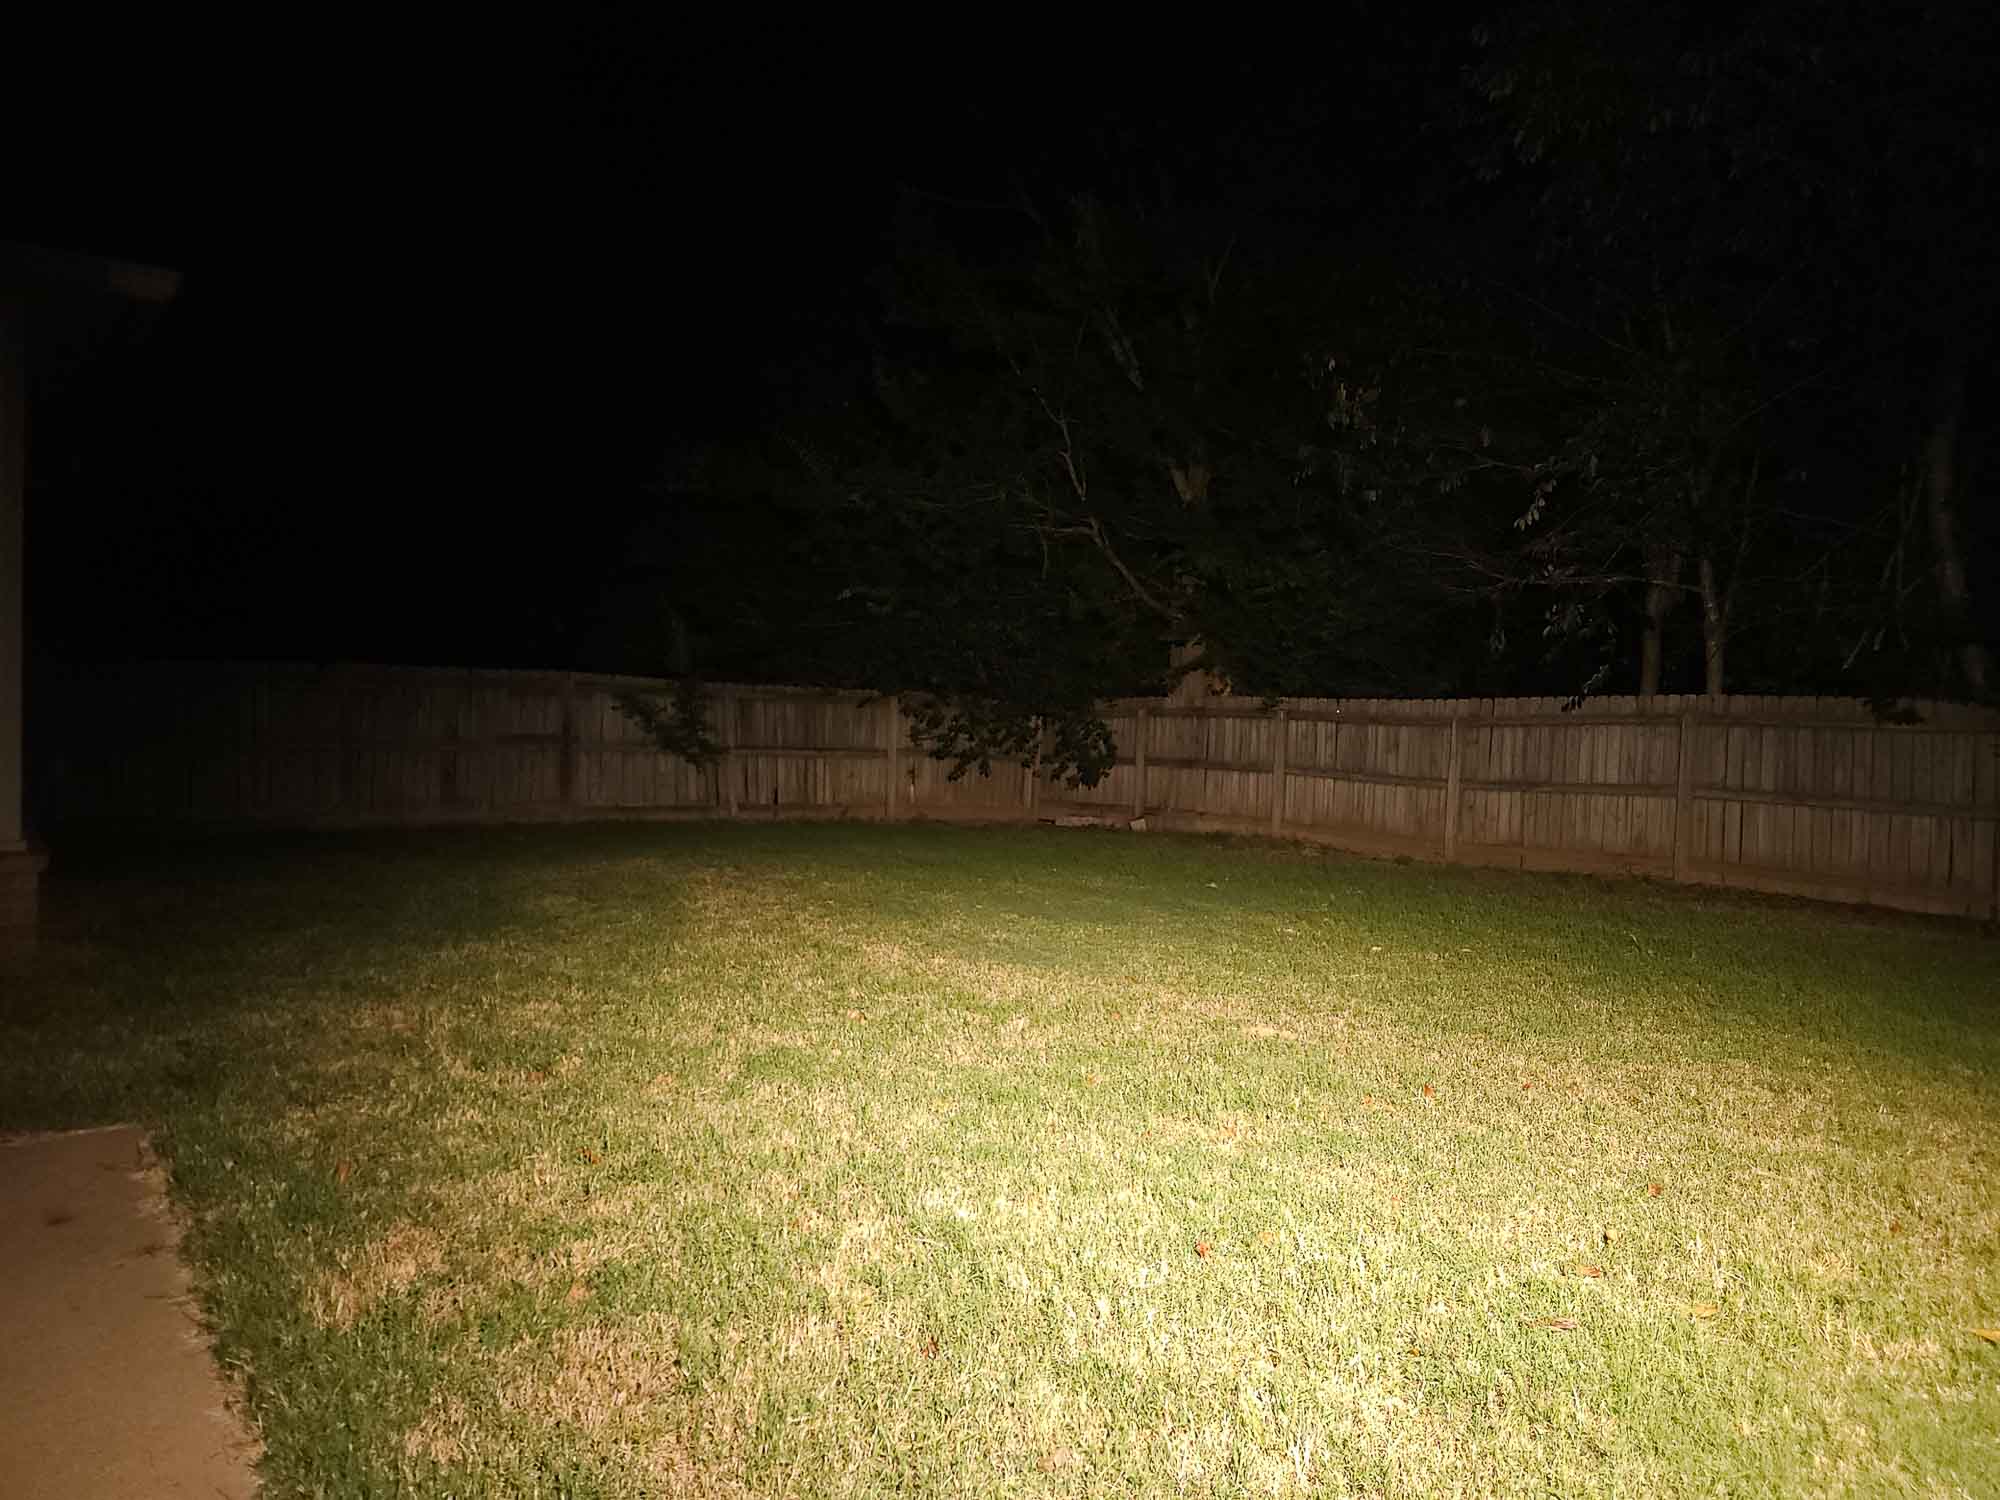
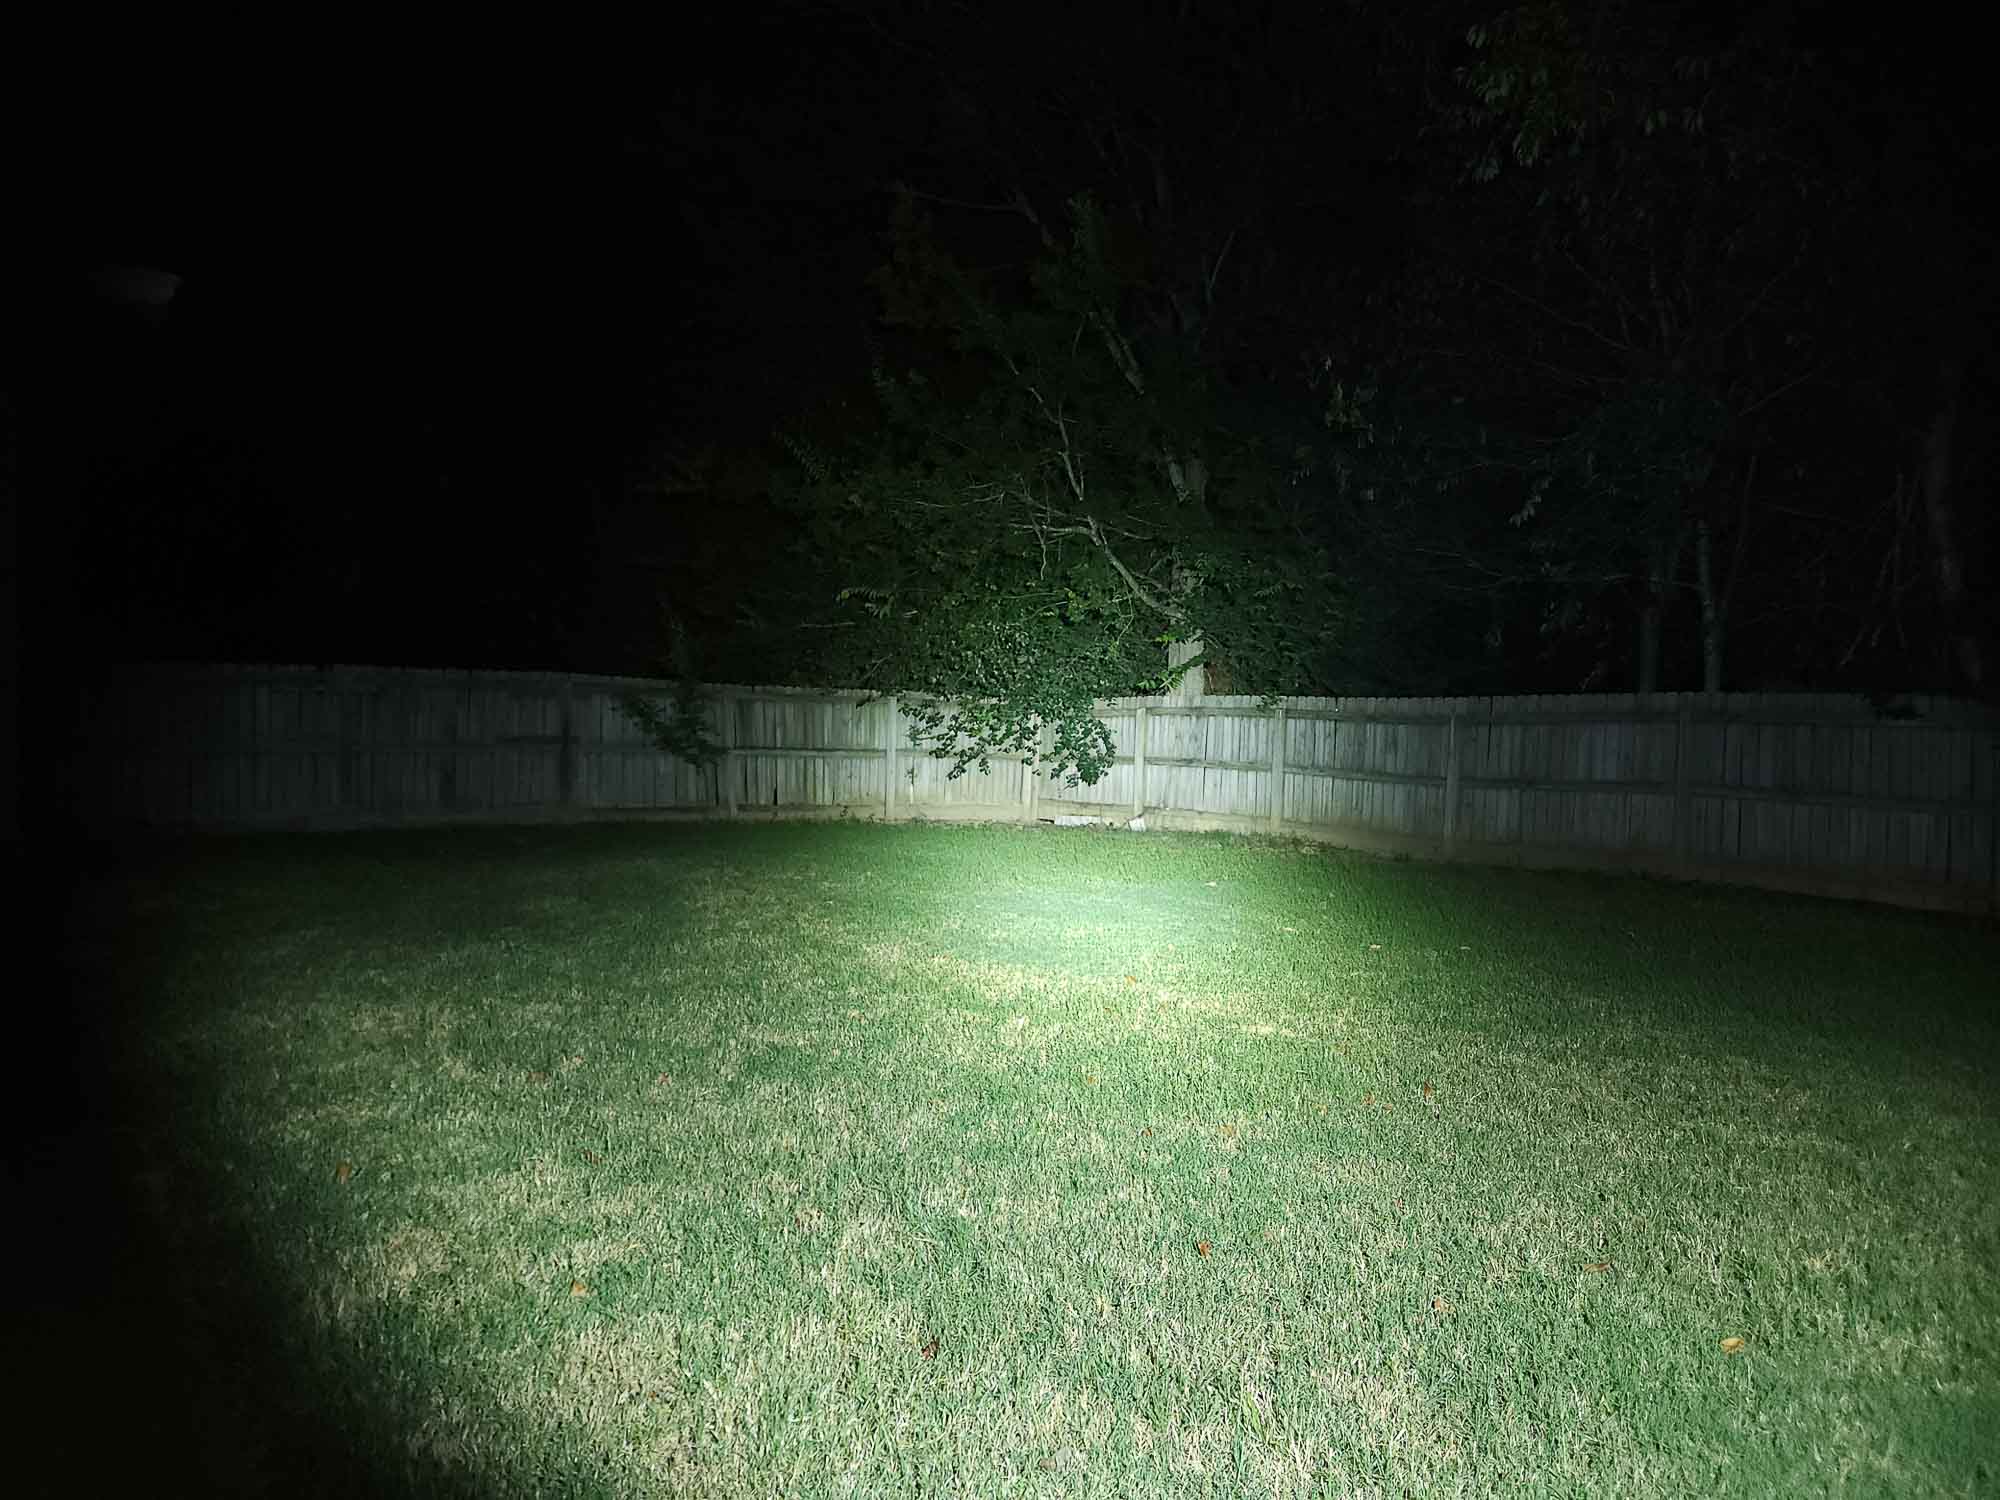
Beamshots
Beamshots were taken using a Samsung Galaxy s23+ with the camera in “Pro” mode. Settings as follows:
- ISO 200, 0.5sec, WB 5000k
- Distance to fence is 28m
Beamshots of the following flashlights compared:
- Fenix HM75R
Please note that the following beamshots are mainly intended to showcase the beam pattern and beam quality, rather than overall performance. These images are typically taken directly after activation, and in different seasons or weather conditions, and therefore do not fully represent its overall performance. In few cases the camera settings are even different and therefore not meant for performance comparisons. For accurate performance metrics, such as output, beam distance, and runtimes, you need to look at the performance section of this review.


Disclaimer: This flashlight was sent to us for review at no cost by Fenix Lighting US. We have not been paid to review, nor have we been holding back on problems or defects.
Final Verdict
Pros
Loooooong runtimes
Spot, flood and Red leds!
Comfortable
Build quality
Ease of use/ simple UI
On-board charging
Battery pack can be a Powerbank!
All included – everything you need plus
Cons
Must pass each mode, (no direct access)
Weight for new headband users.
Cost – (maybe a little pricey, but look what all you get!)
Struggling to come up with more!
Explanation on star ratings:
1: Avoid: my phone flashlight would be a better choice – 2: Poor: significant defect or issues; almost unusable – 3: Average: some defects or issues; but still usable 4: Good: recommended (minor issues) – 5: Great: highly recommended

4.5 stars: ★★★★⋆
Note: Our star ratings serve as a general guide, but we advise against placing too much emphasis on individual scores. Each reviewer brings their own perspective, and there is no standardized scoring system to reflect the intricate preferences of all flashlight users. Read the full review to help you make your decision, focusing on the overall performance and the features that matter most to you.
Whew! Did we get thru it all? There was a lot to look over here but I hope you made it through. I really, really enjoy this HM75R headlamp from Fenix. It still gets used to this day! I think they have come up with quite a good collection of features and options and somehow squeezed them all into one great headlamp. I really did struggle to find some negatives here. Tons of lighting options, power options.
Overall the Fenix HM75R exceeded my expectations in more than one area. I would have to give it 4.5 stars looking back on my rating, seeing the only low spot would be the price. That is a tough one when it comes to quality equipment. You get what you pay for goes a long way and I think you definitely get your money’s worth with the HM75R. I feel like they certainly have a winner here!
Get 10% off every purchase at Fenix Lighting US, by using our exclusive 1lumen discount code: 1lumen10
Buy your Fenix HM75R here
1lumen selects and reviews products personally. We may earn affiliate commissions through our links, which help support our testing.